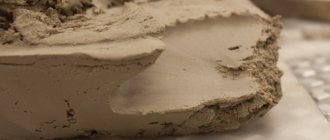
Such a popular material as clay is actually a sedimentary rock. In the initial state, clay is a dusty powder, but when water is added it acquires plastic properties. The composition of clays can vary significantly, since in addition to the main components they contain various impurities. Typically, the base is made up of substances such as kaolinite, montmorillonite, and silica sand.
It is the composition that largely determines the plastic properties of the final material.
Preparing tools and materials for work
Clay walls are plastered in 2-3 layers. Initial plastering of the walls is carried out using the following materials:
- Clays.
- Wood sawdust.
- Sand. Material with medium-sized grains is best suited; large inclusions are recommended to be screened out.
Tools for plastering work.
Special attention should be paid to sawdust, which will be used to plaster the walls. Only thoroughly dried sawdust can be used.
Under no circumstances should they be affected by fungal diseases. Fresh sawdust cannot be used for plastering clay walls. They must be stored for at least 1 year before use. In the process of preparing the mixture, sand is first mixed with sawdust and only then water and clay are added.
The 2nd layer of wall plaster is applied using sand, cement and clay. To work you will need a minimum set of tools, namely:
- Grater board. Instead, you can use 2 spatulas of different sizes. Work with what is more convenient for you.
- Building level.
- Rule.
- Trowel.
For plastering such walls, a special clay composition is used. You will have to select the optimal ratio yourself, because... the properties of clay from different areas, such as plasticity, “fat content,” etc., differ. The optimal proportions of the composition directly depend on this.
Take some sawdust, the same amount of clay and 3 times the amount of sand. Knead the mixture thoroughly, slowly adding water to it. To check the readiness of the plaster composition, you can use various simple and proven methods. Despite their simplicity, they will help you find out without any problems whether the mixture is ready or whether you still need to experiment with the ratio of ingredients.
Scheme for plastering a wall.
The first method is known as the “clay ball”. You need to bring the plaster composition to a state where it no longer sticks to the skin. Roll a small ball from the resulting mass; a diameter of 30 mm will be sufficient. Place this ball on some horizontal surface and crush it with your palm. If cracks appear along the edges, then the composition is not flexible enough, and the proportions will need to be reconsidered. Ideal when there are no cracks. This composition can be safely used for plastering clay walls.
Another method is based on checking the “flagellum”. Prepare a small amount of the mixture and roll it into flagella. There will be enough flagella with a diameter of 2 cm and a length of about 20 cm. Bend the prepared flagella. Check the quality of the composition again by the presence or absence of cracks.
To regulate plasticity, you will need to add less or more sand to the composition. It accounts for about 50-80% of the total mass of the finished mixture. It is more convenient if you have a concrete mixer to prepare the solution. If it is not there, you will need to dig a hole, add the components there and knead the solution with your feet. You can also use a trough for this. It is necessary to check the plasticity of the mixture. Otherwise, during the drying process, the plaster will simply crack and all the work will go down the drain.
If during the work you had to go somewhere and during this time the mixture managed to dry out, to return it to working condition you only need to add a certain amount of water. After this you can return to work. Such properties are an undoubted advantage of such plaster.
Oven adhesive composition
Building materials stores sell special glue designed for repairing stoves, which is durable and heat resistant. For its production, refractory cement and fireclay powder are used.
They produce plastic and solid mixtures. The first of them is used to fill the cracks, and the second is used to plaster the entire stove surface. The main advantage of oven glue is that it dries quickly.
Where is clay plaster used?
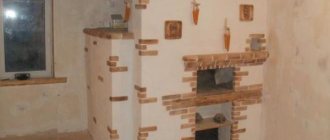
For many years, clay plaster was used, perhaps, only for laying partitions indoors, as well as for finishing and laying stoves and fireplaces.
But, if you look at old buildings plastered with clay compounds, you can be sure that it is still in good use. Red brick partitions are also very durable, in the masonry of which cement-clay mixtures are often used. Moreover, unlike fragile drywall, you can hang heavy racks on them without fear of them falling.
Clay-sand mortar is most often used to plaster wooden and clay (adobe) walls not only outside, but also inside the house. In principle, any surface can be plastered with clay. The main thing is to prepare them correctly, as well as select the fat content of the clay and maintain the proportions with additives (sand, sawdust, straw) in the solution.
This environmentally friendly material is able to absorb excess moisture and release it as needed. Clay plaster containing flax or straw fibers looks original, which is why designers and craftsmen are increasingly using it as a decorative finish.
.
How to eliminate cracks in a metal structure?
The main solution to the problems of cracks in metal stoves is obvious - welding is used. But if this option is not suitable, you can use special fire-resistant putties.
Recipes for preparing mixtures are presented in the tables.
Plastering with clay
The principle of working with a clay mixture is essentially no different from working with conventional plaster:
- Beacon profiles are also placed for alignment.
- To obtain a durable surface without cracking, the thickness of each layer should not be more than 10-15 mm.
- In case of strong slopes and the need to apply a solution of greater thickness, clay-straw or sawdust mixtures are used, which can be applied to shingle-reinforced walls in a large layer.
- If necessary, a new layer is added on top of the first only after the surface has dried.
- After finishing with shingles, the walls are dust-free and moistened with water.
- The surface is moistened abundantly so that it does not take liquid from the solution and weaken the plaster.
- The solution is applied with force to ensure better adhesion.
- To reduce the formation of cracks, it is advisable to add fiber additives to the solution.
The video below shows how to plaster a wall made of clay or wood.
Rules for grouting
To properly coat the stove with clay, you must follow these step-by-step instructions:
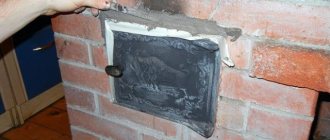
The surface, cleaned of plaster, is generously moistened with primer or water. Using a chisel, knock out the gaps between the bricks. The oven is warming up. Using a trowel, apply the clay mixture into the cracks and spread it over the entire surface in an even layer. If you don’t have a tool, you can do the smearing by hand. The mixture does not cause irritation or damage to the skin. When the surface is dry, another layer of the mixture is sprayed
Particular attention is paid to cracks - there should be a dense layer of mortar between the gaps. Using a damp wooden trowel, grout in a circular motion to remove any unevenness. The last step is plastering the stove.
The process of sealing with fire-resistant adhesive is carried out according to the same scheme, but includes an additional step. After filling the cracks with plastic material, the entire surface is treated with a hard type of glue so that the stove no longer smokes. It takes half an hour to dry, which can be spent on decorating
It is important to remember that the structure can be used after the solution has completely hardened.
Instructions for applying clay plaster
First of all, you need to prepare all the necessary tools and materials:
- Mixing container or concrete mixer;
- Spatulas of different sizes for plastering walls;
- A sieve for straining the solution;
- Hammer or screwdriver;
- Fasteners (nails or screws);
- Reinforcing mesh or shingles.
After this, you can begin preparing the base:
- Before plastering with clay, remove the old coating, especially if we are talking about cement plaster.
- The surface is thoroughly cleaned, fasteners are removed from it, and protruding reinforcement is trimmed with a grinder.
- The area to be treated is roughened using a grinding machine. If the walls are made of wood, then the installation of shingles will be required.
Preparation of the solution
To properly make a clay composition, you need to be guided only by the fat content of the solution.
There are no exact formulas, instructions or proportions, as, for example, for gypsum or cement mixtures. The classic recipe contains straw, but the factory production technology involves the use of polypropylene fiber.
There are two ways to test the plasticity of clay:
- First you need to put the clay in a container and fill it with water, then knead it using an electric drill with a mixer attachment. A properly prepared solution should not stick to your hands. From the finished plaster you need to make a small ball with your own hands (just roll it in your palm) and flatten it into a flat cake. Then you need to examine its edges: if they are cracked, it means there is a lot of sand in the solution and not enough clay and water. A correctly manufactured composition, after compression, forms an even “pancake” without breaks.
- You can also roll not a ball, but a flagellum up to 20 cm long. It must be bent in an arc; if cracks appear on the surface, it means that the solution does not have enough clay.
Instructions for applying clay compositions with your own hands:
- Patches of mortar are applied to the entire wall at even intervals, after which they take a wide spatula, trowel or rule and stretch the material over the surface using the selected tool.
- Levelness is checked using a building level; if necessary, another layer of plaster is applied.
- The surface is left to dry for a month in summer and 3 months in winter.
- Then you need to do the finishing touches. To do this, first of all, prepare a solution from clay of a more liquid consistency than for rough work. The ratio is as follows: 1 part clay, 1 part cement, 3 parts sand.
- The mixture is applied in a thin layer to the wall and carefully leveled with hand tools, after which the surface is left to dry for 3-4 weeks.
At the end the walls are whitewashed with lime whitewash. You can also rub the clay coating with a float, treat it with a primer, and plaster the top with gypsum mortar. This completes the clay plastering.
Plastering walls with clay with your own hands is a fairly simple process. Unlike working with other materials, it does not require precise calculations and careful surface preparation. The main thing is to follow the above instructions and check the walls with a level as often as possible.
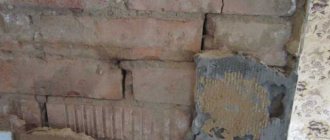
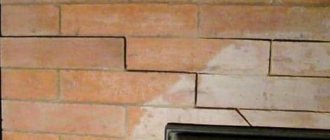
Problems with the strength of plaster arise quite often at the initial stage of finishing work. Plaster cracks not only on the outer surface; cracks are observed in the most unexpected places. The appearance and development of cracks is expressed at the outer corners of the walls, especially in the lower part adjacent to the base surfaces of the masonry. Less commonly, plaster finishes can crack, peel off in sections, and eventually fall off the wall.
How to seal a stove with your own hands - step-by-step instructions
There are several ways to seal a stove yourself. The choice depends on what you decide to use to cover the cracks in the stove. However, there is a step that will be common to all methods - be sure to clean the brick from the plaster and decorative layer. And only after this can you begin to treat the unit with the selected solution.
When working with oven glue, follow these instructions:
- Prepare a small amount of plastic solution (remembering that it dries quickly).
- Treat every crack and crack with water.
- Treat all defects with the mixture.
- Prepare a solid solution.
- Treat the entire surface of the stove with it.
- Allow the glue to dry completely (this takes about 30 minutes).
After the treatment is completely dry, you can safely begin plastering and applying a decorative layer.
If a mixture based on clay is used to combat furnace defects, then the points in the instructions will be slightly different:
- Due to the different densities of all the ingredients, they can separate from each other in the solution, so be sure to mix everything again before working (once will be enough).
- Check the mixture for quality - take a little in your hands and roll it into a ball; if cracks begin to appear on it, then you need to add water.
- Treat all cracks and crevices with water.
- The solution should be pushed into the cracks as hard as possible (it’s more effective to do this with your hands).
- Plaster and whitewash the stove.
Important! After all the manipulations, it is recommended to start heating the stove when the treatment is completely dry. The instructions for processing the heating unit are very simple, so anyone can handle such repairs, the main thing is not to miss anything.
Dust
In order not to later wonder what to do if the plaster on the walls cracks, you need to remove dust from the surfaces treated with it in advance, and to the maximum. Its presence significantly impairs the adhesion of the liquid solution, as a result of which cracks will certainly appear on the walls or ceiling, albeit not immediately.
It is worth noting that it is not at all necessary to dust all walls and ceilings. It is enough to moisten them a little from a spray bottle, but only before starting finishing work, and not in advance.
Gypsum plaster: subtleties of use
The answer to why gypsum plaster cracks literally immediately after drying sounds different than in the situation with its cement-sand counterpart. In this situation, the primary sources of defects are as follows:
- Gypsum plaster cracks when drying where the surfaces being treated have not undergone rough preparation. That is, cracks and voids were not removed from them, into which gypsum would then gradually penetrate, causing ruptures in the decorative layer.
- Excess water is why plaster on walls cracks, because gypsum mixtures are extremely susceptible to large amounts of moisture, which weakens their structure. This is especially true when a slightly dried working solution is diluted with water.
- Another important indicator is the thickness of the applied layer, which cannot be less than 0.5 cm. Otherwise, the moisture will evaporate very quickly and the coating will inevitably “tear”.
It turns out that cracking of plaster is the result of an irresponsible attitude towards its use and disregard for the recommendations specified by the manufacturers. In general, this is a fairly easy-to-use coating that allows you to make a budget-friendly, high-quality, and most importantly, environmentally friendly base for future decorative coating.
Clay plaster, the composition of which is simple and literally lies under our feet, is increasingly found on construction sites as a facing material for interior and exterior decoration. It is known that it was the main material for masters many centuries ago, why are we returning to this experience again today?
Preparation of plaster mortar
Unfortunately, preparing the solution yourself and plastering the walls with it is quite difficult.
This process is not only labor-intensive, but also very lengthy: the clay takes a long time to dry. But the result is worth it, so for those who decide to use this material, we suggest you watch how clay plastering is done in a video and carefully study the recommendations below.
What should be included in plaster?
The main components are ordinary clay, sand and water. A solution prepared only from them has high thermal conductivity, so it is usually used only for making the final leveling layer. For rough finishing, the task of which is to strengthen the thermal insulation of the walls, plaster with filler is made.
It can be:
Chopped straw or hay;
- Hemp or flax fibers;
- Wood sawdust or shavings, preferably pine, oak, alder;
- Kizyak (horse manure).
All these materials have long been used by our ancestors, and they knew a lot about insulating their homes. Today, modern fillers have been added to them, which can be used without fear. These include various fibers and granulated polystyrene foam.
There are other options:
- For example, if you plan to plaster stoves with clay, then cement, asbestos or fiberglass are often added to the solution to give the plaster greater strength.
- To make decorative clay plaster, colored clay (white, yellow, blue) is used, pigments and ground mineral fillers are added to it.
Preparation of the solution
You can use any clay, but it comes in different fat contents, so you will have to determine the ratio of all components in the plaster experimentally. To choose the proportions, first prepare a little solution.
The instructions are:
- Take one part of the clay and fill it with water for a day, which should be 3-4 times larger in volume;
- Mix the solution thoroughly, kneading all lumps until a homogeneous mass is obtained;
- Stirring occasionally, start adding sifted sand to it. For clay of normal fat content, four parts of sand are required, but you add it until the mass begins to slide off the trowel easily.
Now you need to test in one of the following ways:
- Method 1.
Roll a small ball, lift it a meter from the floor and drop it. It should not fall apart or crack from impact. - Method 2.
Roll out the resulting mass into a rope 15-20 cm long and about 2 cm in diameter, place it on a flat surface and bend it in an arc. There should be no tears or cracks on the fold.
If your samples fail the test, they have too much sand.
Having figured out the proportions, you can prepare the solution in the required volume by adding fillers and water. Sawdust or chopped straw for heat-insulating rough plaster should be about half of the total volume or slightly less. Add them and water gradually until you get the desired consistency.
Now it's time to learn how to plaster with clay.
How and why plaster cracks
To answer the question unambiguously, a small analysis of the circumstances and conditions of destruction of the plaster mass will be required. Plaster warps and cracks most often due to deviations in the technological process:
- Violation of the proportions of the main binders of the plaster;
- Exceeding the optimal layer applied once to the wall, incorrect drying mode of the plaster layer;
- Violation of mixing technology when preparing plaster solution;
- Using materials unsuitable for kneading;
- Settlement or violation of the integrity of load-bearing walls, “the foundation floats.”
Advice! If the plaster begins to crack, the first thing you need to do is immediately check to see if the load-bearing structures of the walls are being destroyed. Otherwise, behind the problem of plaster, you may not notice how the building itself begins to crack and collapse.
In such cases, the depth of the cracks is checked with a special probe made of thin steel wire. If the probe penetrates to a depth exceeding the thickness of the plaster, it means... the problems are more serious than poor-quality wall finishing.
How to repair a firebox in a brick stove
If the question arises of how to repair cracks in a brick stove inside, you should try to minimize the heating of the walls using additional lining. This process involves the installation of special barrier partitions that absorb the entire thermal shock. The inside of the firebox is lined with one of the following materials:
- Cast iron. This is a fairly reliable type of raw material, it is distinguished by its durability and can withstand both loads and constant high temperatures. When introducing it, be sure to leave a small air gap between it and the brick wall.
- Steel. The material will last less than the previous one, since it tends to burn out quickly. An air cushion must be created behind such a layer. To maintain it at the same distance on all sides, a corrugated layer is laid. It will burn out after the first use of the stove, and the back space will remain free.
- Fireclay brick with markings ША-6 and ШБ-6. These models are not installed tightly to the stationary walls of the furnace. The approximate gap will be 7-10 mm. The brick is laid on fireclay mortar, which has increased stickiness.
Restoration of the firebox and removal of cracks in a brick kiln Source pechdoc.ru
Advantages and disadvantages of the material
This type of finishing work, such as clay plaster, has a huge number of advantages:
- naturalness of the material;
- with its help you can adjust the ideal humidity level in the room;
- due to its absorbent properties, this coating will be able to absorb harmful substances from the surrounding space;
- clay is an elastic, fire-resistant and waterproofing material;
- the material is ideal for covering various surfaces: brick, wood, concrete, etc.;
- a clay-based solution is quite easy to apply with your own hands, even for beginners;
- is distinguished by its low cost.
This type of finishing work, such as clay plaster, has a huge number of advantages.
As you can see, the advantages are quite significant, but, of course, there are also disadvantages, albeit in small quantities. The main disadvantage is the difficulty in finding truly high-quality and environmentally friendly material that would not be contaminated with radioactive substances and other human waste. The second disadvantage is the long drying time of the surface treated with clay. At room temperature, such plaster (if its layer is no more than 1 cm) will dry for at least 5 days, and when the temperature rises to 350C - at least 2 days. Whether to use the lengthy process of applying clay plaster or use more modern techniques and materials - the choice is now yours.
How to remove old plaster from walls?
Volumetric plaster on the wall: features and application technique
Plastering drywall: what do you need to know before starting work?
Today, when we, having become saturated with modern technologies, again strive to decorate our homes with environmentally friendly materials that do not contain toxic and harmful substances, clay plaster is becoming increasingly popular again - its composition is completely natural, all the components were given to us by nature.
Unfortunately, there are fewer and fewer good craftsmen who perfectly know the technology of its preparation and application, but if you want, you can handle this matter yourself.
Almost all packaging with modern plaster mixtures (see) bears a mark about the environmental safety of the product. And in most cases it is true. And yet, their composition often includes synthetic additives that give the material plasticity, frost resistance, increased strength and other useful properties.
Clay plasters consist entirely of only natural materials: clay itself, sand and fillers such as sawdust, straw, pine needles, etc. They have a lot of advantages that even the highest quality and most expensive plasters on cement, gypsum (see) and, especially, polymer bases do not have.
So:
- Having an excellent ability to accumulate moisture from the air and release it back, clay provides climate control in the room;
- It also accumulates heat and gradually releases it when the air temperature drops. Even to the touch it is always warm and pleasant;
- This plaster perfectly absorbs odors and is a good barrier to extraneous sounds from the street and high-frequency radiation;
- Has antiseptic properties, prevents the appearance of mold on the walls;
- Another excellent property is the ability to “breathe”, passing through the vapors contained in the air. Wooden structures that have such protection always remain dry, do not rot and are not attacked by insect pests;
- Clay plaster can be reused by soaking it with water. The same is done with a frozen working solution, so no waste remains during repairs;
- It can be used on any base: wood, brick, concrete, cinder block, etc.;
Of course, an important advantage is the extremely low price of the material. It may not cost you anything at all if you use clay for plastering from a pit dug under the foundation, and bring sand from the river bank. But ready-made mixtures usually cost no more.
Solution and its use
When mixing the solution, the main thing to consider is the place of its application.
The most popular recipe for clay plaster is considered to be a lime-clay mortar, which is mixed as follows:
- on the eve of work, soak the clay for 24 hours;
- Before you start kneading, the clay needs to be kneaded thoroughly;
- mix lime and crushed clay in some container;
- You can add sand to the resulting mixture in small portions, add a little water without ceasing to stir;
- if the clay has a “sticky” consistency, you need to add more sand to the solution;
- to make the solution stronger, you need to add a secret ingredient such as sawdust or straw into it;
- Before adding sawdust to the solution, they must be sifted;
- To give the mixture viscosity, add a little cement or gypsum to it.
The most popular recipe for clay plaster is lime-clay mortar.
In order for the sawdust in the solution not to swell and absorb all the moisture, they must first be well soaked in water and allowed to “rest” a little so that the excess liquid is drained off. Also, you should not use plaster containing dry sawdust or straw to finish the surface. This will give the walls unevenness, and further smoothing them may result in fragments of clay finishing falling out. When mixing the solution, try to pour water in small portions so that you can control its consistency.
There are clay solutions that were invented specifically for plastering high-temperature surfaces. They contain a substance that increases the heat resistance of the plaster - asbestos.
Application of clay plaster
There are many variations of this solution that you can prepare with your own hands without much effort and knowledge; let’s look at the most popular ones:
- Composition No. 1
In this case, cement is not used, but the following proportion must be observed: 3 parts clay, 2 lime, 1 gypsum, 1 sand, and the main component of the mixture is 1/5 asbestos. - Composition No. 2
This mixture is mixed without adding gypsum, but more clay is required - 4 parts. The composition should also contain: 4 times less cement and lime, 2 times less sand, and 10 times less asbestos. - Composition No. 3
This composition is the most elementary, and the proportion looks like this: 1 part clay, 1 cement, 2 sand, 1/10 asbestos.
Using these types of clay mortar, you can easily create a very warm and cozy room with your own hands.
Exterior finishing with clay plaster
Special putty is what you need to coat the oven with to prevent it from cracking
You can buy this mixture for eliminating cracks or make it yourself. Fireproof putty for stoves and fireplaces purchased at a building materials store is ideal for repairs. It perfectly withstands temperatures of 1000 degrees. Before applying it, the stove and cracks should be treated with water.
You can do the grouting yourself, following the instructions:
- Pour clay into a container and break up the lumps.
- Fill it with water and leave for 12 hours.
- Pour sand into the clay and knead the mixture.
- Finely chopped straw is added in small portions.
- Add one pack of salt.
Sand and clay are mixed in a ratio of 1:4. For 4 buckets of clay you will need about 50 kilograms of straw.
Classification of clay mortars
The variety of clay compositions is also reflected in the classification of the plaster itself for which it is used.
Clay plaster can be obtained from the following components:
- from light clay, the plasticity of which is 0.17-0.27;
- from heavy, ductility more than 0.27.
The second option is used much less frequently, because due to its density it cracks over the years under the influence of temperature changes, and the proportions have absolutely nothing to do with it.
The color range of this building material is very diverse:
- white (kaolin);
- gray;
- black;
- red (most often used in construction work);
- yellow;
- blue.
Decorative clay plaster
Please note that the natural composition of clay does not always indicate the environmental purity of the product. Always pay special attention to the composition of the clay
The following components can be added to it in various proportions:
- dolomite;
- calcite;
- quartz;
- magnetite;
- cellulose;
- sodium gluconate;
- urea.
Clay decorative plaster
Below is a table of variations in the composition of the mixture in volumetric parts.
| Components | Composition of the mixture in volume parts | ||||
| A | B | C | D | E | |
| Cast mortar (based on soil and sand in a ratio of 1:2) | 10 | 10 | 10 | 10 | 10 |
| Sand | 25 | 25 | 25 | 25 | 25 |
| Cellulose | — | 5 | 5 | — | 5 |
| Casein glue | 1 | — | — | — | 1 |
| Urea | — | — | 0,2 | — | — |
| Sodium gluconate | — | 0,2 | — | — | — |
Studies carried out at one time have proven that the addition of such impurities to the composition of clay plaster simplifies the process of laying the mixture and improves its strength. But, be careful with your choice, because all such supplements have a high level of natural radioactivity. It is better not to use clay with a “dangerous” composition at all when plastering surfaces, and do not hesitate to ask the seller about the place where the material was mined. And also remember that the proportions of additives greatly affect the elasticity of the clay solution.
What to do to avoid drying cracks
- First of all, of course, follow the technology for making ceramics.
- Secondly, to achieve a relatively uniform thickness of the walls and bottom of the product. If you are sure that the thickness of the walls and bottom is approximately the same, then this is already half the success. Sometimes you can remove excess thickness before finishing the job. If you did not have time to “finish” the product directly during creation, grooving the bottom can help, but for this the product must dry enough so that no deformation occurs during post-firing processing.
- Thirdly, artificially slow down the rate of drying of ceramics. In such cases, ceramics are placed to dry in cool rooms, but without drafts, since a sharp change in the rate of moisture evaporation from the surface can again lead to uneven drying. In any case, the batteries should be kept away from the ceramics, otherwise the drying will again be uneven. You can also artificially and slightly increase the air humidity in the room, or moisten the drying ceramics. But slowing down the drying speed is not always possible, especially when the workshop has only one room.
Therefore, the solution is often to accelerate the drying time of raw products while maintaining its uniformity. Sometimes the bottom of a ceramic product is dried with a hairdryer immediately after production. But here it is important not to overdo it, since a hairdryer can cause uneven drying of the outer surface of the work, which, on the contrary, should be avoided. If the goal is to achieve uniform drying, then proceed as follows
First of all, the product must be placed with its bottom on a moisture-absorbing surface; the classic option is a plaster circle or plaster stand. But plastic will not work. As a last resort, you can put regular newspaper, which, due to its “looseness,” absorbs moisture very well. Our next task is to ensure uniform drying of the walls and bottom. When drying, ceramics are sometimes placed in bags or covered with glass caps
If the goal is to achieve uniform drying, then we proceed as follows. First of all, the product must be placed with its bottom on a moisture-absorbing surface; the classic option is a plaster circle or plaster stand. But plastic will not work. As a last resort, you can put regular newspaper, which, due to its “looseness,” absorbs moisture very well. Our next task is to ensure uniform drying of the walls and bottom. When drying, ceramics are sometimes placed in bags or covered with glass caps.
For uniform drying, the thin wall needs to dry in the same amount of time as the thicker bottom. Therefore, the optimal option is when the walls of the product are covered (a plastic bag selected according to size is quite suitable), and air access is provided to the bottom. However, here you need to take into account the dimensions and not leave the drying ceramics unattended, periodically checking the uniformity of drying of the mass throughout the product.
Causes of cracks in the stove
It happens that deformation occurs inside the air chamber, and this phenomenon is very unpleasant, because absolutely not noticeable visually. You can understand this only at the moment when the smell of burning enters the room with air currents (those who have poor draft in the stove notice this faster). This smell is similar to the one that appears when there are problems with outlets. In addition to this inconvenience, the heat output of the stove is also significantly reduced and the room becomes much cooler. There is another indicator - hot air, which is obtained from burnt dust inside the furnace chambers. All this is often accompanied by dark burning spots. Knowing how to coat a stove to prevent it from cracking will be useful to many.
The occurrence of defects on the stove most often has the same problem - unscrupulous masonry (possibly using low-quality materials) or improper operation. Here are the main identified causes of cracks:
Plastering was not done by professionals. Perhaps the workers did not have enough experience, and the technology was not followed, and perhaps poor quality budget materials were used. According to all rules, plaster must be applied to an exclusively dry surface. In this case, it must be melted in advance so that the walls are hot. If this is not repaired, but rather the material is applied to a cold surface, the heat will cause it to begin to expand and crack.
Sudden heating. Many people have the sin that after complete installation they want to immediately test all the capabilities of the stove and heat it up to full capacity. This is highly not recommended. When firing for the first time, you need to use a minimum amount of material and gradually increase its amount each time, preventing the unit from overheating. After each kindling, it is important to leave the ashlar door ajar so that the moisture that forms from the moisture does not remain inside.
Important! When drying the oven, under no circumstances should it be allowed to overheat and then you will not have to look for ways to get rid of cracks. This applies to any stoves - both new and old. If this happens, then with 100% probability you should forget about using the oven and relocation cannot be avoided.
Draft. Another point that depends on the workers who lay out the unit. If everything is done correctly, there will be no such problem, but if you make a slight mistake in one of these calculations, trouble will follow:
- the foundation is incorrectly calculated;
- small foundation laying depth;
- the beams in the wall are poorly laid;
Uneven heating. Sometimes it happens that some parts of the device heat up more, and others less. Usually due to improper laying. The areas where the heated part of the furnace comes into contact with the cold part begin to crack. A peculiarity has been noticed: with this problem, 2 types of cracks are formed: horizontal and vertical. The latter are formed in Dutch ovens due to the fact that they have smoke circuits that are located sequentially, and accordingly the former heat up much more strongly. Horizontal cracks occur in single-turn furnaces.
Modest size of the firebox. This point should be paid attention to first. This design defect contributes to overheating of the firebox, and, as is already known, extremely high temperatures mean the appearance of cracking. Therefore, even at the time of design, you should take into account what load the furnace will have and correctly calculate the volume of the firebox.
Falling plaster. Very often this happens inside and outside around the furnace doors. This happens due to overheating of the valves, and accordingly their expansion. To avoid this problem, you should consider this point, as well as the dimensions of the firebox, when designing. Doors must be able to expand freely as temperatures change.
Chips around the stove body. This deformation occurs in two cases:
- the building in which the stove was installed begins to sag;
- the ceiling of the building puts a lot of pressure on the heating structure and it cannot withstand it.
To prevent this problem from arising, be sure to leave some free space between the shelf and the cutting area.
In the first four points, design defects arise. Their disadvantage is that it is impossible to get rid of them by caulking or simply plastering them; you need to do a high-quality coating. To avoid problems, the main thing is to initially select the right workers, so that the masonry is done with high quality and the project is drawn up competently. To protect against overheating, it is strongly recommended to consider in advance the possibility of free expansion of certain parts of the furnace. In any case, the information on how to cover the stove in the house will be as useful as possible in order to know what to do if something happens.
This is interesting: The operating principle of a solid fuel heating boiler, the device, how a long-burning solid fuel boiler works, the principle of operation
Best answers
Garniy Khlopchik:
Now listen to the correct answer from a professional. To “lean out” fatty clay, up to 30% of burnt ground clay is added to it. Sand causes problems during firing, so it is not used. The mixture is called CHAMOT. Such a mass can be up to 10 cm thick, subject to slow drying. The fire shrinkage of fireclay is also small, which is why all monumental ceramics are made from it.
Veloria Granta:
yolk or maybe liquid glass
VASILY login:
add regular sand. and the proportions depend on the purpose
Dr.Evil:
The drying mode, plasticizer additives, including organic ones, depend on the purpose and further technical process - firing, coating with something, etc.
Vladimir Ivanov:
Guys, don't worry: asbestos powder is added.
Konstantin:
if the clay cracks when drying...it means it is “oily”...add sifted sand...preferably river sand...
Anastasia Babashkina:
Sand is sand, but there is a point - the clay must be kneaded well, all of it, piece by piece, in order to extract all the fragments of stones, glass, and debris from it. Because it is because of foreign bodies that the work cracks in half the cases, and when fired, it simply falls into pieces.
Is it possible to use the stove if it has cracks?
Using the stove if it has defects of this nature is not only not recommended, but strictly prohibited. If problems are detected, it is necessary to remove the unit from service as quickly as possible and not use it until complete repairs have been carried out and all cracks have been eliminated. If possible, cover up the cracks, perform a number of necessary works on coating the brick, look at what could have caused the slab to crack, etc.
Important! Any stacked cracks are dangerous because they allow harmful carbon monoxide into the room, which is dangerous not only for health, but also for life in general. Statistics say that most of the people who die during fires die not from fire, but from carbon monoxide poisoning. Therefore, if there is excessive smoke and an unusual heat is felt, you should put out the stove as soon as possible.
Answers from experts
thanks for the advice:
I answer as a professional ceramist... 1) you need to clean the clay from debris and stones. To do this, fill it to the top with water (in a basin or bathtub), when it gets wet, stir until it reaches the consistency of sour cream and pass through a large sieve. Leave the resulting mass for several days to allow excess water to evaporate. To improve plasticity, you can add a little ordinary office glue (also called liquid glass) to that creamy mass. if you are sculpting monumental sculptures and do not intend to fire them later, then you don’t have to clean them... but for small sculptures I highly recommend this procedure! 2) when drying (and then during firing), the clay decreases in volume and shrinks. uneven shrinkage is the cause of cracking... to avoid this, a number of simple requirements must be observed: *during long-term sculpting, the product must be regularly moistened; *at the end of the sculpting session, the product must be covered with a wet rag and hermetically sealed in polyethylene *the finished (molded) product must be dried away away from heat sources and, again, under a plastic cap (the sealing of the packaging is no longer needed here)... good luck!!!!
alex suvorov:
deplete it, add filler, sand, straw, shells, manure, etc.
Bill Gilbert:
Add 1/3 of sand
Katerina Pshshchevyat:
Well there are many options!!!
GYurZa:
Add more fine sand to the clay. And the pipe is not bad on cement. That's what I did.
TCH:
ceresite (you need to lubricate it many times if it keeps cracking. There are good recommendations on YouTube.
Joseph Schweik:
In order for the clay-sand mortar not to crack, it is necessary to select the correct ratio of clay and sand (if the clay is “oily”, more sand is needed, if “skinny” - less). You will find the proportions in the stove maker’s reference book (search on the Internet). On average, the ratio of clay to sand is 1:2
Alexander Urmatskikh:
buy alinex308 for these purposes. I tiled the wells. If you don’t want to, then add horse or cow manure
Igor Iskandarov:
Sand needs to be added, river sand, or washed well.
Alexander Kamaev:
A lot of sand, Skinny clay Add clay, a ladle of ash and 400g of table salt - this is 10 kg of solution, and the pipe can be transferred to a regular cement composition (just not a hog)
Tips and tricks for preventing cracks in stoves
In general, there are no magic rules that can 100% protect your stove from cracks. But there are several recommendations that will help reduce the likelihood of their occurrence:
- regularly carry out thorough preventive inspections of the furnace in order to prevent deformation at the initial stage if something happens;
- condition: choose experienced workers to install the structure so that the finished version is of high quality;
- carefully design the stove, taking into account all the points in the section on the causes of cracks;
- knowledge of what is better to initially coat the stove so that it does not crack.
Nowadays, many people have stoves or at least small stoves. They are installed everywhere - in private houses, at dachas, in bathhouses. Whatever the weather, winter or summer, the house will be warm and cozy. Therefore, the topic of servicing stoves will definitely be useful, knowing what to cover the stove with can avoid a large number of problems.
This is interesting: Single-core or stranded wire
Decorative clay finish
Recently, clay colored plaster has become one of the most popular materials for interior decoration. It is used in many decorating techniques and is suitable for emphasizing the home owners’ commitment to natural, traditional materials.
Often the natural texture of a clay wall is complemented by the application of relief designs or patterns. To do this, the clay is puttied with a fine-grained compound without impurities. Then they roll over a layer of putty 3-5 mm thick with rollers, stamps, or form a pattern with their own hands.
The finishing layer can be coated with a vapor-permeable casein primer or paint in various colors.
Here are a few photos of clay in the interior.
Texture of decorative clay plaster
Wall decoration
Ecology of consumption. Estate: Plastering with clay mortar solves several issues at once. Firstly, there is no need to search and buy a mixture for work. Secondly, clay is an environmentally friendly material. Thirdly, due to the use of natural materials, repairs are significantly cheaper