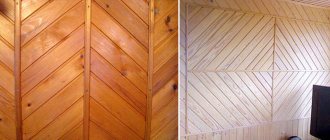
The direction of the lining of the internal surfaces - horizontally or vertically - matters only for wooden lining, since it largely determines its subsequent durability. This is much less important for plastic lining. Other methods (“herringbone”, diagonal) are not considered further, if only because they sharply increase the labor intensity of the work and increase the consumption of material. In return, you can only get the originality of the final appearance of the surface. In this regard, it is appropriate to recall that of all types of finishing materials, lining (and especially from valuable wood) is considered the most expensive.
The lining looks advantageous with any installation method
What are the conditions of the steam room casing?
As you know, in a steam room the highest air temperature is in the upper part. The closer to the ceiling, the higher the temperature of the steam. With proper ventilation arrangement, fresh air enters the steam room from the outside from below, which, rising upward, is heated to the desired steam temperature. The heated steam, circulating through the steam room, falls down. Along the way it gives off its heat and, having reached the lowest level, has the lowest temperature.
At the same time, its relative humidity undergoes the opposite changes, that is, the higher it is, the lower the humidity. Thus, unfavorable conditions for wooden structures and elements are created in the lower part of the steam room.
These are important conditions that should not be neglected when finishing a bath. After all, the wooden parts located at the bottom of the steam room will experience increased exposure to wet steam both during and after steaming. And this cannot but affect their service life due to wood rotting.
Bath solution
Let's consider the pros and cons of each method of attaching lining in a bathhouse:
| Criteria | Vertical | Horizontally |
| Moisture | + Easier for moisture to drain | + The frame is vertical and there are no obstacles to the drainage of condensate that forms on the foil behind the lining. + The lining is laid with the tenon facing up and water will not get into the groove. |
| Ventilation | — The fastening beam goes horizontally, closing the possibility of ventilation under the lining | |
| Rotting | + Easy to replace bottom boards | |
| Floor repair | + It is enough to remove a couple of lining strips | |
| Shrinkage and cracks | — The temperature below and above has a significant difference. Expansion and shrinkage are more noticeable. | |
| Installation | + Easier, faster | |
| Price | + Cheaper |
Which is better, vertical or horizontal finishing of the steam room
To give a logical explanation for this issue, we will first consider the option of finishing a steam room with a vertical lining arrangement, and then assume that the wall cladding is horizontal. After that, we will draw conclusions about which is better.
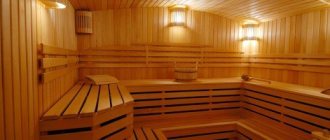
Vertical arrangement of the lining
When the lining is positioned vertically, it heats up unevenly. So, in the lower part adjacent to the floor, its heating temperature will have the lowest value, and near the ceiling - the highest. In this case, the air humidity at the bottom will be the highest.
It is not difficult to imagine what will happen if you repeatedly heat and cool a sufficiently long wooden element. This is its unpredictable deformation: bending along a plane, propeller-like, warping and other changes in the original shape.
And if its opposite parts are exposed to air with varying degrees of humidity, then, on top of everything else, wood rotting processes may also occur. Unfortunately, this will apply to all elements of vertical cladding in the floor area along the entire perimeter of the steam room.
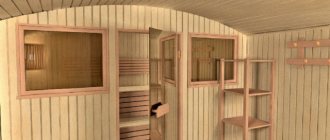
Examples of vertical finishing of steam rooms:
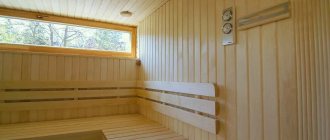
Horizontal arrangement of the cladding
In contrast to the vertical arrangement, with horizontal fastening of the lining, each of its elements is located on one corresponding horizontal level (row). Therefore, the temperature of its heating along the entire length will be practically the same. This equally applies to the humidity of heated steam. Such conditions are the most favorable and will not cause excessive deformation of the sheathed wall.
However, it should be noted that all cladding elements will be in different conditions, corresponding only to their horizontal row. But this circumstance will in no way affect the general condition of the wall decoration.
Unlike vertical cladding, with this option for finishing a steam room, in the most unfavorable conditions there will be only one bottom row, directly adjacent to the floor. It will be most susceptible to mold and rot. But replacing only the bottom row when repairing is not the same thing as replacing all the vertical cladding elements that are rotten in the lower part.
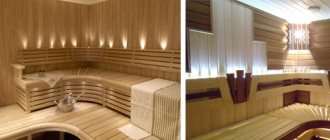
Examples of horizontal cladding of steam rooms:
Choosing the best way to decorate the walls in a steam room
Based on the above, the only correct choice suggests itself in favor of the horizontal arrangement of the lining. If you need to replace rotten lower trim elements, this will be easy to do.
Therefore, when initially finishing the steam room, you need to choose the right direction for laying the lining. You need to start from the very top, orienting it with the groove down. All subsequent elements are assembled from top to bottom using the “groove-to-tenon” method. That is, each subsequent lining must insert tenons into the groove of the overlying element.
With this method of fastening, water that gets on the wall will not get into the gaps between adjacent sheathing elements, which will prevent the possibility of their rotting. In addition, to remove the lowest paneling, it will be enough to unscrew just a few screws. Therefore, in the very bottom row, it is secured to the sheathing with wood screws. With this fastening method, it will not be necessary to disassemble the entire casing to replace one damaged element.
As for vertical finishing, this option is certainly possible. Moreover, he is often chosen. But we must take into account the negative sides of this method. For example, if you need to replace one paneling in the middle of a wall that is rotten at the bottom, you will have to disassemble and then reassemble half of the normal paneling. But this will not be so easy to do, because during the operation of the steam room, all the cladding elements change their original shape, and re-joining will be fraught with certain difficulties.
It’s good if you need to replace just one cladding element. And if you have to replace several, and even on different walls! Compare, with a horizontal arrangement, only one or two of the bottom rows can rot, and with a vertical arrangement, all of them (in the worst case). I think everyone understands what this will lead to.
Types of fastening material
The lining is nailed down with finishing nails with small heads. The heads are slightly visible, there is a high probability of chipping the wood of the panel tenon. Fixing with nails is a less effective method compared to self-tapping screws and clamps.
Correctly fasten the strips with small self-tapping screws (2.5-3 mm). Some craftsmen first recommend making a hole using a thin drill, then fixing the screw to prevent chips or cracks from forming. This method is mainly used for hard wood (oak, elm).
Claymers are the best option. You can nail any type in such a way that the connecting element will not be visible from the outside. It is a small complex bent metal holder. One side of it is inserted into the tenon, covering it, and the platform leg is nailed to the sheathing.
How to install the lining correctly?
When using a block house for external walls, the first thing to do is to impregnate them with compounds that prevent the penetration of moisture, antiseptics. The timber and panels are also coated with products that increase resistance to the external environment, the formation of mold and mildew. For this purpose, moisture-resistant impregnations, antiseptics, special varnish, and stain are used. After treatment, the wood must dry.
Horizontal installation is carried out in such a way that the spike is on top. This rule will prevent water from penetrating into the gaps between the planks. Metal profiles are used less often. First, metal brackets are attached to the wall, then the profile is fixed to them according to the level.
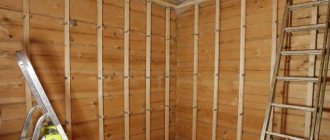
Installation of sheathing under the lining
They start with markings. It is necessary to measure and beat off two perfectly even vertical lines, top and bottom, with a distance of 5 cm from the floor and ceiling using a coated cord.
- Next, the frame is fixed to the wall. Begin by installing the top and bottom horizontal panels. They are installed along the marked lines. Then you need to nail the beam vertically (with a distance of 5 cm from the corner of the wall), connecting it with horizontally installed planks to form the basis of the perimeter.
- The size of the timber is selected based on the unevenness of the walls. If they are relatively even, then you can take a thinner one (10x20 mm). Vertical fastening is most often done on a frame made of 20x40 mm elements. The perimeter of the sheathing must be perfectly level; each stage is checked using a level.
- The beams are installed vertically in increments of 50 cm. A reinforcing frame is placed horizontally between them as spacers, including the space around windows and doors.
Nowadays they make bars for sheathing with a drilled longitudinal gap for fastening, or special metal plates with a slot for connecting elements. Thanks to this, the so-called “floating frame” is fixed, which prevents its deformation during shrinkage of the building and expansion during temperature changes.
The easiest way to install a vertically installed plastic lining. It differs in that it almost does not form seams. It can be attached using staples and a stapler, since it is quite light, or thin self-tapping screws can be used. Do not tighten them too much so as not to deform the plastic.
It is better to connect MDF to the sheathing with self-tapping screws or clamps. Due to the dense structure, it will be difficult for nails to enter the surface of the tenon, and chips may form. With clamps, the wall will look more aesthetically pleasing, since they are not visible at all, and can also be easily dismantled if necessary.
When installing wooden panels and eurolining, all types of fasteners are used. The nails are driven into the tenon at a slight angle. The occurrence of cracks and chips is minimized. Self-tapping screws must be screwed in strictly perpendicularly. The best way for regular lining is with clamps. The lining, characterized by the presence of an offset side profile, is fixed to the wall sheathing using any method. The connection point is covered by the next plank. The adjustment is carried out using a mallet, a rubber hammer, or take a piece of lining and insert it into the groove, lightly tapping it.
It is important to pay attention to the following points:
- An expansion joint (3.4 mm) is left between the panels. For the same purposes, a 5 cm indentation is made from the ceiling and floor. The seams are covered with corner molding for the ceiling (fillet), and below - with a floor plinth. The first element is always inserted vertically from the corner of the doorway with the tenon (ridge) forward. The latter is trimmed to the size of the remaining gap. Using a stop, for example, a nail puller, it is inserted into the wall slot.
- The peculiarity of ceiling installation is that it is difficult for one person to carry out. Fundamentally, the scheme is no different. Thin self-tapping screws with a sharp end are more convenient; working with clamps is more labor-intensive. Expansion joints are also left on the ceiling along the edges.
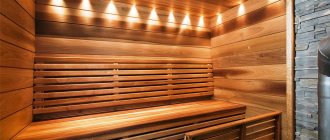
- Not all types of wood are used in the bathhouse. Pine and spruce are not suitable, as they release resins at high humidity and temperature. Most often, cladding is selected from linden, aspen, hardwood, Canadian cedar, and larch. The sheathing must be made floating. The ideal option for cladding is eurolining. It has an elongated spike and longitudinal grooves on the reverse side where wet condensation accumulates and drains. Nail only on galvanized, copper nails and self-tapping screws. The planks should not be driven tightly together with a mallet, leaving a gap for thermal expansion of the wood.
Conclusions and recommendations
At one time, when choosing a method for covering a steam room, I settled on the horizontal option. It has been serving well for several years without any serious damage or changes to its original shape. Every year I am once again convinced of the correctness of the choice I made.
Based not on empty space, I recommend that you also choose a horizontal arrangement of the lining. True, you have the right to do as you see fit. In any case, I hope that this article will help you take into account the above nuances so that finishing the steam room is not done in vain.
And finally, watch this video about horizontal installation of lining. Find mistakes that should not be made when decorating a bathhouse with your own hands. And I’ll tell you about them immediately after watching the video.
So:
- For a steam room, the lining must be made of wood such that when heated it does not release resin.
- The installation direction is incorrect. Even if water doesn’t get on the casing, you can’t escape the dust. And when washing the wall, moisture will inevitably get into the gaps between adjacent elements. And this will create conditions for wood rotting.
- Regardless of the nature of the room, horizontal cladding should start from the top, securing the first element with the groove down. Then neither moisture nor dust will be scary. For example, water will flow down the wall, going around the longitudinal joint along the outer surface of the groove, and will in no way be able to get inside the joint.
- There is no air space between the inner surface of the lining and the second layer of vapor barrier. To ensure air circulation and thereby prevent the processes of wood rotting, 20-30 mm thick strips should be placed on top of the vapor barrier on the vertical posts, and the lining should be fixed to them. The space under the lining will provide natural air circulation, drying and removing excess moisture.
- Remember, what you can get away with in an ordinary room is unacceptable in the steam room of a Russian bath
with its rather extreme conditions.
Go to the main article-content: Decorating a bathhouse with your own hands
Dear friends! If it’s not difficult, share it on these social networks with your friends. Thank you!
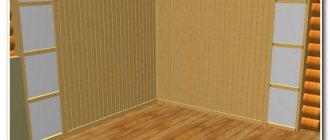
Directions for laying lining
Today, manufacturers offer several types of lining. It can be wooden, MDF or plastic. Wooden lining is the most environmentally friendly type of finishing materials, giving the home coziness and comfort. In addition, wood always stands out in its appearance.
Horizontal clapboard finishing makes the room visually wider, but lower - therefore this method of laying clapboard should be used in large rooms.
When starting to work with this type of finishing, you first need to determine the direction along which the material will be attached. So, there are several features when choosing a direction:
- When the lining is mounted vertically, the room is visually smaller, but becomes taller.
- Horizontal mounting allows you to visually make the room wider, but lower.
- Laying the material at an angle (diagonally) avoids negative visual effects and looks more elegant, but requires greater financial costs and work skills.
When installing the material, if necessary, you can combine all three installation directions. This will give the house originality and individuality.
Visual perception of space - or rather, which lining to choose in width
PROMO
We know firsthand how to create a comfortable and aesthetic atmosphere in a country house.
Interior decoration of a house using decorative elements made of wood that will harmoniously fit into the interior of your home is a science mastered by the specialists of our company. Together with the design department, painting production and carpentry factory, we will create exactly the harmony and comfort in the house that you strive for.
Construction and installation department Lesobaza.rf
When decorating interior spaces with wooden siding, many people have a question about how exactly to position the boards, in which direction and what width to apply to the ceiling, walls or floor. Since the visual effect is of great importance, especially if it is a small space, then it is worth thinking about this important fact.
When using lining in a small room (which is approximately 10-15 m2), keep in mind that vertical stripes lengthen the wall, the room will appear higher, and if the width of the lining is 145mm rather than 96mm, the effect will be more noticeable. But the transverse stripes, on the contrary, push the walls apart, but at the same time the room will seem lower, and if it is placed this way only on the back wall, then visually we will shorten the room. A narrow board seems to expand the space, thereby making it seem larger.
PROMO
The designed house is half built! It is necessary to understand that “with a project in hand” the result of construction work becomes expected and predictable. A façade project, for example, will show “Your home in new clothes.” This is savings, not additional costs!
Current problems that our specialists solve will help you make the right decision.
There are many design techniques for playing with color. Everyone has long known that light shades enlarge and expand space. Bright elements attract attention, diverting the “eye” from other objects. But don’t get too carried away with bright accents, otherwise you risk narrowing the space.
And as an addition, keep in mind that elements such as mirrors and paintings also play a role in the layout, but you always need to take into account the size of such decorations.
Source
Installing guides on the wall
Installation of wooden lining and its plastic variety is carried out mainly on the frame. It is installed as follows:
- Wooden beams are well treated with antiseptic compounds. If the events take place in a room characterized by constant average humidity, then impregnation can only be done with a primer.
- The surface is prepared in advance. There is no need to do this job perfectly, but you should remove the old coating, check the walls for mold and mildew, and cover up all defects with putty.
- Marking in progress. The surface is drawn based on how the lining will be located. The main thing is that the cladding is carried out perpendicular to the load-bearing bars.
- Wooden slats are drilled out. The hole pitch is 50-60 cm. These holes are transferred to the wall. The holes for the dowels are prepared using a hammer drill.
- The racks are laid strictly level. If there is a distortion, then pieces of plywood are placed under it.
- Thus, a frame is obtained that consists of slats arranged in a certain order. The voids between them can be used to lay insulation.
Construction of the frame for the lining
On a note! Many people believe that it is better to install the lining on a metal profile. Indeed, this option can be used, but only in extreme cases, when significant unevenness of the base is observed.
Preparatory work
To begin with, you should decide in which direction the finishing will be carried out. After all, as you know, lining can be laid both along the wall and across it. There are no “right” and “wrong” options – it’s everyone’s personal choice.
The next step is to purchase materials. Since the lining is made of wood, it must be treated with special protective agents. After all, the tree has plenty of enemies - this includes fungus, high humidity, and insects. Each rail is coated with a special product on both sides.
Experts advise to be sure to bring the boards into the room, unpack them and leave them for several days before installing the lining on the ceiling begins. As for the surface above your head itself, you need to inspect its condition and draw conclusions. Areas with weak whitewash and plaster are corrected, decorative elements are removed (chandelier, other lighting fixtures).
It would be a good idea to treat the surface with a substance that prevents mold.
Now let's move on to purchasing the necessary tools. Here is a rough list of what you will need first:
- A hammer drill that simplifies fastening.
- A screwdriver makes work easier and faster.
- Measuring instruments.
- Knife, hacksaw (to cut and file something).
- Dowels, nails, screws.
- The slats that are needed for the sheathing.
Mounting features, installation methods
Do-it-yourself installation of lining on the ceiling can be done in several ways. For fastening, ordinary nails, clamps, staplers or screws are used. Below we will discuss the key features of each type of fastening and 2 installation methods: vertical and horizontal.
- Have you chosen nailing? Don't forget to use a finisher. This will allow the cap to enter completely into the wood. The work will look more neat.
- The simplest method is to chaotically nail the boards with nails with small heads. With a complex method, the nails are driven into the grooves of the lining, so they are almost invisible.
- Metal clamps are special devices that significantly simplify the installation process. They are selected in the store depending on the thickness of your boards. They are often sold in a ready-made set with nails. One side is screwed to the sheathing, and the other side is easily cut into the grooves with teeth.
- It is quite possible to carry out the installation using staplers - for this you will need a special gun.
- And the last proven method is the use of decorative screws. Even a beginner can get excellent results.
How to build a sheathing?
There is no fundamental difference to which surface the lining is attached, but you definitely cannot do without a supporting structure. Lathing allows you to level the walls and provide additional insulation.
Installation of the structure is carried out as follows:
- You drill holes in each block in 60 cm increments.
- Using a level, apply a block and mark the drilling locations.
- Install and secure the piece of wood with dowels and nails. A regular dowel will also work.
- Fix the next element after 40-50 cm.
- Periodically check the evenness of the fixation using a building level.
- Drilling the surface is not always possible. It's okay - you can attach the slats with special glue. To do this, they are pressed tightly.