Material selection
Work begins after installation and testing of the functionality of all engineering systems. Before covering it is necessary:
- Determine the type and volume of materials;
- Make a list of necessary tools;
- Perform heat and vapor barrier;
- Install the sheathing.
Previously, edged boards from various types of wood were used for interior cladding. The lack of necessary equipment and technology sharply reduced the range and quality of manufactured products. New production technologies have made it possible to increase the range and quality of modern lumber.
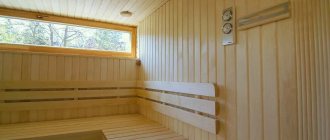
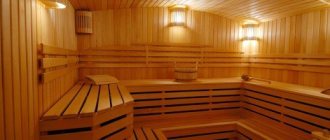
The main material for covering modern bathhouses is lining. The lining is a thin edged board with a special profile.
This is interesting. The name of the paneling comes from the thin wooden strips that were used to cover railroad cars.
The difference between lining and edged boards is the presence of recesses (grooves) and protrusions (tenks) along the long side. These elements ensure a tight connection of the panels during installation.
The widespread introduction of lining as a finishing material is facilitated by:
- Increased thermal insulation;
- Durability of the material;
- High installation speed;
- Ease of maintenance and repair;
- Beautiful exterior design.
Types of wood for finishing
The best wood species for a bath are:
- Linden , which retains heat well, releasing twice as much essential oils as other trees. Possessing hypoallergenic properties, it is ideal for the human body;
- aspen - in its medicinal properties does not differ from linden;
- Cedar has a pleasant smell when heated, is durable, and has healing properties;
- Pine is durable, easily tolerates dampness and is much cheaper than other wood species. The disadvantage is that the resin releases when heated and the color changes over time.
Much less common is oak or ash lining. Despite very high quality indicators, their price is so high that it is not affordable for most consumers. You can reduce the cost of lining a steam room in a bathhouse by using lining made from different types of wood, depending on the location.
For example, in places where the body comes into contact with wood, use lining made of hardwood from deciduous species (larch, aspen, linden, ash, oak). In other places, softwood will do just fine.
Lining in the steam room: vertically or horizontally
There are two ways to solve the problem of how to line a bathhouse with clapboard quickly and efficiently:
- With horizontal planks;
- With vertical slats.
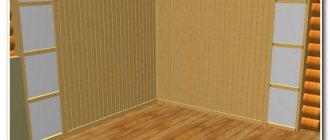
With the horizontal method, the lining is installed parallel to the floor surface. In a vertical position - perpendicular to the floor.
The horizontal position more effectively protects the lining from water penetration. This ensures good ventilation of the space between the wall and the panels.
The choice of method affects the technology of work and the final cost of repairs. For lining the inside of a bathhouse, they prefer the horizontal method. In this case, the wooden panels are installed with the tenon facing up.
Features of fixing lining to the ceiling
We looked at what clapboard-lined walls look like, but how to sheathe ceilings correctly? Attaching the planks to the ceiling follows the same pattern as for vertical surfaces. Self-tapping screws and a screwdriver are very helpful here; sometimes small nails are used.
If the sheathing for the panels is made of wood, it is mounted in the same way as for the wall. However, it is better to leave the distance between the bars large. When a metal frame is planned, special hangers are installed, and the guide profile is fixed to them.
Advice! To finish the ceiling, get a second person to help. The work is not difficult, but it is quite difficult to hold the panels correctly and fasten them yourself.
Required tools and materials
To carry out the work, a significant amount of tools and materials will be required.
List of necessary tools and materials for sauna cladding
| Tool | Materials |
| Gasoline or electric saw | Bar 20x20 mm and 30x30 mm |
| Drill or hammer drill | Roll or piece insulation |
| Screwdriver | Kleimers |
| Axe | Nails and screws |
| Plane | Polyurethane foam |
| Hammer | Tape measure or laser level |
| Doboynik | Construction pencil |
| Clamps and Clamps | Ladder |
| Construction stapler | Workwear set |
What to hammer in: nails, screws or staples?
The lining itself is a board with a certain profile, which must have a tongue-and-groove locking connection. It is attached to the wall or ceiling using nails, screws or staples. The tools and material required to hammer in the lining in the bathhouse are as follows:
- nails, screws, staples;
- hammer, screwdriver, hardware gun;
- a mallet or a piece of clapboard for knocking a tenon into a groove;
- building level.
What nails should I take for the lining in the bathhouse? It is desirable that these are finishing nails 30-40 mm long, with an anti-corrosion coating. It’s worth taking coated screws (their length is the same, by the way). Regarding the length, you should proceed from the thickness of the board (if in a groove, then only the walls of the groove), plus you need to punch through the block to which the board is attached at least to the middle.
The staples should be the same size, although there are comrades who nail 14-mm staples with a construction stapler through a clamp, but this is rather an exception. To properly line a bathhouse with clapboard, it is better to use long staples and shoot them at an angle of 45 degrees (approximately).
Of course, it is tempting to wonder which of these methods is better. There cannot be a definite answer to this, because everything depends on the experience of a particular person. And if it is not there, then the easiest thing to do is to shoot the staples using a pneumatic gun. True, it is not cheap, and few people would agree to buy it for a one-time job. Other methods are a little more difficult to implement.
Preparatory work for wall cladding
Before quickly sheathing the inside of the bathhouse with aluminum foil and wooden clapboard, it is necessary to insulate the walls. Before laying the insulation, install the counter-lattice and sheathing. A layer of vapor barrier is laid on top of the insulation.
Thermal insulation device
The best material for insulating baths is basalt wool. This material has good thermal insulation and a high degree of fire resistance. Basalt wool does not rot. This type of insulation does not burn and does not emit harmful substances. Basalt can withstand temperatures up to 1500° C.
Experts recommend using Rockwool brand “Light Butts” mineral wool. The mineral wool of this company is of high quality, increased density and affordable price.
To cut basalt wool sheets, large, sharp knives with a high-quality blade are used. When cutting, the knife blade is held at an angle of 30-45° to the surface of the blade. When tilted, the blades dull much more slowly.
The width of the canvas is taken to be 2 cm greater than the distance between the vertical posts of the sheathing. The increased width helps to fix the blades in a constant position.
Thermal insulation sheets are laid in 3 layers with overlapping joints. The amount of overlap is equal to half the length of the canvas.
All layers are laid in height within one span of the sheathing. The laying direction is from floor to ceiling. They move to another span after laying all the layers of the previous span.
Attention! You should not choose insulation from artificial and synthetic materials. When exposed to high temperatures, they release substances harmful to health.
Laying the first layer begins from the floor. First, the whole canvas is laid. After laying all the canvases of the first layer, the second layer is laid.
Laying the second layer also begins from the bottom. For overlapping joints, the length of the first web of the second layer is taken equal to half the length of the standard web.
At intersections with obstacles, elements of the required shapes and sizes are cut out.
Before covering the bathhouse with clapboard, care should be taken to protect the walls from dampness and rotting. Therefore, after installing thermal insulation, they begin to install the vapor barrier material.
Vapor barrier device
The vapor barrier layer is designed to protect walls from condensation and increase the heat-reflecting properties of the insulation.
The work of laying vapor barriers is the most critical when constructing bathhouses. The efficiency of steam use depends on the quality of vapor barrier work.
Aluminum foil with a thickness of 50-80 microns is used as a vapor barrier. Attaching the foil begins from the corner of the room in the direction from bottom to top.
Advice. Finnish foil is in greatest demand. The products of this company have high quality, durability and increased heat-reflecting properties.
Vapor barrier sheets are sewn with metal nails or staples to the vertical posts of insulation cells. To attach the foil, use a pneumatic gun or a special construction stapler.
The foil is laid with an overlap of 2-3 cm of vertical seams. All seams are taped with aluminum adhesive tape.
Advice. To seal the seams of the foil, use Unibob adhesive tape, 50 microns thick. This tape adheres well, has high strength and durability.
In places of transition from the walls to the floor and ceiling, the foil is laid with an overlap of 5-10 cm in each direction. The free ends are sewn to the ceiling and floor with nails or tacks.
At the junctions of walls and ceilings, gaps often appear in the foil. To eliminate these gaps, use foil corners. To make such a corner, a piece of foil is placed on the corner of a table or chair. The resulting shape is carefully beaten with a light object to soften the foil. The broken corners are glued with aluminum adhesive tape. The manufactured corner is inserted into the corner and carefully taped.
Advice. To prevent damage to the foil, it is necessary to cut the edges of the bars at 45 degrees using a plane.
After completing the work, check the quality of the vapor barrier installation. Any damage found is covered with adhesive tape.
After installing the vapor barrier, the installation of the counter-lattice begins.
Counter-lattice device
The counter-lattice serves as the basis for the main sheathing. Designed to ensure air exchange in the space between the foil layer and the lining.
To construct the counter-lattice, wooden blocks with a cross-section of 20x20 mm are used. The bars are nailed to the vertical posts of the insulation cells. The distance between the slats is taken to be 400-500 mm. Installation of counter-lattice slats is carried out according to level and plumb.
Advice. Do not use cheap knives with low quality blades to cut basalt wool. Such knives cannot withstand high mechanical loads, quickly become dull and fail.
When installing a counter-lattice, a hole with a diameter of 80-100 mm is drilled in the ceiling for the exhaust duct pipe. A sealing cap (valve) is inserted into the hole. During bath procedures, the hole is closed. To ventilate the bath after washing procedures, the hole is opened.
Periodic ventilation prevents the appearance of dampness and rotting of the lining. To ensure air exchange, a gap of at least 2 cm is provided between the lower end of the lining and the floor.
How to attach the insulation
To understand how to glue penoplex to the wall, check out all the possible options for the products. There are several ways to attach insulation. For example, using:
- polyurethane foam;
- cement mixture;
- disc dowels;
- polymer-bitumen mastic;
- "liquid nails"
Let's look at each method of installing penoplex in more detail and find out how to glue penoplex to a concrete wall, wooden surface or other materials.
Mastic
Bitumen-polymer mastic is recognized as one of the most practical and cheapest materials. Most often it is used to insulate the basements of buildings with constant high humidity.
Also, bitumen-polymer mastic is suitable for rooms with reagents that corrode other mixtures. Penoplex will be securely attached even when exposed to adverse factors.
The adhesive mixture is supplied in the form of tubes and is inserted into a special sealant gun. You can buy one at a building materials store. After installing the tube, you must apply the composition to the center and along the perimeter of the penoplex, as well as into the grooves. It remains to press the insulation sheet for a short time. Complete drying occurs in one hour.
Dry mixes
Reliable and simple option. The use of a dry mixture allows you to quickly and without hassle fix the insulation on a wall made of brick or concrete. To prepare the solution for use, dilute the powder in water according to the instructions. Now mix the mixture using a mixer attachment for a regular construction drill. Set the minimum speed.
Apply the solution using a notched trowel. Don't forget to fill the grooves; you can also do this with a spatula. Press the penoplex lubricated with the mixture onto the surface for one minute.
Adhesive foam
The ideal solution specifically for smooth stone surfaces. Since the adhesive mixture has high adhesion, even smooth insulation will be perfectly fixed to concrete surfaces and will not move over time. The foam is applied strictly along the perimeter of the slab; to enhance adhesion, it can also be applied to the center. It is enough to press Penoplex tightly for thirty seconds, with an average setting time of about twenty minutes.
You will be able to carry out further work with the insulation (for example, grouting) in two hours.
Disc dowels
The use of dowels is relevant for rooms with an uneven facade or large areas. To secure the insulation to the dowels, you will need a drill, a hammer drill and a hammer. So, how to properly attach penoplex using dowels?
Using a hammer drill, you must drill holes; each ready-made one has a recess in the base of about fifty millimeters.
Fill these holes with regular mounting foam, then place and hammer a disc dowel into them. Fungi should not protrude above the stove. One slab of penoplex will require about five pieces. One dowel can be used to fasten adjacent sheets of insulation.
Liquid Nails
The most expensive fasteners for penoplex. If the wall is already well primed and leveled, you can try attaching the insulation to so-called “liquid nails”. The glue is applied using sealant (or a glue gun) in the center and along the perimeter of the foam sheet. Now press the insulation against the wall for a few seconds.
But such an adhesive composition has a fairly high cost. Therefore, the method is suitable only for small insulation areas.
Polyurethane foam
An equally popular option for attaching foam sheets. Apply the foam using a gun, then hold the sheet until it fully adheres to the surface. But do not forget that the composition expands and breaks down over time, so this method is not recommended when installing insulation outside the house.
Self-tapping screws
Suitable for rooms with wooden walls. It’s great if the sheathing was previously installed. Each screw head is reinforced with washers, which increases strength and protects against subsequent destruction.
When several methods are combined (for example, using bitumen and dowels), the tightness and wear resistance of the insulation increases significantly.
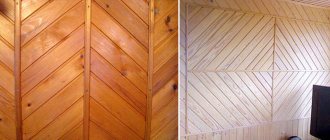
The influence of laying direction on the ratio of the geometric dimensions of the room
Sometimes you want to change the proportions of a room, for example, make it higher/lower or shorter/longer. For large rooms it is possible to install an additional interior partition. In other cases, the required visual effect can be achieved by nailing the boards in a certain sequence.
What are the ultimate possibilities for changing the direction of laying panels? You can “raise” the ceiling if you take the vertical direction of installation of the panels, and make the room lower if you lay the lining horizontally. It is important to adhere to the chosen laying direction along the entire perimeter of the room, since its arbitrary change (for example, one of the walls is sheathed vertically and the other horizontally) does not produce an aesthetically consistent impression, although it can sometimes be justified by purely pragmatic considerations. For example, an abundance of openings, when vertical installation involves less material consumption than horizontal installation.
The external impression of a longer wall is usually created by one whose design contains a significant number of horizontal lines. Thus, it is quite possible to “lengthen” the wall if you nail the material to it horizontally. Of course, the final decision can only be made after careful analysis:
- ratio of free surfaces of the walls of the room;
- relative position of door and window openings;
- the predominant direction of natural light in the room.
The last factor deserves special attention. If the room faces the south or southeast, then the sun's rays come in during the first half of the day. If in such a room you nail the panels horizontally, then as a result you can successfully get rid of the unpleasant effect of shadows in the gaps between adjacent lining boards. Accordingly, for rooms facing opposite sides of the world, a similar result can be achieved by sheathing the walls vertically.
Finally, the vertical direction of laying allows you to mask the connecting elements of the board, which are located in its end part. If you nail the material horizontally, then all the connecting parts will be visible.
What is the purpose of foil?
To achieve effective energy saving in a bathhouse, you will need to not only insulate it, but also use reflective material in the form of a special foil film. Masters claim that it helps return up to 95% of the heat into the room.
The result is that fuel for the stove is saved and the duration of the fire is reduced.
For baths, aluminum foil with a thickness of 30–300 microns is used. It is used in combination with other insulation or is already fixed as its top layer.
Therefore, before covering, they first attach insulating material to the walls and ceiling, thanks to which the heat does not escape beyond the bathhouse. An insulated steam room heats up faster and retains heat longer.
The following are the advantages of foil:
- It acts as a vapor barrier and blocks the access of moisture to the insulation. The generated steam remains on the walls of the steam room.
- Its service life exceeds 50 years. Wooden elements will begin to rot faster than the foil layer will deteriorate.
- Excellent sound insulation. Foil can absorb up to 70% of all sounds and noise.
- Fireproof raw materials. Does not burn. It will become an obstacle to the spread of fire.
- Bathrooms warm up faster and take longer to cool down.
- If you fix the insulation with a foil layer, then the foil will prevent it from falling off.
Among the disadvantages, the following should be noted:
When there is a difference in temperature outside and indoors, condensation appears on the surface of the material. It is important to leave a gap for ventilation before covering. If this is not done, the resulting condensate will begin to be absorbed into the sheathing, which will lead to rotting of the lining. Foil has poor throughput
As users say, she is not breathing. Therefore, the rooms must have good ventilation, both forced and natural (windows, doors). Aluminum particles accumulate in the lungs, causing various respiratory diseases. But if you use the sauna periodically, the risk of harm to health is minimal.
Frame installation
Fastening the lining in a bathhouse cannot be done without a frame. This structure is similar to the one that is erected for installing drywall. In our case, the slats are installed at a distance of 40 cm from each other. The frame for the lining is mounted as follows:
- We place the outer slats according to the level;
- We stretch a rope between them, which will serve as a guide;
- make markings for each subsequent slats;
- we nail the slats along a stretched rope, not forgetting to use a level;
- It is convenient to use wooden spacers to align the slats.
The frame is ready and it seems that you can fasten the lining in the bathhouse, but here another question arises. It is associated with the choice of direction in which the decorative trim will be located. We will deal with this problem in the next chapter.
Useful tips
In this matter, you should follow the recommendations:
- One of the useful tips for those who use nails to fasten elements. If they are driven deeply into the surface, the attachment point can be hidden behind wooden pins.
- Don't forget to check your work with a level. At any moment, elements can “go” unevenly. It is important to notice this phenomenon as early as possible and correct it.
- Do not place the boards too close to each other. Over time, the wood may swell, the lining will change shape - it will not look very aesthetically pleasing.
- When installing a block house, the first part is mounted on top, finishing is done horizontally. Periodically it is necessary to check the work with a level.
- If there is high air humidity in the room, waterproofing is needed. Usually the choice is made of roofing felt or plastic film.
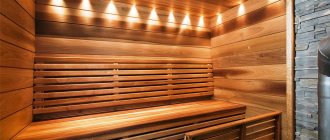
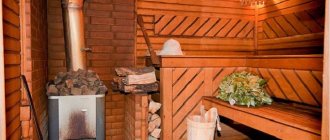
- In the steam room you should use horizontal fastening of the boards.
- In some options, diagonal placement of material on surfaces is possible. It looks very nice too. Diagonal installation of the very first element must begin from the corner. Finally, the board is cut to the required size.
- When using sheathing, the step between the bars should be 40 cm. If you decide to use insulation, then the step is equal to the thickness of the insulation (read about insulating a house with clapboard here). If the walls in the house are uneven, you need to fix the frame with bolts or screws.
Lining is an excellent material with its own characteristics and advantages. All the described installation methods allow you to sheathe the surfaces of different rooms soundly, efficiently and for a long time. It is necessary to follow proven methods and methods of using lining. Then you will enjoy the positive qualities of this material for a long time.
Preparation of load-bearing surfaces
Preparation of surfaces includes their leveling and, if desired, additional insulation. There is no need to level each individual beam, only level those to which the wooden batten will be attached.
The slats, by the way, can arrive horizontally or vertically. Accordingly, the lining in such cases will be mounted vertically or horizontally.
Video - Installation of lining
It is better to check the evenness of the walls using a rope stretched in the corners of the bathhouse, or a flat, long wooden slat. It is advisable to use a rope, it is more accurate and faster. Stretch the rope as close to the floor and ceiling as possible, and use a flat rod to check the distance from the wall surfaces to the rope. If large bulges are found, they will have to be cut down; the depressions will be leveled out during the installation of the sheathing. And not all of them, but only those where the slats will need to be attached.
Option 1 - using finishing nails
This lining fastener is traditional and has been used for several decades. For this work we will need special nails with a reduced head. The length should be such that 2/3 of the nail fits into the sheathing of the lining.
Most often, products with a length of 30 to 40 mm are used. The price of 100 grams is 40-50 rubles, so this is also the cheapest method of fastening.
Finishing nails - the most budget-friendly solution
Let's figure out how the lining is attached in this case:
The first installation option is fastening into a groove, that is, into a recess on one of the sides; in this case, the nail is driven in at an angle of 45 degrees and covered with the next element. A diagram of this technology is shown below.
This is what the groove mount looks like
You can also fix elements through a tenon. Below is shown how to properly fasten the lining with nails in this case. Here the nail is also covered by the next element, ensuring the perfect appearance of the finish.
This method is even simpler, but it is suitable for materials with a wide tenon
Having chosen the option that you will use, you can get to work. Before attaching the lining to the wall, it is necessary to cut the elements to the required length so that there are gaps of several mm to compensate for the deformation of the material due to temperature changes.
- STEP 1: The first element in the corner on one side is fixed through the top; anyway, the corner is covered with a plinth or other decorative element.
- STEP 2: From the second side, a nail is driven into the tenon or groove; this is done very carefully so as not to split the material or damage it. This way you can finish walls and ceilings quickly and reliably.
Remember that when fastening into a groove, the nails are located at an angle