The finishing of the brick bathhouse inside can be done when the installation of communications has been completed. When choosing a material for interior walls, it is important to understand under what conditions the room will be used. For example, the sink can be tiled, and the walls can be insulated and finished with wood. The walls of a recreation room can be lined without installing a frame system, under which insulation is usually located. This allows you to save materials and time during finishing.
What not to insulate and sheath a steam room
We think it would be useful to list the materials that are not suitable for the steam room.
All flammable and melting synthetic materials are not suitable for it, especially in the oven area. You should not use polystyrene foam or Penoplex as insulation. Also undesirable are foil materials with polyethylene foam - “Penofol” and the like. Somewhere there was a video of what such materials turn into when exposed to heat for a long time.
Forget about insulation like glass wool - it does much more harm than good.
It is advised not to use ecowool to insulate steam rooms, because it itself is a non-flammable material, but prolonged exposure to high temperatures leads to smoldering even of borax-treated cellulose.
BY THE WAY! Wood in a steam room also becomes more prone to smoldering and fire over time. This is invisible to the eye, but high temperature changes the properties of wood (over several years), and you either need to change the skin regularly or never lose your vigilance.
The external decoration of the walls and ceiling should also not be made of plastic - for the same reasons. But this is understandable. Paint and varnish coatings for walls and ceilings are also undesirable for a steam room. The exceptions are impregnation compositions made from oil, wax or oil wax or acrylic varnishes designed specifically for saunas.
For paints, you can use heat-resistant silicone enamel to paint the stove, and for the floor, use wood compounds that make it waterproof. See Painting section.
PVC profiles in the steam room are also undesirable, because windows and doors made from such profiles can be damaged by temperature. It is better to use combined profiles - the inside is wood, and the outside is plastic or aluminum. Or purely wooden ones.
*** We have written a lot about specific types of insulation and finishing - we advise you to search on the site yourself through the search, site map or through the menu.
Bricklaying
To build a bathhouse, I chose red brick, because I read that this option is one of the best. The final thickness of the walls was 40 centimeters - they were created without internal voids, as experts advise.
To prevent the walls from letting in the cold in winter, I lined them with thick insulation on the inside.
The plinth and brick part of the foundation under waterproofing were made with the “participation” of solid brick. For all levels that were above the waterproofing, hollow brick was taken. When mixing the mortar for construction, I used the following recipe:
When the masonry was finished, I drove pins into the walls to attach the wall beams. Then he installed the floor beams on bricks (in specially made nests), roofing felt was used as a protective material. The ends of the beams remained uncovered, and the gaps between the walls and beams were filled with thermal insulation.
How to build?
Step-by-step do-it-yourself construction instructions will help you correctly build your own bathhouse on the site.
Any construction begins with choosing a site for the structure. At the selected point, markings are prepared, and then the construction of the foundation begins. For a brick bath, the best option would be a strip base. Such a foundation requires the preparation of a trench that needs to be dug, then it is secured with boards. The walls of the trench need to be covered with formwork, and the bottom is covered with sand. The sand cushion will evenly distribute the load. After this, reinforcement is performed.
You can prepare concrete mortar for a small bathhouse yourself. For large volumes of construction, you can order a ready-made solution. It takes time for the foundation to settle. This period depends on the characteristics of the concrete solution. Sometimes the foundation is treated with waterproofing materials.
If you build a bathhouse with your own hands, then it is easier to use one-and-a-half red bricks. Laying walls for a bathhouse is permissible in one brick. To calculate the amount of material, the planned width and height of the verticals must be divided by the product of the height and width of one brick. The amount of material is selected taking into account the required number of doors and windows.
The wall courses begin with the outer bricks. The material must be wetted when laying, especially if it is hot enough outside. Lay bricks along the entire perimeter of the building, only then move on to a new row. The use of broken bricks is unacceptable for supporting structures. During the process, pay more attention to the quality of the seams.
Appropriate openings must be prepared for roof beams. The ends of the beams that will lie on the bricks must be wrapped with roofing felt. The simplest version of the bathhouse ceiling is the lean-to type. A flooring of boards is made on top of the laid beams. Fabric asbestos is suitable as a waterproofing material. A sawdust-clay mixture is placed on top of it. The dried base is sprinkled with sand.
Pay attention to the location of the chimney
It is important to highlight this area with a sheet of metal
Lath the rafter system of the brick bath. Place roofing material on top of the rafters. It can be slate or profiled sheets.
The next step in the phased construction of a brick bathhouse is laying the flooring. To do this, the lower part of the floor is covered with a sand mixture. Logs are installed on the projections of the foundation. The floor can be covered with boards. Another suitable option is porcelain stoneware. Finishing with tiles will ensure high fire safety of the structure.
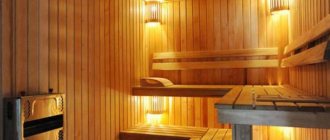
Lining is suitable for covering the ceiling, in the steam room it can be linden wood, and in the dressing room you can use pine. The walls inside can also be lined with clapboard. Make shelves parallel to the wall paneling. Use hardwood. The shelf slats are secured with wooden pins; you can get burned on iron ones.
Install the doors. The outer structure can be ordinary, metal, and the door to the steam room can only be made of wood. Please note that it will be used in a humid environment and at high temperatures.
Installation technology
The walls of a brick bath can be finished by installing lining. It can be installed vertically or horizontally. The first method is most widespread due to its high speed and ease of use. At the first stage, you need to install the sheathing, under which the insulation is laid. Air will circulate between the layers, which will help remove condensation. The sheathing is made of timber, which is coated with a primer. It is recommended to avoid using galvanized profiles.
A 40 cm distance is maintained between the slats. The two outermost elements are nailed at the corners, and a rope is stretched between them. If necessary, shims can be placed under the slats for more precise alignment. Before installing the lining, it is necessary to mark the first row. Fastening is carried out with nails that are nailed to the slats. The last row of trim is cut at an angle. When deviations in height do not exceed 1.5 cm, it is recommended to trim in the bottom row; subsequently, this place is decorated with a plinth.
We insulate the floor
At the first stage of thermal insulation of a brick bathhouse, boards need to be nailed to the wooden beams, the distance between which is one board. Next, the surface of the joists and the floor is covered with windproof film. It is fixed on the protruding elements with a stapler. There is a layer of insulation on top. It is better if it has a foil layer, which will speed up the thermal insulation process. Otherwise, you can use a vapor barrier film, which will protect the layer from moisture and will cope better with the task due to its heat-shielding properties. At the next stage, you need to nail a sheathing consisting of 3 cm bars to the logs. They will also provide ventilation. Now you can begin laying the final coating. They can be wooden boards.
We insulate the walls
When thermally insulating the walls of a brick bathhouse, a frame is formed on the load-bearing surface. Next, the insulation is laid, followed by the waterproofing material. This can be a plastic film or a foil layer. The material is covered with an overlap, and its joints are covered with thin slats. The top needs to be covered with clapboard or boards. An alternative option is PU foam boards.
We insulate the ceiling
The first layer will be a vapor barrier, the main role of which is to prevent the penetration of vapors into the thermal insulation. For these purposes, you can use roofing felt or parchment. Modern geosynthetic coatings, thermofol and membranes also performed well. It’s good if you purchased a foil vapor barrier, then it will also shield the heat, effectively returning it inside.
The next layer will be thermal insulation. It is better to choose the lightest possible material so as not to create unnecessary load on the structure. The layer must be non-flammable and resistant to moisture. An additional selection criterion is ease of installation.
Next, waterproofing is installed. It will be located on the roof side and will act as an additional barrier. It can be a membrane or film. One side must be completely waterproof, and the other must be able to allow steam to pass through. If the bathhouse does not have an attic, thermal insulation is carried out only from the inside.
Furniture
Arranging a bathhouse and rest rooms in particular requires the largest amount of furniture, because for a comfortable stay you need tables, chairs, sofas and other paraphernalia. The number of elements depends directly on the scale of the rest room.
Tables are usually installed in a rectangular shape and of such a size that there is enough space for everyone soaring.
For bathhouses with small rooms, folding tables that fold out only when in use are well suited.
Benches are an integral attribute of each room in the bathhouse. They are used not only as a place to sit or lie, but also as shelves, stands for bath accessories and other accessories.
There are many options: with and without backs, narrow or wide, long and not very long.
Here the choice is yours.
You can make a variety of stands, hangers and shelves yourself, showing a little originality and imagination.
These small attributes will add uniqueness and simplicity to your interior.
Furnace lining
They use red ceramic brick or fireclay, but it is more expensive. The lining of the stove in the bathhouse serves as its case, which should facilitate smooth heating and have special channels for the circulation of hot air.
Sequence of actions and features:
- Laying is carried out in a vertical position, a distance of 40 - 60 mm from the stove casing, such a gap ensures the free passage of hot air;
- Cast iron doors are placed in one of the lower layers to regulate the air supply;
- The width is usually made half a brick, but not thinner, because overheating of the screen may occur;
- Experienced builders suggest using fire-resistant fireclay bricks, but this is not necessary, since the heating temperature of the brick cladding is not so high; here, rather, it plays a decorative role;
- If the stoves are heated from the next room, then special tunnels are created in the panels to provide access to the ash pit.
Criteria for choosing lining for cladding
Lining for the interior decoration of a bathhouse must be selected taking into account several rules
First, you should pay attention to the type of wood. Pine is completely unsuitable for high temperatures, as it also does not cope well with high humidity.
But a rest room can be easily sheathed using lining made from this material. If you want to save money, then it is better to choose exactly this material for finishing the dressing room.
If you want to completely protect yourself and those who will visit the bathhouse, you should choose alder lining for lining the inside of a brick bathhouse. It has a pleasant aroma and attractive shade. When covering a bathhouse for yourself, you can also choose linden. It is completely unsuitable for premises that will be visited by a large number of people, since this breed is not resistant to mechanical damage.
If you want to do the work yourself, you should also pay attention to the profile. If you are looking at a soft line, you should know that products with such a comb have a wide board. The brick wall after finishing will look aesthetically pleasing and without obvious changes
If you don’t plan to cover the wall yourself with anything after finishing installation, you should ask how the slats were protected. It is best if the finishing layer is acrylic compounds with antiseptic characteristics. They are made on a wax base. Special impregnation for baths is excellent. It forms a colorless film on the surface, which is easy to care for, and does not change the natural color of the wood.
Prices for wooden lining
If you want to decorate a bathhouse with clapboards yourself, then you should also inquire about the cost of the material. For example, top-class fake products cost 130 rubles. a piece. Sometimes manufacturers also indicate the price per square meter. So, you can purchase aspen trim for 815 rubles.
Marking and technical requirements
The cheapest type of finish is the one designated by the letter “C”. This material has visible defects, but it can be used for cladding indoor bathhouses for household purposes. This allows you to save money, and not only when you want to decorate utility rooms. After all, although such material has its drawbacks, it can be used for all rooms if the bathhouse is a family one and it is not intended to invite guests.
If you want to purchase higher quality material, but at the same time save money, it is best to choose grade “B” lining. It includes dark and light knots, as well as cracks and recesses. Such material will be ready to last longer, but it can be further decorated to be installed, for example, in a dressing room or a rest room.
Grade “A” lining is made of even higher quality. You will not see any defects on the surface other than light knots. The base will be smooth and is perfect for finishing the main rooms in the bathhouse. This is what is called the golden mean. Since it is in a not so high price segment, it also looks quite presentable.
When your budget allows, you can purchase “Extra” grade lining. There will be no defects on it, the base will be smooth, and this decor can also be used to decorate the main premises. The Premium grade is based on smooth wood with an ideal surface. You will not see any defects on it. The service life of such material is so long that you will most likely want to build a new bathhouse, but not change the finish.
Materials
Traditional decoration inside the bathhouse made of wood. The most suitable wooden base for finishing is lining.
These special finishing panels have the main advantages:
- good air circulation;
- zero condensate;
- beautiful appearance;
- easy installation;
- acceptable price.
The best starting materials for lining are: larch, linden, alder, ash. Hardwood walls warm up faster, while the outside temperature of the walls remains comfortable for human skin.
Unlike conifers, hardwoods do not emit resins, so they are considered harmless for finishing the walls of a steam room.
Walls
Options for the type of finishing “lining” are classy. For example, class C has a low cost and is suitable for finishing vestibule walls. Class B is equipped with contrasting inclusions, cracks, and minor damage. Every 1.5 meters of length of such a lining implies the presence of a certain number of knots. The lining is suitable for the design of a rest room in a natural style, as well as for a vestibule.
Class A lining allows for a few small cracks. However, it does not allow visible cores on the cut. There may be at least one knot per 1.5 meters of length. Class A lining is suitable for finishing the walls of some areas of the steam room.
Premium class lining has an excellent appearance, but a corresponding price. The material can be used to cover the walls of a steam room, relaxation room, or washing room. Linden croaker will serve as an excellent wall decoration. The material does not allow overheating and does not release resins. Linden panels will serve as high-quality sound insulation; they can be supplemented with unedged boards.
For vapor barrier of the steam room, basalt mineral wool and foil in the form of a film are used. Both the walls and the ceiling are sheathed with foil for waterproofing purposes. In order to insulate the stove in the steam room, it is permissible to use brick and salt for finishing.
Ceiling
Work related to finishing the ceiling begins with laying insulation in the attic. To prevent dust from entering the room, all cracks between the boards must be sealed. Brick chips and other bulk options are used as insulation material.
The ceiling of the bathhouse must withstand temperature loads. Finishing materials must resist steam flows. You should not choose materials for finishing the ceiling that emit toxic substances when heated.
The building foundations that are relevant for a bathhouse ceiling are spruce or pine beams for beams and ceilings, unedged boards or tongue and groove for the first ceiling, class A or B linden lining for the interior ceiling lining. Aluminum foil and membrane films can be used for vapor barrier, and membrane films for waterproofing. You can sheathe the steam room with linden and bast.
Floor
The optimal choice for the floor of all rooms of the bath, except for the steam room, is ceramic tiles. A block of tiles in a steam room may be present near the stove. The variety of modern collections will easily allow you to choose the right design for a relaxation room or washroom. At the same time, tiling will not only be comfortable and aesthetically pleasing, but also practical and durable.
The floor of the steam room can be made of concrete or wood. Concrete or stone floors are cold. Therefore, wood is often preferred. Wooden floors require the preparation of a foundation on which beams are laid, and logs are laid on top of them. The voids between beams and joists are filled with insulation, which is expanded clay. A vapor barrier and waterproofing are laid on top of the insulation, then the finishing floor is installed.
A concrete floor requires a foundation made of crushed stone and clay. Roofing felt and bitumen mastic serve as waterproofing. The insulation can be mineral wool or expanded clay. The finishing layer of the floor is laid on the heat-insulating surface.
The procedure for thermal protection of the ceiling
It is impossible to eliminate heat loss in bath rooms without insulating the ceiling in them. This is especially important to do when they are located in a one-story building.
The sequence of work when installing thermal protection for the ceiling in a bathhouse is as follows:
- Fiberglass is laid on top of the ceiling, placing strips of material overlapping. They are connected to each other using tape or adhesive tape.
- A solution mixed from clay, chopped straw and river sand is laid on top of the insulation. The thickness of this layer should be approximately 30 centimeters.
- A layer of foam plastic is laid on the clay mortar, and then a cement mixture about 10 centimeters thick is poured on top of it.
- To improve the thermal insulation performance of a bath structure, you can add foam chips to the cement mass, maintaining a proportion of 1: 3, or even better, 1: 4.
- Sheathing beams are attached to the rough surface of the ceiling from the inside, placing basalt wool in slabs between them.
- A foil film is laid over the heat-insulating product, and the top is sheathed with clapboard, maintaining a 10-mm gap between the elements.
Provided that the insulation of the room from the inside is carried out correctly, during its operation the loss of thermal energy will be minimized, which means that visiting the bathhouse will bring maximum pleasure.
Materials
Many people wonder what material is best to decorate the interior of the bathhouse with. The most widely used lining is small panels used for cladding vertical surfaces. It is made from wood of different species. The main advantages of lining are as follows:
- prevents the formation of condensation;
- is a “breathable” material that does not interfere with air circulation;
- has an aesthetic decorative appearance;
- easy to install;
- has a relatively low price.
For finishing the interior of the bathhouse, finishing with unedged boards is allowed.
- African oak (abachi). It is lightweight, but at the same time strong and highly durable, lightweight, does not emit resin and contains virtually no knots. Abacha finishing materials do not burn the skin. However, this is a very expensive material, so not everyone can afford such cladding.
- Cedar. Ussuri and Altai species are most often used in decoration. They are resistant to high temperatures and excess humidity, and also provide an environment in which fungi do not multiply and mold does not appear. At the same time, the wood has an aesthetic appearance and exudes a pleasant aroma.
- Linden. Baths are often lined with linden slab. Its advantages include high strength and strength with relatively light weight. The tree of this variety tolerates temperature fluctuations and frequent exposure to moisture well, has an interesting texture and emits a healing aroma that has a healing effect on people suffering from diseases of the respiratory system.
- Alder. This is the optimal material for the interior decoration of a bathhouse; it is pleasant to the skin, and in addition, when heated, it changes color slightly, and after cooling, it returns to its original color. This interesting effect creates additional aesthetic pleasure and increases comfort when taking bath procedures. From a practical point of view, it is worth noting that alder does not emit resin and contains very few knots.
- Aspen. This material has a low cost, so it is one of the most budget options. The advantages include zero resinity and ease of processing, however, this coating is prone to a variety of fungal diseases.
- Birch. It has a uniform, strong structure and attractive appearance, but at elevated temperatures it can become slightly deformed. To prevent this from happening, when purchasing, you should give preference to thoroughly dried materials.
- Ash. This is a very beautiful type of wood with which you can achieve a stylish decorative effect.
Very good species for finishing baths are meranti, cedrella and ofram - these are expensive types of wood. Their main difference is that even when exposed to high temperatures, they maintain a temperature equal to that of the human body. Therefore they are very convenient to use. However, their cost is quite high.
Not all wood is good for interior cladding of bathhouses. For example, pine and spruce can only be used to decorate the shower room and recreation area. Using them in a steam room is not allowed, since the material releases resins at elevated temperatures, which can burn the skin upon contact.
Wood is used to cover not only the walls, but also the floors. However, to finish the latter, you can also use ceramic tiles, and the place where the firebox is installed is lined with brick. Perlite is used directly under the floor covering - this is sand with good thermal insulation properties. This material is very light, so it is optimal for use in enclosed spaces where there is no wind, otherwise it will blow up.
The materials used for lining the steam room should not contain any knots, protruding metal parts should not be installed - all handles and holders are made only of wood. Even the shelves are made without the use of nails, since any metal object becomes very hot at high temperatures and can cause burns. Some consumers decorate their baths with clay, brickwork, salt tiles, bast and stone.
Special attention should be paid to materials that cannot be used in finishing the bath, especially around the stove. Fiberboard and chipboard are flammable products that also absorb moisture well. The only place where their use is permissible is the locker room.
How to choose glue?
When working with tiles, you should use a high-quality cement-based adhesive. It not only holds the tile well, but also allows you to attach it even to an uneven surface, since its leveling occurs directly during installation, and this is very convenient and even allows you to control the level of inclination.
Craftsmen often prepare the adhesive composition themselves. It's not difficult if you know all the proportions. Most often, 4 parts sifted sand is used for 1 part cement. Sometimes the amount of the latter can be increased to 6 parts, but this depends on the type of tile laying. Most often, craftsmen lay facing tiles seam by seam, diagonally or in a running pattern.
Disc dowels: long lasting strength
The use of disc-shaped dowels is justified in the case of a large insulation area or uneven façade surfaces. For fastening to dowels you need: a hammer drill (impact drill), a drill of the appropriate diameter and length, and a hammer. Holes are drilled with a recess of 50-60 mm into the base. The holes are filled with polyurethane foam. Then the dowel is driven in with a hammer so that the dowel fungi do not protrude above the surface of the slab. It is best to use dowels in combination with metal screws to increase the reliability of the connection. Installing 5 dowels per slab is sufficient. Adjacent sheets are fastened with one dowel. It must be installed in the seam between the slabs.
Finishing the bathhouse inside: fixing the lining
Having completed the preparatory stage, they begin the process of finishing the bathhouse inside - the photo will help you navigate the order of actions. It is necessary to select suitable fasteners made of materials that are not susceptible to exposure to moisture and high temperatures. Immediately forget about traditional nails, as they will quickly corrode and the walls will be damaged by rust stains. And when the temperature in the steam room rises, touching the nails is dangerous - they can burn the skin.
The lining is cut immediately to size, focusing on the height of the bathhouse, then it is attached to a pre-prepared grate (or directly to the walls) with special brackets. If necessary, the width of the lining can be slightly trimmed at the corner joints.
The relaxation room in the bathhouse is the place where you spend the most time.
To finish the steam room, high-quality wood should be used that can withstand high temperatures and high humidity.
How to cover walls with clapboard: step-by-step instructions on how to do it yourself (read more)
All actions must be performed using a level to obtain a perfectly level structure. After making the frame, it is coated with an antiseptic. The lining should also be processed, but before installing it on the frame. Laying the material starts from the corner. Nails, staples and clamps are used as fasteners. The material that was used to decorate the surface of the walls can also be used to decorate the ceiling.
Light wood species are best suited for small rooms.
It is necessary to understand that the maximum temperature is located under the ceiling, which is why it is necessary to choose lining for this surface from rocks that contain a small amount of resins, otherwise their drops may burn the skin when falling. The finishing of the place where the stove will stand must be made of non-combustible materials - tiles, bricks.
On a note! It is not recommended to choose spruce or pine for the steam room. It is better to cover the dressing room with this material.
The floor in the bathhouse can be made of non-slip tiles.
Summarizing
A good bath is a warm bath. And in order for it to warm up well to the required temperature, it is necessary to choose the right thermal insulation and insulate all structural elements.
The bathhouse is also insulated from the inside:
- Windows, doors and all openings - with natural sealants;
- The outer door is made from good natural materials.
At FORUMHOUSE, the issues of insulating a steam room are discussed in detail, and the insulation of the ceiling of a steam room is discussed separately. Find out how to properly insulate a timber bathhouse from the outside. Read our article about insulating the floor in a bathhouse. Get acquainted with the guide to bathhouse constructions of our users and find the answer to any question about arranging a bathhouse. Watch our video on how to build a full-fledged bath complex.
Bathhouse interior options: photos of various rooms
Design of a steam room in a bathhouse: several photo examples
The steam room is the heart of the sauna. It should be light and cozy
Here, like in no other room, special attention must be paid to the choice of finishing material. It must withstand changes in temperature and humidity, and not swell from steam.
At the same time, appearance is of great importance. For example, if you decorate the inside of a steam room with coniferous wood (pine or spruce), then after several washes the walls will darken and acquire a gray, unsightly tint. Moreover, regardless of what protective compounds they were treated with. We invite you to look at the photo of the interior decoration of the steam room. Perhaps they will give the reader some thoughts:
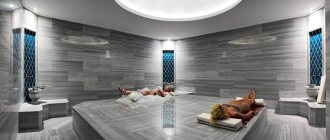
Interior of a washroom in a bathhouse: finishing features
A washing room in a bathhouse is a room whose walls are constantly exposed to splashes or even jets of water, which means you need to take care in choosing a material taking this nuance into account. If we are talking about wood, then larch or linden is used - these varieties are best suited for such operating conditions. However, the best option would be to finish the floor and walls with tiles.
To make it clearer how the washing room is finished, pay attention to photographic examples of finished premises of this type:
The best photos of the interior decoration of the bath: shower room or cabin
Today, home craftsmen prefer shower cabins, which is not surprising. They can be installed in a washing room, their installation is simple, and such devices will not take up much space. The finishing is done in the style of a washroom or is not required at all if the shower cabin was purchased in a store, factory-made. Below you can see what a shower room might look like in a bathhouse interior:
Relaxation room in the bathhouse - interior design of the required premises
Such rooms are designed to allow you to take a break from the hot steam. The temperature in them is maintained cool, which is facilitated by the good thermal insulation of the steam room and the location between it and the dressing room of the washing room.
Decorating a relaxation room involves the use of various materials - strict requirements, as in the decoration of a steam room or washing room, are not imposed on them, but the aesthetic appearance is even more important here. Darker tones are used. The ideal wood for finishing a dressing room would be bog oak.
For example, you can pay attention to the photo of the design of dressing rooms, the finishing of which was carried out by home craftsmen:
And a few more photos of the interiors of the bathhouse and relaxation room:
Looking at these photos of the interior design of bathhouses with rest rooms, it’s hard to believe that the finishing was done by craftsmen without any experience or education as a designer, but this is a fact.
Decoration of the dressing room in the bathhouse and its features
The locker room is the driest room, which means there are no high demands on finishing materials. It is even possible to use pine or spruce - after all, the microclimate here will be similar to a living space.
Preliminary preparation
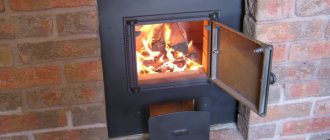
As you know, the main thing in a Russian bath is a properly installed stove. It must be built before you begin interior decoration. And in this case, it is better to seek the help of a professional stove maker, who will determine where the hearth should be, set the correct direction of the outlets and build the body.
Installing a traditional brick or stone stove will require special attention to such features as the soil on which the bathhouse is built, the foundation, the materials used in the construction of the walls, the type of roof, and even the climatic conditions of the area. To make your task much easier, you can turn to modern technologies. In construction markets and in specialized stores there is a huge selection of boilers and stoves, which in their functionality are in no way inferior to a classic stone sauna stove, but compared to it, they are completely safe, and also economical and easy to use.
Such a heating device will not require any special skills from you; you can install it yourself, or with the help of a specialist, quite quickly and without subsequent removal of accumulated construction waste . Manufacturers provide customers with a complete set of necessary equipment and additional devices.
After the stove is installed, install the electrical wiring, provide its insulation and the necessary terminals, and then proceed directly to the interior decoration.
Basic standards and requirements
On the other hand, in the serious business of construction one cannot do without norms and requirements. They are set out in SNiP 30-02-97, which determines that it is permissible to locate a bathhouse 8 meters from other buildings, and no closer than 15 meters from a neighbor’s house. The layout of the bathhouse must include at least three rooms, the area of each of which per visitor is:
- dressing room – 2 m²;
- washing room – 2.7 m²;
- steam room – 3 m².
The height of the walls is 3.3 m.
In private buildings, the stated requirements are not always and not fully met. However, for newly constructed buildings, compliance with fire breaks of 8 and 15 m is not even a matter of good relations with regulatory authorities. This is a matter of safety for residents and neighbors.
Finishing
After the construction of the building, installation of windows, installation of the subfloor and ceiling, installation of heat and waterproofing, you can begin finishing. Different materials are suitable for finishing brick surfaces.
Internal
Features of interior decoration:
When purchasing tiles for a sink, you need to choose rough products. This will reduce the risk of slipping while visiting the bathhouse.
External
It is not necessary to carry out external finishing for brick surfaces, but if the seams are not even, you can cover the walls with special plaster for cladding building facades.
To build a brick bathhouse yourself, you need to have practical skills in using hand and power tools. If you follow simple rules for working with bricks, you can get a durable building.
Advice from the experts
There are no high temperatures in a brick washing bath, but the materials are affected by moisture. Therefore, the walls can be finished with tiles. The surface is first leveled with plaster. The layer is applied with a thickness of 15 mm. Once the ceramics have been laid, the solution is removed with a rag if it gets on the surface of the cladding.
The foundation, floor, walls, windows - all these are parts of a single whole - the baths. Therefore, for its finishing it is better to use materials that combine with each other. For cladding walls, for example, you can use clinker tiles for interior work, and for arranging the foundation, clinker for difficult operating conditions.
Corner in the steam room
A massive cladding is laid out of brick, occupying the entire corner of the paired compartment. It protects the wooden finish on the walls (and in a wooden bathhouse the entire structure) from fire. Thus, a good protective and decorative element is obtained. It is conveniently located near the stove.
The brick corner is laid out in two layers, and in some cases in one. Two layers are preferable, as they allow for good overlap of the seams. For a completely brick bathhouse, enough bricks are purchased, so it is better to lay out the corner in two layers. The work is carried out before the steam room is sheathed. The thickness of the seams is minimal with good decorative jointing.
The process of thermal insulation of a brick bath from the inside
Insulating a brick bathhouse from the inside and with your own hands is not so simple, but not very difficult either
It is very important to protect the building from heat leakage, so it is important to ensure that all stages of thermal insulation are carried out strictly in order. How to properly insulate a brick bathhouse from the inside? You should start with insulating the floor
The correct way to insulate the floor
To install a concrete floor, you will need more than one layer, because with proper insulation of the bathhouse, moisture should not get on the thermal insulators.
First you need to start leveling and compacting the soil. If this is difficult to do due to large stones, the base is leveled with sand. Next, cut-off waterproofing is spread, for example, super-dense cellophane, and the edges are wrapped on the walls. They should be much higher than the screed level itself. Then, before filling in the expanded clay, a cushion of at least twenty millimeters thick made of sand is poured. Despite the fact that according to the instructions you can lay this pillow under the cutoff, it is still better to do it on top - when dry, sand also acts as a thermal insulator, but not when it is wet. Then a layer of expanded clay is poured on top, its thickness is adjusted depending on the need.
Cut-off waterproofing is not required here. To fill the screed, it is enough to place the profiles directly into the expanded clay as a guide. If desired, you can also install reinforcement under the beacons to secure the screed monolith.
It is very possible that you will install a drain in the floor. Be careful: when using, water should not get beyond the edges of the funnel, soaking the thermal water-electric insulation.
Wall insulation
Insulating the walls of a bathhouse from the inside with your own hands is actually not such a difficult task if you follow our instructions. You should start with striping the sheathing for the wooden lining. Most often, the sheathing is mounted on consoles made of metal perforated hangers for plasterboard profiles.
But before you start installing the consoles, it wouldn’t hurt to attach the water barrier to the wall with glue or even double-sided tape. Then you need to place U-shaped brackets on it.
Mineral wool is threaded through these brackets - one of the best insulation materials. So, it covers the entire area of the wall, leaving no gaps or cracks. Alternatively, you can first attach wooden profiles for the sheathing. Then fill the space between them with mineral wool, occasionally nailing it to the beams with a stapler. As for the thickness of the insulation, it all depends on the required thermal insulation power.
When the mineral wool is laid, it is covered with foil polystyrene foam, along with the sheathing. Experts advise fixing expanded polystyrene with glazing beads so as not to make unnecessary holes in the foil.
Wooden eurolining is installed directly on the foil using clamps and self-tapping screws.
Which insulation will be better - external or internal?
If we are talking about a private bathhouse, it makes no sense to maintain a constant temperature above zero from the inside all the time. But due to periodic use in the cold season, the walls can freeze through, and when trying to flood the bathhouse, all the heat is spent mainly on heating the stone. When insulating the outside, the brick hardly heats up; it is covered only by the lining, so much more resources will be spent on heating than could be the case.
Thermal insulation of the walls of the bathhouse from the inside helps reduce fuel consumption. When installed correctly, the heat-insulating material does not release heated air outside, and it is stored indoors.