Wooden baths have been built in Rus' from time immemorial and did not require additional insulation. However, previously the householder himself could harvest the wood, dry it, process it, and set up a bathhouse. Today you have to trust third-party companies, so shortcomings only emerge during operation. And if the tree turns out to be unable to retain heat, you need to think about additional insulation.
In this article we will talk exclusively about the insulation of wooden walls, because the rest (floor, ceiling, roof, attic) have already been discussed in other articles on the site; insulation for the ceiling, among which clay and its mixtures especially stand out, are also analyzed separately.
The choice is always yours, we only undertake to talk in detail about what is needed for this and how it is carried out.
Insulation of wooden baths
Problem areas in a wooden structure are always the same. The problem can be solved either the way it has been done for centuries, or with the help of modern technologies. Below is a list of problems and ways to solve them.
Inter-crown insulation and sealing of cracks
Over time, wooden buildings inevitably shrink, which causes gaps to appear between the crowns. Those, in turn, open the way for drafts, so the first stage of the fight is to seal them.
The initial stage of interventional insulation occurs during construction . Timber (including profiled) and round timber are laid with tow tape or jute. Subsequently, this will be internal interventional insulation.
In addition to the internal, there is also an external one, which has to be periodically updated.
The resulting cracks can be filled with tow, jute, natural moss, or you can use modern materials, but only those designed for wood. IMPORTANT ! Plumbing sealants, putty and polyurethane foam are not suitable for sealing cracks in a bathhouse made of logs or timber.
They are inelastic, designed for a constant gap size (and in wood it changes), they have poor adhesion to wood, insufficient heat resistance, harmful emissions and other disadvantages. Over time, they crumble out of the cracks. The cracks on the outside of the beams or logs are sealed with wood sealants in such a way that the sealants will dry from 2 to 5 weeks, and the walls must be protected from the sun and rain during this time.
Insulation of window and door openings
Windows in bathhouses are usually made low so that the heat accumulated under the ceiling does not escape . All openings - both window and door - must be carefully sealed with tow or foam. For ordinary windows, the junction of glass and frames is insulated with putty, but it is even better to install special double-glazed windows for baths - made of wood.
High thresholds and low doors
Bathhouse builders have long developed design features that help retain heat.
And even in our time there is a reason to take advantage of their findings. However, there are several doors in the bathhouse; should they all be low and the thresholds high? The principle on which this works is that warm air is light and accumulates at the top, so the higher the doorway, the more heat will escape when the door opens. A high threshold prevents drafts from moving across the floor and also effectively saves heat.
But today this rule is more often followed for only one room in the bathhouse - the steam room (about insulation for the steam room here). The calculation is simple: you need a pair from the ceiling 60-80 cm down, at this level you can already make a door lintel. Or you can use another rule: from the floor to the ceiling the door is 160 cm in height. From this height you still need to subtract 20 cm per threshold.
By the way, a high threshold is a guarantee that you won’t hit your head, because a person automatically ducks when he steps over it. And if you make the doorway wider, it will become comfortable even at this height.
IMPORTANT ! The door to the steam room should open outward, not inward. You never know, maybe you'll have to knock it out from the inside.
It is better to make the door to the washing room narrow, about 60 centimeters, so that less moisture leaves the room. Another thing: due to the swelling of the wood, the gap between the door and the frame is increased to 5 mm, so that the swollen door can still close. This does not apply to glass and plastic doors.
The entrance door to the bathhouse can also be ordinary in size, but in terms of material it is better to be metal with wooden lining, so as not to accidentally freeze to the metal in the cold. But the wooden one usually swells and leads .
Necessary tools and accessories
- Electric drill with a set of wood drills.
- Electric jigsaw.
- Wood saw.
- Set of wood rasps.
- Hammer.
- Hatchet.
- Mallet.
- Furniture stapler with a set of staples.
- A device for sawing bars at an angle.
- Level.
- Roulette.
- Yardstick.
- Carpenter's square.
- A ruler for drawing the outline of a log house.
- Plumb.
- Rope.
- Metal clamps for lining.
- Pencil.
When to start insulation and finishing work in a new wooden bathhouse?
If the bathhouse is made of timber or is a log house, then you must immediately keep in mind that in the first three years after construction it will shrink noticeably (then less).
On average, this is 20 cm in the first 3 years. During shrinkage, cracks form - all this time you will be patching them. And the most important thing: if finishing was carried out immediately after construction, and they were nailed down firmly, then the lathing will not allow the bathhouse to sit properly .
Therefore, it is either left unfinished, or grooves are cut out in the sheathing so that the nails gradually slide into the grooves. It’s better not to finish it, because you have to caulk the cracks both inside and outside, and the sheathing will get in the way. The bathhouse needs to be allowed to shrink (at least) for one year . And when its results are already visible, you can think about insulation and finishing work.
How to calculate quantity
This is a fairly trivial task. The area is the product of one side of the rectangle and the other. Each surface that you are going to cover with clapboard is a rectangle (be it a wall or a ceiling).
Be sure to subtract from it the empty space of door and window openings.
The remaining area is summed up, giving us the number of square meters of future lining. This is in general.
But if you know the length and width of one plank, then you may want to know how many planks you need to buy. To calculate the amount of lining for a bathhouse “in slats”, you need to decide in which direction it will be laid and divide this side by the width of the slats. This gives you the number of planks on the wall.
And the other side of the wall or ceiling will show how much will need to be cut from the full length of the plank. It’s good if the plank is divided in half or there is room for the trim on another wall.
In general, draw a plan for your bathhouse , estimate the number of slats and compare it with the length of the lining that can be found on sale. And then start adapting this length to your needs so that there is less waste.
IMPORTANT! The higher the grade, the less waste, but you must always be prepared for the fact that some of the material will be unusable for one reason or another. Therefore, you need to take a little more lining than was calculated. The minimum excess is 5% .
But you can immediately see from the quality how much will go to waste, so feel free to add extra interest. Or just take an expensive one. Because the same AB grade has many surprises in store in sealed plastic packaging.
Insulating a bathhouse made of timber: from the inside or the outside, which is better?
The answer to this question depends on what it should be better for : even after caulking, your bathhouse is so cold that no matter how much you heat it, it does not heat up to the required degree, or do you want to be able to steam in it for two days? In the first case, you need to look for the reason where the heat goes. Alternatively, insulation from the inside can help, although there is an opinion that a wooden bathhouse should not be insulated in this way at all. In the second case, external insulation will help.
IMPORTANT ! No matter which side you insulate the bathhouse, there you lose control over the condition of the wood, because it is hidden from view. You can only rely on proper installation of insulation.
Wood breathes, takes in and releases moisture, so when insulating, you need to maintain the opportunity for it to “breathe.” And this means great limitations in the materials used.
Insulation of a bathhouse made of timber from the inside
This method has two disadvantages , which are worth mentioning right away:
- A bathhouse insulated from the inside leaves the tree exposed to the cold in winter. And this leads to a shift in the dew point, which ends up on the inside of the wooden wall. It begins to get wet and then rot, plus it also becomes infected with fungus. This can be avoided with proper ventilation, but if there is a mistake, you will only find out about it when it is too late.
- When a bathhouse made of timber (which is often compared to frame buildings) is insulated from the inside, the internal usable space is reduced.
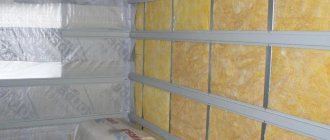
However, here is a diagram of the internal insulation of a bathhouse made of foam blocks:
Shown using the example of a bathhouse made of foam blocks, but the principles are the same.
- After caulking, a lathing frame is made on the antiseptic-treated wall.
- Insulation with or without foil is placed in the gaps.
- If the insulation is without foil, a layer of vapor barrier is added.
- A ventilation gap is left equal to the thickness of the counter-lattice.
- External finishing is carried out, for example, with clapboard.
- You can use Penotherm - foil insulation. For timber 10-15 cm thick, 5 mm Penotherm is sufficient.
More information on internal insulation in the article: We do the insulation of a bathhouse from the inside with our own hands: what and how, different bathhouses need to be insulated differently.
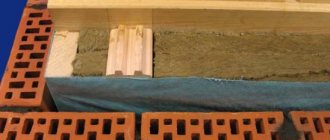
Insulation of a bathhouse made of timber from the outside
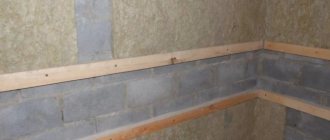
External insulation of walls made of timber simultaneously performs the functions of wind and moisture protection:
- First, caulking is done, and the walls are treated with an antiseptic.
- Then the sheathing is made or metal guides are attached.
- Insulation is placed in the gaps.
- The next layer is wind and moisture protection. It must be a membrane.
- A counter grille or another way to create a ventilation gap of 3-4 cm.
- Layer of finishing.
External wall insulation (shown using a block wall as an example, but this can be done to insulate any wall).
Insulating a bathhouse made of timber from the outside with mineral wool may only be necessary, perhaps, if this bathhouse is a living space. Well, or if the bathhouse is made of very thin timber and is located in the Far North and is operated in severe frosts. Outside, it is permissible to use mineral wool with phenolic impregnation.
When does insulating a bathhouse from the outside make no sense and when is external wall insulation justified? How to do it?
But still, as a rule, insulation of a bathhouse made of timber from the outside is not required.
Covering the walls of the steam room with clapboard
Choosing a cladding method
There are two types of lining arrangement - vertical and horizontal. In our example, the lining is positioned vertically. If desired, you can also orient it horizontally. In this case, there is no need to install horizontal slats (planks) on top of the vertical posts. In this case, the width of the racks must be taken in such a way that the thermal insulation wool is recessed by 20-30 mm relative to their longitudinal end. This will ensure ventilation of the air space between the insulation and the inner surface of the wall sheathing.
It is important to know that when viewed horizontally, the sheathing must be done from the bottom up, placing the tenon at the top. This will subsequently prevent water from getting inside the joint grooves when it flows down the walls of the steam room.
Laying the first moisture-proof layer and vertical posts
- First, we make markings for installing vertical posts, starting from the corners of the steam room with a step of 590 mm between their inner edges. These dimensions will allow you to tightly lay basalt wool with a thickness of 100 mm.
- The decoration of the walls of a bathhouse built from logs has its own characteristics. The fact is that fixing the sheathing slats strictly vertically is not so easy. To achieve this, it is necessary to process the vertical posts from the side where they contact the logs. For this purpose, a special copier is made, which is a thin ruler pointed on one side and holes drilled along it for a pencil. Having attached the stand to the log wall, the copier is passed along it and lines are drawn that repeat the profile of the log house. Further actions boil down to processing the racks along the drawn lines. It is enough to ensure a tight fit of the rack to the logs in several places with a step of 600 mm, maintaining a strictly vertical level. The length of the contact surface of 20-30 mm is quite sufficient. Don't forget to treat with an antiseptic.
- We lay the protective membrane from bottom to top. The top film is overlapped with the bottom film by 20-30 cm. We level and fasten the top edge to the protruding parts of the logs with staples using a stapler. We glue the overlap areas with self-adhesive Isofix tape.
- We align the protective film under the posts, which we install in the corners according to the previously made markings. Using a level or plumb line, set them strictly vertically. Fastening to logs is done with galvanized nails or screws. In order not to use long screws, we drill a blind hole in the rack 2-3 mm larger than the diameter of the screw head.
- We stretch the rope between the outer posts in two places: below and above. It will serve to base the internal racks.
- We install all internal racks according to the example in step 4.
- Align and carefully staple the protective film. Where necessary, additionally glue with self-adhesive Isofix tape. This operation should be performed with particular care. It is important to completely eliminate the possibility of air entering the area of open logs.
- Note: during the installation of corner posts, it is necessary to simultaneously lay thermal insulation wool in the corners.
Installation of thermal insulation and vapor barrier film
- Before laying thermal insulation mats, you should provide yourself with personal protective equipment: work gloves, goggles, a respirator, a hat and appropriate clothing. Getting cotton wool on parts of the body or in the eyes will cause a lot of trouble. Inhaling air filled with volatile cotton wool particles will not improve your health.
- We carefully place the mats in the spaces between the racks in the direction from bottom to top and in the same plane with the outer longitudinal ends of the racks. We carefully press each upper mat to the lower one, avoiding gaps and cracks.
- We cut the top mats with a mounting knife
- We lay the vapor barrier foil in the same way as indicated in paragraph 3 of the above section. The only difference is that it is attached to vertical posts. Each strip should be connected with self-adhesive aluminum tape LAS. The new layer of tape must be glued overlapping with the previous one. You should also make releases of 70-100 mm foil both at the top and bottom of the wall.
Fastening horizontal slats (planks)
At this stage, we fasten the horizontal slats for mounting the clapboard sheathing on them. We nail or screw the slats over the vapor barrier at the bottom and top of the future sheathing.
The internal slats are spaced at 600 mm intervals. We use a level to give them a horizontal position.
Cladding walls with clapboard
- Before covering, you should make sure that the lining is dried and has lain in conditions close to the place of work for at least one day.
- We place the first board strictly vertically with its tenon in the very corner of the wall. At the same time, its groove should look at us. The quality of the entire cladding depends on how you secure it. After all, the first board is the main reference point for all the boards in the row. Using nails or screws from the edge, carefully secure it to each horizontal rail. It is important to ensure that the fastener caps are completely closed during subsequent lining with decorative corners. We place the clamps (clamps) into the protruding edge of the lining groove and carefully nail them to the slats.
- We carefully insert each subsequent board all the way into the groove of the fixed lining, tapping it with a mallet through a wooden block, which will protect it from unnecessary damage. We also secure it to the slats with clamps.
- The last piece may need to be trimmed and secured like the first board. We sheath all the remaining walls, attach the baseboards to the sheathing, and caulk all corners with decorative corners using copper-plated small-head finishing nails. Such nails are practically invisible and will not spoil the appearance of the steam room.
- Important: to ensure unobstructed ventilation in the space under the cladding, the lower end of the lining is installed with a gap of 10-15 mm from the floor. This scheme will also protect the lower ends of the lining from exposure to water during the operation of the steam room.
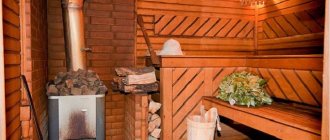
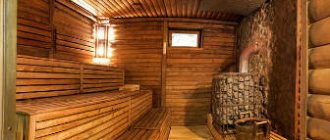
Insulation of a steam room in a wooden bath
Just as in most cases a wooden bathhouse does not need any insulation other than sealing the cracks, its steam room is able to perform its functions without additional effort. Unless the owner sets the task of making a sauna out of a bathhouse, which differ in temperature and air humidity. But even in this case, it is enough to simply lay a layer of foil or foil-coated kraft paper without installing any insulation.
The foil is placed behind the lining, but never end-to-end, but with a ventilation gap so that the lining can dry out. There should also be an air gap between the foil and the timber wall. If you are making a “thermos” from a steam room, you should not use coniferous wood in the lining, so as not to get burns from the resin.
Let's put it this way : insulating a steam room in a wooden bathhouse, if we don't talk about using foil, is a very strange event.
Do you need foil in the steam room?
The debate about foil will never end; it has many supporters and opponents. But, as a fact, a steam room with foil becomes hotter, and the steam in it becomes harsher . Therefore, it is a matter of the owner's taste. On the other hand, mistakes during its installation can be costly; if the wood gets wet, mushrooms and rot will develop. As experts say: try steaming without foil, you will always have time to put it on.
Find out more about the use of foil and foil insulation in baths.
From the reverse
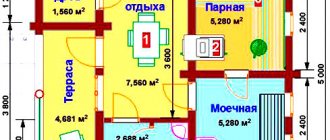
Well, it turns out that the decoration of the bath largely determines the pleasure and benefits of it? Why not, in this case, think of a bathhouse for yourself, following the finishing outwards? That's right, many bathhouse designers do just that. Let’s try to think of a small bathhouse for ourselves that, with a minimum of justifiable costs for it, will be as pleasant and beneficial as possible. The result is:
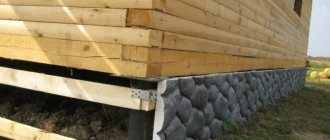
- The foundation is a flat strip foundation or a columnar foundation with a plinth. With the dimensions of the building in plan up to 6x6 m, the forces of frost heaving on ordinary soils will practically not tilt the structure; the bathhouse will simply rise and fall slightly throughout the year.
- On weak, subsiding and highly heaving soils - a strip foundation of normal depth.
- The structure of the bathhouse is foam blocks made of ordinary masonry cement-sand mortar.
- Exterior finishing and thermal insulation – ventilated facade made of dry-molded facing brick; half-brick masonry, connections to the load-bearing wall - steel anchors with deformation bending seam to seam.
- The floor is made of larch planks with joists on larch beams.
- The runoff from the washing room and steam room disperses through the cracked floor into a concrete catcher.
- The drainage pit is located at a distance from the building.
- Insulation - ecowool.
- Finishing the washing room and steam room is the simplest with standing boards.
- Wood for finishing the steam room - linden, cryptomeria, alder, aspen, poplar.
- Wood for finishing the washing room - larch, cryptomeria, pine, oak, ash, maple.
- Finishing the dressing room and rest room - according to your means and desires.
- The chimney of a sauna stove is a steel pipe in a homemade sleeve.
Steam to your heart's content, and then drink tea from a samovar in such a bathhouse will be no worse, or almost the same, as in a real Russian one. But the whole thing will hardly cost more than just custom-made branded finishing.
***
2012-2020 Question-Remont.ru
Display all materials with the tag:
Go to section:
Insulation materials
Insulation for timber bath walls should have vapor permeability characteristics similar to wood. For this reason, all variations on the theme of foam plastic - it does not allow moisture to pass through and condensation will form where it touches the wood.
Polyurethane foam emits harmful substances, so it is not suitable.
Mineral wool has good vapor permeability and can be freely used for external insulation, but the phenolic impregnations of most types of mineral wool during internal insulation of a bath will evaporate at high temperatures, and these are carcinogens. There is basalt wool, to which no impregnation is added at all or very little is added - it is suitable.
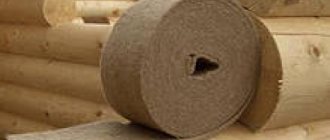
Suitable insulation materials include flax fiber and soft fiberboard . The first consists of 85% flax, the second - from coniferous wood chips. Both materials are vapor permeable, easily absorb and easily release moisture. Their characteristics are close to wood. But without fire retardant treatment, they are highly flammable.
But ecowool has already been treated with fire retardants, so it does not support combustion, it can be used in a wooden bathhouse.
By
Adviсe
To be able to relax comfortably in the bathhouse, it is necessary to properly decorate the room. To do this, it is necessary to plan in advance not only the interior of all rooms, but also their thermal insulation. The materials used for this must be environmentally friendly, resistant to high temperatures, and also resistant to mold.
It is better to use mineral wool to insulate the room, which is a natural material with a high degree of thermal conductivity, and its service life can reach 50 years. You can also use insulation made from foil. Their advantage is that they are only one centimeter thick.
Glass wool should not be used. It is slightly inferior in properties to mineral wool, and over time it produces an unpleasant odor. To insulate a log bath, you can use jute felt material. Do not use foam for insulation inside, as it can release toxic substances. For the floor, you can use a layer of expanded clay, the thickness of which should be 25 centimeters.
It is better to decorate the interior of bath rooms from wood, which is a durable and environmentally friendly material. Moreover, no other material can replace either the look or aroma of wood. After all, it is not only pleasant to touch it, but also to walk barefoot. There is no need to treat wood surfaces with paint or varnish; it is better to enjoy their natural aroma.
If wood is used for finishing, then it should be brought into the room in advance, two to three days before the start of work. This will give the lining the advantage that it will then not feel either moisture or dryness. To install the sheathing, you need to use beams measuring 50 by 50 centimeters.
Do not forget about installing a rough and finished floor in each bath room. It must allow air to pass through so that the boards or any other base do not rot or become moldy over time. It is imperative to install overhead vents to ventilate the room. After all, they are vital. If a person becomes ill, then with their help you can instantly reset the steam level. Also, if the bathhouse is not heated, the vents should be left open so that the walls do not become damp.
When installing a stove, you need to pay attention to the design of the chimney so that soot does not catch fire in it. Also, don’t forget about electrical wiring.
To avoid any safety issues, it is necessary to use safe LED lights for lighting in the steam room and washing room.
Although there is a lot of work on finishing a bathhouse and it is not easy, you can still do it yourself, you just need to follow the advice and recommendations of experts, and also pay attention to the process of installation work
Working with drywall
When we insulate the walls of a bathhouse from the inside with our own hands, one of the final stages of this process is laying the rough sheathing. An excellent material for these purposes is drywall. When working with this material, you need to take into account several rules:
- The UD type guide profile is attached along the perimeter of the ceiling or wall. The pitch of such fastening should not exceed 600 millimeters. This profile is fixed to timber or logs with self-tapping screws, and to a concrete or brick wall - with screws and plastic dowels.
- The axes of the CD profile are marked and then hangers are attached along these axes at a distance of 600-800 millimeters from each other.
- Installation and fastening of CD profiles is carried out with metal screws, the length of which is 9 millimeters. Then the protruding edges of the hangers are bent.
- We attach our drywall to the entire resulting structure, under which the insulation is located.
Plastic panels
The use of plastic panels makes it possible to carry out cladding work quite cheaply. This is due to the cost of the material itself, which does not need to be painted or carefully processed. A bathhouse made of plastic looks monolithic and has all the qualities of one covered with siding. The log house should be treated with bioprotective liquids before installation work.
Plastic paneling
But you will never need paint for such cladding, which is what makes finishing a bathhouse with this material such an economical option. Panels, like all previous cladding methods, require a frame. Thin wooden slats are perfect for this. But the log house of the bathhouse should be made only of timber.
Thermal insulation of floors, ceilings, doors, windows
The issue of thermal insulation of the floor in a bathhouse made of timber is solved in two ways. If we are talking about a concrete base, then such a floor is formed in the form of a pie. Foam boards are used as insulation, sandwiched between two layers of concrete and ceramic tiles laid on top of the entire structure as a finishing touch.
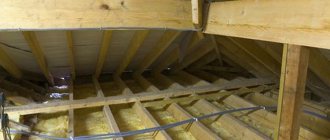
The wooden floor of a bathhouse made of timber is made in two layers, the space between which is filled with mineral slabs or cotton wool.
The same principle is used to solve the issue of thermal insulation of the ceiling, where the space between the beams is filled with mineral insulation.
It is preferable to install wooden windows in a bathhouse made of timber with double glazed windows. The main requirement for doors is that they must close tightly. Gaps in openings when installing door and window blocks are filled with polyurethane foam.
Recommendations
For those who independently decided to insulate the facade of the bathhouse, we offer several tips that will help in the work.
- If the log house still needs external insulation, it is enough to install a vapor barrier sheathing under the cladding, without the insulation itself.
- For laying polystyrene foam, it is better to use the “wet facade” technology.
- EPS boards should not be used as insulation for baths; the lack of vapor permeability will lead to the formation of condensation on the walls.
Whatever you choose as insulation for external walls, you should remember that success can only be achieved using complex methods, insulating the floor, ceiling, doors and windows.
How to insulate a bathhouse, see below.