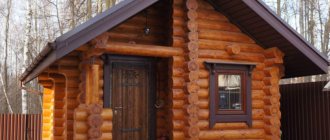
Many owners of country cottages sooner or later wonder about building a bathhouse with an attic on their site. The design of this building at the dacha is best carried out taking into account the fact that there is not only a shower in the bathhouse, but also a warm toilet.
Layout of a bathhouse made of timber with a sink and toilet
The presence of a toilet in the 6x6 m bathhouse project is justified for a number of reasons:
- The presence of a mesh or any similar fence around the bathhouse area at the dacha makes it not entirely convenient to leave it in order to go to the toilet.
- Many people get special pleasure from visiting a bathhouse during cold winter periods, and leaving a warm room into the cold at this time of year is, naturally, extremely undesirable.
- The presence of small children is another factor in which not only a shower in a 6x6 m bathhouse with an attic is important, but also a toilet, since this makes the rest even more convenient and comfortable.
- And, finally, a natural reason: even in the absence of all the above factors, the layout of the toilet in the bathhouse is simply convenient.
Arranging a toilet in a bathhouse
The design of a bathhouse with an attic and a toilet is a question that requires reflection and a final decision at the initial stage, while the planning of the future building is being carried out and the general construction scheme is being prepared.
This is due to the fact that the toilet plan will need to be applied to the general drawing of the building, and also taken into account when calculating the required amount of building materials.
Before considering the project of a 6x6 m bathhouse with an attic and a toilet, first of all, you need to remember the main nuances:
- The drawing of the room and the general layout must take into account the fact that the toilet must be located in a specially designated place, and it is preferable to separate it from the rest of the premises with a full wall with a door.
Detailed drawing with dimensions of a wooden bathhouse 7x7 meters with toilet and shower
- The design of a bathhouse with an attic and a toilet must include a ventilation system and a pipe that acts as an exhaust hood. This will preserve the bath aromas.
- When drawing a full-fledged toilet with a toilet, you will additionally need to calculate all the necessary plumbing system, which includes the supply and drainage of water resources.
How to arrange a bathhouse with a toilet
A bathhouse with a bathroom is both a modern requirement for comfort, and in some cases an urgent need. Of course, toilet equipment creates a lot of additional problems associated with waste disposal, increasing sanitary standards, and most importantly, allocating space in a small building where the dimensions of all rooms are limited. When planning the construction of a bathhouse, you should correctly assess the need for a bathroom in it and the type of such establishment.
Bathroom in the bathhouse - a convenient option for a bathhouse and sauna separate from the house
Cost calculation
The cost of a bathhouse with a utility unit consists of many factors, and it can fluctuate in different regions of Russia. If we average the price range, we can say that a standard structure with an area of 18–20 square meters will cost, depending on the materials used, the following amounts:
- from unprocessed logs – 500 – 600 thousand rubles;
- made of brick (gas block, foam block) - 900 thousand - one million rubles;
- from laminated timber – 1100 – 1200 thousand rubles;
- from rounded logs – 500 – 600 thousand rubles;
- from profiled timber – 400 – 500 thousand rubles;
- from simple timber - 300 - 400 thousand rubles.
The building, erected using frame-panel technology, will cost about 800 thousand rubles. Arranging a strip foundation for a building will require additional financial investments of approximately 200 thousand rubles.
More details about two-story bathhouse projects can be found at this link.
Why problems arise
First of all, you need to decide whether a bathroom is needed in the bathhouse. Maybe it’s easier to run to an existing toilet if necessary? This issue must be resolved taking into account all the features of the bathhouse itself and its comfort.
Advice! If a stationary toilet is located very close to the bathhouse or it is used quite rarely, then it is not advisable to place the bathroom inside. The same can be said if there is a very small bathhouse in which there is no rest room.
In most cases, the need for a toilet inside a bathhouse is quite urgent. As a rule, private areas are fenced off with an openwork or mesh fence, which does not allow you to run to the toilet undressed, and getting dressed and undressing spoils the entire bathing procedure. If the bathhouse is used in the cold season, then it is generally difficult to do without a warm internal toilet, especially during a leisurely process with relaxation in the relaxation room. The relevance of such an institution is dictated by the presence of children. They definitely shouldn’t be allowed out into the street when they’re hot. Finally, the design of a bathhouse with a bathroom is about providing comfort and increasing prestige, when you are not ashamed to invite friends to take a steam bath in the bathhouse.
The bathroom is more suitable for a large bath or sauna with a relaxation room
What is the problem with placing a toilet in a bathhouse? The following circumstances can be highlighted:
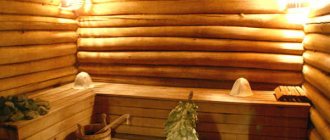
Installation of walls and sauna cabins
Any version of a home sauna should consist of a cabin lined with wood, as well as a lounger or bench inside the steam room. In addition, a sauna in the bathroom must have a sprinkler and a special stove. The home sauna set is equipped with heat and waterproofing, which allows you to retain heat inside the steam room and protect the apartment from moisture and steam.
If necessary, you will have to purchase additional equipment for air ventilation in the steam room, as well as a connection and wiring system with a control panel.
The cabin itself should consist of several wooden panels. It is advisable to purchase the outer side from coniferous tree species. The most ideal option is Scandinavian spruce. The golden color of this wood and the pattern with a large number of knots make the design of a bathroom with a sauna look like a fairy-tale pattern. Another classic option is northern pine, which has a pinkish tint and a unique ring pattern. In our latitudes, alder is especially popular. Its wood has a dense consistency, light brown, sometimes pinkish tint and a magnificent pattern.
For finishing the internal surface, tree species that do not release resins when exposed to high temperatures are suitable. In addition, the tree must have a high degree of resistance to moisture. The leader among such tree species is aspen. It is considered the most affordable, is not subject to rotting processes, and under the influence of water it becomes even stronger and harder. The light beige shade of wood will create an additional atmosphere of comfort and warmth.
The inside of the bathroom with a sauna can be decorated with linden wood. This wood does not contain resins that can evaporate at high temperatures, which can cause fire. Expensive materials include Hemlock and African Abashi oak. Both types of wood are significantly more expensive than their counterparts, but their physical characteristics and the magnificence of the wood pattern are worth the money.
See original design ideas for a combined bathroom using non-standard plumbing fixtures here. How mosaic tiles will look in a bathroom, about their varieties and installation process, read here.
Possible designs
In principle, a toilet in a bathhouse can be of 2 types: mobile (portable) and stationary. If the bathroom is organized in an existing structure, then the first option is more suitable. In a small bathhouse built long ago, all the rooms are clearly laid out according to the required area, where there is no isolated “nook” for the toilet. In this case, lightweight standard partitions are installed and a local container is provided for collecting waste.
For an already built bathhouse without a bathroom, you can use a portable dry toilet, separating it with a partition
A permanent bathroom is included in the construction plan already at the design stage. It has its own permanent walls and door. The sewer drain is formed in advance and ensures the operation of the establishment. The option of an attached stationary toilet is possible, when it is built in close proximity to the bathhouse foundation, and the entrance to it is organized from the bathhouse room.
A stationary toilet must be installed at the bathhouse design stage
Mobile structures include mobile cabins and dry closets. Mobile cabins are made in the form of light partitions, and disposable containers are installed to collect sewage, which are emptied after the bath procedure. One of the common options is a powder closet, or dry toilet. In it, the container is filled with sawdust or peat, which absorb sewage. To clean it outside the bathhouse, a sealed, storage septic tank is built, periodically cleaned by vacuum cleaners. This design does not have a sewer drain, but ventilation must be equipped. For this purpose, a ventilation duct with an exhaust fan is installed. Mobile booths are installed in the dressing room or rest room.
The dry toilet is filled with peat or sawdust
A more expensive, but reliable, modern version of a mobile bathroom is a dry closet. It is a mobile, ready-made stall with a toilet. There is no need to connect sewerage to it, because... Sewage is collected using a two-section container. Sections are arranged vertically. The upper compartment, connected to the toilet and water tank, is equipped with a pump that flushes feces into the lower section.
Structure of a dry closet
The lower part with a volume of 10-25 liters is designed to accumulate runoff. This storage tank is equipped with a valve and a pipe for cleaning the container. A chemical-type dry closet uses special reagents that break down solid components and eliminate odors. High-quality dry closets are equipped with tank full indicators. Regardless of the speed of filling the container, the effect of chemical reagents lasts for 12-14 days, after which you will have to clean the container and introduce a new portion of the reagent.
Special reagents are used to care for the dry closet.
The electric dry closet is considered the most effective. It costs more, but does not require the use of chemicals, and the filling cycle lasts much longer. In this design, the lower section is divided into 2 compartments - storage units for the liquid and solid fractions, and drying is carried out in the compartment for collecting solid waste. The liquid fraction, significantly diluted with water, can be sent to the drainage system of the bathhouse.
apartments for rent in Voronezh Kominternovsky district
Electric dry closet diagram
Operating instructions
The process begins with preparing and marking the construction site and digging a cesspool. To erect a structure, you need a fairly high area, marked with a tape measure and a cord, on which, first of all, a pit is dug at least one and a half meters deep.
The pit must be reinforced with brick, fixing it with cement mortar. When the latter hardens, sand and gravel are poured onto the bottom and this mixture is concreted.
Next comes the installation of the foundation and drain for the shower. A foundation made of pillars, also made independently, is very convenient and practical. Shallowly located, it nevertheless easily supports the relatively light weight of a wooden structure, raises the building above the ground, which protects the material from dampness and mold.
First, shallow holes are dug along the marked perimeter, into which sand and gravel are poured layer by layer and thoroughly compacted. A column-shaped formwork is constructed from plywood, protruding above the soil surface, and several rods of metal reinforcement are inserted into the hole. All this is poured with concrete and left for two to three days.
And the final touch at this stage is the installation of a drainage system and a drain pipe, one end of which remains outside.
The construction of the building begins with the installation of the bottom frame made of timber, to which vertical supports and pillars for the doors are attached. These elements are tied together with the top strapping, and in the center of the latter, 3 vertical posts are installed, topped with a ridge board.
Next, rafters for the roof are laid - single-pitch or gable - protruding beyond the edges of the walls, sheathing of boards and roofing material - metal tiles or slate, connected to the bottom layer - are laid on them.
The next stage is work on the floor of the toilet and shower.
Boards are laid on the lower frame, and a pedestal is mounted above the cesspool made of beams, which is also sheathed with wood. Once this work is completed, you can begin working on the shower floor, which is a relatively long and painstaking task.
First, a small ditch is dug into which a drain pipe connected to the drainage system is hidden, the floor is covered with crushed stone and concreted. When the solution hardens, a layer of bitumen-rubber mastic is laid on it and after it has set, the boards are laid.
Features of stationary structures
A stationary bathroom in a bathhouse can be in the form of a separate isolated room inside the building or a small extension on the outside. This toilet is equipped with permanent sewerage and ventilation.
An attached bathroom can be built simultaneously with the construction of the bathhouse itself. In this case, its foundation becomes a continuation of the bathhouse base, and the entrance is organized from inside the building. If the toilet is attached to an existing facility, then it is built directly next to the foundation of the bathhouse. There are several options for logging in:
The combination of a bathhouse and a bathroom (photo 1 clearly illustrates it) with its internal placement is included in the construction design. There are many standard projects that allow you to implement such an idea with the optimal location of all departments. The fact is that the toilet is a rather specific room, and it should not disturb the comfort of vacationers.
Important condition! For a toilet in a bathhouse, a stationary sewerage system is required.
It can have several options:
Another important requirement for a permanent indoor toilet is the availability of water to flush the toilet. The flushing system can be organized in the following ways: central water supply; own water supply from a well or borehole; storage capacity.
A stationary toilet must have a flush system
Toilet flush options
Making a shower cabin
Option 1 - do-it-yourself shower for a summer house made from metal corners
The shower stall should be spacious enough, its minimum dimensions: 1 x 1.3 x 2.2 m. The dimensions 190x140x250 cm are more convenient, since together with the thickness of the walls it comes out to 200x150x250 cm, and for board sizes this is a waste-free option.
- Make a frame from 30*30 mm corners connected with reinforcement with a diameter of 12 mm.
- Concrete the bottom trim.
- Attach wooden blocks to the vertical corners; finishing material will need to be attached to them.
- The shower stall (the resulting frame) can be finished with anything: wood, plastic, plastic film, waterproof fabric, plywood, polycarbonate or tarpaulin.
Option 2 - do-it-yourself shower cabin for the dacha made of timber
- Site marking.
- Installation of racks made of 100*100 mm timber for the tank, pre-tarred or wrapped in roofing felt, tarred with tar or waste machine oil, and deepening them by 1300 mm.
- It is advisable to concrete the racks.
- Next to the booth we make a changing room (dimensions 100*90 cm) and a washing room (dimensions 100*130 cm) (racks for them). General dimensions of 190x140x250 cm are more convenient, since together with the thickness of the walls it comes out to 200x150x250 cm, and for board sizes this is a waste-free option.
- Construction of the upper frame: assemble the frame on the ground, lift it and secure it at the ends with capscrew bolts.
- Make a platform for the tank - it is highly desirable that the washing area is not under the tank, but in front.
- Construction of the lower frame, also the base for the floor.
- The floor can be made of boards, packed at intervals of 5-10 mm, or a grate can be placed on a concrete floor with a slope towards the drain. It is advisable that the floor be at a height of 100-150 mm from the ground.
- If you don’t want to make a floor with cracks from which air can blow, you need to make a half-pallet.
- The dressing room and washing area are separated by a high threshold and curtain.
- The door is hung with hinges on a beam attached to the casing. It is better not to make it close to the box, because it may swell, but to achieve tightness, use a double sealing circuit.
- For wall cladding we use asbestos cement sheets or boards treated with drying oil
- You can make a window for ventilation and a light source opposite the door.
- The shower can be sheathed with moisture-resistant plywood, coated with glazing antiseptics or drying oil and painted with oil paint. You can also nail clapboard, siding, fiberboard, or roofing felt sheets onto the frame.
- The frame can be insulated with expanded polystyrene, covered with a film on top (vapor barrier + moisture barrier), attached with a stapler. You can finish the inside on top of the film.
Option 3 - a major shower for a summer house with a foundation and lighting
Foundation
Fill a 300*300 mm trench around the perimeter of the site with a solution of 1:3:5 (cement:sand:crushed stone). Before this, the sand needs to be sifted, and crushed stone taken smaller with a diameter of 5-20 mm. After hardening, if necessary, level the foundation.
Walls
The mortar for masonry walls is 1 to 4, it is better to use cement M500. Plumb masonry in a checkerboard pattern of half a brick. First, the corners are laid out in three or four rows, then the horizontal line is laid out along the level line. Use a level throughout the entire laying of the walls.
Roof
A 50*100 mm beam is installed on edge on the walls, then two more rows are erected so that the beam is inside. Then a metal sheet is laid and attached to the beams.
Interior decoration
The walls are finished with tiles, which are laid on a special tile adhesive or a solution of M500 cement and sand 1 to 4.
Reset organization
Without solving the issue of collecting and disposing of sewage, it is impossible to create a bathroom in a bathhouse. The most reliable and safest in terms of sanitary standards is the construction of stationary septic tanks outside the bathhouse area. They are sealed wells of the required capacity, in which the discharged mass is accumulated and subsequently pumped out by sewer trucks.
In the toilet itself, a standard connection of the toilet bowl to the sewer pipe is provided using standard elements. Next, the pipe is laid in a trench with a slope to ensure gravity flow of liquid (at least 2 mm per meter of length). The depth of its installation must exceed the depth of winter freezing of the soil.
The sewer pipe is connected to a sealed storage tank. A septic tank, as a rule, is made of reinforced concrete well rings with a diameter of 0.9-1.2 m with reliable waterproofing of the joints on the outside. The bottom of the well is filled with concrete 20-30 cm thick and reinforced with steel rods. The top of the septic tank is covered with a concrete slab with a hole for a hatch.
Sewerage diagram for a toilet in a bathhouse with a septic tank and ventilation
When constructing an attached toilet, a cesspool is often used for drainage. The main requirement for it is the tightness of the bottom and walls. It can be made by pouring concrete, from sand-lime brick followed by plaster, in the form of a metal or plastic container. The construction of an attached bathroom begins with digging this hole and arranging it. The advantage of this method is that there is no need to lay sewer pipes.
nuance! When planning storage tanks of any design, it should be remembered that feces tend to decompose, releasing substances harmful to the human body.
To eliminate the risk of poisoning, it is necessary to provide a ventilation duct for the outflow of gases from the storage tanks, and the outlet should be raised above the roof of the bathhouse.
Installation and nuances of use in the country
When the structure of the country toilet and shower is erected, you can proceed to the direct installation of a water barrel and connecting a tube with a shower head to it. It is also necessary to install a seat in the toilet.
A flat roof is most suitable for installing a water barrel. Since in our case it is gable, it is necessary to build a stand for this container. It must be made from metal pipes, a channel or a corner, using electric welding. In our case, we used a metal corner with sides of 50 mm and a thickness of 3 mm. To strengthen the structure, it is necessary to weld reinforcements perpendicularly, every 100 cm. The total length of the frame is 4 m. The result should be a solid stand in the form of a tripod. Then, near the shower wall, drill three holes 1 m deep. Lower the tripod into them and fill them with concrete.
In order to save material, a frame was made of three metal corners
A plastic container 20 cm high, 100 cm long and wide was used as a water barrel. Due to its small height, the water in such a container heats up quite quickly from the sun's rays. It is necessary to make a wooden frame under it. In our case, it is made of beams with a cross section of 50x50 cm, 100 cm each. Their ends should be connected using the half-tree method and secured with self-tapping screws.
The shape of this tank holds a lot of water, which quickly heats up in the sun
The wooden frame must be attached to the stand with self-tapping screws.
Now you can move on to installing the shower pipes. For this, it is better to use plastic ones with a diameter of 25 mm. Carefully drill a similar hole in the barrel, into which, using lock nuts and rubber seals, install the fitting. Connect a pipe to it, in which, after 50–60 cm, connect a ball valve. It is necessary to shut off the water in the event of any repair or construction work. Then drill a hole in the ceiling and insert a pipe into it. Using tees and fittings, place it in the shower. Install a watering can with a tap in the pipe under the ceiling.
Now you need to install the toilet seat. To make a straight hole, you need to place a bucket in the middle of the pedestal and trace it with a pencil. Using a jigsaw, cut a hole in the marked area.
The bucket will hide the edges of the hole
Insert a bucket into it and secure it with self-tapping screws. If you use the toilet in winter, you must purchase a foam seat. It will be warm in any weather, which is important for health.
The appearance of the finished building will fit well into the territory of the summer cottage
Features of the arrangement
The toilet must be protected from the penetration of steam and moisture. Waterproofing a bathroom in a bathhouse is an important condition for its arrangement. During construction, the walls of this room must be covered with a layer of moisture-proof material, which, as a rule, is roofing felt or thick polyethylene film. In addition, it is necessary to provide a vapor barrier, for which a layer of polymer film with foil is laid. In attached toilets, there is also a need for thermal insulation. It is made of mineral wool, polystyrene foam and other materials. A corner bathhouse with a bathroom also requires increased attention, where the likelihood of exposure to moisture from the outside should also be taken into account.
The bath floor must be waterproofed
The most important requirement is the organization of reliable exhaust ventilation. In addition to ventilating storage tanks, it is necessary to remove contaminated air from the bathroom itself. The ventilation riser is installed with access to the bathhouse roof at a height of at least 60 cm above it. The riser should not be located in close proximity to the chimney.
In the bathroom for a bath, it is necessary to provide ventilation so that the smell quickly goes away and fungus and mold do not form
The interior decoration of a bathroom in a bathhouse is no different from the arrangement of toilets in an apartment. Ceramic tiles are recognized as the most common facing material. If there is a bathhouse made of timber with a bathroom, then the interior decoration is most often carried out with clapboard, not forgetting about the formation of ventilation gaps.
To preserve the feeling of a natural hut, you can decorate the bathroom in the bathhouse with clapboard
Bathroom with ceramic tiles is easy to clean
Types of saunas
There are many variations of saunas. They differ in design, dimensions, temperature conditions, type of heating, and layout.
The steam room can be located in the house or in a separate building. Because of this, it is important to decide in advance which type of sauna is most suitable for you.
The most commonly used options for paired structures:
- Dry air sauna. The most common type. Differs in smaller sizes. It is built from linden or aspen wood. Cedar, pine, etc. are used as finishing materials. The main premises are a steam room, a dressing room, and a swimming pool. Can be equipped with a shower.
- Infrared sauna. Suitable for a private home. Fits perfectly into the apartment. Does not require forced ventilation. Easy to install and maintain. Heating is provided by infrared equipment.
Design Features
A bathhouse with a bathroom requires a special approach to design, because... Already at this stage, issues of not only the placement of the toilet on the plan, but also the supply of water supply, organization of sewerage and ventilation should be worked out. There are many standard bathhouse designs that you can safely use on your site. You can choose options for large buildings: a two-story bathhouse with a bathroom or a design for a bathhouse with a bathroom and an attic. In such structures, a certain problem arises with ventilation. Thus, a bathhouse with an attic and a bathroom requires the passage of a ventilation riser through the living space, which requires its reliable insulation and placement along the edge of the attic.
bestway children's pool with roof
Figure 2. Project of a 6x6 m bathhouse with a bathroom
Typical popular projects include the following:
In large buildings, finding a place for a toilet is not difficult. In such projects, it is important to place it optimally relative to other rooms. Naturally, the greatest need for a bathroom arises after a bath procedure during a period of relaxation in the relaxation room, which must be taken into account. However, the use of the establishment should not interfere with other vacationers.
It is somewhat more difficult to allocate space in small buildings, but standard options are provided for them as well. Thus, 4x5 bathhouse projects with a bathroom and even a 2x6 bathhouse project with a small bathroom are available for implementation. In small bathhouses, mobile options are more often installed, especially when the desire to increase comfort arose after several years of their operation.
A bathhouse with a bathroom is not only a tribute to fashion and prestige. With frequent and year-round bathing procedures, organizing such convenience becomes a necessity. The desire for such a little comfort arises especially acutely when there is a rest room, and also when there are small children in the family. It is best to plan a toilet inside a bathhouse at the design stage, but the problem can be solved in an existing establishment.
Source
Is the complexity of the project justified?
Of course, a bathhouse with a toilet and a shower will be more complicated than just a steam room and dressing room, but it will be much more comfortable to use. Imagine that you wanted to take a steam bath not in summer, but in winter, and the bathhouse was located 30 meters from the house. It is unlikely that anyone will enjoy covering this distance in the cold.
It is also necessary to take into account the operating mode of the bath. If it will be used only in the warm season, and even then irregularly, then it makes sense to abandon the equipment of its restroom.
If, after all, a fateful decision is made, then you need to choose the appropriate type of toilet:
- separate toilet in the bathhouse . The most comfortable option is provided at the design stage. Among the disadvantages, we can highlight the complication of the water supply system (it is necessary to organize the supply of water to the cistern), as well as the sewage system;
The photo shows outlets for the restroom, steam room and shower
- composting toilet - cheap and cheerful. An excellent option for those cases when during construction this detail was forgotten, but the problem needs to be solved somehow;
Compact dry toilet
- an extension to a bathhouse is already a typical work on correcting mistakes; during the design we forgot about the toilet, now we are fixing it. Entrance is provided from the street;
- construction a short distance from the bathhouse.
Toilet – extension to the bathhouse
There is not and cannot be a universal option; you will have to choose based on your needs (price, of course, also matters). We can only say that it still makes sense to equip a bathhouse that is more or less regularly used with a restroom.
Bathhouse projects with toilet and shower
Many owners of country cottages sooner or later wonder about building a bathhouse with an attic on their site. The design of this building at the dacha is best carried out taking into account the fact that there is not only a shower in the bathhouse, but also a warm toilet.
Layout of a bathhouse made of timber with a sink and toilet
The presence of a toilet in the 6x6 m bathhouse project is justified for a number of reasons:
Arranging a toilet in a bathhouse
The design of a bathhouse with an attic and a toilet is a question that requires reflection and a final decision at the initial stage, while the planning of the future building is being carried out and the general construction scheme is being prepared.
This is due to the fact that the toilet plan will need to be applied to the general drawing of the building, and also taken into account when calculating the required amount of building materials.
Before considering the project of a 6x6 m bathhouse with an attic and a toilet, first of all, you need to remember the main nuances:
Detailed drawing with dimensions of a wooden bathhouse 7x7 meters with toilet and shower
Polycarbonate bath
A temporary option for a summer residence is made of polycarbonate, covering any frame of the desired size and shape. Such a bathhouse can do without a stove in the summer. To increase the temperature, just place a container with hot stones inside. Heat stones or bricks over a fire and place them in a bucket or other container. It turns out to be an improvised heater. I splashed water on the pebbles, and here you have warm steam. But again, it’s difficult to call it a bathhouse. Polycarbonate warps at high temperatures. And the close proximity of the stove and pipe can actually melt it.
Basic equipment of a bathhouse with toilet
As an example, we can cite the basic design of a 6x6 m bathhouse with a toilet, but each owner of a summer cottage has the right to make his own adjustments to its plan, based on individual preferences and the available budget.
The proposed building layout, meeting all minimum requirements, is as follows:
3D design and layout of a bathhouse with toilet and rest room
The process of lining a bathhouse with clapboard
Project and drawing of a wooden window for a bath
Shower stall and heating boiler in a wooden bathhouse
Step-by-step description of the workflow
Let's look at the step-by-step process of building a wooden shower with toilet on a personal plot:
- First, the site for construction is prepared. It is cleared of debris, roots, and carefully leveled.
- Next, a pit is dug for the drainage hole.
- Afterwards the foundation is laid.
- The next stage is the construction of the frame, which is sheathed with boards, OSB boards or other material.
- Next, windows and doors are installed, communications are provided.
- The final stage of construction is the arrangement of the roof, and after that you can proceed to the interior finishing work.
The nuances of building a bathhouse with a toilet
If it was decided to build a bathhouse with a separate room for the toilet, then it is necessary to take into account the following several nuances, which are preferable to be implemented during construction:
Layout and project of a large timber bathhouse with toilet
Simple bathroom layout with toilet and shower
Selection of materials and tools
To build a toilet and shower under one roof you will need:
- Beam for strapping, vertical supports of planned height and rafters.
- Boards of different cross-sections and lengths.
- Plywood sheets for formwork.
- Plastic pipes and drain.
- Concrete mixture, sand, gravel, metal tiles or slate.
The next task is the selection of tools. They are represented by an impressive list, these are:
- Shovels.
- Concrete mixer.
- Hacksaw.
- Axe.
- Plane.
- Buckets or wheelbarrow for bulk materials.
- Hammer, Phillips screwdriver, wire cutters, pliers, level, tape measure, screws, nails and pencil.
Making an original shower in a bathhouse with your own hands
Speaking about the construction and design of a bathhouse, one cannot fail to mention the presence of a shower in it, since this plumbing object is primarily responsible for the comfort and ease of use of the room for its intended purpose. You can install a shower in a bathhouse with your own hands without the involvement of qualified builders or plumbers.
Option for arranging a shower in a bathhouse
However, in addition to the standard options that we are all accustomed to in city apartments, there is a more original way of constructing this element of plumbing, and, of course, it is worthy of mention.
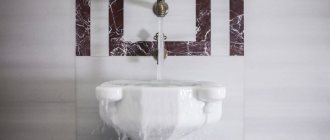
We are talking about a shower with a bucket, which is not only ideal for baths, responsible for comfort during relaxation, but at the same time is also an excellent creative element of bath design, taking us back to antiquity.
Moreover, the presence of a water bucket can allow you to use useful and pleasant contrasting water procedures without any difficulties. The mechanism of such a shower is quite simple - the holder system is arranged in such a way that the bucket can easily turn and tilt.
Diagram of the water supply system in the bathhouse
Such a system is controlled using a special rope, which controls the inclination and, as a result, the flow of water being poured out. Such buckets have long been used in Russian bathhouse projects, so nowadays interest in them is gradually being revived.
when to replace the front door in a new building
Traditionally, they are made from natural wood, mainly oak, linden or birch, and the presence of an original bracket designed to supply a flow of water will add a touch of originality to the design. When arranging a shower in a bathhouse in the form of a water bucket, you must remember the basic rule - this object should never dry out, the wood should always be saturated with moisture.
Source
What's in demand?
In addition to the Russian bath, all steam lovers are familiar with the phrase “Finnish sauna”. Its difference lies in the drier air of the steam room. This effect is achieved by not placing a colander with water on the stove stones, which evaporates during the heating process and produces a lot of steam.
The popularity of the Finnish sauna in its homeland is breaking all records. Every self-respecting Finn is required to have a personal sauna in his apartment. And now this tradition has reached us. For this reason, ready-made Finnish cabins and stoves are most popular among sellers.
To the great delight of customers, specialized stores are ready to offer a wide range of booths ready for installation with a full set of equipment. All that remains is to choose the appropriate design.
Most often, a sauna is installed in the bathroom, since a single cabin can be placed in this room without any problems. In terms of area, it will take up no more space than a shower stall.
Types of baths with toilet and rest room
Projects of this type are divided into three groups. The first contains classic one-story baths. For them, capital building materials with low thermal conductivity are used. Such bathhouses provide a standard set of premises: there is a steam room, a shower, a dressing room, a toilet, and a relaxation area. The latter is also used as a changing room. These are small baths that do not require significant usable space. They do not require significant financial costs due to the energy intensity of heating.
Such projects are the most convenient, because due to the layout it becomes possible to maintain optimal temperature conditions in all rooms: the stove evenly heats all adjacent rooms.
The second group is projects with a recreation room located in the attic. This option is preferable if the building area is small. But the foundation will have to be strengthened. Typically, according to the project, the first floor is allocated for a dressing room, a locker room, a steam room, a toilet, and a shower. On the second floor they will equip a room for guests, with or without a balcony. But in this case it will be necessary to allocate space for the stairs to the attic.
In the third type of bathhouse projects with a rest room, toilet and shower, it is planned to create an area for guests on the terrace or veranda. This type of layout is more suitable for use in the summer. But if the extension is insulated, rest in it is possible even during winter frosts. An additional advantage will be panoramic glazing.
About the required premises
But even the smallest bathhouse cannot consist of one steam room - it’s simply inconvenient. Therefore, in small projects, the main room is divided by partitions into several rooms, which are assigned one or another role. It is not necessary to make load-bearing partitions and lay a foundation under them - it is enough to divide the area with light wooden partitions, as shown in the project below. The layout of the bathhouse itself is quite spacious - 4 x 6 meters.
Dividing the bath into rooms
Dividing the main building into several rooms will allow (and this is the main thing) to quickly, efficiently and efficiently warm up the steam room, without overheating the remaining rooms, especially the relaxation room. In addition, the plan of the bathhouse needs to be carefully thought out regarding free access to all rooms.
What to consider when choosing a bathhouse design with a bathroom, shower and rest room
The selection of the project depends on the seasonality of use of the bath complex. After all, if the terrace or veranda is not insulated, it is simply impossible to relax there in winter. Also, for winter baths it is mandatory to have a vestibule with cut-off of cold air. At a summer cottage, it is enough to build a small bathhouse with a relaxation area covered with a canopy made of flexible film or polycarbonate material.
Planning a recreation room
Projects of miniature buildings 3x3 sq. m suggest a recreation room measuring 1.5x3 square meters. m. in such a room a company of 4 people can easily accommodate. If the dimensions of the room are larger, it is possible to place not only a table with benches, but also:
If in a small bathhouse you combine a shower with a steam room, then as a result of the absence of one door, useful space is saved, thanks to which two more people can join in the relaxation.
Projects of bath complexes with one room for relaxation require proper zoning. You can select areas for drinking tea, watching TV, playing billiards using partitions, pieces of furniture, and finishing materials. To create additional comfort, you can make a fireplace in the corner and place a couple of chairs in front of it. When selecting a bathhouse design, check where the windows of the rest room will go. After all, it’s much more pleasant to admire beautiful views than a fence or a neighbor’s shed.
If there is not much space on the site, look for a bathhouse project with an attic where the recreation area will be located. To heat this room during winter frosts, you will need to install an air water circuit. If you install a long-burning stove with a convector on the first floor of the bathhouse, this can be a solution to the problem.
Ventilation device
The stove in the home sauna design is initially equipped with its own fan, which mixes the internal atmosphere and equalizes the temperature.
To ensure additional ventilation, you need to maintain the dimensions of the sauna cabin. Its height should not be less than 2.2 meters. If the ceilings of the apartment are higher, then an additional mezzanine can be created to level out the free space.
To ensure the natural movement of air flows, it is necessary to nail the inside of the boards with gaps of two centimeters at the top and bottom of the structure.
Turnkey construction
As mentioned above, it is best to choose an offer from companies that offer turnkey construction. Then there is more guarantee that the work will be performed by real craftsmen who provide their client with a guarantee of quality and reliability.
Moreover, such performers will be able to make a design of any complexity. For example, projects of modern baths with a summer kitchen are now very popular. This structure is perfect for both a country house and a room located within the city. A summer kitchen is the dream of any housewife who is interested in preparing food for the winter or simply loves to cook deliciously in nature. And if you also take into account the fact that such a kitchen is combined with a bathhouse, then this room will be popular with all family members and guests.
Typically, turnkey construction consists of the following stages:
- Project preparation.
- Pouring the foundation.
- Construction of external walls.
- Installation of partitions between walls.
- Roof decking.
- Pouring floors.
- Ceiling padding.
- Interior work - wall cladding, arrangement of the steam room and all other rooms;
- Installation of windows and doors;
- Installation of the necessary plumbing and furniture;
- External insulation works (if provided for by the project).
Even at the stage of project preparation, the contractor negotiates with the customer what material the building will be built from and what to use for interior work. Of course, at this moment there is a discussion about what kind of plumbing fixtures and furniture the client wants to see in his room.
Features of shower cabins with a steam generator
The shower cabin with the “Turkish bath” function is equipped with a steam generator - a capacity with a capacity of 2-3.5 kW. Due to the electric heating element, the water in it is heated, releasing steam through the holes. Thanks to the fan, the steam is distributed throughout the cabin, creating a temperature from +45 to +60 degrees. It is impossible and not necessary to achieve a higher temperature in a home steam room, due to the presence of metal components. By adding aromatic oils to water, you can achieve an effect similar to that in spa salons. Shower boxes with a steam room effect provide a comfortable seat, because it takes 15-20 minutes to warm up. Along with the “Turkish bath” function, modern shower boxes have a lot of high-tech useful and secondary options:
- cascade and rain shower;
- hydromassage of feet, legs, back;
- backlight;
- music;
- Charcot's soul;
- aromatherapy, ozonation, etc.
Choosing the type of foundation
A bathhouse with a shower in the country is a lightweight object and allows the construction of one of the following types of foundation:
- strip shallow foundation;
- pile-screw;
- columnar.
You can do without a foundation at all; this option is suitable for building or purchasing a mobile bathhouse with a shower for your country house.
The construction of a mobile bathhouse differs from the traditional version in the absence of a foundation. This design is installed on a car trailer and can be easily moved if necessary. Inside the mobile bathhouse it is easy to organize a shower, steam room and a small relaxation room.
Installation principles
To independently install a shower in the washing room of a bathhouse, you do not need to have practical skills. It is enough to familiarize yourself with the theory, correctly connect the tubes for supplying and discharging water.
Preparation and design
You need to prepare the room: install a water drain and a liquid supply point. Select a method for heating the liquid. Install a boiler or flow circuit.
Tools and materials
To install a shower stall in a bathhouse, you must prepare:
- set of wrenches;
- plastic tubes of different diameters;
- hoses, clamps;
- anchor, hammer drill.
After preparing the tools, you need to choose a shower stall.
Choosing a shower stall
The choice of shower stall depends on the size of the room:
- if there is enough space inside the washing room, it is better to choose a shower with hinged doors;
- For small washrooms, the best option is a special small-volume tray or a design with folding doors.
If a bath attendant wants to spend time in the shower in comfort, it is better to choose a closed model. If you just need to wash quickly, open it.
Installation
The shower stall must be installed on a level base. To prevent it from shaking and to stand steadily, it is necessary to nail the legs under the base to the concrete floor with anchors. Hoses, tubes, drains should be arranged as indicated in the instructions. It comes complete with a shower stall.