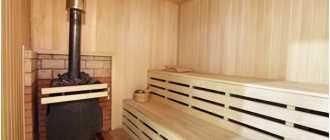
A brick stove is the main functional element of any Russian steam room, which is traditionally made of heat-resistant red brick. The construction market offers a wide range of ready-made stove designs, but bathhouse owners decide to build a Russian stove with their own hands.
A classic brick stove for a bathhouse with a heater, built with one’s own hands, makes it possible to safely heat the room, maintain optimal temperature conditions, produce clean and thick steam, and is a decorative interior element.
Selecting material for constructing a furnace
Currently, there are many available schemes for constructing a furnace, but a novice master is recommended to choose the simplest drawing.
What kind of brick should a stove be built from? Choosing the right building material is not easy. If you have limited financial resources, you can choose red brick of dubious quality.
However, the dimensions of such material rarely correspond to accepted standards; for this reason, quite wide seams can be obtained - up to 11 mm, which is absolutely unacceptable when constructing a stove.
Often, a sauna stove is built from fireclay brick, which consists of 75% heat-resistant clay. This material is resistant to overheating and high humidity, cracking and deformation. In terms of technical and operational characteristics, fireclay bricks are superior to all existing analogues, but the price is much higher.
The firebox is built from fireclay bricks, and it is better to build a chimney from fire-resistant red bricks.
For construction work you will need clay, which you can get yourself or purchase at a specialized point along with bricks.
To build a brick stove, you need to prepare the following materials:
- fireclay;
- heat-resistant brick;
- coarse clay and sand;
- a grate, a door for the ash pit and combustion chamber, cleaning wells, a cast-iron stove and a grate;
- asbestos cord;
- heating tank;
- zinc wire;
- corner;
- roofing felt
These materials are enough to build a simple brick oven with your own hands.
Kinds
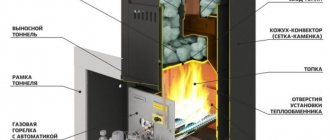
When Kuznetsov's bell-type stoves for baths operate, a two-tier bell system is used. The operating principle of the Kuznetsov bell furnace is to maintain high temperatures in the lower bell (from 900ºС to 1200ºС) so that the combustion reaction is completed with further separation of the movement of cold and hot gases.
Kuznetsov’s brick stove for a bathhouse is capable of heating three bathhouses at once (steam room, washing room and rest room), while ensuring optimal temperature and humidity conditions of the air.
Kuznetsov’s brick stoves for baths have seventeen standard varieties, differing in size, location of the combustion chamber and water heating tank, the presence or absence of a fireplace, etc. You can find an overview of the types and characteristics of Kirasir sauna stoves here.
Advantages of using a Kuznetsov stove for a bath:
- high heating performance; economical fuel consumption, despite the fact that there are no fundamental requirements for fuel quality; heating water up to 150 liters (the stove is capable of maintaining water in a warm state for one to two days); formation of a minimum amount of soot during fuel combustion, due to which, a stove built according to the Kuznetsov system will need to be cleaned much less frequently than other sauna stoves; attractive appearance; long service life.
Preparing construction tools
To build a brick sauna stove with your own hands, it is recommended to prepare working tools:
- grinder with a circle;
- electric drill with a special attachment;
- wide plastic container for solution;
- Master OK;
- level;
- tape measure and pencil;
- metal strips.
This is a basic list of tools, but if desired, it can be expanded with additional equipment.
At the stage of choosing a place where a small brick oven will be located, as well as preparing a construction project, it is important to take into account the basic requirements for the future design:
- Firebox safety doors should face the door.
- The base for the stove device must be at least 75 × 75 cm in size and up to 22 cm in height.
- The shelves should be located along the wall near which the stove is installed.
- Heating stoves made of bricks are built in compliance with the technological gaps between the walls of the structures and the walls of the steam room.
Advantages and disadvantages
The advantages of a brick sauna stove include:
- the ability to accumulate and release heat for a long time;
- uniform and stable heating of the room;
- attractive and neat appearance
- comfort and ease of use.
The disadvantages of a brick kiln are:
- stationary installation option, inability to move the oven even a few centimeters;
- large weight and size, the need to create your own base (foundation);
- heating the room takes longer than when using metal stoves;
- If used incorrectly, there is a risk of carbon monoxide poisoning.
Expert opinion
Lovkachev Boris Petrovich
Bath master who knows everything about steaming
The advantages and disadvantages of brick kilns have been known for a long time. Users prefer brick baths for uniform and stable heating, safety and ease of use.
If you accidentally touch it, it is more difficult to get a severe burn on a brick oven than when you touch it on the hot body of a metal structure. In addition, the cooling of a brick structure takes much longer - the bathhouse maintains operating mode for several hours.
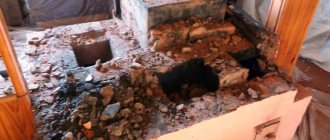
Arrangement of the foundation
Laying brick stoves begins with laying out the foundation, which is the basis for any heating structure, ensuring its strength, reliability and durability.
According to the finished bathhouse design, markings are made at the construction site and a foundation pit up to 65 cm deep is dug. Its width should exceed the dimensions of the stove by 10 cm.
A layer of sand 18 cm thick is laid on the bottom of the pit and moistened with water, then covered with crushed stone, stones and broken bricks. All layers are thoroughly wetted and compacted. The pillow is kept for some time to shrink.
After complete shrinkage of the sand layer, removable formwork is installed, reinforced with an armored belt made of thin reinforcement.
Important! A technological gap of 12 cm must be left between the walls of the formwork and the earthen edges of the pit.
The formwork is filled with concrete mixture to the boundary level, which is 17 cm below the soil surface. The mixture is prepared in proportions - 1: 3 (three parts sand to one part cement) with the addition of the required amount of water.
After the concrete has completely hardened, the formwork is removed, and the existing voids are filled with fine gravel.
Folded roofing felt is used as a waterproofing layer for the foundation. The material is laid on a concrete base layer strictly according to the size of the site.
Photo
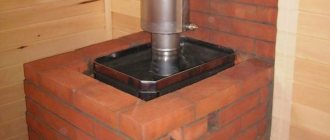
The most popular models combine the functions of a sauna stove, equipped with a heater and water tank, and the function of a fireplace. In this case, you can light the fireplace and stove at the same time.
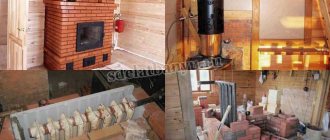
The facade of the Kuznetsov stove for the bath is shown in the photo
In addition to the main function of heating the bath room, the stove is equipped with additional structural elements that help organize the most comfortable temperature and humidity conditions in the steam room.
The photo shows a view of a brick stove from the side of the steam room (on the left is a stove with a built-in heater, on the right is a stove with a built-in steam generator)
Kuznetsov’s bell-type stove for a bathhouse, thanks to its unique device for movement and removal of gases, warms up the room most efficiently and quickly, and also retains heat for a long time.
The picture shows a version of a brick kiln designed by Kuznetsov
Mixing connecting masonry mortar
To ensure a reliable and durable brick stove for a bath, it is important to properly mix the masonry mortar. The accuracy of the proportions depends on the quality of the clay - its fat content.
To mix the solution, clay and sand are used in a ratio of 1: 2 (for one clay part, 2 sand parts). The clay is pre-soaked in a small amount of water.
To do this, the material is placed in a container, filled with water and mixed thoroughly. To simplify the kneading process, you can use a drill with an attachment. The clay is kneaded until it becomes sufficiently plastic.
Only after this is slightly damp sand introduced into it in parts and stirred. A well-prepared stove solution should be viscous.
One batch of mortar should not be too much or too little; it should be prepared just enough to be enough to complete 2-3 full brick rows.
Kamenka - a feature of the stove for a Russian bath
The main attribute of a bathhouse is often classified according to the heating method:
- The first to appear were stoves that were heated black . They did not have a chimney, and while the logs were burning, the smoke accumulated in the room and stained the walls with soot. Afterwards, the smoke was released through the window, and in order to take a steam bath, you had to wait until the firewood burned completely. Heat and steam were obtained from heated stones lying in the hearth, a prototype of the heater.
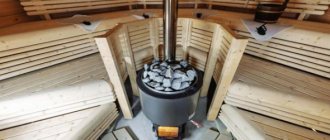
- Stoves that burn gray or white have a chimney and a heater in their design. A gray sauna (with an open heater) warms up faster, but soot also accumulates on the stones, and this means that you have to wait until the wood burns out completely.
- In the white sauna, the stove is equipped with a closed heater. It does not pollute the walls of the steam room, does not burn oxygen and carefully preserves heat for a long time. If the steam coming out of an open heater is hard and scalding, here it remains comfortable and soft, even if the thermometer shows 100°C.
Black sauna, with an open heater Source pechnoy.guru
It is convenient to divide sauna stoves according to the heating method:
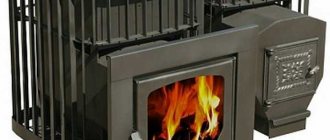
- Periodic action . Here the stones are on the grate above the flame and have maximum contact with it. Water can only be poured onto the stones after the wood has burned out (otherwise you risk dousing the fire). The stove has to be lit periodically.
- Constant (continuous) action . The stones are in a closed heater (an insulated metal container), which is heated by fire. Heat transfer suffers a little, but you can pour water and heat all the time (constantly), and the soot remains inside and does not pollute the steam room. The stove is lit when there are people in the room; its design prevents combustion products from entering the steam room.
The design of the stove is responsible for generating that famous “light steam”, optimal temperature (70°C) and humidity (60%). Stoves with a closed (internal) heater cope best with this task.
Step-by-step execution of brickwork of the furnace
The procedure for erecting brick walls for a bathhouse is determined by the construction scheme - the order. The proposed step-by-step instructions consider alternate brick laying.
Bricklaying from 1st to 7th row
Beginning craftsmen have a completely logical question: how to build a stove from the foundation (the first 7 rows)?
- The first row is laid out directly on the waterproofing layer of the foundation. The bricks are pre-wetted with water. Corner elements are made at a right angle, which is checked with a corner. The edges require careful measurement, which will prevent the appearance of unwanted gaps in the stove structure. In this case, the thickness of the finished joints between the bricks should not exceed 6 mm. To better stack the bricks, you need to properly mix the mortar.
- The second row of bricks is laid out in a similar way, with each subsequent element being located at the joints of bricks from the bottom row. Bricks for the third row should be laid according to the same pattern. A blower door should be installed here. It is fixed with thin wire and steel strips.
- Before proceeding with laying the next row, it is recommended to check the evenness of the walls being erected vertically and horizontally, as well as the accuracy of the angles. In this row, wells for ash and gratings for air ducts are installed. To do this, small holes of 1 cm are made in the elements with gaps for mounting the grate. Under the installed grille, the rear wall is made slightly rounded.
- In the sixth row, the installed blower door is fixed, and in the seventh row, the installation of the grate and firebox door is completed. To ensure safe heating of the steam room, the stove door must be made of cast iron. At the moment this is the most durable and heat-resistant material.
Bricklaying from the 8th to the 23rd row
- How to fold the stove from the 8th row until installing the chimney? When forming the eighth row, a partition is installed, which serves as the basis for arranging the chimney. Using a similar principle, brickwork is carried out up to the 14th row inclusive, on which metal channels will be installed. In this case, it is necessary to create a small opening in the front wall of the furnace for the vertical installation of the water tank so that it is in full contact with the channels.
- To lay out the fifteenth row, ½ bricks are used, which are placed at a slight angle among themselves. This will serve as the basis for the dividing partition. Up to the 18th row, the laying of bricks is carried out by analogy with the first rows of the structure.
- When laying the nineteenth row, a door is installed to allow steam to escape. Next, metal strips are installed, with further laying of the remaining rows. This is necessary for securely fixing the door frame for steam exhaust and installing a hot water tank, which is lined with bricks.
- From the 23rd row, a chimney pipe is installed, which determines the final height of the structure.
Video description
About the stove with a water tank in the following video:
Of course, a stove with a pile of stones on top looks much more impressive and produces excellent steam. In fact, an open heater is more suitable for a Finnish sauna, with its high temperature and dry air (Finns pour little water). High temperatures and high humidity can cause heart problems in an unprepared person. The main benefit of an open heater (as well as a metal stove) is the rapid heating of the room.
Installation of a chimney pipe
How to fold a stove with a chimney after completing the construction of brick walls? The furnace construction manual provides for the preliminary selection of a pipe, which in type and functional features must correspond to the design of the future furnace. For a lightweight design, it is recommended to choose a small pipe made of lightweight and heat-resistant material.
When choosing, you should take into account the appropriate wall thickness of the chimney pipe, which cannot be less than ½ the thickness of the brick. The diameter of the passages for the chimney pipe should be of a similar size.
The length of the upper part of the pipe, located above the roof, should not be less than 55 cm. To equip the smoke exhaust duct, a connecting mortar based on cement or lime is used. The clay-sand mixture is not suitable for such work, since under the influence of precipitation it will quickly wash out and form condensation on the inner walls of the pipe.
The chimney pipe with a minimum number of bends must have a total length of at least 5 meters. The finished design can be equipped with a special gate valve.
Project selection
This stove project is suitable for most types of baths.
The dimensions of the structure will allow you to heat the room (10-15 m2) up to 50 degrees, and when steam is supplied, up to 90 degrees. A tank with a capacity of 180 liters is built into the stove and satisfies all the necessary needs for hot water for a comfortable washing process for all family members. To allow the heater to cool down for a longer period of time after finishing the fire, iron pipes are provided (6 pieces, next to the water tank).
The pipes also support the stones above the firebox. The pipes heat up quickly, and after the heating process is completed, they gradually release heat. There is a hole above the cobblestones through which water will be supplied to generate steam.
Having decided on the project, you need to begin the assembly process itself. Assembling a stove with your own hands is not difficult. Based on the masonry drawings, the process will take a little time.