The operation of buildings and structures without an installed effective eastern system leads to critical destruction of very important architectural elements. First of all, the basements suffer, then the foundation and base of the building begin to collapse. The load-bearing capacity of these structures is significantly reduced, as a result of which cracks appear on the facade walls.
But this is not all the problems caused by increased soil moisture near the house. With a significant increase in the amount of water during freezing, soil swelling far exceeds the calculated maximum values. If the foundation has a large margin of safety and the building is built from lightweight materials, then only minor problems with opening/closing windows and doors may be observed. But if the walls are made of masonry bricks, and the foundation does not have such significant reserves of strength, then cracking of the walls is inevitable. The consequence is the destruction of load-bearing structures and elements, inevitable very complex and expensive repairs.
The destruction of the facade of a house in the absence of a drain is a matter of time
Important. When designing houses, no one takes into account the influence of the above factors in the strength of the foundation due to the lack of a drainage system. Such a huge margin of load-bearing capacity greatly increases the estimated cost of construction. It is always taken into account that there is a blind area around the house, and all water from the roof is discharged far beyond the foundation or into special sewerage networks. Today, for these purposes, companies produce very effective, durable and reliable drainage systems.
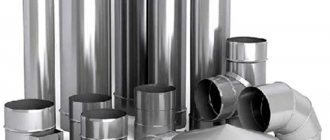
Installation of a plastic drainage system
Selecting a drainage system by material
Task No. 1: correctly select and calculate drains. And the question of choice is decided not so much by the owner’s personal preferences as by other, more objective indicators:
- ➠ Climate in the region (maximum possible precipitation)
- ➠ Configuration, roof dimensions and slope angle
- ➠ Number of floors of the house, its age and endurance of the supporting system.
The choice of material is often dictated by expediency. Thus, gutters made of copper or titanium-zinc are not subject to corrosion and are resistant to aggressive environments, but are expensive.
Copper drain (photo No. 2)
Most often, steel is used to make metal drains:
- galvanized (recently less common - it is susceptible to corrosion and short-lived),
- covered with a protective polymer layer.
Steel gutter. (photo No. 3)
This system is durable, reliable, and suitable for multi-story buildings. But it has a number of nuances:
- Metal should not be used in coastal areas where there is a lot of salt in the air, as well as in areas with developed industry - the active substances will dissolve in water, react with the metal and shorten the service life of gutters.
- You should abandon the metal system if you have an old house, a weak supporting structure, foundation or rafter system.
- Metal gutters have low noise insulation. When it rains they will hum.
A popular alternative is plastic gutters.
Plastic drainage system. (photo No. 4)
They are not subject to corrosion and are resistant to aggressive environmental influences. Light in weight and easy to install - even an inexperienced homeowner can install a plastic drainage system. They are not suitable except for multi-storey buildings.
Pros and cons of plastic structures
The choice in favor of a plastic gutter is explained by the following advantages:
- Ease of installation.
- Light weight, thereby reducing the load on the vertical supports of the building.
- No need to use complex pipe cutting tools.
- Ease of removing debris from drains.
- No oxidation.
- Inability to damage the protective coating, which is a problem when cutting metal pipes.
- Moisture resistance.
- Silence.
- Impact resistance.
- Low price.
- Color uniformity.
The disadvantages, in turn, are:
- instability to extreme low and high temperatures,
- as well as to ultraviolet rays and aggressive atmospheric phenomena,
- to heavy loads;
- rapid loss of tightness of connections (for pipes with large diameters).
Selection of drains by parameters
The throughput of drains is determined by the diameter of the pipes and gutters. These parameters are usually indicated in the labeling. For example, there may be markings 100/75, 125/90, 150/110.
Different manufacturers have different parameters for drainage systems.
To connect them you cannot do without adapters. But in this case, the risk of leaks increases. Therefore, it is better that all elements are manufactured by one company. !
Do not try to connect elements of gutters from different manufacturers - they will not fit together.
To accurately calculate the required dimensions of gutters, you need to know the surface area of the roof slope.
Scheme 1. Calculation of the effective roof area.
If the roof is flat (slope angle less than 10 degrees), its entire area will be effective:
E1 = A x C
To select the sizes of pipes and gutters, use the table below.
Selecting the diameter of the gutter and pipe. (diagram No. 2)
The choice of location and quantity of drains is influenced by the length of the roof overhang. If it is less than 10 m, one drain is installed. If more than 10 m - two.
The number of drains depends on the length of the roof overhang. (diagram No. 3)
Where can I buy
You can buy plastic drainage elements anywhere. High-quality products - only in construction hypermarkets or large construction stores, with a certificate, receipt and guarantee. You should not take the cheapest drainage system, but chasing the price is also not an option. Better than a proven average. Inspection of purchased materials is still required - there should be no chips, cracks, burrs, uneven coloring, and when purchasing in hot weather, the material should not be too soft. It will not be possible to check plastic products for fragility - no one will allow you to break the products. The surface should be very smooth.
approximate price
The approximate cost of a white plastic gutter with a running diameter of 125 mm and a length of 3 m is from 406 rubles, a pipe with a diameter of 125 mm and a length of 3 m is from 470 rubles, and a corresponding funnel is from 222 rubles. Colored products are 10–15% more expensive.
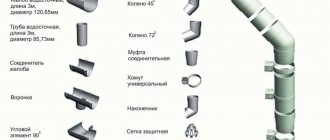
What does the drainage system consist of?
Before moving on to the installation description, let's take a closer look at the drainage system.
Elements of the drainage system. (diagram No. 4)
The drainage system is:
- gutter - to collect rainwater and melting snow from the roof;
- pipe - to drain water from the gutters into the sewer;
- funnels - so that water from the gutters flows into the pipes;
- plugs - to close the blind ends of the gutters;
- bends - to lay pipes along the protrusions of the building;
- brackets - to secure gutters;
- clamps - to secure pipes.
Corner elements, couplings, protective nets, etc. may also be useful. The kit may differ from one manufacturer to another.
For example, the adjustable gutter angle in gutters from Alta-Profile is an element with which you can connect gutters at different angles (from 125 to 145 degrees). It is in demand in houses with a complex roof configuration and allows owners to avoid difficulties with selecting or manufacturing different corner elements.
Types of element
Drainage systems can have different shapes:
- Round.
- Rectangular.
- Square.
- Trapezoid shape.
The first option is considered classic and occurs more often than others. There are no stiffening ribs on such gutters, so their installation is carried out using special clamps, which provide more reliable fastening of the elements to each other.
Rectangular patterns are very similar to sidewalk drains. They are equipped with several stiffening ribs and are quite large in volume, which makes it possible to equip a system capable of discharging large amounts of wastewater. Rectangular and square pipes are used mainly for closed drainage systems. Such structures are installed in the roof and equipped with drainage funnels.
How to fix gutters?
The material and design features of a particular system from a particular manufacturer determine its installation technology. For example, plastic gutters can be installed using adhesive or glueless methods (using sealing rubber bands).
Let's look at how to attach gutters to the roof using a glueless method.
To work you will need:
- building level,
- screws,
- screwdriver,
- drill,
- cord or rope,
- universal bimetallic crown for cutting holes,
- hacksaw for metal.
There are two ways to install the Alta-Profile drainage system:
- ➠ Horizontal: the system is first assembled at the bottom, and then transferred to the façade and inserted into pre-fixed brackets. This is convenient to do on small houses.
- ➠ Vertical method - from top to bottom. The drainage system is assembled step by step on the building. This method is used more often. Let's look at it in more detail.
Our works
Installation of a drainage system in the Voskresenskoye CP
Installation of drainage on Volgogradsky Prospekt
Installation of snow retention in the Provence CP
Installation of drainage on a utility building
Installation instructions for the drainage system
Step by step we will look at how to install gutters.
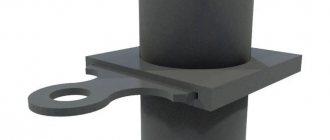
Stage 1. Attaching the brackets
Gutter brackets. (photo No. 5)
We can use metal and plastic brackets. The choice is determined by what the gutter is attached to.
Metal brackets
- if the gutters are attached to the rafters.
How to install them? First, we install the outer elements 15 cm from the end. A gap of at least 2 cm must be provided between the front board and the bracket.
We stretch the cord between the installed brackets. Along it, at a distance of 60 cm from each other, we fix all the other brackets. Important: there should be a slight slope towards the drain. It is optimal if it is 3-4 mm per 1 linear meter.
!
Optimal gutter slope: 3-4 mm per 1 linear meter. This ensures free movement of water towards the drain.
Plastic brackets
can be used if the gutter is attached to the front board. But first we check that it is installed vertically, evenly, without bending. In the same way, you need to double-check the brackets that will be attached to it. The quality of the entire system depends on this.
Like metal ones, we first fix the plastic brackets approximately 15 cm from the end of the gutter. We stretch the twine, along which, using self-tapping screws, we mount all other brackets in increments of 60 cm. It is also important to provide a slope for the natural movement of water towards the pipe.
Stage 2. Installation of gutters
Installation of a gutter. (photo No. 6)
We insert the gutter into the brackets one by one. In this case, you need to press until it clicks.
Stage 3. Attaching the funnel
Funnel fastening. (photo No. 7)
The hole for the funnel must be cut in a solid gutter (installation of a funnel in a fragment of the gutter is not allowed).
The funnel is installed in the right place. We mark its dimensions with a pencil. Then we cut the corresponding hole in the gutter. For this it is convenient to use a bimetallic crown. You need to work at low speeds.
Remove burrs from the edge. We hook the edge to the rear edge of the gutter and place it behind the front edge. A characteristic click will be heard.
The place where the funnel is installed must be strengthened on both sides with brackets.
Stage 4. Installation of metal mesh
The mesh is installed in the hole of the funnel. This is an optional, optional step.
Stage 5. Installation of gutter couplings
When the temperature changes, the plastic elements expand and contract. Therefore, they should not be connected too tightly. On the reverse side of the Alta-Profile coupling there is a special restriction for this purpose with the inscription “Stop”.
We hook the edge of the coupling to the rear edge of the gutter. Then we bring the front edge behind the edge in front. A characteristic click will be heard.
To give the system strength, we install additional brackets on both sides of the coupling.
Stage 6. Installation of the gutter corner
We install the brackets as close to the corners as possible. We insert the edge of one gutter into the corner element, then the second until it clicks.
!
If the angle is greater than 90 degrees, the following solution can be applied. We make a hole in one of the gutters. We insert the second gutter at the desired angle, and close the end with a plug.
An alternative option is to use an adjustable chute angle. The method of application is similar to how we used the universal 90 degree angle. First we insert the gutter, then we adjust the required angle and insert the second gutter until it clicks, but no further than the limiting mark with the inscription “Stop”.
Stage 7. Attaching the plug
Attaching the plug. (photo No. 8)
Inside the plug there are special antennae that firmly fix it to the gutter. With their help we secure the plug.
Stage 8. Installation of the pipe elbow
Pipe elbow. (photo No. 9)
We install the pipe elbows in the direction of the drain, so that the slope angle differs from the vertical position.
Stage 9. Pipe installation
Pipe installation. (photo No. 10)
We insert the upper edge of the pipe into the socket of the elbow. We fix the pipe to the wall using clamps, which we place 180 cm (or less) from each other.
To ensure that the pipes are positioned vertically, you need to make sure that the brackets that hold the gutters are also installed vertically, without deviation.
Only in the lower part can the pipe deviate slightly from the vertical, but in the direction opposite to the wall of the house.
Stage 10. Installation of clamps
We install the upper clamp under the drainpipe elbow.
To do this, we bend part of the clamp and thus open it. Insert the pipe until it clicks and fix it. We snap the clamp and secure it with a self-tapping screw.
Stage 11. Installation of the pipe coupling
To connect two pipes along the length, we use a coupling.
Stage 12. Installation of drain
We install the drain at the bottom of the pipe. We fix it with self-tapping screws.
The work is completed. Now you know how to install a plastic drain. The metal drainage system is installed in a similar way, but with some nuances.
Installation of a metal drainage system
We will not go through the entire algorithm step by step. It is the same as for plastic systems. Let's look at just a few features.
To cut a funnel in the gutter, use metal scissors. Sawing with a grinder can damage the protective layer - as a result, rust will appear and the service life of the gutters will be reduced.
For metal drainage systems we use only metal brackets. The slope of the gutters should be the same as for the plastic system - 4 mm per 1 linear meter. The distance between the brackets and the end edges of the gutters should also be about 15 cm. The installation step of the brackets is 60 cm. At all joints, the system must be reinforced with additional brackets.
Useful tips
Little tricks will allow you to organize the drainage of rainwater and melted snow more efficiently.
- The location of the vertical riser in buildings with a wall length of more than 15 m is more appropriate in the center. This will allow you to slope from the corner of the house to the middle.
- Special paint with protective properties in cylinders will extend the life of the metal in places where the protective coating is damaged and chipped.
- The use of mesh installed around the perimeter of the trays or in the funnel will prevent clogging of the drain.
- It is necessary to organize the drainage of water from the house using a stormwater system or a water collection tank.
- For areas with aggressive climatic conditions, it is important to use anti-icing devices.
Such subtleties will prevent the need to replace the drain earlier than the deadlines stated by the manufacturers.
Rules for installing a drainage system
Plastic drainage system. (photo No. 11)
In order for the drainage system to serve for a long time and efficiently, you must strictly follow the installation rules. Let's focus on a few of them.
1. Select the correct slope of the gutter.
➠ How should it be? 3-5 mm per 1 m of gutter.
If the slope is less or the brackets are not installed level, the system will become clogged and its efficiency will be significantly reduced.
If it is larger, the gutters will be too far away from the edge of the roof and water will not get into them.
2. Select the correct step for installing the brackets.
➠ How should it be? Installation of a plastic drainage system requires that the installation step of the brackets does not exceed 50 cm. For metal drains - 60 cm.
If the distance is greater, the system may become deformed or break due to significant precipitation.
3. Select the correct position of the gutters of the drainage system.
➠ How should it be? Mentally draw a line that continues the roof slope - it should be 2-2.5 cm above the edge of the gutter.
Otherwise, snow sliding from the roof can damage the gutters. Or during heavy rainfall the water will overflow over it.
!
We check the position of the gutters relative to the roof: so that water gets into the gutter, but snow coming off the roofs does not.
4. Carefully check the coupling connection.
➠ How should it be? During installation, efforts must be made to make the system airtight.
If you do not pay attention to this, leaks may occur.