The temperature background and high level of moisture in the bathhouse are favorable conditions for the settlement of all kinds of harmful microorganisms. These include bacteria, viruses, molds that destroy wood and the pulmonary system of bath lovers. Properly done ventilation in the bathhouse will eliminate the listed negativity. How to make it?
We will tell you everything about the rules for organizing ventilation systems designed for drying wet rooms. Using reliable information will help you develop and implement an impeccable ventilation project. The data presented for consideration is based on building codes and the practical experience of builders.
The article describes in detail the methods of constructing ventilation systems designed to remove water suspended in the air, drying finishes and load-bearing structures. The materials and components required for their arrangement are described. Photo applications and video tutorials will provide effective assistance in mastering a difficult topic.
Is ventilation necessary in a traditional Russian bath?
In the old days, Russian baths were not specially equipped with a ventilation system, and served well for many years. Air exchange in them occurred naturally. This was facilitated by log walls without insulation or cladding, between the crowns of which air leaked. As well as brick wood stoves with a blower, fired directly from the steam room, the chimney of which served as an exhaust hood.
Nobody thought about how to do ventilation in the bathhouse, and there was no need for it, since the bathhouses were small and consisted of a maximum of two rooms - a dressing room and a steam room, in which they steamed and washed. For such small buildings, the burst air exchange that occurs when the door is opened when entering and exiting the steam room was sufficient. And at the end of the procedures, it and the stove door were left ajar until the room was completely dry. Damp warm air was drawn into the chimney.
In the Russian bathhouse there was no special air exchange system Source dveribani.by
The possibility of burst ventilation can be provided in modern baths if you make an opening window on the wall opposite the door to the steam room, and diagonally from it. They are opened briefly before the next batch of steamers enter, only to freshen the air, but not to chill the room.
If you are building a Russian bathhouse without any frills, many separate rooms, with a traditional stove, you don’t have to think too much about how to make a hood in the bathhouse so that there is no dampness. A door, a small window, a good stove draft and mandatory ventilation after everyone has washed are enough.
Manufacturing and installation of a grate with a plug and a box in a bathhouse
In some cases, the inlet and outlet openings are equipped with a special box for adjusting ventilation, and it is made in the following sequence:
- We knock down the frame according to the size of the hole at the exit from the bars with a section of 2*2 cm.
- We cut lattice elements along the length of the frame, 0.5 cm thick and 2 cm wide. Please note that all wooden elements must be thoroughly sanded and impregnated several times with antiseptics and fire retardants. We apply each next layer of protective compounds after the previous one has completely dried.
- We install a grate at the exit. We check the horizontal position with a level and fix it with galvanized fasteners.
- We cut out a block of wood. Its width and height should correspond to the dimensions of the ventilation hole, and its length should correspond to the thickness of the wall.
- We thoroughly polish the product and impregnate it with protective compounds.
- We cut out a plate separately, 4 cm larger on each side than the hole.
- We sand it and attach a wooden handle in the middle.
- We fasten the plate to the blank block with galvanized fasteners. We make sure to dig the caps deep into the wood.
- If necessary, the protrusion of the plate above the plug can be covered with roll insulation. This will prevent air from entering through small cracks.
As a result, the plug should move freely along the ventilation duct and fit snugly against the wall.
The need for ventilation in modern baths
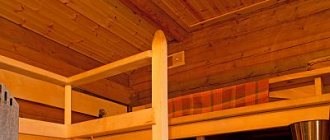
Modern baths have become completely different over the last century. Today they are built from different materials, not just logs. They are clad on the outside, insulated and clapboarded on the inside, literally sealing the building. They make several isolated rooms - a steam room, a washing room, a locker room, a relaxation room, a bathroom, and sometimes a swimming pool and a kitchen.
Plan of a modern bath complex Source remoo.ru
The principles of heating have also changed: stoves are often made with a firebox from a dressing room, and many people prefer electric heating devices, which do not require a chimney, to work with wood. And in order not to go outside in bad weather, such complexes are often attached to the house or placed directly in it.
The desire for convenience, comfort and beauty can lead to undesirable consequences and even harm your health if you do not think about how to properly ventilate a bathhouse. The most common consequences are carbon monoxide poisoning, rotting of wooden structures and the appearance of mold, the spores of which are not at all harmless.
Proper construction of a sauna for ideal air circulation
A steam room must be designed and built correctly to be considered healthy. Proper ventilation in the sauna, which is necessary for the constant availability of fresh air, is largely responsible for this. But even here there are mistakes, knowledge of which will help to avoid or eliminate them. When designing, it is necessary to take into account that the windows cut into the walls for air inflow and outflow must certainly be located at different levels. Violating this rule guarantees that your legs will be drafty and it will be hot at the top. If you do not place a fan at the only lower hole for air outflow, then suffocation may occur at the upper level. If the flow comes from below and goes into a single hole in the ceiling, it interferes with air circulation, so two outlets are needed.
Methods of natural ventilation
Dense and heavy cold air always sinks down, and heated air is displaced by it and rises. This is how moving air currents arise in rooms with any heating device. But without an influx of fresh air, it is not renewed, but simply moves.
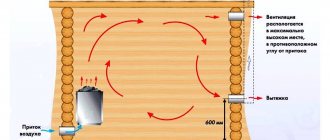
If you make a hole in the lower part of the wall, air from the street will flow through it if its temperature there is lower than in the room. And through the hole at the top it will be pulled out. This is natural ventilation.
Scheme of the movement of air masses in a heated room Source e-derslik.edu.az
This elementary law of physics is used when thinking about how to make ventilation in a bathhouse with your own hands without using any mechanisms. As a rule, natural ventilation without forced air intake is quite enough for a small bathhouse. Unlike residential premises, where in summer it can be as hot as outside, the temperature in the bathhouse is always higher.
But it is necessary to maintain a comfortable temperature for receiving procedures, and in such a way that drafts do not form and there is no sharp change from heat on the shelf to cold on the floor. To do this, air flows must move along a certain trajectory, which is set by placing supply and exhaust openings in specific locations.
Ventilation through the chimney
The easiest way to solve the problem is how to make ventilation in a steam room if it contains a furnace firebox with a blower. It will serve to remove exhaust air through the chimney, in which draft occurs during fuel combustion. But this scheme will only work if there is an influx of air from outside.
Ajar door to the steam room Source prodverivdome.ru
Inflow can be ensured in the following ways:
- from time to time slightly open the door to the steam room;
- make a small gap of 1 cm in the door or leave the same gap between the door and the floor;
- if the log house of the bathhouse is not sheathed, such a gap can be left between the first crowns located below the floor level, provided that the boards are not laid tightly;
- make a special opening in the wall opposite the stove at a height of 20-30 cm from the floor.
In any of these cases, the cold flow penetrating into the room moves towards the heat source and displaces the air already heated by it upward. As it moves, it warms up the entire room, gradually cooling down and descending. Here it is drawn into the ash pit and discharged through the chimney to the street.
Air movement pattern Source i.ibb.co
Note! This scheme only works if there is draft in the chimney, which occurs when wood burns. In the absence of combustion, air exchange practically stops.
This method of making ventilation in a steam room is not the most reliable and effective, since most of the fresh air is immediately drawn into the stove. Therefore, even during the construction of the bathhouse, it is advisable to think through other options for installing vents in the walls.
See also: Catalog of projects of houses with a bathhouse made of timber
Ventilation through vents
To ensure that air exchange does not depend on the operation of the stove, special openings are installed in the walls for air inflow and outlet. It is guaranteed to work subject to the following conditions:
- the exhaust hole is placed under the ceiling of the bathhouse - where heated air accumulates;
- the supply opening should be located low above the floor on the opposite wall, the closer to the stove, the better, so that the cold currents drawn in do not hit the legs;
- the optimal vertical distance between the vents should be 150-200 cm;
- The cross-section of the exhaust opening must be larger.
Cold air immediately enters the heating zone Source ventilation-conditioning.ru
The ideal location of the supply air is behind the stove. Entering the room, it immediately begins to warm up, displacing the already hot air mass upward and towards the hood. Therefore, cold streams and levels with noticeably different temperatures do not form in the steam room.
If you want to know how to properly make ventilation in a bathhouse and steam room, provide this diagram at the design stage and before installing the stove. It is also important to make sure to make a difference in height between the ventilation holes. If they are located at approximately the same level, this will lead to a draft and rapid passage of fresh air in a straight line, without circulation in the room.
Advice! It is best to make an exhaust vent directly above the shelf to allow hot air to flow into it and quickly remove waste materials.
Natural ventilation hood Source stroyfora.ru
In order to be able to regulate ventilation or limit the access of too frosty air into the steam room, you need to provide covers or valves for the vents.
The benefits of natural ventilation are that it works without the need for devices that require mains power and can break down. Its installation and operation do not require large expenses.
Grate with plug for bath
You can buy a production ventilation grille for a bathhouse. The best products are considered to be from the Finnish manufacturer Harvia. But if you wish, you can make the grate yourself.
Making a grate with a valve for a bath
Ventilation grilles for bathhouses with valves are traditionally made of wood.
Plugs with metal handles are strictly prohibited from being used in the steam room. In this case, you can get burned by regulating the air flow in a heated room. The optimal material is alder or linden. They best tolerate changes in temperature and humidity. Coniferous species are also undesirable to use. When heated, they release resins, which can also cause burns.
When making the grating, we adhere to the following algorithm of actions:
- We take measurements of the ventilation hole and cut four slats to assemble the frame. Calculate the dimensions so that the frame protrudes a few centimeters on each side of the hole. The optimal thickness of the slats is 2-3 cm.
- We mill a 0.8 cm indentation along one side of the rail. We sand all the frame parts with fine-grained paper.
- We completely cut off one rail in height by 0.8 cm. This is necessary for the free movement of the plug.
- We assemble the frame. We use wooden dowels or galvanized nails as fasteners. The milled holes should be on one side.
- We cut out individual lattice elements along the height of the frame, with a cross-section of 1*0.5 cm or 0.5*0.5 cm. Sand them.
- We fasten the elements to the frame in increments of 0.3 cm. It is best to use galvanized screws as fasteners.
- From a durable piece of wood we cut out a 0.5 cm thick gate around the perimeter of the frame, taking into account the milled area. We sand the surface and attach a wooden handle.
- Between the top and bottom slats, on the side opposite the handle of the plug, we nail another slat thicker than the frame. She will hold the bolt.
- We insert a plug into the hole between the frame and the nailed rail. It should fit into the grooves milled for it and move easily along them.
- By analogy, make a second grille, since we will need two such products to equip the ventilation system. They are installed at the inlet and outlet openings.
Please note that all wood after sanding must be impregnated with an antiseptic compound and fire retardant.
Installation of a grate with a plug in a bathhouse
Before installation, it is necessary to fix the corrugated pipe in the exhaust duct, which is usually extended to a level above the roof to increase draft.
Remember that it is advisable to make the air duct as short and straight as possible. In this case, the efficiency of the ventilation system will be maximum. We fix the grid itself in this order:
- We install the structure in the hole so that the valve can move freely along the groove.
- Using a hydraulic level, we check the evenness of the position.
- We fix it firmly to the wall using galvanized self-tapping screws. We bury the caps of the metal fasteners into the wood.
This method is used to install a ventilation valve at both the inlet and outlet openings.
Methods for installing forced ventilation
It is not always possible to provide natural air exchange of acceptable intensity. Such ventilation does not work well both in bathhouses with a large number of rooms, and in those that have a common wall with the house or are built into it.
In such cases, they resort to a device for forced injection and/or release of air, artificially creating flows or forcing them to move faster. To do this, fans are built into the system - exhaust or supply.
Supply fan installed in the corresponding hole Source engvent.ru
See also: Catalog of companies that specialize in the construction of baths, ventilation and air conditioning equipment
Depending on the type of object, one of the following types of forced ventilation is used:
- supply and exhaust when both types of fans are used. A rather rare option in private baths, since they do not require high ventilation intensity;
- supply , with mechanical suction of air through the supply opening and increasing the pressure in the room, due to which the exhaust air is squeezed out into the hood. Its main drawback is the too active supply of cold air masses;
- exhaust , the operating principle of which is the opposite: a fan in the exhaust hole forcibly removes polluted air outside, creating a vacuum inside, forcing clean air from the street to fill the vacated volume, entering the supply hole.
If you choose how to properly make a hood in a bathhouse, then preference should be given to the last option as the most optimal.
Fan on the exhaust vent Source stroi-remontirui.ru
Fan selection
Any mechanisms operating in a bathhouse must withstand difficult operating conditions: high humidity, heat, frequent temperature changes. Therefore, the fan is selected primarily based on these requirements.
Dependence of the bathhouse ventilation system on the type of building
For a Russian bathhouse, which is traditionally built from logs or timber, natural ventilation is best suited. The main thing is to observe the location of the ventilation vents and correctly calculate their size relative to the room.
When building a frame bath, it is preferable to use forced ventilation. The external inlet must be equipped with a blower fan.
Forced ventilation is used in buildings made of foam blocks and bricks. When using these materials, other types of ventilation are not possible.
Video description
It is easy to find units on sale that are specifically designed for baths and saunas - these are the ones shown in this video:
It is also necessary to determine the power of the device, since excess power is completely unnecessary and even contraindicated. This is easy to do if you know the volume of the ventilated room and the air exchange rate recommended for baths, which is 5.
For example, for a 2x3 m steam room with a height of 2.2 m, the fan power is calculated as follows:
2 x 3 x 2.2 x 5 = 66 m3/h
Advice! Buy a device with variable adjustable power and a timer that will periodically turn the device on and off. You can fully automate the system by including humidity and temperature sensors configured to certain values, upon reaching which they will start the fan.
If desired, you can assemble an automated system with remote control Source nevoton.ru
Such devices, depending on the design, can be installed directly in the exhaust vent (duct fans) or on the wall behind it.
Let's sum it up
High-quality air exchange is an important aspect of arranging a bathhouse. Without it, your building will not last long. The walls and floor will become covered with mold, the boards will quickly rot. Ventilation in a bathhouse is not difficult to do with your own hands. You can organize natural air flow or activate it using fans. It is best to organize the movement of air masses not only directly in the room itself, but also under the floor and behind the wall cladding. This way you are guaranteed to preserve materials and ensure a comfortable climate in the bathhouse.
Video description
The following video shows an example of such a combination of ventilation and heating:
- If the floor in the steam room and washing room is made in the form of a flooring with slots on a concrete base, an exhaust duct can be made under it by combining the underground of the two rooms and equipping it with a fan. In this case, it is simply necessary, since the trajectory of the movement of air masses is complex, and natural ventilation is unlikely to cope with its task. A channel through a hole in the foundation removes moist exhaust air to the street. The supply opening should be located as close to the stove as possible so that the cold air begins to heat up immediately after entering the room. If openings are made in the walls between adjacent rooms, it will circulate throughout the entire volume, simultaneously warming both the washing room and the rest room.
Scheme of ventilation of a bathhouse through the underground Source youtube.com
Dimensions of ventilation ducts inside the steam room
The best option would be 100-150mm . Ventilation holes that are too large will quickly cool down the steam room. To improve circulation, the diameter of the outflow can be slightly increased, but openings that are too large will quickly cool the room. It is also worth remembering that for safety reasons, it is forbidden to make supply systems larger than exhaust systems.
For comfortable use of the ventilation system in any weather, it is necessary to install dampers. By adjusting their radius, you can regulate the intensity of circulation.
There is an opinion that if the influx is insufficient, then the person will not have enough oxygen. This is a misconception; a cubic meter of air is enough for a person for an hour and a half.
Arrangement of supply and exhaust openings
When designing a bathhouse, you must immediately provide for the location of vents in the walls or foundation. It will be easier to make them during the construction process, rather than punch them after completion. In the case of forced ventilation, their dimensions are not particularly important, since a fan of calculated power will provide the necessary air exchange.
It is easier to lay a piece of pipe when pouring it into the foundation than to drill a vent in hardened concrete Source readmehouse.ru
Another thing is how to properly make ventilation in the steam room of a bathhouse if the use of mechanisms is not provided. For good natural air exchange, the cross-section of the supply opening must be sufficient. It is calculated according to a standard that regulates the dependence of this section on the volume of the room. For each cubic meter of ventilated space it is necessary to install a vent with a cross-sectional area of 24 cm2.
If we take our example with a steam room 2x3x2.2 m, then its volume will be equal to 13.2 m3. Multiplying it by 24 we get 317 cm2. To determine the diameter of a round hole with such an area, use the converted formula for the area of a circle: divide it by Pi and take the square root from the resulting value. The radius of our hole is equal to 10 cm, so its diameter should be 20 cm.
The radius is found using the inverse formula for the area of a circle Source ds04.infourok.ru
It is even easier to find the length of the side of a square hole - it will be approximately 18 cm. The sides of the rectangle are also selected in accordance with the cross-sectional area - for example, 10x32 cm.
To arrange round vents, steel or plastic pipes of the appropriate diameter or slightly larger are used, and the channels in the rectangular wall are made in the form of wooden boxes made of boards.
The exhaust hole, as already mentioned, should be made larger than the supply hole. The gaps between the wall and the walls of the channel are filled with tow, other insulation, or foamed.
Another important point in such a matter as making an outlet in a bathhouse is protection from the outside from the penetration of insects, rodents, and debris into the channel. To do this, cover the hole from the outside with a mesh or lattice.
Ventilation grille with insect mesh Source www.video-sovety.ru
And inside, to regulate the intensity of the air flow, valves are installed, partially or completely blocking the holes when necessary. For example, in winter, the draft, due to the huge difference between the low temperature of the street air and the high temperature in the bathhouse, increases so much that the cold currents do not have time to heat up from the stove and quickly cool the room. It is reduced using a valve, leaving only a small gap or completely blocking the vent for the duration of the procedures.
Gate valve manufacturing technology
In general terms, the manufacturing procedure and finishing of the valve boils down to the following operations:
- Take a planed and even workpiece with a cross-section of 20×20 mm and a length of 1000 mm.
- For one installation of the router stops, a groove with a depth of 6 and a width of 7 mm is selected (see sketches). Milling the groove should be done in several passes of the cutter.
- We clean the milled workpiece with sandpaper and cut two longitudinal and two transverse sidewalls into dimensions of 125 and 342 mm, respectively.
- In long workpieces, we carefully mill protrusions of 7 × 14 mm on both sides, maintaining dimensions of 8, 6 and 330 mm. This operation should be treated with special attention, since the protrusions will affect the correct location of the grooves in the short and long sidewalls. Ideally, they should be in the same horizontal plane.
- We carry out a trial assembly of the frame. If everything is fine, then measure the dimensions between the grooves in the long sidewalls (needed for making the damper), and the length of the cross member.
- We make a damper with a handle and a cross member, taking into account the measurements made in step 5.
- We perform a test assembly of all elements. We check the smooth movement of the damper along the entire length of the grooves.
- Upon receiving positive results, we proceed to the final assembly of the ventilation valve, first applying PVA glue to the surfaces to be glued.
- We set the corners, place the weight on the workpieces and leave it for a while for the glue to set.
- Drill holes for fasteners.
- We smooth out all the irregularities with sandpaper, remove burrs and round off sharp edges.
Note : fixing the crossbar to the long sidewalls can be done as follows:
- on the sidewalls, at the junction with the crossbar, we fill two thin nails ½ of their length and bite off the caps;
- Before gluing, when we assemble the valve, the free ends of the nails should fit into the ends of the crossbar, thereby ensuring their reliable fixation.
In addition to the 3D image, I also provide a sketch drawing of this valve with a top view and two sections.
In the next article we will look at the technology for making a wooden headrest for a bath.
Go to the main article-content: Decorating a bathhouse with your own hands
Dear friends! If it’s not difficult, share it on these social networks with your friends. Thank you!