Good day to all readers. Today we will do creative, exciting, but rather painstaking things with you...
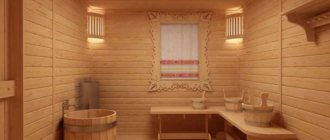
Have you built a bathhouse? Do you think you can relax and enjoy the work done? It's a bit early. You need to boast about the “temple of cleanliness” after decorating the interior. And this is a very interesting and entertaining thing! You can imagine yourself as a design guru and create a masterpiece that will captivate guests and household members with its exclusivity.
So, pick up a brush and start painting a delightful picture - a bathhouse interior design project! What? No ideas? Is your Muse sleeping soundly? Now we will stir it up! And for this you need to pamper her with delicious sweets, wonderful music and a wonderful mood. Awoke? Great, let's get started!
First you need to decide on the facing material for walls, floors, ceilings, pools, etc. Are your eyes running wild among the abundance of finishing raw materials? And pay attention to the mosaic tiles. The material is charming. A bathhouse in a mosaic robe looks very presentable. Don't know how to lay mosaics on a wall? It’s very simple and even exciting. We will definitely study the technology of laying out elegant material, but first we will understand the types and advantages. You should know what you're paying for, right? Let's go.
Preparing the foundation
Laying a mosaic (made from special tiles or individual elements) is a creative and challenging activity. Here you need to show more diligence and accuracy than when laying ordinary tiles. Increased demands are placed on almost everything.
Styling tools
So, when laying mosaics, you need to be more responsible in preparing the base. If, when installing a tile covering, you can slightly adjust the location of the tiles using the thickness of the adhesive mass, then this will not work here. Any bump or depression will be immediately visible. Moreover, this requirement applies to any plane. Whether you are laying mosaics on the ceiling, floor or wall, the quality of the surface must be ideal. In popular parlance, it’s like “under the wallpaper.”
When preparing the surface, pay special attention to plumbness and horizontality. If the error is more than 1-2 mm for every three meters, then unsightly areas may form at the ends. This requirement especially applies to laying mosaics from small tiles, where all the irregularities will be especially noticeable.
Primer of walls
To improve adhesion and reduce the porosity of the base, the entire surface must be primed. It is advisable to do this in several layers. If you use transparent tiles in your “picture”, then it is worth covering the surface with tinting. Otherwise, the heterogeneity of the base will be visible through the transparent elements.
Transparent
When laying mosaics in rooms with high humidity (bathrooms, saunas, etc.), it is necessary to apply another layer. It will consist of waterproofing impregnation.
What should be the surface for laying
Before gluing the mosaic onto the surface, it needs to be prepared. It is advisable to perfectly level the base; the material stands out for its ability to fit on any uneven wall. But this will spoil the appearance of the result. Therefore, it is necessary to get rid of the flaws in the base.
It is also necessary to first clean the base from all types of contaminants and prime it. This will increase adhesion, and applying a starter putty will help get rid of dark spots on the substrate that can be visible under some types of mosaic.
It is advisable to perfectly level the base.
We carry out the markings
Marking
Before you start laying the mosaic, you need to carry out preliminary markings. This is especially important if you are carrying out such work for the first time. First, make a sketch. In this case, you should pay attention to some nuances:
- if the room has external corners (boxes or slopes), then the drawing should start from them;
- if there is any decorative element on the wall (mirror or panel), then it also becomes a priority;
- try to remove all possible trimming in inconspicuous corners (for example, the corner of the front door).
After the paper sketch is ready, it is transferred to the wall. If the mosaic is laid on the floor, then it is advisable to make a “dry” layout.
Features of the material
Mosaic refers to a set of small ceramic tiles measuring 10x10 mm or more. To simplify the laying of the mosaic, it is laid out on a special grid. Mosaic tiles on a grid create separate modules, which allows you to speed up the process of wall cladding.
On this module, the seams between the tiles are the same size. Only in this case can you get a beautiful design of walls or floors. Although today there is a mosaic that does not have a similar base and you have to lay it out completely independently, i.e. It is not the module that is placed on the wall, but each small tile separately.
The process is labor-intensive, but the result completely justifies it. Wall mosaics today are made from various materials:
- Glass. It has a translucent structure. To ensure a satisfactory result, it is important to choose the right adhesive and grout for the joints.
- A natural stone. It is made from sandstone, marble, jasper and other materials. The main disadvantage is the high price.
- Ceramic. It can be coated with azure or matte. Unlike its analogues, it has a more massive appearance.
- Metal. The basis for such a mosaic is stainless steel. This finish has many advantages, as it has increased wear resistance.
Apply glue
Mosaic glue
Now let's figure out how to glue. The adhesive mass must be selected carefully. As a rule, special glue is produced for mosaics. It can be either tinted or white. Here the choice will depend on the tile used (transparent or not). Also pay attention to the base material.
When installing, it is worth remembering that the glue hardens quite quickly. After just twenty minutes, a film forms on its surface. Therefore, do not apply a large amount at once. It is better to go through no more than one square at a time.
Applying glue
The glue is applied using a smooth spatula. The layer should not exceed four millimeters. Then they pass over the surface of the adhesive mass with a notched spatula (tooth height no more than 3 mm).
Some professionals apply a thin layer to the tile itself. This ensures a more reliable connection. But such a layer should be minimal so that the mosaic looks even.
Recommendations
Problems with laying mosaics arise due to the fault of the master himself, who carried out incorrect markings. There is only one recommendation for this - carry out the marking several times, check it carefully, use a level. It is important to consider other nuances:
- glue is selected depending on the type of surface;
- the glue should have a medium viscosity (liquid will flow, but thick will dry quickly);
- dilute the composition a maximum of 2-3 times;
- do not allow leakage through the seams (difficult to remove);
- Do not work at temperatures exceeding 25 degrees.
Laying tiles and mosaics yourself is not difficult. It is important to adhere not only to the algorithm of actions, but also to control the work using equipment and measurements, and choose high-quality materials.
We install the mosaic itself
Mosaic sheet
If you know how to install regular tiles, then you will quickly figure out how to lay mosaic tiles. The principle is very similar, there are only some nuances.
So, for example, ordinary tiles (when laid on walls) are mounted from below. The bottom row will serve as a holding base for the top row. There is no need to do this with mosaic tiles. They weigh little, so you can start installation from any place you have planned.
It is better to start your first installation tests from an inconspicuous place. This way you can practice a little and do the main part better and more beautifully.
Mosaic on the grid
The mosaic tile is placed against the adhesive mixture and pressed lightly. Here you should carefully look at the seams. Using plastic crosses (as is the case with ordinary tiles) is unlikely to work. Everything needs to be done “by eye”.
If, when installing on walls, the glue does not set immediately, the tiles may move a little. In this case, small cloves will help. They are inserted into the seam and hold the material in place.
Gluing
As soon as the square is laid, you need to walk over it with a plastic pad with a nozzle made of elastic material. Use it to lightly tap the entire finished surface. At the same time, your actions should be moderately strong and short.
Half an hour after laying the square, it is necessary to remove the protruding excess glue. This is done carefully using a stick or a brush with hard bristles. If the mosaic tiles have a paper coating, then you need to get rid of it on the day of installation. To do this, wet it a little and remove it. It is not advisable to postpone this work until the next day. Difficulties may arise with cured glue.
Step-by-step technology for carrying out work, how to do it yourself
The process of laying any type of mosaic follows a single pattern. It is necessary to first prepare the wall for surface finishing. The steps involve performing the following steps:
- Priming the base; in damp rooms, choose a waterproof mixture.
- Application of adhesive solution.
- Applying the material to the surface, tapping it to obtain a single, even structure, uses a rubber spatula.
- Wait for the adhesive layer to dry, then apply grout to the seams.
To ensure that the tiles are laid evenly, you can use special crosses for the tile material. This will make the process easier.
To ensure that the tiles are laid evenly, you can use special crosses for the tile material.
Laying mosaics on a surface is a simple process, but there are types of material that require more painstaking work. When you need to create a separate panel that involves a complex image, then it is better to turn to professionals for the service so as not to spoil all the material. Working with a mesh type of backing is much easier than with paper, so beginners are recommended to purchase this option to do the installation themselves.
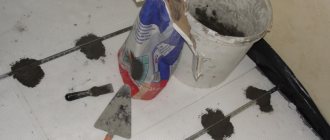
We produce grout
Mosaic grout
Grouting should begin a day after installation. For this work, a rubber spatula is used. Before grouting, inspect all seams. Remove any protruding adhesive residue and debris from them. The grouting itself is done with strokes in different directions. The last pass must be perpendicular to the previous one.
Wash off the white grout
After applying the grout, excess must be removed. If you use waterproof material, then this is done immediately. The water-soluble grout is allowed to sit for 10-15 minutes, then it is removed with a damp cloth. Remaining plaque can be removed at the end of the day using a soft rag. At this point all work is completed.
Recognized product advantages
A magnificent product will delight:
- high strength;
- waterproof;
- frost resistance;
- fire resistance;
- environmental friendliness;
- security;
- wear resistance;
- durability;
- biological passivity;
- resistance to temperature changes;
- pliability;
- aesthetics;
- ergonomics;
- ease of operation;
- resistance to chemical and mechanical factors.
Thus, mosaic is a good investment in the future.
Preparing the walls
The main secret of high-quality mosaic cladding is perfectly smooth walls. The plane must be flat, without differences horizontally or vertically. The best way to achieve smooth walls is to plaster them along the beacons.
I will talk about plaster briefly, since this topic deserves a separate article.
- The walls are cleaned of old finishing and plaster. We remove all layers that do not adhere well.
- If the wall is too smooth, use an ax to make notches to increase adhesion.
- We prime the walls and install beacons. First, the outer beacons are installed. They are attached to the wall using gypsum plaster and are leveled in one plane. Then threads are stretched between them and intermediate beacons are placed. The step between them should be less than the width of the rule, that is, for a 2-meter rule we take a step of 1.5-1.8 m.
The beacons are installed level in the same plane. Notches on the wall to improve adhesion.
We apply plaster and wait until the walls dry. It is advisable to use cement plaster for tiles and mosaics, but gypsum plaster (Rotband) is also suitable for the kitchen.