The technology for installing any floor covering involves performing a number of significant previous measures, the main goal of which is to eliminate cracks, protrusions and other irregularities. Otherwise, the finishing will not only look ugly, but will also very quickly lose its performance characteristics and last less than expected.
Installation of beacons for floor screed
To level the floor surface, a screed is traditionally used - a special composition that is distributed over the surface in an even layer. In this case, filling is carried out strictly at one level. It is impossible to comply with the above requirement based solely on the eye. To solve this problem, special devices are used - beacons.
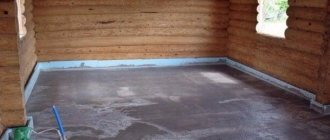
Example of a beacon screed
You are invited to familiarize yourself with the features of existing types of beacons, as well as recommendations and instructions for their use below.
Definition of zero level
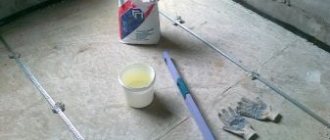
In order for the beacons to be installed evenly, before starting work you need to determine the zero level and carry out markings. A laser or regular hydraulic level will help you with this. The first option is preferable - it will make the work faster and easier.
It is more convenient to mark using a laser level
Stepping 1 m up from the floor, place a starting point on the wall. Retreating a similar distance from the base, place points at a meter height, walking along each wall of the room.
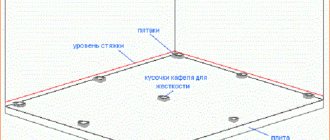
Align the markings to the highest point and connect the marks with a solid straight line, thereby setting the base level. Step back 1 m from the created line and draw a new solid line parallel to it along the entire perimeter. This is how you get level zero. To set the required thickness of the screed, simply step back up from the zero level to the required height (usually from 3 cm) and draw a new line.
Definition of zero level
You will place the beacons along the last of the created lines - the upper part of these landmarks should be at the same height as the markings on the wall.
Peculiarities
In order for the floor finish to look flawless, without wrinkles, cracks and unevenness, it is necessary to first level its surface. Most often, a screed is used for this - a special mixture that is evenly distributed over the entire surface of the room. It is difficult to visually bring even a few square meters under one level, so you have to install special rigid guides - beacons.
Placing beacons is only necessary in some cases; for example, when using a self-leveling floor, they are not needed, since the mixture itself, which has leveling properties, spreads evenly over the entire surface. But for concrete and cement-sand screeds, their presence is simply necessary. The minimum layer thickness for such solutions is 3 cm, and at the lowest points it can be more than 10 cm, so you have to use beacons.
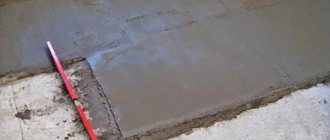
Metal beacons look like hollow pipes, profiles or corners. They can be attached to cement mortar, gypsum plaster or self-tapping screws. Some make them from strong and smooth wooden beams or from the same mortar. The main condition is to maintain an ideal horizontal level on the entire surface of the floor in the room. After the beacons are installed and firmly fixed, they begin to pour the screed.
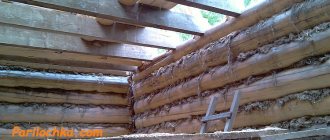
Installation of beacons for arranging dry screed
Installation of beacons for arranging dry screed
General recommendations
Dry screed is made using bulk materials and their mixtures, among which expanded clay is a recognized favorite. Metal profiles best cope with the functions of beacons for arranging such backfill. If desired, you can use products of any shape. Along with this, it is important to understand that after the screed is installed, the profiles will not be dismantled, so the height of the landmarks should be selected in accordance with the thickness of the backfill - in this case, from 30 mm.
Dry floor screed
To install the beacons, you should use a sufficiently strong profile so that in the future it does not sag under the weight of the backfill - because of this, the evenness of the screed will be disrupted. If possible, you should avoid using thin profiles, because... To properly perform the screed, they will have to be fixed to the surface, which will require a number of preparatory measures using additional materials. You simply cannot fix a thin profile with self-tapping screws - such fastening will compromise the integrity of the moisture-proof layer, which will not have the best effect on the durability and key characteristics of the floor.
Beacons for dry screed
Beacons made of U-shaped profile
When arranging a dry screed, beacons are best made from a U-shaped profile. Use guides with a wall height of 27 mm or more. The work is performed in the following order:
- profiles are installed on the base with sharp edges up. Choose the step for placing landmarks so that it does not exceed the length of the rule you are applying. Most often, a 100-centimeter step is followed;
- fill the gaps between the edges and the beacons directly with the selected building mixture;
- follow the rule along the profiles, getting rid of excess backfill and at the same time leveling the screed layer.
U-shaped profile for beacons, photo
As a result, the beacons will come into contact with the sheet material laid on top only with their edges, which will preserve the soundproofing and other significant characteristics of the base.
Required Tools
Installing beacons for floor screed is a painstaking process and requires patience and care. To construct them we will need:
- factory beacons;
- water level (hydraulic level);
- tracer thread (beater);
- self-tapping screws with plastic dowels;
- rotband;
- thin cord or nylon thread;
- tape measure and square;
- trowel and spatula;
- building level and rule;
- perforator;
- drill with mixer;
- screwdriver and screwdriver.
Attention! When making markings, it will be convenient to use a tracer thread - a special device designed for applying straight lines to any surface. A thin thread is wound on a spool, which is located inside a flask with dry paint (ocher). To draw a line: shake the flask well, pull out the thread of the required length, press it to the control points on the surface with a slight tension, move it a short distance and release. A thread of the “beater” stained with ocher flaps on the surface and forms a straight line on it.
Selection and installation of beacons for semi-dry and wet screeds
Wet and semi-dry screeds can be poured using different beacon options. Next, you are invited to familiarize yourself with the arrangement of the most popular of them.
Profile on solution
Profile on solution
You can use ordinary steel pipes or a plasterboard profile as beacons. The second option is more preferable. The recommended profile dimensions are similar to the dimensions specified in the manual for arranging beacons for dry screed.
Using drywall profiles as beacons
The profile is turned over and laid on top of the supports pre-fixed on the base, which are necessary to level out differences in height. Bricks, bars, and hills of cement mortar are traditionally used as supports.
To fasten profiles (pipes) with supports, you can use cement-lime mortar or gypsum (alabaster). The first option is less preferable, because It takes 2-3 days for such mixtures to dry, and work can be continued only after the fixative has hardened.
Self-tapping profile
Self-tapping profile
A more effective and faster method of arranging beacons for pouring floor screed compared to the previous method. The sequence of actions is given in the table.
Table. The procedure for installing beacon profiles on self-tapping screws
| Stage | Description |
| Arrangement of dowels | A preparatory activity, the essence of which boils down to driving dowels into the surface in increments of about 200-300 mm. |
| Profile laying | The product chosen for arranging the beacons is laid on top of the driven dowels. |
| Fixing beacons | The guides are fixed by screwing self-tapping screws into the dowels. The self-tapping screws are adjustable without any problems, which allows the performer to set the guides to the required level. |
When arranging a fill on the ground, you can use another method, after first nailing wooden blocks to the base. Products with dimensions of about 140 x 15 x 15 mm are suitable. Self-tapping screws are screwed into wooden supports at a given level. Start working from the extreme points, gradually moving towards the middle ones.
Combined version of beacons
Combined version of beacons
Follow these steps:
- drill holes in the base in increments of 100 cm and drive dowels into them;
- screw self-tapping screws into the dowels to the required level;
- in the middle between the screws that are screwed in, place a mound of cement-sand mortar with a height slightly higher than the level of the screws;
- Using a rule or a lath, level the solution, pressing it to the required height.
Lighthouses from solution
Heaps of mortar as beacons
The sequence of arrangement of such beacons consists of the following stages:
- Screws are installed on the floor. The distance is selected in accordance with the length of the guide being installed;
- a wire is stretched in several rows between the established landmarks;
- A cement-lime mortar is carefully laid along the stretched wire. The task comes down to forming a structure that resembles a wall. The craftsman pulls a long strip perpendicular to the wire, touching the screws at the same time. As a result, a horizontal platform will be created. She will take on the functions of a lighthouse.
Important! Before pouring the screed, such beacons should be given 2-3 days to dry and gain strength. The waiting time is fully compensated by the convenience of work: the landmarks do not have to be dismantled after the foundation has been arranged.
Beacons for semi-dry screed
Beacons for semi-dry screed
Semi-dry screed can be done practically without the use of beacons. Having prepared the surface in accordance with the previously mentioned instructions, pour 2 mounds of cement mortar in the corners of the room and form them into platforms in accordance with the pouring level. Arrange the sites in increments not exceeding the length of the applicable rule.
After the beacons have dried, fill the remaining gaps between them with the selected filling solution and level it according to the height of the prepared landmarks.
Beacons for arranging a floating screed
Beacons for arranging a floating screed
The technology for arranging the base comes down to laying a cement-sand mortar on top of a layer of foam plastic. In addition to the main function, this design will additionally increase the thermal insulation properties of the floor. In this case, the functions of landmarks are best handled by self-tapping screws screwed into the floor.
A day after pouring the screed, the landmarks can be dismantled (the time may vary depending on the properties of the solution used, but this is the average). Fill the remaining holes with the solution used to create the base layer.
The last provision is also relevant for other types of beacons used when arranging a wet screed: about a day after pouring the screed, the landmarks are removed, and the remaining recesses are carefully rubbed with the solution flush with the main coating.
Dimensions
It is best that the beacons for the screed are solid, spanning the entire width of the room. If their length is not long enough, then you can change the installation across the room.
It is also worth remembering the standard sizes of different types of profiles:
- plaster beacons T-shaped 10x26 or 6x21 mm have a length of 2.7-3 m;
- guide profiles, rack-mount, ceiling profiles can be 2.75, 3, 4 and 4.5 m;
- bent profiles can reach a length of 6 m.
Tubular beacons with a rectangular or round profile come in different lengths, depending on their purpose, but most often it does not exceed 6 m.
Selection and installation of beacons for self-leveling floors
Often, performers who are engaged in the independent arrangement of self-leveling floors refuse to use beacons, believing that the fill itself will fill the surface without differences in height or other defects. Along with this, qualified craftsmen still recommend not to abandon the use of beacons, especially since in combination with self-leveling floors, landmarks are used that have a simplified design and do not require a lot of time for their installation and subsequent dismantling.
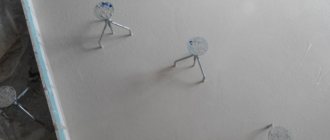
Benchmarks
Benchmarks
A professional beacon, ideal for use when installing self-leveling floors. The design is made in the form of a tripod with a moving central rod. It is the last element that allows you to set the desired screed level.
Before starting work, the floor must be primed, wait about 5-6 hours, and only then pour the selected material. The recommended installation step is 1 m.
Having installed the reference point on the base, the performer, by rotating the central rod, positions the product at the desired height in accordance with the previously made markings. After pouring and leveling the mixture, the guide beacons are dismantled.
Lighthouses made from self-tapping screws
If desired, a self-leveling floor can be made using a homemade analogue of the previously discussed benchmark. To do this, you need to take self-tapping screws twisted into dowels, fasten them with a piece of punched paper tape and align the resulting structure at a given level. Homemade landmarks, as well as benchmarks, are dismantled before the pour hardens.
Beacons for self-leveling floors
Installing beacons for arranging floor screed is a very important and quite time-consuming process. However, as practice shows, there is no need to rush to the detriment of the quality of the fill, because... this is fraught with extremely unfavorable consequences: the finishing coating laid on top of an uneven screed will not have the most presentable appearance and will last much less than expected.
When placing beacons, check the evenness of their placement using a level in both directions, i.e. along and across, and only if there are no deviations, proceed directly to the stage of pouring the screed.
Aligning beacons using a level
Good luck!
Advice from professionals
A few useful tips will help you install beacons quickly and efficiently:
- Install the two outer guides first, stretch a rope or fishing line between them, and mount the remaining beacons along them. Thanks to this technology, you won’t have to check each one separately, which will save time.
- If you plan to make beacons from DSP, then it is better to use a long bubble level; it is easy to make grooves of the required depth in the solution.
- Check the level between the guides not only perpendicularly, but also at other angles.
If the beacons are made of cement-sand mortar, then it is better to level the surface with a long bubble level
Placing beacons is not a difficult task, but it is a responsible one. The final result depends on the correct installation, but based on the recommendations of this article, you can easily figure it out, choose beacons of the desired configuration and make an even and high-quality floor screed.
Which beacons do you prefer when installing floor screeds and why? Share your opinions in the comments.
Final Recommendations
Beacons for floor screeds can significantly simplify the process of screeding, as well as ensure the horizontality of the formed base. It is important to control the horizontal installation and ensure a fixed position. To increase the strength of the formed base, a screed with fiber fiber is used. To increase water resistance, add liquid glass to the cement screed. The proportions for concrete and mortar must be observed. Knowing how to calculate a cube of concrete, it is easy to determine the amount of material to fill the base.
On our portal, novice developers will be able to obtain comprehensive information on how to insulate the base and how to calculate the amount of bricks per base.