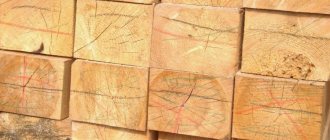
During the construction of buildings from various types of wooden beams, situations arise when it is necessary to use not individual parts, but a composite element, since the length of the standard fragment is not enough. In this case, it is necessary to connect the beams together along the length.
This operation is quite often carried out if the wall of the building under construction is longer than six meters. In this article we will discuss the types of longitudinal connections of timber during the construction of a house, and also talk about how to carry out this procedure yourself.
Return to content
Tenon connection with dowels
Tenon connection with dowels
This type of merging of wooden elements is considered the most reliable and strong. It is what is most often used during the construction of buildings from various types of timber. The principle of connecting timber in this case is very simple - absolutely identical grooves need to be made in two elements. After this, the processed parts are placed next to each other so that the grooves touch and a key is driven into this groove.
The key is an insert element, a kind of wedge, which is made of hard wood. For wooden beams, you should use an aspen piece. After falling into the prepared grooves, this element securely fastens the two beams to each other. Keys can differ in geometric shape and be:
- straight;
- rectangular;
- with serrations;
- prismatic;
- in the shape of a dovetail.
Return to content
Methods of docking without residue: “in the paw” and “dovetail”
The photo shows “claw” and “half-tree” connections.
The connection without any residue is often performed “in the paw”, representing a joint, only without the end part. The simplest option is a paw with a notch, that is, with spikes and sockets at the ends of the beam, for greater stability.
Such a joint has a big drawback - it is very blown out. Therefore, it is recommended to use a “dovetail” connection, in which the spikes fit tightly together, as if wedging the entire structure, giving it reliability and improving thermal conductivity qualities.
A variation of the previous method is the “dovetail”, which is trapezoidal cuts on both parts, taking into account their tight fit. Such a joint is very strong and has sufficient joint rigidity, but does not have good thermal conductivity.
Important: joining timber during construction, especially for connections using dowels or those made using the fat-tailed method, tongue-and-groove, or with a notch, requires vertical gaps that will help compensate for the shrinkage of the structure.
Connection in an oblique lock
Connection in straight and oblique lock
Experts call this splicing method the most difficult. Such a connection is extremely difficult for a person without the proper qualifications or experience. However, the reliability of the resulting design is really worth the effort. Companies that construct buildings from timber are well aware of how to join two timbers lengthwise using this method, but often keep silent about it in order to save time and maintain a high level of productivity.
So, first of all, you need to cut out the oblique elements from the ends of the wooden part. In this case, a certain angle must be maintained, the necessary bends must be repeated, and the dimensions must be fully consistent. The result should be some kind of tongue and groove, which ultimately form an oblique lock. After this, the two beams must be connected by placing the treated areas next to each other. To achieve maximum reliability and strength of the connection, special wooden dowels are used.
Return to content
Requirements
What properties should the compound have?
- Durability. It is clear that the beam is supported by its own weight, the mass of the floors and roof; however, the connections will have to withstand the inevitable fluctuations in the linear dimensions of the timber with changes in atmospheric humidity and temperature.
Please note: a house built from so-called natural moisture timber is most susceptible to deformation and experiences maximum internal stress. On the contrary, material dried to 16-20% creates a minimum of problems for builders and the owner.
- Tightness. At a minimum, straight and corner joints of the timber should not be blown through: drafts are unlikely to please the residents of the house. The practical conclusion from this requirement is obvious: the more complex the form of the connection, the less likely it is for drafts to occur.
Connection to root tenon
This type of connection is a key connection and it is also best to entrust it to specialists in this field. The fact is that the operation is not so much complicated as it requires the worker to be qualified and have certain skills in working with wood. To carry out this operation, you should cut a groove on one edge of the wooden element, and a tenon on the second. This must be done at an angle of 45 degrees.
This type of splice differs from all others in its shape. Most often, this method is used to arrange the corners of a building. The grooves and tenons are shaped very much like a trapezoid, and ultimately form a “dovetail”. To achieve greater strength and durability, the connection should be reinforced with dowels.
Connecting timber into a root tenon and analogues
It is important to know! If you use this type of splicing, it is important to ensure that one beam does not mix horizontally with the second.
Return to content
Wood floor splicing
This type of connection of wooden elements when constructing buildings from timber involves sawing out a corner in the timber to the middle of its cross section. One part should have a bittern with a downward angle, and the second one should have an upward angle.
After the preparatory procedures, the wooden elements should be laid on top of each other. The most important disadvantage of this type of connection is that in the places of splicing, the wooden beam significantly loses its thickness, which means its performance indicators drop.
Unlike the above methods, this one is the simplest. It does not require special training or extensive experience, so it can be done independently. After splicing the timber using this method, it should be additionally secured with wooden dowels.
Half-tree connection with an oblique cut
Return to content
Joint with remainder
Naturally, when constructing a building “with a remainder,” a larger amount of material is required. But such joining of timber in the corners provides more comfortable conditions inside, resists wind loads well, and protects from rain and snow drifts. (see also the article Treating timber against rotting is the key to long-term operation of the building)
Structurally, a house built using this method is more stable compared to a house built “without residue.”
The oblo method and its variations
The photo shows the docking in the oblo.
- Very often, the “bowl” method is chosen for joining; sometimes it is also called “bowl” - due to its external similarity, since a round recess is cut out in the upper part, reminiscent of a bowl or blot - as it was called in ancient times, that is, “round” . The next log is placed across this “bowl”, in which a “bowl” is prepared for the next one.
- Half a tree. The oblo or bowl also has its own varieties, the simplest timber joints of which are made “half a tree”. Additionally, for a tighter connection, a longitudinal groove is made in the bowl - it is necessary for installing the beam of the next crown, after installing the longitudinal one. Another name for this groove is laying. To ensure greater stability of the structure, the top log is made with a rectangular or round dowel or dowel.
- Joint with ridge. If an oval ridge-shaped residue is left at the bottom of the bowl, the structure of the house will become even more stable. In this case, it is important that the shape of the ridge follows the shape of the groove of the upper beam, but you should pay attention that the groove in this case will be at the bottom.
- Kurdyuk. One of the most technically difficult methods of laying timber is “in a fat tail”, but if the appropriate instructions are followed, it is even possible to master and complete it yourself. A special protrusion is also added to the ridge in the bowl, strictly across the bowl and along the log, and in the lower part of the next beam across the groove, a notch is made, specifically for the fat tail.
- Okhlop and okhryap. There are other ways to cut the corners of a wooden house, but all of them are, to one degree or another, a type of cutting. For example, “in a big way” or in other words “the Siberian bowl” is the same thing, only in reverse. The upper beam with the bowl is placed on the corner, slamming it down.
- The “ohryap” method can be considered intermediate and is similar to the okhlop method, only it additionally has recesses about a quarter of the diameter in depth. This method is used for the transition between an angle with and without a remainder.
Splicing by application
This splicing method is perfect for those who are not very concerned about the appearance of the structure, as well as its durability. Its principle is to attach two beams to each other and apply a metal bracket to the joint. Of course, this splicing method cannot be called super-strong, so it needs to be reinforced. To do this, fasteners are used that are hammered into the already laid row of wooden elements, as well as into the contact zones.
By following this link you will learn how to attach timber to timber. This article describes how to attach timber to the base of a house. Recently, the construction of houses from timber has become very popular.
Now you know how to connect timber together along the length in various ways. Now let's talk about how to choose the right method for connecting wooden elements.
Return to content
Video description
This video shows how to make a groove on the end of a beam using a template and a chainsaw:
If the structure of spliced beams does not require the formation of smooth edges, they can be overlapped, tightened with nails on both sides or metal pins at several points. This is often done when you need to lengthen the rafters. Or get powerful logs or floor beams by merging two beams not only in length, but also in thickness. In such cases, before joining the timber, the joints must be shifted relative to each other.
How to choose the right connection
Connections that do not require calculations and skills can be made independently, but this method of splicing is not very strong and durable. Of course, it can be strengthened using special fasteners, which we wrote about above, but stronger connections still benefit in terms of performance characteristics.
Due to their relatively low strength, such connections cannot be used for the construction of load-bearing wall structures. Any professional builder will not use material with a non-solid structure for such purposes. Only if you neither order nor purchase wooden elements of the required length, longitudinal connections are allowed. However, in this case, the structures lose some of their parameters, including durability.
Correctly connected beams
For the construction of buildings from laminated veneer lumber or any other timber, splicing with tenons and dowels is best suited. The resulting structure is almost as good as a solid wooden piece, so it can be used for any purpose. The connection is rigid and durable, and therefore can last for quite a long time.
It is important to know! In this type of splicing, the fastener – the key – plays a huge role. Therefore, when choosing it, you should not chase cheapness, but buy a truly high-quality product.
Due to the high degree of rigidity of the connection, as well as its reliability, many experts recommend splicing into an oblique lock. The resulting timber after joining can be used for the construction of load-bearing wall structures. The only problem you will encounter is the complexity of the work.
For such a connection, you will need an experienced worker who knows how to use all the necessary tools, and if you are not one, then it is better to leave this idea. A qualified specialist is able to carry out such a splice, but he will require about 1,100 rubles for one connection. On the other hand, these costs can be recouped, since you will not have to order new wooden elements of non-standard length.
Return to content
Connecting boards together in width and length. Basic workflow requirements
Sometimes, when carrying out construction and other work using wood, it is necessary to make elements longer or wider, but very few people know how to do this correctly. That is why we will look at how to splice boards yourself and what methods and techniques exist. It is important to choose the option that is best suited in a given situation and requires minimal investment of time and money.
In the photo: microspike joints are widely used by manufacturers of various wood products
Basic workflow requirements
Before we begin to consider specific options for carrying out work, it is necessary to understand what factors will ensure that we obtain the expected result:
Important! Remember one simple rule that experts always use: to get the best result, the parameters of the elements being joined must be similar; in other words, the same type of wood must be used.
The simplest example of structures where width jointing is used is a tongue-and-groove floorboard
Work options
All events of this kind can be divided into two large groups - joining boards in width and length; we will consider them separately and tell you which techniques are the most popular and how to implement them correctly.
Width connection
Of course, the simplest solution would be a panel splice option, so we will start with it, first present a diagram of the main options, and below we will describe them in detail:
These are the main types of work, if you can use the panel connection option
- The first method involves cutting out a cavity using a milling machine, which has a trapezoidal shape and allows the key to be used as a retainer. The advantage of this solution can be called reliability, and the disadvantage is the need for a milling machine or the presence of a manual milling cutter to carry out the work; you can’t get by with hand tools here;
- Joining using an end block, which is connected to the ends of the board using the tongue-and-groove method, is used for elements of short length, since this option ensures high reliability of small structures. To work, you will again need a router for wooden products. With its help, it will be carried out quickly and efficiently;
- You can make a cutout along the end, fit a strip under it and place it on wood glue, this is also a rather interesting option that is suitable for small-sized structures;
- The last two options involve gluing a triangular strip, only one of them cuts into the end, and the second option involves cutting the end at an angle, you need to choose what is best suited in a given situation.
But if you want to connect the board more securely, then one of the following methods will do:
These options have proven to be the best
- The first option is called a smooth joint, which requires very careful grinding of the ends for a tight fit, after which they are lubricated with glue and connected under a press or using special ties. This solution is suitable in cases where high load-bearing capacity is not needed;
Smooth joints are often used in the manufacture of furniture panels
- The second solution is quarter splicing, for this purpose grooves of approximately half the thickness are selected at the ends, this option is more labor-intensive, but its reliability is noticeably higher than that of the previous one, the instructions for carrying out the work are simple: grooves are selected using a router, after which the ends are lubricated with glue , and the structure is tightly compressed until the composition dries;
This is what the connection looks like in the diagram
- You can cut grooves on both sides and insert a strip inside, which is again lubricated with glue for reliability. This solution has proven itself well on elements of large thickness, since in this case the thickness of the wooden slats will be significant, therefore, it will be able to withstand even heavy loads without any problems. Accurate fit of all elements is important, so milling equipment is used for the work;
Example of a keyed connection
- The tongue-and-groove connection is well known to many from floorboards and finishing materials made of wood; here it is important to cut the connection correctly so that the elements fit together as accurately and tightly as possible; a separate option is the triangular tongue-and-groove, it differs in that one end is made in the shape of an angle, and the second has a recess in the shape of a protrusion;
- The last of the options being considered is a dovetail; this type assumes the presence of a groove that expands in depth; due to this feature, the boards are inserted from the end and slide as if on a slide; they cannot be separated without applying significant force, which is also important.
Features of joining profiled material
Contrary to popular belief, profiled material can also be joined along its length. All aspects of such operations are regulated by GOST 30974-2002. The requirements given in this documentation cannot be considered mandatory. They are rather used for corner or shaped connections of profiled wooden elements.
It is important to know! When purchasing material, be sure to ask the seller for a quality certificate, which will confirm that the material meets the requirements of GOST.
Connection of profiled timber
According to these documents, spliced profiled timber can be used for the construction of the following structures:
- internal wall structures, as well as all simple partitions (the length of the timber is from 8 to 22 centimeters);
- external load-bearing wall structures (the length of the timber is from 10 to 2 centimeters).
The connection of profiled timber along the length requires the presence of chamfers in this design. They are needed to drain liquid from the joints. These elements should have dimensions of 2 by 2 centimeters or 1.5 by 1.5 centimeters. As a rule, professional builders use dovetails to join wooden elements of a building under construction.
Return to content
What you need to know for do-it-yourself longitudinal joining
As we said above, the need to connect wooden parts when constructing a building from this material appears when the design documentation provides for the construction of one or more wall structures more than 6 meters long. The binding must be done first on one side, and in the next row on the other, and so on until the end.
This is necessary to obtain an attractive and original appearance, because joints that are staggered look more interesting than those in a row. In addition, this arrangement makes the entire wall structure much stronger and more durable.
When choosing a method for connecting wooden elements, you should pay special attention to exactly how the beam is located in the building structure. The whole problem is the load on these elements, because in different parts of the wall it can be different, for example, a beam can be subject to tension, compression or deflection.
Types of longitudinal connections
All additional fasteners must be made exclusively from hard wood. The humidity of these elements should correspond to the humidity of the timber itself and not exceed five percent. If the parts have more or less moisture than the material itself, the connection will be weak or the part may damage the material.
Each joint must be perfectly level. Before laying the jointed beams, it is necessary to saturate them with antiseptic compounds and allow some time to dry.
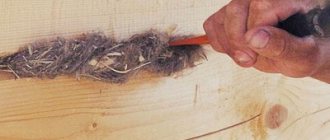
Each joint, including corner or longitudinal, must be insulated with a layer of heat-insulating material. This procedure is best done during installation. To do this, it is enough to cover the joint with flax fiber.
It is very important to remember the moisture content of the material during splicing work. If you overdry the products, then after some time significant defects may form in the joints, which will entail extremely unpleasant consequences. Additional reinforcement of joints must be carried out with special responsibility.
If we are talking about profiled material, then in this case it is better to use such types of connections as a tenon or an oblique lock. This way the wall structures will not lose their reliability. And if all the work is done meticulously, the connecting nodes will not only be reliable and safe, but also attractive in appearance. Now you know how to connect a beam in length and you can cope with this task without the involvement of craftsmen.
Return to content