There are various methods and devices to power two or more devices from one outlet - for example, tees and surge protectors. If it becomes clear that several devices will always be turned on in a certain place, then it is much more convenient and practical to connect the socket from the socket. True, it is necessary to take into account a number of nuances that will affect their normal and long-term operation.
Combined wiring
Combined wiring
This method is used when you need to connect additional ones from one electrical outlet, but you cannot drill into the walls. The procedure for installing and connecting wires in this case is as follows:
- Power outage. It is necessary to de-energize the entire apartment or room in which the work will be carried out. Using a tester, you need to make sure that there is no voltage.
- Removing the protective cover from the main power point.
- Removing the socket by loosening the retaining contacts.
- Connecting wires to the new power point.
- Next, it is checked whether the limiter will not squeeze the wires. If it interferes with the cables, you need to carefully break off a small piece from the socket box or wall to the size of the wire.
- Reinstalling the socket.
- Creating a hole in the decorative cover for the wire.
- Installing the cover.
Testing and operation
To check, power is supplied to this socket group by turning on the machine that serves it, then using an indicator screwdriver, the voltage in the right socket of the new socket is tested.
It is important to remember about power limitations and not to plug powerful appliances into both outlets at the same time. When installing hidden, you should keep in mind that the wire to the new socket is not connected from above, as usual, but horizontally. This circumstance requires caution when installing hanging cabinets, shelves and other wall-mounted interior elements.
Basic mistakes
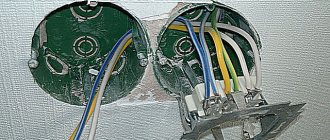
Brown wire - phase, blue - neutral, yellow-green - ground
Installing an additional outlet is usually not difficult. But beginners can make the following mistakes:
Wrong choice of wire cross-section. You need a cable of the same thickness as the main outlet. Using a wire made of a different material. Connecting two different wires causes additional difficulties, and the contact itself is less reliable. Violation of the order of connecting wires
Particular attention should be paid to the grounding conductor. If it is not available in the house (especially in old buildings), it is better to purchase sockets without ground. Unreliable contact
You need to familiarize yourself in advance with the existing methods of creating a contact and practice connecting on spare sections of wires. Installing wires diagonally. Standards only allow vertical cable routing.
There is also a risk of buying a model that is not suitable in design. This is not a critical error from a technical point of view, but can disrupt the overall concept of the room. Therefore, when purchasing, it is recommended to select the color of the product, its shape and size in advance. Manufacturers of electrical products offer a wide range of products; any buyer will find a product that suits the style.
How to steal electricity through grounding. How to steal electricity from an apartment
In Russia, illegal connection to the power grid is quite common, through which electricity is stolen. Electricity is stolen from private and apartment buildings. There are several ways to steal electricity from the network.
Methods of theft:
- Remake the counter;
- Affect the operation of the meter.
With certain skills and knowledge of the design and operation of meters, you can remake them in such a way that they begin to count electricity by 30 - 50% less. For this purpose, these devices are equipped with additional elements.
For example, if the meter is electronic, additional transistors and electronic devices are soldered into its circuit, with the help of which the meter is remotely controlled.
If the device is mechanical, then in this case, the operation of its mechanical parts is changed. For example, they reduce the number of teeth on a gear.
Note! You are responsible for illegal connection to the power grid. If electricians discover an illegal connection to the electrical network, then a huge fine will be imposed on the consumer.
There are several ways to influence the operation of the meter. But in most cases, you will need access to the electrical elements of the device. In older models, it was possible to change the polarity of the connection, due to which the counter began to spin in the opposite direction.
To bypass the meter, some craftsmen will shorten the phase input and output of the meter with a jumper. Thus, the phase bypasses the counting mechanism of the device.
Older models of devices were stopped mechanically, using various wires or plates.
You can influence the operation of the meter using a powerful magnet. But it is worth noting that modern models are equipped with additional protection.
Sockets in drywall
This is both hidden and open wiring - it belongs to the first category because the wires are not visible, and it falls into the second category because the wires are not walled into the wall and can be reached. In addition to standard tools (unless you are installing a socket block), you will need steel wire for installation. The procedure is as follows:
- The socket and socket box are removed from the wall. They are screwed to the drywall, so there is no need to break anything.
- The steel wire is inserted into the hole and pushed in the direction where the new socket is planned to be installed. At this stage, you just need to make sure that there is a gap between the plasterboard slabs, profiles and the wall into which the corrugation with wire will pass (wiring unprotected from mechanical damage cannot be left inside).
- If you can find the way with the wire, then a hole is drilled in the right place for a new socket box. A strong rope is screwed to the wire and it is pulled back.
- Then, using a rope, a corrugation is pulled between the sockets, the wires are inserted into it and connected.
How the new input cable was laid
Mark the wire attachment points directly on the wall. We drill holes and install fasteners. They will allow you to maintain a distance between the wall and the wire. The fastening is searched for using the phrase “facade fastening for wire.”
Corrugated cable fastenings along the facade
The screed is usually included in the kit.
Cable mounts are mounted under the canopy along the facade of the house
To be honest, we managed to meet only one height requirement – at least 2.5 m from the ground.
Gander for fastening SIP and input cable, there will also be a connection point
After installation is complete it looks like this:
New entrance to the house: SIP and corrugated cable on a gander
We are done with this stage.
Installing a block with two and three keys
Installation of such a block makes it possible to control two light sources in different rooms, or two in one room. In this case, not 4 wires are supplied from the distribution box, but five.
- The phase is connected to the jumper of the switching block.
- Only the neutral wire and the grounding conductor are attached to the socket contacts.
- Then the two remaining conductors are connected to the switch contacts.
- In the distribution box, twists are made of the cores that supply the core and those that go to the lighting fixtures.
Three-key combined devices are the best option for small apartments. They often have a bathtub, a toilet and a kitchen nearby, and the lighting is switched on on one wall. If there are three keys, then you will need a cable with six cores, three of which are also connected to the switch terminals.
Turn off the electricity
De-energize the room using a switch in the electrical panel on the landing or in the apartment. To do this, the handles of the machines need to be moved down - the indicators on them will change from red to green or from one to zero. Circuit breakers are not always labeled, so be sure to check that the power is actually off.
The flags are cocked and the red indicator is visible - the machine is on / ac220.ru
If the apartment has a distribution board with several circuit breakers, turn off only those that protect the outlets. This way you can work under light and comply with safety measures.
Wire selection
The wire is selected according to this principle:
number of cores If you decide to install a socket with a grounding contact (see above), it is connected with a 3-wire wire. Otherwise, use 2-wire;
material. In general, when installing wiring, it is recommended to use copper cable - brand VVGng (in non-flammable insulation) or NYM (imported analogue). Copper is superior to aluminum in electrical conductivity and ductility (the aluminum core breaks off after several bends). But with a daisy chain connection, a wire made of the same material is used that is connected to the first outlet. If a copper conductor is directly connected to an aluminum conductor, when current flows, both materials are destroyed due to an electrochemical reaction. A special neutral alloy adapter is required. Aluminum wires (brand AVVG, etc.) are found in old houses
Therefore, before installation, it is important to open the existing outlet and see what it is powered by;
core section Also selected according to the wire connected to the first socket (when using cables of the same material)
There is no point in using a wire with a larger cross-section, since the throughput of the “chain” is still determined by the capabilities of its weakest link.
For household sockets, the minimum recommended core cross-section is 2.5 mm2 (for copper wire). Such cables, when laid hidden, can withstand a current of up to 16 A (when open, even more due to good heat dissipation), so you can safely plug in any device into the outlet, except for particularly powerful ones - an electric stove and an instantaneous water heater.
If the first socket of the loop is powered by a wire with 1.5 mm2 cores (mainly used in lighting networks), you should think about replacing it. Otherwise, only the lowest-power devices can be connected to the loop sockets.
Should I wire the socket from the socket or not?
The option of installing an additional outlet will help get rid of quarrels between family members who require electrical points to turn on various household appliances.
This problem arises especially acutely in the kitchen with the purchase of new equipment - a blender, mini-processor, yogurt maker, bread maker, multicooker and other appliances.
It turns out that the existing sockets can no longer cope with their responsibilities - their number is physically insufficient to meet the needs of all households. On our website there is a whole article dedicated to the selection and placement of kitchen outlets.
Therefore, it would be advisable to decide to install an additional outlet from an existing one.
A technically equipped kitchen needs a sufficient number of electrical connection points. This should be remembered at the stage of drawing up an interior design project for the future premises.
But here you may encounter a real problem - it is not always possible to complete such a task. There are a number of restrictions when it is categorically impossible to carry out such a modernization of the existing electrical network:
- if you need an outlet for an electric stove;
- when you decided to connect a boiler with the washing machine;
- if the total power of the devices is more than 2.2 kW.
In houses or apartments where the owners purchased a new electric stove to replace the old gas stove, a new outlet will be required to connect it. In such a situation, it is impossible to wire another one from a regular outlet to turn on this powerful device.
Here you will need to install a separate branch from the distribution box, or even better, from the panel. Yes, and a residual current device for powerful equipment needs to be installed. In order to learn about the rules for connecting an outlet for an electric stove, we recommend reading this material.
Another unfortunate example is when the bathroom only has an outlet for the washing machine. But over time we purchased a boiler. Read on to learn how to properly position and connect sockets in the bathroom.
These devices cannot be plugged into one double socket at the same time - the wiring may burn out. It will always be problematic to control the order in which the boiler and washing machine are turned on.
The result of a network overvoltage can be disastrous - it’s good when the problem was discovered in time or the circuit breaker tripped and a fire was avoided
It is also necessary, even before starting work on installing another outlet, to calculate the expected power of the devices that will simultaneously be included in the new block of outlets.
Often they plan to upgrade the connection point to the electrical network, which is fed by a wire with a cross-section of 1.5-2.5 mm2. Therefore, the total power of the devices can be slightly more than 2 kW.
You cannot turn on a dishwasher, an oven and a heater, or a boiler and a washing machine at the same time in such neighboring sockets, powered from one core.
Some tips
Since these units are still considered new, it is necessary to provide several recommendations regarding how to connect an outlet with a switch.
- If installation is planned in a wooden house, then the socket box should be metal.
- When the unit is mounted near a doorway, the part that is the switch is located closer to the door.
- If you don’t have enough knowledge in electrical engineering, no work experience and no confidence in the correctness of your actions, it is better to entrust the work to professionals.
- Often home craftsmen make various mistakes when connecting. The most “popular” mistake leads to the fact that the socket is in working condition, but the switch refuses to function. In this “severe” case, the incorrect distribution of wires is to blame - confusion with the phase and neutral on the socket. The solution is to connect the phase conductor to the jumper and return the neutral conductor to the socket.
Sometimes such designs become the only possible solution, and in this case the owners no longer have to think about the pros and cons of the blocks. Understanding how to connect an outlet with a switch will make it possible to cope with similar work in the future.
An example of such a connection can be seen in this video:
When it becomes necessary to install a double socket
Double socket
In some cases, a 2-socket outlet is a necessary measure, especially for apartments built in the mid-to-late last century. Their peculiarity was an extremely inconvenient arrangement of electrical appliances. In most cases, one of them ended up behind cabinet or upholstered furniture, and the owners had one point at their disposal in the corner of the room. Installing long external pads in such places is neither practical nor aesthetically pleasing. This will lead to the fact that over time a trail of wires will stretch to them that do not fit into the interior. The best solution in such situations is to install double recessed sockets.
The advantages of this solution are the following:
- The products have one body. There is no need to make inserts and jumpers using twists. The cable retains its integrity after installation and connection of the device.
- Common cover for both sockets. This is not only aesthetically pleasing, but also practical. To install covers when installing dual outlets, you will need to widen the holes in the wall to increase the distance between the mounting blocks. In any case, there will be a gap between the outer linings, which will not decorate the wall in any way.
- There is no need to drill a hole for a double socket box. Double designs fit perfectly into standard glasses in the walls. Their mounting blocks correspond to the dimensions of single products.
- Easy to install. Connecting a two-socket outlet is as easy as connecting a device with one input. The caliper and spring-loaded feet ensure precise positioning and strong fixation of the mechanism.
Serial and parallel connection
The daisy chain method is otherwise called serial connection of sockets. In contrast, the parallel connection method provides for powering each outlet with a separate line from the distribution box (for the most powerful devices, a line is drawn from the distribution board).
Advantage of daisy chain connection:
- less dirt and dust is formed: the groove is made in a short area between the sockets;
- for the same reason, labor costs are reduced;
- cable costs are reduced.
But there are also important disadvantages:
- low reliability: if the wire burns out, all subsequent sockets of the loop become inoperable;
- limited power: the maximum permissible current, determined by the cross-section of the cable cores of the first socket (at 2.5 sq. mm 16 A), is divided by all devices included in the loop (with a parallel connection, each socket can consume the maximum current);
- startup and shutdown of the device are accompanied by more noticeable voltage drops in adjacent sockets than with a parallel connection.
Connecting sockets with a cable. Features of connecting sockets with a cable
Schemes for connecting sockets with a cable
Connect sockets with a cable in several ways;
— radial connection or star connection is used when installing electrical wiring in houses and apartments. With this type of installation of sockets, each socket is connected to the distribution box or electrical panel with a separate line and they are installed in one place, side by side.
This method is characterized by great reliability and safety, but due to the need for additional cables, it is considered the most expensive. The strobe for this method of parallel connection can be made one wide for all dogs. If the sockets are intended for heavy loads, then this installation method is necessary;
— a ring connection diagram involves connecting sockets on both sides, that is, on a ring. This type of connection increases the reliability, safety and efficiency of electrical wiring. But in our country this method is practically not used, although it is quite popular abroad;
- connecting sockets with a cable (in parallel) is done in order to reduce cable costs, but in this case the reliability and safety of the electrical wiring is reduced. With this connection option, it is necessary to ensure that the total power of the loads of the socket outlets does not exceed the permissible cable current.
Connecting sockets with a cable
For daisy chain connections, it is necessary to ensure that the total power of the socket loop loads does not exceed the permissible cable current. Here, the permissible load per socket is lower than that of a single socket with a separate line or a socket connected using a radial method.
Features of installing sockets with a cable
Connecting sockets with a cable has its pros and cons. The downside is that if a wire breaks in a group, subsequent sockets will not work. With fewer sockets in a group, their reliability increases. The only advantage can be considered the savings and ease of installation of electrical wiring.
Connecting sockets with a cable without breaking the grounding by soldering
The connection of sockets with a cable according to the PUE must be without breaking the PE conductor. Grounding is connected to the terminals of the PE socket only by a branch. This is due to the fact that if the grounding conductor breaks, the socket is left without protective grounding. The power of a group of sockets should not be more than 3 kW and is connected to a 16 A circuit breaker. If the load of the group exceeds 3 kW, then it is necessary to run a separate line to each socket.
The procedure for installing branches in a socket box
Often they connect a group of sockets to one three-core cable and connect them with a cable, that is, in parallel. With a parallel connection, the requirement for continuity of protective grounding is not met. Connecting two PE conductors with a loop on one terminal reduces the reliability of the contact.
A cable connects all three conductors in each socket (phase, neutral and ground). Connection with a loop is done in the case of light consumer loads and under normal operating conditions. A cable is also used if it is necessary to quickly add sockets.
Connecting sockets with a cable without breaking the PE protective grounding using the crimping method
When connecting with a cable, to increase the reliability of contact, the ends of the wires must be bent under the ring and soldered. It is advisable that the terminal have a rectangular washer to ensure tight contact. However, the correct connection of the PE grounding conductor must be without a break and have a branch.
The ends of the grounding wire are connected by crimping to the branch terminal. After crimping, the sleeve is insulated with a special cap. This grounding connection is made for each socket in the socket box. Crimping is considered the most reliable connection and ensures continuity of the ground wire.
The tap reduces the load on the terminal. Some experts recommend using a tap-and-crimp connection, not only for grounding, but also for the phase and neutral conductors. There is enough space for laying branches and crimping in modern socket boxes. They make a daisy chain connection when adding one or two sockets, with minor repair work.
How are sockets and switches connected?
We hope that the general part of the circuit structure is clear to everyone. Now let's see how the electrical points are connected to it.
Connection diagram for luminaires via a two-key switch
So, we have a group power wire that comes into the junction box. This wire can have two or three cores. According to modern standards, three-core wires are used for these purposes. It is worth saying that the connection diagram will not change much depending on the number of available wires.
- All three wires will have different color markings. White or pink is phase, blue is zero, and yellow-green is ground. Be careful and careful when making connections, as there is always a chance that the electrician connected the wires to the machine incorrectly. Pre-check the wires for voltage with a tester.
- Let's start the analysis by connecting the outlet. The phase and neutral are connected to its power contacts, while the “ground” is connected to the grounding contact. That is, to connect it to the network, all three wires are used.
Grounding is required to transfer charge from the device body to the ground loop, which avoids electric shock.
- With the switch, everything is a little more complicated, since this part of the circuit also includes a lighting device.
- So, we have three wires in the box - they are separated from each other and we can clearly see the color coding, which corresponds to the actual parameters of the circuit. A two-wire or three-wire wire is laid from the distribution box to the switch box - the first is taken for a single-key switch, and the second for a two-key switch. If there are even more keys, then the number of conductors increases proportionally.
- We screw the stripped ends of the wire to the switch terminals. Let us say right away that only phase wires will be suitable for this device, regardless of their number. The fact is that the task of the switch is to break the circuit and stop the supply of electricity to the lighting fixture. That is, the ends of the wire are input and output.
- Already in the distribution box, one core connects to the phase conductor of the group wire. The second core is connected to another wire, which is extended to the lamp as a phase. This wire also has two or three cores - the second is connected to zero according to the color marking, and the third is connected to ground. We do the same if the switch is two-key, but according to a slightly more complicated scheme. Here the task is to divide the lighting fixtures into groups and turn them on separately.
Connecting wires in a junction box
Video - Connecting a socket and switch
If you have read the above carefully, then you already understand that the connection diagrams for the points are completely different and there is simply no zero or grounding in the switch box so that you can connect the outlet. So how can this be done? Let's name all acceptable methods.
Pros and cons of this connection method
There is only one advantage and it is always visible - ease of use, because you no longer have to fiddle with carriers, trip over wires or worry that the tee will loosen the contacts of the socket and fall out of it.
In order to fully evaluate the possible shortcomings, you need to disassemble the device and see what wire is connected to it - most often it is wiring with a cross-section of 1.5 or 2.5 square millimeters. Such a cable will easily support the connection of one household device with a power of about 2 kW and, with some stretch, a couple of such devices. What saves sockets and wires is that several powerful devices are connected to one of them quite rarely - basically it is one device of 1-2 kW and several weaker ones.
Before you install an outlet or several from an existing one, you must take into account that each subsequent one is a connection of wires, which is an additional resistance to electric current. Even if you connect one powerful device, but to the last socket, there is a possibility that the previous contacts will heat up. The nature of electric current is such that it has a vibration effect on the wiring, as a result of which the contacts inevitably weaken over time. According to the rules, all electrical contacts in enterprises must undergo an annual inspection and tightening of bolted connections.
On the other hand, in living rooms the most powerful device is usually an electric heater - if it is not homemade, with contacts made unknown, then two sockets connected in series and their wiring can easily withstand it.
The third question is the kitchen - this is where the most powerful devices are usually assembled in terms of electricity consumption: dishwasher, microwave, electric oven, oven, electric kettle, toaster and others that “eat” from 1.5 kW. “Hanging” them on one wire is strictly not recommended, unless it is the weakest of them, for example, a microwave oven paired with a kettle or toaster.
How to choose the right method
Connecting two outlets to one cable
To choose parallel or serial connection of outlets, you need to calculate several parameters: the amount of money that can be spent on electrical wiring, equipment power and wall decoration (the ability and desire to redo repairs in case of breakdowns).
The optimal way is to connect two sockets to one wire of a panel or distribution box - a parallel connection. If the room does not have a large number of sockets and appliances (for example, only a TV), the loop method is suitable.
Which way to use
This issue is resolved in each case individually, depending on where the “parental” outlet is located and what power the connected device will be. If these are not kitchen sockets for an oven or points for powering a boiler with a washing machine, then calculations and practice show that several sockets will work without problems without causing overloads in the network.
The main condition when installing any sockets is good contacts between the wires, which reduces the overall resistance of the wiring and the likelihood of it heating up during operation.
Is it possible to connect sockets in series?
Connecting sockets in series mode has a number of disadvantages and limitations. In a large room and a significant number of powerful electrical appliances, this method cannot be used - the load is too high. It is better to parallel the sockets or use the ring type. The recommended quantity per chain is 5-6 pieces.
Another disadvantage is the uneven distribution of voltage at power points. Each outlet accounts for a portion of the total electrical flow. Therefore, serial connections are not used in residential and industrial premises. But you can use it in Christmas tree garlands and others.
Correct connection of sockets with a cable
All sockets located on the same electrical group have the same connection diagram - parallel. But you can “parallel” sockets in different ways: connect them in junction boxes (twisting, terminals, soldering) - 1. or connect them to each other at the terminals, bypassing these boxes (connection with a cable) - 2.
Which socket connection to choose. By connecting sockets with a cable, you can significantly save on material - wires, boxes and, accordingly, significantly reduce labor costs. However, currently in the Electrical Installation Rules (PUE) there is a clear and unambiguous prohibition on breaking the PE conductor (“ground”).
If you are changing the electrical wiring in your apartment (house), there is nothing particularly to be afraid of - after all, you do not need to officially put the facility into operation, but you must agree, it is better to sleep peacefully, knowing that the electrical wiring of your home is in order and meets all regulatory electrical safety requirements.
How to properly connect sockets with a cable. without violating the PUE? There is an alternative: the figure shows a method for connecting sockets in this way. The method is quite old, but proven, and for reliability it is better not to limit yourself to the “ground” wire, but to leave the current-carrying wires – phase and neutral – unbroken.
With this connection of sockets, the load on the terminals of the first socket where the power “comes” will be limited only by the power of the household electrical appliances included in it. This method of connecting sockets extends their service life and, most importantly, keeps the PE conductor (“ground”) intact.
Copyright 2010-2016 When using site materials, an active link to remont220.ru is required
The site uses cookies. By continuing to browse the site, you agree to the use of cookies.
Installation procedure
Drywall is a fragile material and must be handled with care.
Before you begin installing sockets yourself, you will need to read the installation instructions. The easiest way to consider an example is when they are installed in a plasterboard wall. The work order in this case looks like this:
- Take an electric drill with a “crown” type attachment, through which a hole for the socket is prepared in the selected location. Its diameter must match the size of the plastic case (glass) used as a mounting base and fixed directly at the installation site.
- The mounted socket is placed in the glass and secured in it using long spacer screws.
- It is necessary to connect the phase and neutral conductors brought out to the contacts, and then close the product with a decorative cover.
At the final stage of work, you should supply power to the line and check the socket for functionality - connect any household appliances to it.
To correctly connect several outlets in a row at once (with a cable), experts advise paying attention to the following points:
- The wire from the phase terminal of one socket unit is pulled to the same contact of the next product, and so on. To such a cable you can add the entire set of sockets installed in a given room.
- The same is done with the neutral conductor, laid from the corresponding contact to the second and subsequent products mounted on the wall.
- If there is a grounding conductor, the same operations are performed with it.
The advantages of this connection method include ease of implementation and economical use of consumables (wires). The disadvantages are the unreliability of the system, in which a break in one of the conductors will lead to de-energization of all subsequent sockets connected to this loop. In this sense, a star connection looks much preferable.
Selecting a wiring method
All ways to wire a socket from an outlet come down to how they will be secured - inside the wall, outside or from the inside of the “parent” point, the wires will be brought out. All other working issues are solved in the same way in all cases:
- Wire thickness. Everything is simple here - they should not be thinner than those that fit the “main” outlet. Otherwise, when a sufficiently powerful consumer is connected to a “daughter” socket, the contacts will heat up - sooner or later the wire insulation, the plastic cover, or both will melt.
- Design. From a functional point of view, there are no special restrictions here - some will be satisfied with “as long as it works”, while others will choose “so that it is beautiful and matches each other and with the wallpaper”
- The order of connecting contacts. On household devices there may be two or three. If there are two, then this is phase and zero - which wire is connected where does not matter, the main thing is that they are “connected” to different contacts. When three wires are used, this is phase zero and ground - its socket contact usually sticks out from the device body when you remove the cover from it. You need to find a fastening bolt on the contact and screw the grounding wire there.
- Grounding. It all depends on its presence - if it is in the first outlet, then it is strongly recommended to install a grounding wire to the following points. In this case, it is necessary to take into account the requirements of the PUE - the cable should, if possible, be solid with separate leads to each point.
brown wire - phase, blue - neutral, yellow-green - grounding
There is one important nuance in the last question - initially the grounding wire was connected directly to the grounding contacts, but it cannot be connected in the same way as the phase and neutral wires - from contact to contact . This is prohibited, since if the core burns out, all subsequent devices will remain unprotected. How to make the correct connection is shown in the figure - the main wire is unscrewed from the contact and a twist is made on it.
A separate vein goes to the first point and another one - the “main” - to all the others. It is directly connected to the last point, and the previous ones, like the main one, are “hung” on it using separate wires.
All further actions depend on the installation method.
External wiring
In its pure form it is found in wooden houses or among fans of the retro design style.
wiring in a wooden house in copper pipes
In the first case, its use is due to strict fire safety requirements, which do not allow theoretically flammable objects to be placed in wooden walls. Additional difficulties here can be metal pipes, into which wires are often inserted to avoid even theoretically possible contact with the wall surface. This means that connecting an outlet from another outlet in this case means an almost 100% guarantee of the need for additional plumbing work.
retro wiring
If the wiring is simply made in a “retro” style, then adding another from one outlet means breaking the entire picture being created. The whole point of this style is that the wires are neatly routed from the junction box to the outlet. They are often twisted in a spiral and generally look like openwork weaving hanging in the air. In order not to risk ruining the entire design, it is simpler, more beautiful and more reliable to spend a little more cable, but make a separate outlet from the junction box.
If you really need two sockets and for some reason you can’t run a wire from the distribution box, then there is another way out of this situation. It consists of placing the new outlet next to the old one - on one dielectric stand. If they have the same design, then this will already be a made block of sockets - in this case, the wires can be hidden behind their covers and the overall picture will not be affected.
Hidden wiring
It is called so because it is not visible, since it is hidden inside the wall, for which purpose, during installation, grooves were cut into the concrete into which the wires were laid. Then these grooves (correctly called “grooves”) are sealed with plaster or cement mortar, after which the wall is painted, wallpaper is glued to it, or other finishing is done.
hidden wiring
As a result, in order to stretch a wire from an existing outlet to the next one, first of all you need to imagine whether it is possible to cut a groove in the wall, drill a hole for the socket box, and only then make the connection.
If it is not planned to connect powerful loads to the new point, then this method - how to connect an outlet from an existing one - is the most preferable, because labor costs will be much less than with a full installation from a distribution box. If you don’t want to excessively damage the wallpaper, then this solution becomes almost the only possible one.
socket block
If the new point does not need to be located at a distance from the old one, then installing a block of sockets will help again. Next to the first one, holes are cut out in the wall for them and the wire is hidden inside them. When such a scheme for connecting an outlet with hidden wiring is used, then with due care the entire finish remains intact. The size of the socket cover is larger than the diameter of the socket box, so even taking into account cutting a larger hole (which is necessary for its installation), the decorative overlay covers all traces of cutting the wall.
Combined wiring
The results of this method of connecting one or more from one outlet are viewed with certain coolness by professional electricians, especially if some shortcomings were made during the installation process. But for a number of reasons, home craftsmen most often do this if they need to connect another outlet from one outlet, an additional outlet, but they cannot drill into the wall...
Such situations happen all the time, for example, in rented apartments - the owners do not give permission for redevelopment, and in some houses there are sockets on only one, or maximum two, walls out of four, and it is far from a fact that they are located in the right places.
Installation procedure
The general principle by which new points are correctly connected using a combined method is as follows:
- Trite, but necessary - the electricity in the apartment is turned off (or only the outlet itself is de-energized).
- The cover is removed from the “parent” socket and the extent to which it covers the hole for the socket box is assessed.
- The expanding tendrils that hold the inner part of the socket in the socket are weakened - it is removed so that there is free access to the contacts.
- The wires that will go to the new outlet are connected.
- Before inserting the inner part of the socket into place, you need to check whether its limiter will not squeeze the wire (usually this is a rectangular steel plate protruding beyond the socket box along its entire perimeter). If this is the case, then you need to carefully break off a piece of the electrical outlet (or maybe the wall) so that the wire can pass through there freely. Next, the socket is installed in place.
- A hole is cut in the cover to the size of the wire so that it fits well to the wall. The housing is then screwed into place.
- The connected wire is lowered to the baseboard and guided along it to the desired location, secured with electrical wiring brackets every 30-40 cm.
This video discusses in detail the installation and connection of sockets:
Options for hiding the wire
The method in which the socket is secured is selected depending on how it is planned to be used. The new socket (for this type of installation, an external one is chosen) can be screwed to the baseboard or simply left as a carrier. The wire that goes from the socket to the baseboard can be inserted into a cable channel, but for this it must be glued to the wallpaper or firmly secured between the socket cover and the baseboard itself.
If the socket is being installed seriously and for a long time, then it is worth trying to completely hide the wire. If there is a layer of plaster on the wall at least 3-4 mm thick, then you need to scratch a groove for the wire in it - then it will be flush with the surface and you can putty it or paint it over.
If wallpaper is pasted on the wall, then it is cut along the wire laying line and spread to the sides. To avoid tearing them, it is advisable to wet the seam. When the wallpaper is peeled off the wall, you can scratch a groove in it for the wire, lay it down, putty it and stick the wallpaper back.
Connecting the cable
Connect to an existing outlet like this:
- the end of the new cable is cut to a convenient length;
- free the ends of the cores from insulation to a length of 1 cm. There is a special tool for this operation - a stripper (also known as a crimper), which eliminates the possibility of damage to the core. In its absence, the insulation is carefully cut off with an ordinary knife, trying not to damage the core;
- the bare ends of the strands are bent into loops and lightly squeezed with pliers;
- Having pressed the spacer antennae, remove the inner part of the socket and loosen the screws on the phase and zero terminals. The grounding conductor is completely unscrewed;
- the power cores of the new cable are inserted into the terminals and the screws are tightened. Now each terminal has two wires - from the power cable and from the jumper for the new socket. The colors of the insulation on the cores in each terminal are the same.
Grounding is connected differently. For it, connecting with a cable is unacceptable due to low reliability: if the contact in one of the sockets burns out, all subsequent ones will be left without grounding. According to the PUE, it is necessary to maintain the continuity of the conductor by making a branch for each socket.
Do this:
- a crimp sleeve is put on the unscrewed grounding conductor of the supply cable and two more conductors are inserted into it: from the jumper cable and a short section - a branch for the existing socket;
- press the sleeve with press pliers;
- put a heat-shrinkable tube on it and heat the latter with a hot air gun or lighter (insulation);
- Screw the branch to the grounding contact of the existing outlet.
Do the same when connecting each subsequent socket of the cable. The existing outlet is being assembled
It is important to make sure that the limiter on its inside (a rectangular metal plate) does not squeeze the jumper wire. If this is discovered, a cutout is made for the wire in the socket box, and if necessary, the hole in the wall is deepened
Arrangement of a new outlet
Steps to install a new outlet:
- the end of the jumper wire is inserted from the back into the socket box and it is installed in the hole;
- fix the socket box with plaster or alabaster mortar;
- connect the conductors to the terminals of the internal part. Phase (in brown insulation) - to the right contact, zero (in blue) - to the left. The grounding conductor (yellow-green) is screwed with a special screw;
- install the internal part into the socket box;
- install the front panel.
Kinds
A new outlet is selected based on a number of important technical parameters.
type of instalation
There are two options:
- mortise: installed in a hole drilled with a crown;
- overhead: screwed onto the wall with self-tapping screws.
Mortise ones in combination with hidden wiring (cables are hidden in grooves and sealed with mortar) are installed in residential and other premises with high aesthetic requirements.
Invoices with open wiring are used in garages, country houses, etc. - they are easier to install.
Presence of grounding contact
Grounding household electrical appliances is desirable because it protects the user from electrical injury. But it can only be implemented in houses with a grounding system organized according to new standards (type TN-CS).
In older houses with a TN-C system, grounding is not connected to sockets; therefore, you should purchase a product without a third contact.
Even if the house has a modern TN-CS grounding system, you should not rush to buy an outlet with a grounding contact. Since it was decided to power the new point from an existing outlet, you first need to make sure that a 3-wire wire is connected to it.
If it is connected with a 2-wire wire, then even if there is a grounding contact on it, there is no point in buying a socket with grounding.
Socket diameter
There are two types of sockets:
- Soviet model;
- Euro sockets: with sockets of increased diameter.
The choice of outlet depends on the type of plug on the electrical appliance. The error is not critical: there are adapters for connecting Soviet-style plugs to European sockets and vice versa.
Terminal type
This determines the quality and reliability of the contact in the socket. If the contact is poor, the wire becomes very hot, which can lead to burnout or fire.
Sockets are equipped with three types of terminals:
- flat spring. The most reliable variety;
- screw with pressure plate. To fix the wire in the terminal, tighten the screw against the copper plate. The terminals are flat spring, inferior in reliability, but quite acceptable;
- screw without pressure plate. The option where the cores are simply pressed with a screw is the worst; purchasing such a socket is not recommended.
Installing an outdoor (external) outlet
These types of sockets are very popular in wooden private houses and country houses. To install such an outlet, you do not need a socket box. The socket is attached to the wall using self-tapping screws.
As for the electrical cable, it is laid in cable ducts or simply along the wall with fixation using special plastic brackets.
An example of cable channel installation is presented below:
In the photo above the cable channel is open
An example of self-tapping screws for attaching a cable channel
For example, consider the process of installing and connecting a double outdoor socket:
Step 1.
Remove the front panel of the socket.
Step 2.
We fix the socket to the wall using self-tapping screws and connect the power cable:
Step 3.
In the front panel of the socket you need to make a small cutout for the cable, as shown in the photo below. To do this, it is convenient to use metal scissors:
Step 4.
We install the panel in place and close the cable channel.
How to install it yourself?
It’s not difficult to figure out the correct wiring and installation of wiring boxes. The main operations are carried out even before the finishing of the premises.
- Having decided on the consumers and locations for installing the sockets, they move on to marking them on the walls.
- The center is outlined, after which a hole 40–60 mm deep is made with a 63 mm crown for the “socket box”. If you don’t have a special tool, you can get by with a chisel and a hammer. Many professional electricians prefer to work with a grinder and a hammer drill.
- Then you can proceed to securing the mounting box with the wire passed into it. Usually fixation is done using building gypsum or plaster mixture. It is permissible to use special glue.
- After “cementing”, all voids and cracks around the perimeter of the box are sealed with plaster.
The length of the protruding wire must be at least 150 mm so that when connecting, you can easily install a socket or switch.
Conclusion
We have considered almost all possible options that you may encounter when installing and repairing sockets. But some “mega-specialists” forget the PUE standards given in clauses 1.1.27 and 1.1.28, which say that all electrical installations must have the most simple and clear diagram possible.
Because of this, incidents are possible. Therefore, when installing your electrical network, “you shouldn’t reinvent the wheel,” but do everything according to the rules. This will save not only a lot of nerves and strength for those who will be doing the repairs, but also possibly their lives.
At what height should sockets be installed?
The installation height of sockets is determined based on purely practical considerations. It is necessary to take into account user convenience, the length of the power cable for heavy devices (refrigerator, washing machine) and safety. Sockets break down from time to time and need to be replaced or repaired. When preparing installation, you should remember this.
The distance to the sockets from the floor is usually from 30 to 80 cm. When installing at a low height, you should take care of the safety of children by choosing devices with special curtains. The upper point of the outlet location is not determined by the standards.
But you need to know that there should be at least 15 cm from the floor slab to the socket, and at least 10 cm from the edge of the window opening. A socket block installed away from the window is better protected from temperature changes, from water, dust and other atmospheric factors.
Briefly about retractable sockets
In the article we did not pay attention to this type of electric point. This concept has only recently been introduced to the market, but is nevertheless quickly gaining popularity.
Retractable socket built into the tabletop
Structurally, such devices are much more complex than standard products, and accordingly their cost is much higher. The factor of novelty also has an important influence on the price. In the near future, an overview of these devices will be presented on our website, including information on how to install a socket of this type.
What is needed to switch the circuit?
Electrical wiring can be open or hidden. In this article we will consider the connection of sockets and switches made according to the second option, when all electrical switching is hidden under a layer of plaster. Hidden design is the most common type of electrical wiring; open wiring is usually used as a temporary option.
Preparing the walls
Before connecting a socket and switch in the room, you need to prepare holes in the wall for their installation and grooves in which the wires will be laid. There should be three holes in total - for the junction box and for the connected switching devices.
It’s better to draw an approximate drawing on a piece of paper in advance, where exactly you plan to connect the switch and socket, and what route the wires will take to these places.
The hole for the distribution box is made, as a rule, under the ceiling, 10-15 cm lower. Holes for switching devices are made at the site of their planned installation. It is better to install the socket at a distance of 30 cm from the clean floor, where household appliances will be connected to it. It is advisable to install the switch at the entrance to the room at the level of an adult’s lowered hand - about 90 cm from the clean floor. These works are performed with an electric drill with a special bit for brick or concrete, a hammer drill with a Pobedit drill, an impact drill or an angle grinder.