Floor leveling is mainly used for laying ceramic tiles or in the case of installing heated floors. For leveling, semi-dry or liquid cement-sand mortar can be used. There are several types of beacons for leveling the floor, some of them can only be used under semi-dry screed, while others are universal or only under liquid screed. We will talk about the most commonly used options and describe the universal technology for preparing beacons. Each master makes his own changes to it, and chooses the option that is more convenient for him to do.
Leveling floors according to beacons
The task of all beacons without exception is to serve as reliable guides for the rule, to ensure the most even horizontal plane of the screed. Craftsmen independently choose the leveling method, taking into account not only the physical properties of the materials, but also specific conditions: the size of the premises, the material used to make the base, the presence of various special and available materials.
Using beacons
Cement screed - implementation features
Beacons made of self-tapping screws
Used mainly by experienced craftsmen, they can be used on both concrete and wooden floors. They are self-tapping screws screwed in on one horizontal plane.
Step 1. Using an electronic level or water meter, mark a horizontal line at the level of the zero mark.
Definition of zero level
Step 2. Taking into account the length of the rule, mark the distance between the lines for installing the screws. Keep in mind that the rule should be 10–15 centimeters larger than the distance between the beacon lines.
Step 3. Screw the self-tapping screws into the corners of the room, and pull the thread level between them.
Self-tapping screws as beacons
Point pin beacons
Step 4. Along the thread at a distance of ≈ 20–30 cm, drill holes for dowels and insert hardware. The length of the screws is 30–40 mm. The greater the difference in height of the base, the longer the dowel-nails are needed.
Dowel nail
Step 5. Screw the self-tapping screws into the dowels and gradually level their height along the stretched rope. You can also use a level, but the first method is more reliable and faster.
Point pin beacons
Important. The rope must be pulled with sufficient tension, it should not sag. If you do not follow this rule, a sag will appear in the middle of the room, and you will have to level the floor a second time. As a result, all screws must be strictly horizontal at the same level.
Practical advice. Keep in mind that when scratching, you need to know the thickness of the metal profile or wooden strip that will rest on the screw heads. If this is not taken into account, the screed level will be higher than planned.
Step 6. A lath or profile is placed on the caps, and you can begin to make a screed. If the room is longer than the slats, then as the work moves from one end of the room to the other, the slats move slightly along the screws.
Installed beacon
Layed profile and floor leveling process
For inexperienced builders, the lath may spontaneously fall from the screw heads. To eliminate such an unpleasant phenomenon, fix the position of the slats with a solution in some places. To make the solution harden faster and allow you to work, sprinkle it with dry cement several times, it will draw out the water and speed up the setting. A simple method can save you several hours of time.
The disadvantages of this type of beacons include the need to drill holes in the floors.
If you are engaged in construction work professionally, then it makes sense to make reusable beacons that can be used in most cases. They are made from wooden or metal slats. For manufacturing you will need smooth wooden slats with dimensions of ≈ 20×30 mm and self-tapping screws 80–100 mm long. The length of the slats does not matter. At a distance of approximately 20–30 cm, holes are drilled and bolts and nuts are screwed in on both sides or self-tapping screws. It is desirable that hardware have galvanized surfaces or are made of stainless alloys. The length of the hardware is at least ten centimeters.
Fasteners for beacons
Such beacons are set according to the same principle as adjustable floor joists. First you need to determine the minimum thickness of the screed; for this, find the highest place and from it, approximately 1–2 centimeters away, use a level to make marks on opposite walls. Next, the distance between the beacons is determined; it must be less than the length of the rule. Experienced builders can work with a rule longer than one and a half meters; for beginners, it is better to have shorter planks.
Aluminum rules for plaster and screed
Rule
Important. You need to understand one dependence. The length of the rule affects not only the productivity of work, but also its quality. The dependence is inversely proportional to length. The shorter the rule, the easier it is to work with, but the quality may deteriorate.
The fact is that inexperienced craftsmen most often allow a difference in height at the joints of the screed between the beacons. More lines with beacons means more kinks in the screed will be made by the builders. The long rule is more difficult to work with, but the floor is smoother. This rule applies to absolutely all types of foundations and floor leveling materials.
Floor screed using beacons
The thickness of the screed is regulated by SNiP 2.03.13-88. File for download
SNiP 2.03.13-88
Installation Rules
Installation of beacons on the floor surface must be carried out carefully. Otherwise, it will be difficult to get a level base. To begin with, a zero point is determined, which is considered the starting point for all other installed beacons. There should be an equal distance between them over the entire area.
Installation of beacons is best done together with a laser level. With its help, a level line is marked on the wall using control points connected to each other.
In each corner of the room, you need to determine the distance from the floor to the control point. It is not uncommon for the highest point to be located approximately in the middle of the wall. For this reason, the cord should be drawn at the level of the measured point to the opposite wall at the level of the control points. When it does not cling during the transition, you can begin pouring the self-leveling floor along the beacons. Otherwise, you will need to knock down the protruding elements with a chisel or set a new zero level (if the elevation cannot be eliminated).
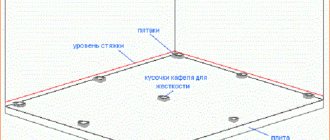
Lighthouses from solution
The “oldest”, most reliable, universal and fast technology. During the production of beacons, part of the floor is leveled at the same time - the screed process itself is accelerated. There are many varieties of mortar beacons; wooden slats or metal profiles can be used as upper guides; experienced craftsmen do not use slats at all, but align linear beacons along a plane using a level. This technology eliminates the need to seal the marks left by the slats after the screed has hardened and been pulled out.
Lighthouses from solution
Which manufacturing method to choose is up to everyone to decide on their own, taking into account work experience and practical skills. We will tell you the easiest way to install beacons - using a wooden or metal guide. It is better to use a metal one; it can be left in the concrete. Sometimes you have to pull out the wooden one, and then seal the groove.
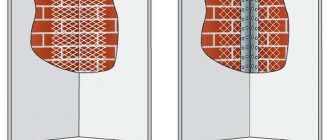
With the help of beacons, you can make a screed over the waterproofing from the solution without damaging it. Although they require a little more time, the performance of the screed does not suffer; the beacons themselves are already part of the screed, and not a small one. If the load on the screed is not too large, then the beacons can be made using alabaster, it hardens much faster, and there is no need to take a fairly long break. But only experienced builders can work with alabaster; the guides must be set very quickly, otherwise the plaster will cool and harden, and everything will have to be done all over again. And this is a waste of not only time, but also money.
Lighthouses made of alabaster
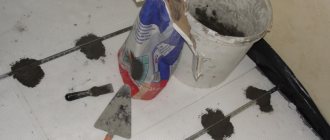
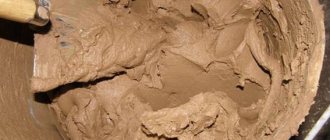
Practical advice. The quality of beacons made from a solution depends on its composition and consistency. In order for them to set faster, it is recommended to increase the amount of cement. If for leveling a mixture is prepared in the proportion of one part cement to three parts sand, then for beacons you need to prepare a solution based on one part cement and one part sand. There should be enough water so that when you squeeze the mixture in your hand, moisture does not seep through your fingers.
Recommendation for the composition of the mixture for beacons
Step 1 . Use a laser or hydraulic level to find the zero level and make marks on the wall.
Step 2 . Taking into account the width of the rule, mark the position of the beacons; they need to be made in a line along the entire length of the premises.
Step 3 . Prepare a cement-sand mortar; it should not be too liquid and hold its shape. Lay out the first line of the lighthouse for them.
Prepare the solution
Checking the solution
Step 4. Place a wooden strip or metal profile on the top plane.
Types of beacons for screeds
Using a level, set it in a horizontal position along its entire length; to do this, carefully press the rail into the solution, constantly monitoring the position of the level. If a mixture appears above the rail, it must be carefully cut off; the plane of the guide must be clean and level.
Installation of beacons on mortar ridges
The lighthouse is sunk into the solution
Checking the horizontal position of the beacon
Practical advice. It is much easier to align the guide bar along the rope. Pull it between the extreme points, wrap the ends of the rope around self-tapping screws or nails driven into the walls along the horizontal marks.
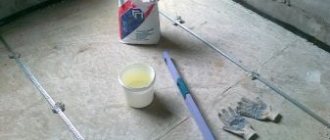
Step 5 . Wait until the solution sets a little and begin screeding. If you have experience, then you don’t have to wait for it to cool completely, but as a rule you will have to work very carefully, not to press it too hard against the slats. If you have no experience, it’s better to wait until the morning.
Further work with the leveling screed is carried out according to the usual algorithm.
Example of pouring screed
Removing the beacon
Rack structures
It is very difficult to install a self-leveling floor without using beacons. They must be prepared before work begins so that no difficulties or distractions arise later. The following types of rack structures are distinguished:
- From solutions. They are used with a thin layer of self-leveling floor. Self-tapping screws are screwed into the floor at a certain level, and a cord is tied to the top of them. The solution is laid under this cord in such a way that after drying it forms a guide. It will contribute to high-quality thickness regulation.
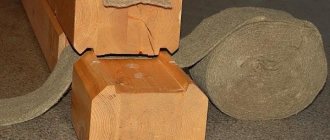
- Wooden. The oldest method of making beacons is from bars with a cross section of about 2.5 cm. To adjust the height, it is enough to place wedges of a certain size under the bars. With increased humidity, they change their size and parameters, which is considered a serious drawback.
- Made from steel pipes. They are used in rooms with sufficient space. In addition, there is also a sufficient thickness of the self-leveling floor - at least 4-5 cm. The cross-section of the pipes can be different, not only round, but also square. Even under pressure they are able to maintain their original appearance.
- Metal. These are standard metal profiles. Area of application: compact rooms. Self-tapping screws are screwed into this profile, used to adjust the height and thickness of the screed layer, which does not exceed 2.5-3 cm. With a greater load on the profile, the structure may be deformed. The result will not be entirely pleasant.
- Mortar slide. The quantity will depend on the circumstances and requirements. More suitable as a guide for dry styling. The solution is distributed over the surface to the level of the slides using a rule.
Installation diagram of rack beacons
Beacons for self-leveling floors
In most cases, self-leveling floors do not require beacons; the liquid solution itself hardens in a horizontal position. But this only happens when professional builders are involved in the work. One has only to slightly disrupt the technology for preparing the liquid solution, and this will certainly have a negative impact on the quality of the screed. It will have depressions (if the solution was too liquid and, upon cooling, gave a large uneven shrinkage) or bulges (if the solution is very thick and could not level out on its own).
Benchmark
Whether beacons are needed during the manufacture of liquid screed should be decided by an experienced craftsman on site, taking into account the maximum number of factors. Some of them, when carrying out very important work, prefer not to take risks and use special beacons, the so-called benchmarks. With their help, it is possible to maintain a horizontal plane with an accuracy of ± 1–2 mm. The benchmark is a metal tripod; a pin is screwed into the center of the thread; its lower plane controls the height of the self-leveling floor. You can buy such devices in specialized construction stores.
Professional beacon for self-leveling floor
How are they installed?
Step 1. Find the highest place in the room. This can be done in various ways, the simplest is to use an ordinary long level.
Step 2. Place a benchmark at this location and use the central screw to set the required minimum thickness of the screed. In most cases, one centimeter is enough, but this figure may vary depending on the load on the screed and the initial condition of the floor.
Step 3. Install the next reference point on the opposite wall, using a water or laser level, align the central screw in the same horizontal direction as the first one.
Step 4. Using a level or a rope stretched between the outer reference points, align the remaining beacons; the upper heads of the central adjustment screws should be in line. The distance between the benchmarks is approximately 40–50 centimeters.
Self-leveling floor according to benchmark beacons
Step 5 . Begin pouring the screed until the solution touches the bottom plane of the central adjustment screws. Until the screed hardens, carefully lift the reference points up one by one. The holes from the legs will close on their own.
Practical advice. It is not always possible to buy a complete set of such beacons. This is not a problem, you can make the devices yourself. To make one benchmark you will need four long screws, a piece of plywood, laminate or board.
Pouring self-leveling floor
Definition of zero level
The process of determining the zero mark is one of the most critical operations affecting the quality of foundation formation. In order to determine the zero level, it is advisable to use a hydraulic level or use a modern laser device, which allows you to quickly and efficiently perform the work.
Installation of beacons for floor screed begins with calculating the zero floor level
Follow the following algorithm:
- Mark the starting point, moving one meter vertically up from the level of the floor slab.
- Using a level, draw a basic line along the closed contour of the room in which the work is being carried out.
- Check the distance from the drawn line to the floor surface and mark the farthest and closest point.
- Draw a line along the furthest point and connect the marks with a solid line, forming a base level.
- Move a meter towards the base and draw a solid line around the perimeter of the room, parallel to the existing mark.
- Step back from the resulting zero mark to the required height of 3–4 cm and draw a line.
The indicated line corresponds to the required thickness of the array and serves as a guide when performing work.
How to make beacons for liquid screed yourself
All work will take no more than an hour, but you will always have on hand the tools for producing screed in any room.
Beacons for self-leveling floors
Step 1. From any segments, cut out an equilateral triangle with a side of 10 cm. Do not pay much attention to accuracy, it does not matter.
Step 2. Drill through holes in the corners of the triangle and in the center; the diameter of the holes should be 1–2 mm less than the diameter of the screws. Due to the difference in diameters, the hardware will be tightly screwed into the triangle.
Step 3. First you need to screw in three self-tapping screws in the corners, ensuring that their heads are approximately at the same level.
Step 4 . Screw in the adjusting screw in the center; it will control the horizontality of the screed.
It is recommended to take long hardware of about 10 cm, this will allow you to make a screed even on very uneven surfaces.
A wide variety of beacons makes it possible to choose the best option in each case. You should not always use the same method; the master must choose the solutions that are most convenient for him.
Benchmarks for mixtures
A benchmark is a special device, the guides of which are placed and secured according to the level. For 3D floors, benchmarks are needed if the fill height is from 3 mm to 3 cm. But this does not depend on the mixtures used, beacons are used.
Even working with polymer compositions according to set guidelines allows you to achieve a smooth surface. Installation of components is done as in chess.
Benchmarks for screed
It is convenient to use benchmarks for mixtures of both the leveling layer and floor covering .