general characteristics
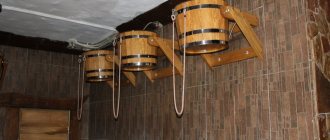
So what is a waterfall for a bath? This is a wooden bucket held together with metal rings. Its volume can be very different, but most often there are buckets of 12-20 liters. It is attached to the wall with brackets. A hose passes over it, from which cool water flows into the container. Usually the bucket is filled before visiting the steam room. It is recommended to choose containers made from environmentally friendly, high-quality material. The most popular materials include stained oak, which is strong and durable.
If there is a pool, then after leaving the steam room they cool down in it. But if such luxury is not available, then a waterfall bucket is perfect for this purpose. This procedure is not only a tradition, but also a way to strengthen the body, while receiving a sea of positive emotions.
The waterfall system was invented thousands of years ago, but has not yet lost its relevance. For a complete relaxation in the bathhouse, you need all the attributes, not just a steam room and a stove. The pouring bucket has long been present in all baths. The essence of this procedure is to instantly cool the body after warming up in the steam room. The original appearance of the waterfall will decorate the interior of the bathhouse, creating a special atmosphere. In addition, such a structure can be installed not only in a steam room, but in the courtyard of a private house in order to be able to cool down in the hot summer.
The process of installing a sprinkler
Often, a bucket for dousing in a bathhouse is mounted in the washing compartment, where a water supply and drainage system is provided, and the wall covering is characterized by high water-repellent properties. The simplest option for implementing a shower shower is to manually fill a bucket with water without the need for an additional water supply.
Many bathhouse attendants choose the outdoor option of installing a bucket - on the wall at the entrance to the bathhouse. Water filling can be automatic (requires additional water supply) or manual.
For fixation, brackets are used that can support the weight of the product up to 60 kg. The classic installation method involves the use of stainless steel fasteners. To create a tipping mechanism, holder ears are welded to the sides of the container. A simpler option is to install a metal rod that penetrates through the top of the container.
Determining the optimal mounting height
The most crucial moment when arranging the product is calculating the optimal installation height. For average height, the height ranges from 200 to 220 cm. For tall height, the height is determined individually - in a standing position, arms raised up, height measurement. The size of the bucket (height from base to top) is added to the value.
Supplying water to the installation site
A more complex method of installing the system involves preliminary supply of water, when the water pipe is laid to the height of fixing the bucket. A water tap is installed at a distance of 120–150 cm.
Next, a stainless steel or rubber braided hose is connected to the pipe. The free end is connected to a float valve, which controls the water level in the container.
This completes the preparatory stage, after which you can begin testing the finished system.
Types of construction
Waterfalls come in several models and shapes. Typically, such an attribute is made of wood, since it can withstand temperature changes and is an environmentally friendly material. In addition, the aroma of wood gives this procedure even more pleasant moments. However, not all types of raw materials are suitable for making a waterfall bucket. Most often they are made from the following tree species:
- natural oak;
- bog oak;
- Linden;
- cedar.
Waterfalls come in two shapes - round and oval. Each of them has its own characteristics and advantages. For a small bathhouse, it is recommended to choose a round bucket for dousing. But an oval bucket provides a longer pouring time, since it has a protracted process of pouring water, in contrast to the instantaneous turning over of a round bucket. Another difference between these two forms of waterfalls is where they are installed. An oval bucket requires more space, so the axis for it is installed in the center of the pouring area.
When choosing this bath attribute, you should pay attention to its volume. This can be either 10 or 30 liters. The required volume is determined based on personal preferences and the dimensions of the bath.
Also, when choosing a waterfall, you need to take into account its color so that it fits harmoniously into the interior of the bathhouse. It is best to select a bucket from the same wood from which the interior decoration of the room is made. The most practical and durable are buckets lined with plastic inside, which will reduce the likelihood of leakage and increase its service life.
Choosing the right waterfall bucket
A dousing bucket is a practical, durable and inexpensive device that replaces a cold water pool. It performs the same function: it cools after a steam room, hardens the body, and trains the cardiovascular system. The compact bucket is suitable for a home sauna and takes up minimal space: it can be installed in a washroom or shower corner.
The cost of a sauna sprinkler depends on the following factors:
- volume (10 – 30 l);
- manufacturing materials (the best are solid oak, cedar or larch - types of wood that are not subject to rotting under the influence of water, the most durable and durable);
- accessories (products with a cord are cheaper, but stainless steel chains are more reliable);
- internal coating (stainless steel makes the structure heavier and more expensive, so models with two-component PVC inserts are a smart choice in favor of affordable quality).
Waterfall buckets are not always equipped with an internal coating, but if you don’t want to save as much as possible, pay attention to options with inserts. Models with a protective coating do not dry out or deform for many years, since they are protected from direct contact with water. The design, color and shape of the buckets are varied. The shade depends on the wood (stained oak models are dark brown, ash models are whitish-beige, birch models are golden yellow). Water containers are round, oval and barrel-shaped. Choosing the best option, taking into account the area and design of the bathhouse, will not be difficult.
How to use it correctly
The procedure of dousing with a waterfall bucket begins with psychological preparation for a sharp flow of cold water. After the person is emotionally ready, he should quickly enter the place of dousing and simply pull the rope sharply. The strength of the flow depends on the sharpness of the movement turning the bucket over. If you tug lightly, the cold water will pour out gradually, and with a strong tug, the entire volume of water pours out immediately, instantly cooling the hot body. It is the sharp temperature contrast that provides the healing effect. This procedure should be completed by wiping with a towel.
What is needed for a “Russian shower”?
The improved “Russian shower” attracts with its ease of use and design simplicity. Surely, the craftsmen examining the finished cooperage product had thoughts about applying their own efforts. Without a doubt, it’s easier and easier to buy, but it’s much more interesting to tinker with making it yourself. The process is extremely exciting, and the result can be boasted to your guests. And a considerable amount is saved, because high-quality models of dousing buckets are quite expensive.
We found out that to assemble an extreme shower with our own hands we will need:
- wooden container with a capacity of 10 to 40 liters;
- brackets capable of supporting the weight of a water container;
- preferred type float valve;
- metal rod - a piece of smooth reinforcement grade A3. The diameter of this rod can be from 8 to 14 cm, because the size depends on the calculated weight of the dousing device filled with water;
- ball valve;
- a piece of flexible hose.
You can purchase the entire list in a store and, by drilling three technological holes in a wooden bucket to install a metal axis and a float, you can quickly and easily make a dousing device. You can buy only that part of the mini-shower parts, which is pointless to do with your own hands. The home craftsman has economic justification for showing skill in making brackets and containers. So we will discuss folk methods of their production.
Bath bucket with plastic liner
You can make a doused bucket in the most primitive way, accessible even to people who have not previously had anything to do with wood.
To do this, it is not necessary to become familiar with the basics of cooperage and learn to use special tools. A couple of simple steps will help you quickly make a wooden container that costs a lot of money on the market:
- To begin, select an ordinary plastic bucket of the most successful color. For example, white or azure blue. Water in such a container will look very advantageous.
- Next, remove the handle and any other parts present from the bucket. You don't need them at all. Don’t rush to throw them away; perhaps they will come in handy in the future.
- Prepare 25–30 not too wide sanded wooden planks. Their exact quantity depends directly on the size of the plastic bucket.
- Using super-resistant glue, attach the strips to the outer walls of the plastic container, imitating a wooden bucket. Coat the joints with transparent silicone.
- Cover the “wooden” container with a suitable varnish and strengthen it even more firmly with metal rings.
The wooden dousing bucket with a plastic liner is ready. Externally it is difficult to distinguish it from natural, but internally it meets all the requirements.
Wooden sauna bucket
This method of creating a wooden bucket will be more to the taste of those who have previously dealt with the processing and use of wood.
For a high-quality pouring device, you will need a piece of iron strip for two rims (about 3-5 cm wide) and a board of the 1st grade 1 cm thick. As a result, we get a 10-liter bucket with a height of 40 cm. The manufacturing process is a little more complicated than the previous one method, but the result is correspondingly much better and more aesthetically pleasing:
- Prepare a template for the bottom parts and rivets (side strips).
- Cut the existing board into pieces that match the stave pattern. Treat them thoroughly with a plane and sherhebel.
- Bring each detail to a state similar to the template. That is, carefully cut off the excess, giving the rivets a slightly trapezoidal shape.
- Mark the outside of each stave. Cut the ends at an angle of 3 degrees so that when connecting the planks together, you get a circle.
- Also, on each rivet, make a 4 mm indentation at a distance of 4 cm from the bottom edge. This recess is necessary to install the bottom of the container.
- Do your first fitting. Gather all the parts into a pile, holding them with metal wire. Number all rivets. Determine the size of the bottom part.
- Using the template, cut out the piece for the bottom. Cut off the top and bottom of the ends, forming a circle, so that the diameter is 1 cm less than the originally measured one.
- Measure to excess and cut a piece of metal strip for the bottom rim. Use a hammer to give it the desired rounded shape. Make holes at both ends and rivet them (with wire in fives).
- Make two tight clamps from pieces of metal strips.
- Attach two opposite rivets to the rim, securing them with clamps. Next, insert all the other parts, trimming them as necessary. Thus, completely fill the entire clearing on one and the other half of the bucket.
- Place the workpiece in its natural position and install the bottom piece.
- Measure the top circumference of the bucket and make a second rim at a distance of 10 cm from the top.
- Sharpen and file the product if protruding areas are visible anywhere.

