Before covering the stove, decide on the type of tile. First of all, pay attention to the following characteristics:
- Fire resistance. The coating is subject to constant contact with high temperatures.
- Thermal conductivity. The tile should let through, but at the same time retain heat.
- Strength. Accidental impacts affect the integrity of the coating. In addition, the low-strength material cracks at the first heating.
- Decorative. Pay attention not only to the colors and patterns, but also to the size of the elements.
- Porous structure. Due to this, the tiles adhere firmly to the surface of the oven and do not lag behind during temperature changes.
Facing tiles should not only be beautiful, but also practical
Glue selection
Another point is how to glue ceramic tiles to the stove. You cannot use ordinary cheap compounds; they contain harmful resins and impurities that release dangerous toxins when heated.
Ideally, when finishing the stove with tiles, special fire-resistant mixtures are used. In principle, sand-cement mortar is also used, but it is better to purchase specialized products. This glue will ensure reliable adhesion of the tile to the surface and will not crack or crumble.
Special heat-resistant mixtures
Variety of finishing materials
There are several types of materials used for finishing stoves:
- terracotta is a material made from baked clay that is not covered with glaze;
- majolica - a tile with a finely porous structure, coated with white or any other color glaze;
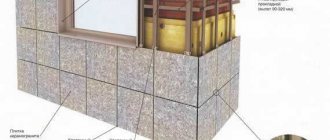
- porcelain stoneware – artificial tiles made from different types of materials and fillers;
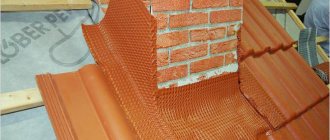
- clinker - a cladding material made from refractory types of clay;
- tiles - ceramic parts for cladding, having a rectangular protrusion, covered with glaze, created for finishing stoves.
Tiles can be used only if it is possible to finish the stove simultaneously with the masonry. If this is not done, then it will only be possible to finish the heating device with other types of tiles.
The thickness of the selected tile should not be less than 7 mm. In addition to tiles, you can use natural stone for cladding. This option perfectly withstands strong temperature changes, so it is recommended for use in those houses that are not heated on a regular basis.
Tools used
To tile a stove, you will need to prepare a considerable list of equipment necessary for operation.:
- a set of straight spatulas;
- mallet;
- mounting grid;
- metal corners;
- tile cutter or grinder;
- crosses and plates for fixing joints;
- level;
- primer;
- starting heat-resistant plaster;
- hammer;
- brush;
- construction mixer;
- plumb line;
- metal scissors;
- nails;
- rule;
- roulette;
- notched and small rubber spatula.
The mounting mesh is necessary when strengthening the structure; it improves the adhesion of the solution to the surface of the stove and ceramics.
To make the edges smooth and the corners easier to form, special overlays are used. All materials are installed using nails.
Spot bonding of ceramics
Popular brands of tile sealants
Point fastening of ceramic tiles is carried out using sealant. Red silicone sealant is perfect for this purpose and does the job perfectly. This installation method significantly saves the technician’s time and effort.
The spot method of finishing a stove has some disadvantages. Thus, the heat transfer of the furnace is significantly reduced. This happens because the finish does not adhere tightly to the base.
To carry out installation, apply sealant to the 4 corners of the tile on the back side of the sample. It is necessary to make an indent from the corners, which will be 2 or 3 centimeters. The area of each attachment point is quite large: approximately 3–4 square meters. see the gap between the tiles is 3 millimeters. Fixing crosses will help to obtain an aesthetic result: the seams between the tiles will be smooth and neat.
Preliminary work
Before tiling the stove, you need to prepare its surface. If it was previously lined with another material, it will be dismantled. Then a piece of mesh is measured and applied to the stove, the edges are pressed with corners and nailed.
Related article: DIY sliding doors
After this, the surface is primed. The starting plaster is spread and a layer is applied to cover all uneven surfaces and the metal mesh. They check it with the help of a rule so that in the end they get the perfect base. For the purpose of adjustment, a level and plumb line are used. After drying, the surface is re-primed and an adhesive solution is prepared.
Marking and calculating material consumption
Expert advice on tiling sauna stoves
To avoid the need for additional material during the process of laying tiles, it is necessary to correctly determine the amount of tiles. It is calculated using a formula, a simplified version of which contains data on the area of the outer surface of the heating device, to which 10% is added.
Glue consumption is determined based on the manufacturer's data. They can be found out by reading the information on the packaging of the composition. When preparing it yourself, it is recommended not to make large reserves, because after a certain time the water will begin to evaporate. The fluidity of the glue will decrease and it will be uncomfortable to work with.
To perform high-quality work on tiling the stove, you need to stock up on self-tapping screws and steel wire, the cross-section of which is from 0.8 to 1.0 mm. The number of fasteners is directly dependent on the size of the oven.
Laying
Before tiling the stove, make sure that it is designed for this type of work. The material will certainly be exposed to high temperatures, and therefore it is better to double-check in advance whether it will withstand such a test.
Ceramics must be insensitive to high temperatures
How to glue heat-resistant tiles to a stove:
- First of all, you need to prepare a solution and let it sit for 15-20 minutes.
- Then a small amount of glue is applied to the stove - approximately enough to lay 3-4 fragments.
- The mixture is leveled with a notched trowel. If the surface is not too smooth, add another layer of mortar to the tile itself.
- The tile is glued, tapped with a mallet and trimmed.
- Several rows are dried and only then do further work begin.
- After the tiles have dried, the seams are sealed with a special heat-resistant grout.
Recommendations for use
How to work with glue is described in detail in the instructions. But there are some general recommendations .
- The surface for cladding must be thoroughly cleaned, especially from oil and grease stains - they reduce adhesion. If the base is highly absorbent, it is first treated with a primer.
- Dry mixtures are prepared 2 hours before work: after mixing, they need about an hour to settle. You need to dilute the glue with clean water, preferably filtered.
- To obtain a homogeneous mixture, it is recommended to use a drill with an attachment or a mixer.
- The adhesive is applied in a thin layer, both when installing tiles and when laying bricks. This is his advantage.
Heat-resistant and heat-resistant mixtures are used not only for the construction of stoves or laying porcelain stoneware. They are used in the repair of heaters, microwaves, and electric ovens.
Porcelain tiles
This material is increasingly used in oven linings. It has excellent heat resistance and unique characteristics. Porcelain tiles are used to decorate not only the outer surface, but also the interior of the oven. In addition, he is not afraid of temperature changes, evaporation, cold and shock.
Porcelain tiles are wear-resistant, so they practically do not wear out over time.
How to cover a stove with porcelain tiles:
- Apply glue to the surface with a notched trowel.
- The fragment is installed and compacted with a mallet.
- Several rows are laid in this way and allowed to dry.
- Work continues. At the end, the cut tiles are glued.
Tiles
This material is specially designed for lining stoves. It features excellent performance and stunning appearance. But this is not only a stylish decor, but also a way to retain heat for as long as possible. It has a box-like structure with a recess on the reverse side - the so-called rump.
Article on the topic: Do-it-yourself children's attic bed using the tongue-and-groove principle
Tile cladding will provide visual appeal and effective functionality.
How to lay tiles on the stove:
- A serpyanka mesh is fixed to the surface and plastered with a thin layer.
- Self-tapping screws are screwed into the seams between the bricks.
- Glue is applied to the stove and to the back of the tiller, along its contour.
- The tile is fixed to the surface, then screwed to a self-tapping screw using wire. All tiles are laid in this way.
- The distance between elements reaches 1 cm.
- Fire-resistant chamotte is poured inside the pump; it retains heat and increases the useful effect with less consumption of heating materials.
Clinker
Most often, when facing a stove with clinker tiles, elements in the form of bricks are used. This material is quite strong, heat-resistant and durable. The result pleases with its decorativeness and variety of available options.
An example of step-by-step lining of a kiln with clinker
Laying is carried out according to the same principle as in the case of tiles or porcelain stoneware:
- Apply the adhesive solution using a notched trowel.
- The tiles are laid and compacted, the seams are set.
- Corner elements and cut pieces are mounted.
- The joints are rubbed.
Due to the shape and small size of the bricks, people are experimenting with laying methods. Most often, the “seam to seam” pattern is used, but the brick ligation method, that is, with an offset of half an element, looks more interesting.
Please note that with this scheme you will need to file a lot of fragments, but this can be avoided if you purchase special corner elements.
After the final finishing of the stove with heat-resistant tiles, at least 4-5 days, or better yet a week, should pass before using it for its intended purpose.
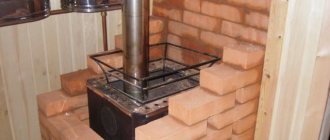
How to tile a stove
How to cover a stove with tiles if it has lost its original neat appearance, or in the case when such cladding was planned in advance, even when planning the construction? This question often arises among owners of private houses during renovation of a room where an old stove is installed, or upon completion of laying and drying a new one.
How to tile a stove
Some owners prefer to plaster the stoves followed by whitewashing or painting, but this is a less durable finish and will have to be updated after a couple of years. But properly laid tiles will last for decades.
The stove is finished with tiles not only to make the structure look aesthetically pleasing, but also to preserve the plaster layer. In this case, the plaster is the main protective layer that prevents the seams between the bricks from opening, through which combustion products can enter the room.
In addition, the stove tiles have a high heat capacity, and when they heat up themselves, they release heat into the room for quite a long time and do not allow the entire brick stove to cool down quickly.
Previously, tiles were laid in only one way - with mortar. Today, some craftsmen are inventing new methods that even make it possible over time to replace a cladding material that has become boring or has lost its decorative qualities with a new one that has, for example, a more interesting design that matches the style of the entire room. The same method can also help if one of the tiles, anywhere on the stove wall, is accidentally damaged and you want to replace it.
To decide on the choice of finish and figure out which cladding method will be easier to implement, you need to take a closer look at the nuances of the technology.
Plastering the stove is also a good solution!
For a long time, brick ovens were plastered with clay mortars and whitewashed for every major holiday. This is a time-tested method, and if the solution is prepared with high quality and the plaster is applied according to all the rules, then sometimes you can limit yourself to such a finish. How to properly plaster a stove - read in a special publication on our portal.
But before starting finishing work, it is necessary to carry out preparatory measures, which are no less important for the safe operation of the stove and high-quality tile laying.
Preparing for tiling the stove
You need to start by preparing all the necessary tools that will help prepare the surface and finish it.
Tools for work
Tools needed for tiling the stove
Tools you will need:
- Spatulas:
- serrated - for applying and distributing tile adhesive. Recommended tooth height – 5 ÷ 6 mm;
- a regular straight medium size - for cleaning the surface;
- corner - for decorating the corners of the building;
- rubber - for sealing seams between tiles when laying them on glue.
- Tile cutter and sander.
- Metal ruler.
- A simple pencil or marker for marking.
- Construction level, plumb.
- Glue container.
- Electric drill and mixer attachment for mixing the adhesive mass.
When installing tiles without glue, you additionally need to prepare:
- Wooden or rubber hammer for making corners.
- Metal scissors.
- A device (sheet bending jig) for making corners of the required size. It is assembled from a thick wooden beam and a steel strip with a thickness equal to the thickness of the ceramic tile, plus 1.5 ÷ 2 mm.
- Riveter, rivets, drill with a set of drills for metal.
Materials for preparatory and finishing work
For each installation method, in addition to the tile itself, various building materials will be required.
So, to lay ceramic tiles with glue you will need:
- Heat-resistant adhesive intended for lining fireplaces and stoves.
- Primer.
- Grout for joints between tiles.
- Skirting board.
In case of “dry” installation of tiles, without glue, you need to prepare:
- Sheets of galvanized steel with a thickness of 0.6 - 0.9 mm.
- Aluminum or steel angle for closing corners.
- Aluminum strips 2 mm thick, 20 mm wide - for making a frame on which the guides will be attached.
Prices for heat-resistant plaster for stoves
heat resistant plaster
Preparatory work
Whatever finishing method is chosen, the surface of the stove must be well prepared for plastering and cladding. These works cannot be considered secondary, since they will determine how smoothly the plaster and tile adhesive will lie on the surface.
- The first step is removing the old plaster. To make it easier to remove, you can wet the wall with water several times. If the coating consists of clay, it can be easily removed with a spatula. If the solution was made with the addition of cement, then you may have to use a chisel and hammer. But, you need to remember that the furnace wall must be completely freed from the old plaster layer to “clean” brick.
Removing old plaster
- Having removed the plaster from the surface, you need to walk over it manually with an iron brush, or with a grinder, attaching a special attachment to it.
Cleaning the surface with a stiff wire brush
- Next, the surface is well sprayed with water from a spray bottle, and the seams between the bricks are cleaned to a depth of 8 ÷ 10 mm - this is necessary for the plaster to adhere well to the wall.
For greater effect, the surface should be moistened
- If the masonry is new, then it must be well dried, and it also needs to be cleaned, since in any case, residual mortar or dust linger on the surface.
- Upon completion of cleaning, the wall must be well primed, and the soil should reach the depth of the masonry joints. Before moving on to the next work, the wall is left until completely dry. It would be optimal to spare no primer and apply it twice.
The surface requires priming, and best of all - twice
- Next, the walls of the oven must be checked for their straightness, since laid tiles will not be able to make them even and will only emphasize differences, if they exist. The process is carried out using a building level and a plumb line.
- If differences are detected, the wall will have to be leveled.
To do this, focusing on the plumb line, metal beacon profiles are placed on the wall. It is desirable that the height of the leveling layer be no more than 8 ÷ 10 mm.
Attaching the beacon profile
Leveling is carried out with a plaster mixture, which is intended for finishing stoves.
If the layer of plaster is thin, then it is applied using a wide spatula, immediately leveling the solution.
A thin layer can be applied and leveled with a spatula
A thick layer of mortar is applied using the throwing method (“spraying”), and then leveled using a rule, moving it along the fixed beacons.
If strong leveling is necessary, sketch the solution and then level it using the rule
- If, when removing the old plaster, knocked down corners are found, they must be strengthened by reinforcing them with a perforated metal corner before applying the solution.
Strengthening and leveling corners with metal profiles, reinforcing walls with mesh
- After the plaster solution has set, it is recommended to attach a reinforcing fiberglass mesh to it on a thin layer of adhesive mixture. When the glue dries, the mesh is covered with another thin adhesive layer, which, in turn, should also dry well.
Sometimes reinforcement is carried out with a metal mesh, which is attached directly to the brick before leveling the wall using nails with wide heads driven into the seams between the rows.
- The leveled plastered wall must dry thoroughly before carrying out further work.
- If the tiles will be mounted with glue, then it is better to prime the dry plastered surface again - this will help the tiles to be more securely fixed to the wall.
Once again, I would like to remind you that the preparation of the furnace walls before facing work must be carried out very carefully, otherwise the glued tiles will begin to fall off due to temperature changes. Well, if the installation of the finishing material is carried out on a metal frame, fixed to an old, dilapidated plaster layer, then it is possible that the entire structure will move away from the wall along with the old plaster and tiles.
Adhesive for tiling ovens
Tiling a stove can be done using different solutions, but in order not to rack your brains and calculate the proportions of the components, it is better to buy ready-made glue, specially designed for finishing stoves and fireplaces.
Special adhesive composition specifically for stoves and fireplaces
Some craftsmen prefer to use cement mortar with the addition of PVA glue or salt.
If you add a little ordinary table salt to the finished masonry glue, it will not be worse, since this substance can accumulate moisture and thereby prevent the glue, concrete or clay from drying out quickly. Therefore, no matter what solution is chosen, adding salt to it will not hurt.
How to cut tiles?
Another process that can also be classified as preparatory work is cutting tiles. It is better to know in advance how to do this correctly, since you can ruin a lot of facing material before you can cut out the necessary fragments with high quality.
The most important thing in cutting tiles is accuracy and dexterity. Once you have a little experience, the work will go easily.
- This process is easiest to perform if you have a small tile cutter at your disposal.
Of course, the most convenient tool is a tabletop tile cutter.
— The first thing to do is measure the required distance on the tile and draw a line along the ruler with a marker.
-The tile is then secured in the tile cutter so that the marked line is located under the cutting roller.
— Next, the roller, without much pressure, is drawn along the mark, which will be the fault line.
“Then the lever is lowered and the tile breaks into two parts.
When there is little experience in this process, it will take one ÷ two minutes of time. But in order for the tile cutter to work efficiently, before starting work you need to:
— Pour a few drops of machine oil onto the roller and the guide frame.
— You need to check how well the roller is secured, that is, it should not move from side to side, otherwise the cut will be uneven.
— If the tile cutter has already been actively used, then the cutting roller may need to be replaced. It can be found in stores that sell tiles.
The tile cutter allows you to cut tiles, even those with a thickness of 8 ÷ 10 mm.
- Another tool for cutting tiles is a manual tile cutter. If you purchase this tool, it must be of high quality. It should be said that it is unlikely to be suitable for thick floor tiles, but if the stove is finished with wall material, then such a tool may be sufficient.
Hand tools - tile cutters and nippers
- In addition to tile cutters, a jigsaw can be used for cutting, on which you need to install a special tungsten carbide file. But when using this method, you need to take into account that each tile will take about 10 minutes.
- If you install a special circle on the grinder, it will also be suitable for making straight cuts on ceramic tiles.
- Some craftsmen successfully cut tiles with a regular glass cutter, running it along a metal ruler laid along a drawn line. This cutting method requires the application of a certain amount of force both when drawing the line and when breaking the tile in two. In addition, without experience in carrying out such a process, you can seriously damage your hand.
Experienced tilers sometimes make do with a regular glass cutter.
Therefore, the best and safest option is still a large tile cutter, which is installed on a reliable table or directly on the floor.
If the edge of the cut tile is not perfectly smooth, it can be trimmed with a grinding stone.
Cladding the stove with ceramic tiles using glue
Moving directly to the cladding, the work is carried out as follows:
- Laying tiles on the walls of the furnace begins from the bottom. Therefore, the first thing to do is to beat off the line of the first row. The marking is carried out using a painted cord, which is aligned horizontally along the intended risks, checking the building level, pulled back and released. The cord will leave a perfectly straight line on the wall along which the first row will be laid.
- Since the tiles may initially slide down the wall, it is recommended to secure a metal perforated corner along the broken line.
Aluminum perforated corner
It is fixed to the wall with dowels in increments of 150 ÷ 200 mm. The size of the corner is selected according to the thickness of the tile. If you choose it correctly, the profile will not be noticeable after installing the tiles on it.
If it was not possible to find a corner of the required size, then a 15x25 mm wooden strip or a wide glazing bead, which is temporarily fixed from below along the broken line, will do. This improvised guide is removed after the masonry is completed and the glue has completely dried.
- You can attach perforated corners to the corners of the stove, which will form the corner joint, since without this it is quite difficult to make it neat.
Profile for facing external corners of tiles
To do this, you need to choose a profile that has a roundness at the junction of the sides, which, when installing the element on the walls, will end up at the corner of the wall. The ends of the glued tiles will be pressed against this profile on both sides.
The corner is fixed to the wall with small dowels in increments of 300-350 mm.
- After preparing the wall and tiles, you can proceed to preparing the glue. To do this, water is poured into the prepared container, then the prepared mixture is poured into it, and mixed using an electric drill and a mixer attachment. As mentioned, a small amount of salt may be added.
Mixing tile adhesive
After mixing, the solution should sit for 10 ÷ 12 minutes - during this period the polymer additives included in its composition enter into the necessary reaction, and the mixture becomes a full-fledged glue.
- Next, you can move on to laying the first row.
The adhesive mass is applied to the wall using a notched trowel. The glue is distributed over an area of 5 ÷ 7 tiles, since it should not have time to set during laying.
Application and distribution of glue on the surface of the stove wall
- Tiles are laid on a glue-coated surface, between which crosses are installed in both vertical and horizontal joints. Usually two crosses are installed on each side of the tile. This is done to maintain the same thickness of the seams. When lining stoves (for example, when using terracotta tiles), fairly large gaps are used, even 10 mm, so sometimes cut pieces of drywall are used instead of crosses.
Laying tiles with installation of calibration crosses
- Each tile is pressed tightly against the wall, its horizontal and vertical position is immediately checked by the building level.
- Any adhesive that has come out between the tiles into the seams must be removed immediately. The joint space should remain empty, as it will be filled with grout later.
- When laying tiles, you need to remember that if they are installed unevenly, they can still be corrected on the wall within 12 ÷ 15 minutes. After this time, the glue will have set and you cannot move the finishing material on it. In this case, you will have to remove the tiles from the wall, clean off the glue and do all the work again. So it is better to immediately approach installation with maximum care and accuracy.
- Having laid out 4 ÷ 5 rows, you need to take a break for two ÷ three hours so that the lower rows set well.
- After this, you can complete the masonry completely and leave it to dry for 24 ÷ 36 hours. However, we should not forget about cleaning the surface of the tile from any glue stains that may have fallen on it. Now it won’t be difficult to wipe them off, but when the ruts finally set, removing these stains will become a very difficult task.
Grouting joints using a rubber spatula
- After the glue has set for a period of time, you can proceed to grouting the joints. Only those grouts that have a heat resistance of at least 200 °C are used for the oven. The composition for this is often selected according to the color of the tile, but you should not choose white, since with temperature changes it can acquire a dirty tint.
- When sealing seams, excess grout from glazed tiles must be immediately removed with a damp sponge. This composition dries quickly, and after even a short time it will be difficult to remove.
Filling joints between terracotta tiles
- If the cladding was done with terracotta tiles, a construction gun with a tube is usually used to fill the joints. The seams are filled to the full depth and left for one and a half to two hours. After this, “joining” is done, for example, with a wide flat screwdriver or a wire loop. In this case, you should not try to wipe off accidentally spilled grout from the surface of the tile - it is better to wait for it to dry completely, and then carefully pick it out with a thin screwdriver or a knife blade.
Video: how to tile a stove with terracotta tiles
Cladding the stove with ceramic tiles without glue
Prices for ceramic tiles for oven cladding
Ceramic tile
This installation method is suitable for those craftsmen who do not want to use glue and who express doubts that using the adhesive mass will result in high-quality tiling of the stove.
Oven tiled using “dry” technology on a metal frame
This method is also good because the cladding will not react in any way to increases and decreases in temperature, and an air cushion is formed between the wall and the tile, where hot air is trapped. Therefore, it turns out that such cladding is to some extent reminiscent of tile structures. Cladding a stove in this way is quite simple - the main thing is to take very careful measurements and accurately manufacture the frame elements, and also carry out the work slowly and very carefully.
The entire structure consists of a kind of frame made of metal profiles, into which ceramic tiles are laid, as if along guides.
| Illustration | Brief description of the operation performed |
| The first thing you need to start working with is marking the furnace wall. To do this, marks are made along the top of the masonry, which are verified to the building level. Then, the same is done along the bottom line - it is marked at the height of the plinth fastening. After this, the entire space between the upper and lower marks is divided by horizontal lines into equal stripes - the height of the tile plus 3-4 mm. The inter-tile profiles will be fastened along them. The extra millimeters are necessary to ensure that the tile moves freely in the metal frame attached to it. | |
| The lines marked using a level must be marked off with a blue-dyed cord. To do this, it is stretched across the entire width or length of the furnace wall along the marked marks, then pulled back and released. Smooth lines remain on the wall along which the frame profiles will be attached. | |
| Next, the baseboard should be immediately secured to the floor and wall. You can make it yourself from galvanized metal or choose a ready-made option, since today you can find a large number of profiles with different shapes on sale. To make it yourself, you need to measure and cut a strip from a sheet of metal, 1-1.5 mm thick, equal to the height of the plinth plus 15-20 mm for the bend that will extend onto the floor. | |
| The bend is made by placing the strip on a metal table or a special device prepared in advance, consisting of a 50x60 mm beam and a steel plate (strip) fixed on it with self-tapping screws, with a thickness greater than the thickness of the tile by 1-1.5 mm. The workpiece is laid and secured with clamps on top of the metal plate, leaving an outward protrusion of 15-20 mm. Then gently tap it with a mallet - the even strip should bend, forming a right angle. The narrow bent part of the element will be fixed to the floor. The finished plinth is fixed to the stove wall using anchors, and on the floor, if it is wooden, with self-tapping screws with wide heads. It is especially important to make a metal plinth on the wall of the stove under the firebox. | |
| Next, you need to measure and cut a piece of the corner, which will be fixed along the upper line marked on the wall of the stove and on the lower edge of the plane of the hob. This corner will frame the edges of the inside of the frame, and its vertical elements will be attached to it. | |
| This photo shows a corner secured with anchors along the edge of the hob. | |
| Through fixed perforated corners, metal strips 20 mm wide, made of 2 mm aluminum, are secured with rivets. The strips are installed vertically across the entire plane of the wall, at a distance of 250-300 mm from each other. They will serve for mounting supporting profiles to them, into which the tile itself will be installed. In the photo, the master shows how the stripes run inside the entire already assembled structure. | |
| When the horizontal corners and vertical stripes are fixed to the wall of the stove, you can proceed to the manufacture of the profiles themselves into which the tiles will be installed. The figure shows the J-shape of the profile that should be the result. For each row of tiles being installed, you will need two profiles, which are installed above and below the height of the tile, forming a groove with sides. | |
| To manufacture these frame elements, you need to cut strips of 44 mm wide and a length equal to the width of the wall from a sheet of galvanized metal. If the furnace wall is too long, then it is better to make profiles no more than a meter long and join them together when installing the frame. | |
| J-shaped profiles are made using the same sheet bending device from timber with a metal plate. An important point is that it is necessary that the steel plate extends outward along the entire length of the beam by about 3 mm - this is required for the correct formation of the side. | |
| The strip for the future profile is laid on the edge of the sheet bending machine with a protrusion outwards initially of 3 mm. When installing the tiles on the wall, this side will serve as a holder for it. | |
| The thin metal is tapped with a mallet until the entire strip is L-shaped. Then the strip needs to be bent again to form a J-shaped profile. The workpiece is moved forward so that the shelf size is equal to the thickness of the tile + 1 mm. Another 1 mm is added to the bend itself. For example, with a tile thickness of 6 mm, it is necessary to retreat 8 mm from the first angle obtained. We must remember that in order for the cladding to look neat, the sides must have the same width. The workpiece is again fixed with clamps and bent with a mallet. The three-millimeter protrusion of the metal plate ensures the correct formation of the entire profile. | |
| Having made the profiles, each of them is checked with a tile, which is placed over the side and moved. It should slide easily along the inner surface. | |
| This photo shows how the profiles are secured inside the structure. | |
| This shows how the profiles of two adjacent rows should be set in relation to each other. | |
| Installation of profiles is carried out from the baseboard. Exactly along its upper part, the lowest profile is fixed to the vertical stripes. To do this, through holes are drilled in the wide profile flange and strip, where the rivet is then installed. The second J-shaped strip is mounted along the line defining the top of the lowest row - for control, you can install two tiles along the edges. Next, close to the first row, guides for the second row are installed using the same principle - and so on until the very top. | |
| Having mounted the frame for two or three rows, tiles are installed in them. It is inserted between the upper and lower profiles, and pushed to the end of the wall - and so on until the entire row is filled with tiles. The result is a neat surface, and, as can be seen from the installation process, the tile can be replaced with a new one at any time if desired. | |
| After installing the tiles, you can proceed to closing the joints at the corners. Narrow, self-made corners are installed around the cooking chamber. | |
| Rounded metal corner pads are mounted on the outer corners, which are secured to the frame guides with self-tapping screws. | |
| It is advisable to line the inner walls of the cooking chamber with stainless steel sheets. Rectangular fragments of the required size are cut out of it, bent at the edges to obtain more reliable joints, since the panels at the corners are installed overlapping and screwed to the inner walls. After installing them, the surface can, if desired, be coated with heat-resistant black paint, which allows you to easily tidy up the chamber walls. |
This method of finishing a stove is accessible even to those unfamiliar with the art of a tiler or stove maker. If you carry out the work correctly, carefully calculating your actions, then the cladding will turn out no worse than that made using the technology of laying tiles with glue. Another advantage of this installation method is that, using frame rows, you can lay out any pattern from tiles of different colors, having prepared its diagram in advance. Study liquid insulation for walls on our website.