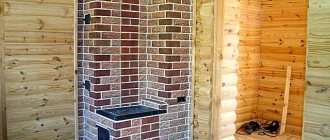
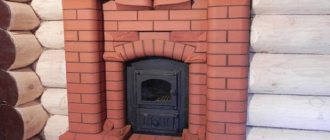
Although modern space heating devices can be small, discreet and integrated into the interior, people still resort to using stoves. Sometimes they are simply interesting decorative elements that emphasize the style of the room and, at the same time, warm it up. Sometimes they are the “heart” of a bath or sauna and perform purely functional tasks. In each case, it is important to properly design and line the stove. Previously, bare bricks were often used for this purpose, but now preference is given mainly to various types of tiles.
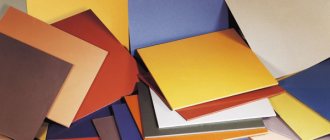
What are stoves made of?
In principle, at the moment there are practically no working stoves in houses. But there are their analogues - fireplaces, which are very popular today. So:
- The following structures are built from fire-resistant materials: brick, shell rock, cinder block, and so on. They require high-quality and correct cladding, as they play a big role in the interior.
- If they are fully functional, then only fire-resistant materials that do not deform when exposed to high temperatures are used in the finishing. You can use porcelain stoneware for lining the stove, natural or artificial stone, simple ceramic tiles, sand-lime brick, and so on.
Note. Fire-resistant mortars are also used for masonry, which do not lose their properties from high temperatures. Particular attention should be paid to the firebox, which is finished with a similar material.
Is it possible to clad a stove with porcelain tiles – Master on both hands
To the question of which tile to cover a stove or fireplace, you can give a clear answer - one with improved heat resistance characteristics. Non-standard operating conditions do not allow the use of conventional material, and therefore it is necessary to understand the requirements for such finishing.
Due to non-standard operating conditions, not every tile is suitable for stoves and fireplaces
Material requirements
- low porosity structure;
- low water absorption coefficient;
- increased strength;
- resistance to mechanical damage;
- heat resistance;
- the ability to accumulate and retain heat.
The main quality of tiles for stoves and fireplaces is heat resistance
Constant contact with heat and the risk of mechanical damage determine the characteristics of the cladding.
It is important to know what temperature a particular tile can withstand, as well as how well it provides heat exchange with the room.
For finishing stoves and fireplaces the following are used:
- heat-resistant tiles;
- terracotta;
- porcelain stoneware;
- clinker;
- tiles.
It is worth considering the features of these materials in detail.
Heat-resistant tiles
The first thing that comes to mind is ordinary ceramic tiles. But is it possible to surround a fireplace or stove with it? Here we turn our attention to the function of the structure.
If you plan to regularly heat the room with its help, it is better to discard this option right away. And if it’s more of a decoration, all restrictions are lifted.
Option for facing with special tiles
In any case, it is recommended to pay attention to the strength and heat resistance of the tiles.
If it cannot withstand high temperatures, there is no need to take risks; choose a material of a higher class; it is not afraid of heat and has much better resistance to mechanical and chemical influences.
Ordinary low-class tiles cannot be used in such work; they will crack from high temperatures and burst.
Terracotta
This material has been used for centuries, and therefore has good time-tested recommendations.
Terracotta is an unglazed ceramic tile that is easily recognized due to its characteristic red-brown hue. It is made from clay and fireclay, and the color is provided by the addition of metal oxides.
A distinctive feature is the change in properties when adding different amounts of fireclay.
The larger it is, the better the thermal characteristics of the material become; however, large grains reduce strength indicators, which is undesirable.
Terracotta cladding improves heat transfer
Similar tiles are used to cover a fireplace or stove, since it weighs relatively little, which means it does not require additional strengthening of the base.
During operation, it heats up quickly and cools down slowly, gradually releasing heat to the heated room, and it is not afraid of high temperatures.
And the natural design will appeal to lovers of rustic style.
Porcelain tiles
Porcelain tiles are better in terms of resistance to high temperatures and sudden changes, and this material is also not afraid of impacts and scratches.
Cladding with porcelain tiles with a textured surface
It is made from several types of clay, and high strength indicators are achieved by adding granite and marble chips to the original raw materials.
Therefore, porcelain stoneware is used to cover stoves, fireplaces, building facades, kitchen work surfaces, floors, etc.
It is able to withstand enormous loads without losing useful qualities.
As for the thermal characteristics, due to the properties of the materials used and the solid non-porous structure, this tile provides no worse, and sometimes even better, heating of the room compared to other types of cladding. Another plus is the ability to imitate any surface, both terracotta and glazed majolica.
Clinker
Clinker tiles are made from natural materials, which, thanks to pressing and firing technology, are transformed into a super-strong, heat-resistant and antistatic product.
When using such cladding, do not worry about the integrity of the coating during operation; clinker tiles perfectly contain fire and ensure heat retention for complete and uniform heating of the room. It is absolutely not afraid of high temperatures, as well as mechanical damage during operation. Clinker tiles do not allow moisture to pass through, which is also important.
Despite the limited palette, you can easily choose the right tone, and in a private home, naturalness looks best. The variety of colors ranges from white to rich chocolate.
Tiles
This material is the best for the stove. This is a special ceramic tile that consists of three-dimensional box-shaped elements.
Essentially, this is a flat decor attached to the so-called tiller.
Thanks to this feature, uniform and fast heating of the room is ensured, as well as reliable heat retention using an air cushion.
To cover a stove or home fireplace with tiles, special adhesive mixtures and cement-sand mortar are used. The additional type of fastening is of great importance here.
Each fragment is connected not only to the walls, but also to each other. To do this, a nail is driven into the seams between the bricks, and a tile is tied to it with wire.
Joints and voids are filled with mortar.
This type of cladding provides gradual heating, so they do not “burn” the room and are able to accumulate heat for a long time, resulting in a more rational distribution of heat.
Naturally, the question of which tile is best to cover the stove disappears by itself if you focus only on these indicators. However, take into account the high price of such products, so sometimes it is more advisable to find a decent budget alternative.
Knowing what tiles are used to cover a fireplace or stove, it will be much easier for you to decide on the facing material without making a fatal mistake.
Before purchasing, be sure to evaluate the cost of finishing work and subsequent heating costs.
This will help you decide where to save money so that you end up in a profitable position.
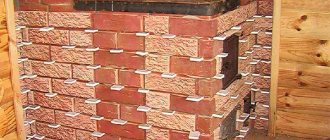
Cladding the stove with porcelain stoneware: finishing stages
Interior ideas using porcelain stoneware
Stoves in the house can serve not only for heating, but also as a decorative element of the interior. In this case, its design must correspond to the design. The cladding of stoves with porcelain stoneware is considered universal.
What are stoves made of?
In principle, at the moment there are practically no working stoves in houses. But there are their analogues - fireplaces, which are very popular today. So:
- The following structures are built from fire-resistant materials: brick, shell rock, cinder block, and so on. They require high-quality and correct cladding, as they play a big role in the interior.
- If they are fully functional, then only fire-resistant materials that do not deform when exposed to high temperatures are used in the finishing. You can use porcelain stoneware for lining the stove, natural or artificial stone, simple ceramic tiles, sand-lime brick, and so on.
Porcelain tiles and its properties
Porcelain stoneware consists of two types of clay, sand, field putty and water. It is an environmentally friendly material that does not emit harmful substances and does not harm human health. It is most often used for:
- Facing the base of the building.
- Floor works as a covering.
- Finishing rooms with high air humidity.
- Facade works.
- For cladding stoves with porcelain stoneware.
- There is a large selection of such material, which is currently in great demand. It has a variety of designs. On its surface you can find imitations of natural stone, brickwork and other things.
- The surface of porcelain stoneware can be smooth or structured, matte or glossy. But there is a drawback here. the structural surface of this material has minor pores. Because of them, stains may appear on the surface of porcelain stoneware over time, and getting rid of them is not so easy.
- As for other types of material surfaces, they are distinguished by their resistance to abrasion and loss of appearance.
- Porcelain stoneware is obtained by pressing the clay mass and then double firing it. All this gives strength to the material.
Porcelain stoneware is produced in individual tiles, which can have the following dimensions:
Note. There are also larger slabs, but they are not used so often in interior finishing work due to their not very convenient installation.
The properties of porcelain stoneware include:
- Moisture resistance, since its surface is covered with a protective layer and is not able to absorb moisture or any dirt. It is resistant to cleaning with various detergents.
Advice. You should not use abrasive agents on the glossy surface of porcelain stoneware, which can damage it and thereby disrupt the structure of the material.
- Practicality - the material is easy to install and does not require special care. All this is ensured by the porcelain stoneware surface.
- Durability - thanks to its double-firing production technology, the material is very resistant to mechanical and physical stress. It does not break or crumble when cut with a special tool.
- Durability - porcelain stoneware can be used as finishing for a long time. The average service life is at least 20 years.
- Wear resistance - over a long period of service, some finishing materials may wear out and lose their original appearance. The same cannot be said about porcelain stoneware.
- The simple installation of porcelain tiles makes it even more popular.
- Resistant to low or high temperatures, as well as sudden temperature changes.
- The weight of porcelain tiles can vary depending on the size of the tile itself.
- Since porcelain stoneware is most often used in the lining of stoves, this material has high heat resistance.
Many may say that the price for such material is too high. But, if you evaluate its properties and characteristics, it will even be very low.
How to choose the right porcelain tiles
Choosing the right material
For high-quality finishing work, you need to choose the right porcelain stoneware for lining stoves. So:
- The first thing to do is ask the seller for a certificate of material quality and compliance with international standards.
- Secondly, check the quality of the goods and, if possible, the warehouse where the goods are stored. This should be a dry room with normal temperature conditions.
- Thirdly, the tile must have a flat plane and the corners must also be smooth (not raised, bent, crumbled, etc.).
Advice. It is also worth carefully considering the surface of the material. It should be smooth and free of various types of defects. Otherwise, the quality of the finish will be out of the question.
Properties of porcelain stoneware
This material consists of clay, kaolin and quartz sand. Feldspar is also used as an additive. Porcelain tiles are made under high pressure at a temperature of 1300⁰. Let's look at the main properties of porcelain stoneware:
- Porcelain stoneware is quite wear-resistant; this material is used to cover the floor, and the coating lasts for many years. It is used not only in everyday life, but also for industrial purposes.
- It has quite high strength and can withstand heavy loads. Tolerates temperature changes and high humidity perfectly. Therefore, surface cladding can be carried out even in rooms without constant heating.
- Does not chip or crack. And this is significantly superior to ceramic tiles.
- It practically does not absorb water (less than 1%), so stains do not form on it, so porcelain tile cladding does not require complex maintenance; it is enough to wipe it with a damp cloth.
- The fireplace can be lined with porcelain stoneware in any location of the hearth, even if it is installed in an unheated country house.
- Porcelain tiles are available for sale in a wide range of colors and textures.
- If desired, the cladding can be done by hand, which will reduce the cost of the entire product. Installation instructions will be given below.
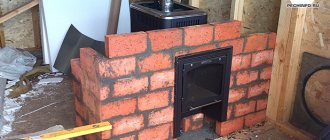
Preparing the oven surface for installing porcelain stoneware
Preparing the surface for laying
Cladding a stove with porcelain stoneware is characterized by a number of preparatory works. These include leveling, cleaning and strengthening the surface. So:
- In most cases, the construction of a furnace does not feature a very flat surface. Such structures are built from durable heat-resistant materials (brick, foam blocks, etc.). Their masonry can be of any kind. But this does not mean that the surface will be smooth after this.
- To level the surface of the furnace, only cement or concrete mortar should be used. They are characterized by heat resistance and durability.
Prepare with your own hands from:
Advice. To ensure a high-quality solution, it is best to use a deep container and a construction mixer. In some cases, a concrete mixer is used to speed up the process and increase the homogeneity of the mass.
The solution is applied according to the principle of plaster. It is impossible to say that there are specific instructions. Simply all actions should be carried out using:
- Sandpaper may not be used. It would be very good to apply the solution to the surface with a wooden spatula rather than a metal one.
- In the process of such work, the surface is strengthened. All these measures are necessary for the reason that, regardless of size, porcelain tiles are not too light in weight and not every finished surface can support it.
- How to perform a boost? It's quite simple. For this purpose, a small wire mesh is used. It is initially attached to the surface of the oven using a stapler or self-tapping screws or nails. It will be convenient for anyone. The solution is already applied to it.
- You can initially apply the solution to the surface and only then embed the reinforcing mesh in it. There will be no error in either action. It all depends on the layer of the solution itself.
Advice. The layer of solution on the surface of the furnace should not be too thick. It will add extra weight to the finish. And together with the mass of porcelain stoneware, all elements of finishing work can simply move away from the surface, thereby disrupting the appearance of the finish.
Material laying technology
You need to start installing porcelain stoneware only after the solution on the surface has completely dried and acquired the necessary strength. In most cases, to speed up this process, special hardeners are used, which reduce the drying time of the product by several hours. To install porcelain tiles you will need:
- Construction level for high-quality and even finish of the stove.
- Tape measure and chalk for marking the distance between tiles or size.
- Plykorez for smooth cutting of porcelain stoneware. Only here it is worth considering that the material is particularly durable and special tool attachments are used for it.
- A cement solution that will securely fix the finishing material to the surface. In some cases, a special glue is used, which in its properties is in no way inferior to cement mortar.
- Spatula for applying mortar or glue (metal).
- Cross-shaped beacons for an even and correct distance between each finishing element.
Advice. The surface must be primed.
- After the surface has been properly prepared, porcelain tiles for lining the stove are installed as follows. The solution is initially applied to the surface and left for several minutes. It needs this time for a stronger bond with the surface.
- It is also applied to the back side of porcelain tiles and lightly smeared over its surface. Then the material is applied and leveled using a level. With the second tile, all work is performed in the same way. Only between them should cross-shaped beacons be inserted. The size depends on the size of the porcelain tiles.
- After such work, the joints of the tiles generally remain uneven and do not have an attractive appearance. In order to mask the defects of such finishing works, decorative putties of a certain shade are used.
It all starts with calculations
A little preface. Ceramic tiles include just a few of the most common types, which have significant differences. Its history goes back hundreds of years, which suggests that it is an indispensable material for lining stoves.
So, before proceeding with the direct selection of materials necessary for work, the area of the furnace is measured. And also do not forget that adjacent surfaces (walls, floors and ceilings) that will be exposed to temperature must first of all be finished with fire-resistant elements.
Tile adhesive is calculated separately. To do this, you can read the instructions that each manufacturer places on the packaging. You can also use free calculators found on sellers’ websites.
Additionally you will need:
- rags;
- roller and brush;
- mallet;
- tile cutter;
- screwdriver;
- level and rule;
- fine mesh;
- trowel and spatula.
I would like to immediately give some advice:
- Tiling a stove does not take place without damaging the material, especially when you work with your own hands. Even experienced craftsmen take into account the required margin of ten percent, which is due to damage or other defects.
- Before covering the heat source with a decorative layer, it needs to be strengthened. To do this, a wire is often used, which is stretched to form a cellular structure. But you can use a ready-made mesh.
- You can make your own mortar for laying tiles. It should be borne in mind that it is better to cook it in small portions.
Is it possible to use ceramic tiles for a heating stove?
Is it possible to cover a heating stove (i.e. a wall that heats) with ceramic tiles? - I heard that it seems possible, but not glazed, but matte, or even better with porcelain stoneware. And how should I put it - on a special composition for fireplace stoves or on cement-lime plaster?
Thanks for the advice,
mihalich25 wrote: Is it possible to cover a heating stove (i.e. a wall that heats) with ceramic tiles?
-You can, I personally have lined stoves with ceramic tiles more than once
About ten years ago, when there was no smell of special coating compounds yet, I was finishing the stove with glazed ceramic tiles. I cut it with a roller glass cutter from the front side, tapped it from the back and broke it on the seat of the stool. As a solution I used clay + sand + cement milk + fluffed asbestos. I left that apartment seven years ago, I came in recently and the tiles are still there.
mihalich25 wrote: I heard that it seems possible, just not glazed
and glazed 7mm. I tiled it with Belarusian tiles before the New Year - FSE holder - the heat transfer is crazy
mihalich25 wrote: And how to put it - on a special composition for fireplace stoves
preferably, is the stove laid out evenly?
2mihalich25 Any tile, the main thing is suitable glue (use glue for heated floors). It is unlikely that the walls heat up above 200 degrees.
stroika wrote: preferably, is the stove laid out evenly?
Hello, Thanks to everyone - the stove seems to be built well - quite evenly, but it’s already plastered with cement-lime plaster - so why cut it down now?
To place tiles on this special. glue ?
An experienced craftsman advised me that the tiles should be ceramic, they are similar in composition to stove bricks; he advised against porcelain tiles. There are plenty of adhesives for ovens these days. But it’s not clear with the grout: they didn’t grout before, they left a small gap for thermal expansion, but now I don’t know, maybe progress is moving forward and there are grouts for stoves?
brodjaga66 wrote: I used clay + sand + cement milk + fluffed asbestos as a solution
Nowadays, asbestos is banned and is recognized as causing cancer.
Vasss wrote: But it’s not clear with the grout
I use this grout to grout the stoves - everything stays together - although it’s impossible to put your hand on the stove
mihalich25 wrote: but already plastered with cement-lime plaster
mihalich25 wrote: - and why cut it down now?
alas, I don’t know how this plaster behaves on the stove. I first stuff a 10*10 mesh onto the stove and then plaster it over the pre-heated stove, pouring plenty of water on it (the stove). I prepare the solution like this – 1 hour. cement 2h. sand and 1 tsp. clay - pour water until it becomes thick.
Description of cast iron floor tiles
Cast iron tiles are one of the best materials for the construction of industrial floors. Industrial floors today mean not only the floors of directly industrial buildings - production workshops of factories and factories, but also all kinds of floors that can withstand significant loads, both physical and chemical, thermal, abrasive.
Cast iron floor tiles, unlike other materials, are not subject to corrosion, and thanks to the properties of cast iron they become stronger every year. Unlike concrete and polymer tiles, cast iron tiles are easy to install and can be reused in the future.
Selecting and purchasing floors for industrial buildings that meet all the necessary requirements can be difficult, and sometimes simply impossible. Therefore, sometimes in certain areas of even one room several options for industrial flooring are used.
Traditionally, cast iron floor tiles are used in the following cases:
- laying cast iron floor tiles in industrial buildings
- line floors at high temperatures (100-1400 °C)
- when exposed to shock and mechanical loads
- Floors made of cast iron slabs are indispensable in production or warehouse premises, when metal-powered vehicles move across the floor or very large loads are moved.
1. The back side of the tile has stiffening ribs and spikes of a triangular cross-section for better adhesion to the mortar.2. The tiles are laid on a layer of mortar 4-45 mm thick, the mortar is spread in a strip of 6-10 tiles.3. The slabs are laid along a cord and set with a vibrator or a hammer weighing 2-3 kg (the tiles are set with a hammer on a wooden block, which is laid on several slabs).
1. The outermost slabs around the perimeter are laid on the mortar.2. The remaining slabs are laid on a layer of sand and rolled with rollers weighing up to 3 tons or settled with tampers.
What ceramic tiles can be used to cover a stove or fireplace?
- Terracotta.
- Clinker tiles.
- Majolica.
- Tiles.
- Porcelain tiles.
- Chamotte.
- Tile.
Some types of tiles for cladding require special professionalism of the craftsman. Thus, laying tiles can only be done by a tiler who has special skills and experience in performing the work. For independent finishing, choose porcelain stoneware or tiles.
Terracotta tiles
Unglazed ceramic tiles - terracotta - have been used for cladding stoves and fireplaces for several centuries. During production, special clay and fireclay are added to the composition in certain proportions. The composition affects the quality and heat resistance of terracotta tiles.
The special red color with a brown tint appears due to the presence of a large percentage of metal oxides. When making terracotta tiles for fireplaces and stoves, only fine-grained clay is used. Large fractions lead to a decrease in strength and heat resistance.
Cladding fireplaces and stoves with terracotta tiles is simple. The material has the following characteristics:
- Light weight.
- Fast heating of the material. Terracotta heats up quickly and evenly.
- Tiled walls give off heat for a long time.
Terracotta fire-resistant tiles are used for lining natural hearths and fireboxes. The only thing that somewhat limits the use of finishing material is its appearance, a small range of choices and a constant red tint.
Clinker tiles
Clinker facing tiles for finishing fireplaces and stoves are made from a clay composition using pressing and high-temperature firing. When clay reaches 1200°C, it changes its crystal structure and acquires the strength and heat-resistant characteristics of ceramics.
Advantages of the material:
- Durability - clinker is not afraid of temperature changes, sudden heating and cooling.
- Resistance to mechanical damage.
- High hydrophobicity - the material does not absorb moisture during operation.
Compared to terracotta, clinker has a larger range of colors. Decorative brick-like clinker tiles used for fireplaces look organic. Color range from white to red and chocolate shades.
Majolica tiles
Majolica tiles got their name because the first samples were painted by hand, using painting that appeared on the island of Mallorca. Today, production has been put on stream, but you can also order unique handmade tiles. After applying a design or creating a tone, the elements are fired until a ceramic glaze appears.
According to its characteristics, majolica resembles terracotta and has a similar production process. The color and decor of the material is practically unlimited. There are samples decorated in classical and ethnic styles.
Tiles for stoves
The disadvantage is the complex installation, which is carried out simultaneously with the laying of bricks. Unskilled installation leads to disruption of the heat transfer of a brick stove after facing with tiles. The location of each tile in vertical and horizontal levels, as well as plane, is carefully checked. They start by attaching the corner tiles, gradually moving on to laying the remaining fragments.
Porcelain tiles
Porcelain stoneware got its name due to the addition of granite and marble chips to the clay mass during production. The finished product has the following characteristics:
- Ability to withstand thermal and mechanical loads.
- Easy to install.
- Wide variety of colors and designs.
- Relatively low price.
Glue and mixtures
Another interesting option that you can do with your own hands, even without experience in tiling, is to cover the stove with tiles without glue. The fastening is done using homemade galvanized corners. This is complex and painstaking work, but the costs will be minimal.
Example of finished cladding
The main advantage of this method is that if one ceramic tile breaks, it can be replaced in a couple of minutes with your own hands by unscrewing the corner and pulling it out from the defective row. The downside is that a 3 mm horizontal frame will be visible on each tile and the heat transfer will be slightly reduced due to the air gap.
You will need:
- Any ceramic tile, in this example the size is 10x10 cm. It is sold in 30*20 cm modules, so you will need to separate them with your own hands.
- Galvanized sheet, thickness 0.5 mm.
- Aluminum corner 20*20, thickness 2 mm.
- Aluminum strip 20 mm, usually sold in 3 meters.
The simplest ceramic tiles 10x10 cm are used.
The longest and most difficult job is to make the corners with your own hands. They will be J-shaped to hold the tiles in place at the top and bottom, like a frame.
- We cut the galvanization into strips of 44 mm. You will need to make a corner from these blanks.
- To bend them, we make a simple device from a block with a 6 mm metal plate screwed on. It is screwed on with a small protrusion (3 mm).
- The dimensions of the corner are shown in the diagram. We set the workpiece on the fixture according to size and clamp it with clamps.
Dimensions and location of corners
Using a wooden mallet, bend the corner.
Give the plate the desired shape using a mallet
We adjust the plate to the dimensions of the next bend and bend the corner again. Due to the presence of a protrusion on the device, a 3 mm bend goes under it.
Fastening tiles
- Along the perimeter of the stove, a frame is made of aluminum corners. They will serve as the basis for attaching horizontal aluminum strips.
- In addition, intermediate aluminum vertical plates are attached to the corners.
- Homemade corners are attached to the plates using 6*3.2 mm tear rivets. To do this, you will first need to drill holes. One corner will look in one direction, the second - in the other.
- The space between the rows is made according to the width of the ceramic tiles, but taking into account a couple of mm of margin so that they can be easily inserted and pulled out.
- When all the corners are installed, the ceramic tiles are inserted from the side into the resulting frame. The end is then closed with a corner.
Inserting ceramic tiles into the frame
For purposes of laying ceramics on heated surfaces, there are special compositions. Bags of glue are always marked accordingly.
- Grout. Used at the last stage of work. Fills seams, making them neat and beautiful;
- Net. For stronger adhesion of the plaster to the surface of the stove, it is advisable to lay a metal mesh, securing it to the base;
- Plaster mixture. For initial plastering of walls you will need a special solution. It can be made using clay, sand and cement, or you can buy a ready-made mixture for plastering stoves. The latter option is preferable, since it has a measured proportion of components and has increased strength and thermal conductivity.
When the tools and materials are ready, it's time to get to work.
Before finding out how to lay tiles on the stove, we decide on the contractor. If a professional is hired, then the work process is known to him, and if finishing the stove with tiles is intended to be done with your own hands, then the next section is just about this.
How to tile a brick fireplace or stove
To ensure that the independent lining of the furnace is durable and does not come off after the first fires, the existing masonry order is followed:
- Preparing the walls - the old layer of plaster is removed. The seams between the bricks are cleaned so that a recess appears, approximately 5-10 mm.
- Surface primer - to treat old brickwork, use a primer mixture with the addition of fine marble chips. This solution provides good adhesion.
- Reinforcement of the stove during finishing - a metal mesh is stretched over the primed masonry. The reinforcing layer is fixed to the brick with dowels.
Plastering is the next stage of masonry, plastering the surface. The plaster layer increases the strength of the brickwork and levels the surface. It is prohibited to tile walls with differences or deviations from the vertical.
Laying ceramic tiles on a brick fireplace or stove requires compliance with the main stages of the work, the use of special solutions and compositions.
What mortar is needed for laying tiles
As practice shows, it is better to use ready-made mortar for laying tiles, sold in hardware stores. Various additives and plasticizers are added to hot melt adhesive to ensure good adhesion and bond strength.
The composition of the mortar for laying ceramic tiles often includes fireclay clay and lime. To facilitate the process of preparing glue, manufacturers, in addition to dry mixtures, produce compositions that are completely ready for use. Before application, the solution is simply mixed with a mixer adding the amount of water indicated on the package.
The adhesive used for laying tiles is divided into several categories, depending on the maximum surface temperature:
- For covering surfaces with a heating temperature of no more than 200°C.
- Compositions for finishing very hot structures, up to 600-800°C.
- Heat-resistant masonry compounds for lining fireboxes and open hearths. Withstands temperatures up to 1200°C.
To properly tile a stove or fireplace, you should carefully study the instructions for using the adhesive composition. For each type of facing material, a special type of adhesive is produced, and there are also universal compositions suitable for different types of tiles.
How to plaster a brick surface before laying tiles
You can plaster a brick oven before tiling with a home-made clay mortar. Clay from quarries located near water bodies is suitable for this purpose. To make a plaster mortar, do the following:
- The clay is mixed in water - the minimum time required for preparation is 2-3 days. During this time, the clay is mixed several times.
- Before plastering the walls, check the quality of the solution. For the dough, make several balls from the resulting mixture and allow them to dry. The solution is considered to be of high quality if the workpiece has not cracked and has retained its strength.
Plastering bricks under tiles is also done with factory-prepared compounds. The mortar layer is from 1-3 cm. It is allowed to re-apply the plaster after the first layer has dried.
Manufacturers producing dry mixtures for plastering stoves and fireplaces describe in detail the features of application and work with plaster solutions. The packaging indicates the production time, the required amount of water, as well as the period after which the solution will gain strength and it will be possible to begin laying tiles.
When can you light the stove after laying tiles?
Reviews about cladding show that quite often, after laying the tiles, they make a gross mistake that affects further operation. Before the adhesive composition has completely dried, the stove is heated, which negates all the efforts of the master. As a rule, after this the tile lags behind the surface.
At each stage of cladding work, it is necessary to give time for each layer to dry. Experienced professionals recommend maintaining the following time:
- Primer – after applying the layer, it will take 2-3 hours to dry completely.
- Plaster – the time required for drying depends on the thickness of the layer and the composition used. On average, it is recommended to wait 2 days before proceeding with further cladding work.
- Tiles - after laying on the adhesive and before kindling, they must be kept for at least 1 month. During this time, the solution will acquire maximum strength. For the entire period of time, stable temperature and humidity conditions are maintained in the room. Minimum permissible temperature is +5°C, maximum +25°C.
After laying a brick oven, it must be constantly heated for 1-1.5 hours in order to gradually increase its strength. Facing does not require compliance with such conditions. After gluing the tiles, you just need to wait the specified time.
When tiling yourself, it is worth studying the instructions for the adhesive composition printed on the packaging. In particular, it explains when the adhesive layer will gain enough strength to fire the stove for the first time.
Properly laying ceramic tiles on a brick oven is not at all difficult if you have certain construction skills. You will need to wisely select the appropriate facing material and decide on the selection of plaster and adhesive mortar. After installation, allow enough time for the glue to gain strength.
If the tiling process seems difficult, it is better to seek help and leave the work to a qualified tiler.
Glue it yourself or invite a specialist
Most tile masters like to scare their potential clients by colorfully describing how difficult it is to tile a stove with ceramic tiles with your own hands without practice and experience. In fact, there are many nuances in how to line a stove, but they are all known and do not pose any particular difficulties if:
- Use high-quality tile materials and heat-resistant adhesive. There is no point in relying on homemade compositions;
- Prepare the furnace walls thoroughly for cladding, level the surface with plaster mortar so that the height difference is no more than 10 mm;
- Follow the technology and installation steps exactly, without trying to improve or save money, for example, as in the video:
- Be patient and take time, since facing stoves with ceramic tiles does not tolerate haste and careless attitude to work.
The body of a properly assembled fireplace does not heat up any more than a conventional stove, so the risk of chipping ceramic tiles is relatively small. Such work will add confidence and at the same time allow you to test the materials prepared for lining a home stove. A little practice will allow you to get used to laying ceramics and get better at simple operations. Of course, the issue of facing with ceramic tiles concerns, first of all, old worn-out stoves, as well as new buildings, if instead of expensive facing bricks, ordinary red ceramic material was used in the masonry.
Preparation for lining the stove with ceramic tiles
Before purchasing and preparing materials for work, it is necessary to take into account the type of main structure and operating conditions:
- single-circuit brick kilns are characterized by strong surface heating, so the facing material and mortar must be temperature resistant. Devices of this type are used in rooms with high humidity and temperature fluctuations (baths, saunas), which also affects the careful selection of tiles and adhesive composition;
- double-circuit brick devices. The external contour of the furnace, in contact with the facing material, has a lower degree of heating than the internal one, and is characterized by the absence of local overheating points. Such characteristics make it possible to install one type of tile using one type of mortar;
- ovens with a metal surface. Furnace finishing is complicated by differences in the heating and cooling rates of metal and tiles, which can lead to deformation or destruction of the lining. Installation of lamellas is possible in a “dry” way - on a special frame.
Before starting work, calculate the total surface area of the heating device, including horizontal and vertical planes.
Take measurements of the tiles and determine the number of elements required for cladding; be sure to add 10-15% to the result obtained - the reserve may be needed in case of damage to the material during installation or to replace a surface area that has become unusable during operation.
Also decide on the installation method: straight rows (with exact alignment of the sides of the elements), diagonally, offset (type of brickwork).
The procedure for laying a tiled stove
If with other methods the tiles are attached to bricks, then the opposite happens here - it is necessary to attach the bricks to the tiles directly while laying out the stove. A brick is firmly but gently pressed against each prepared tile (to the inside). This is how the first row is laid out.
It is important to be very careful when laying it out; if you make mistakes at this stage, they will lead to serious consequences in the future.
Next, the second and subsequent rows are laid out. The crutches are lowered to the level of the bottom row.
It is best to fill the gaps between the tiles with simple crushed stone, so the structure will be stronger.
When all the bricks are laid to the top of the row of tiles, the latter are pulled together with wire passed through the bends of the crutches. The crutches are further deposited, and the ends of the wire are pulled into the brickwork. At the end, it is necessary to fasten the tile boxes with steel staples and cover the seams between the components with liquid gypsum dough.
Florentine mosaic.
Read here what influences the thickness of the laminate.Adhesive for vinyl wallpaper: https://trendsdesign.ru/materialy/oboi/vinilovye-ili-flizerinovye-kakie-oboi-kupit.html
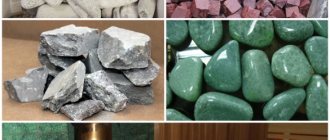
Materials and necessary tools
Tile selection
The material used for finishing stoves must have the following characteristics:
- resistance to mechanical loads, strength;
- wear resistance;
- heat resistance;
- the thickness of the elements must be at least 8 mm to prevent deformation of the coating;
- environmental friendliness - during heating, toxic substances will evaporate into the surrounding space;
- moisture resistance - the water absorption coefficient should be less than 3%.
Types of tiles used for finishing stoves:
- clinker - in the production process they use the method of pressing and firing a mixture of several types of clay, fireclay and dyes. The products are durable and come in a wide range of beige shades;
- porcelain stoneware - made by pressing under high pressure and temperature of a complex composition (clay, sand, granite chips, metal salts, marble). The material is highly resistant to mechanical and thermal loads;
- terracotta - the basis of the tile is clay. The surface of the lamellas is not susceptible to scratches, the tiles are impact-resistant and can withstand temperature changes, which makes it advisable to use them for lining stoves in cold rooms;
- majolica – terracotta products covered with glaze. Used to implement unusual design solutions with elements of luxury. For the same purposes, tiles are used for finishing - high-strength, fire-resistant clay tiles, which are quite expensive.
Artificial and natural stones are in demand as facing materials: marble, sandstone, granite
Selection of adhesive composition
Cement mixtures
They consist of highly refractory cement, sand with the addition of mineral and synthetic additives that provide the necessary thermal resistance characteristics. Dry mixtures can be purchased on the building materials market; if desired, you can make your own solution:
- take clay or fireclay, refractory cement, sand in a ratio of 1:1:3, respectively;
- displace cement and sand;
- in a separate container, dilute the clay with a small amount of water and
- add to dry mixture;
- Mix the glue thoroughly until a homogeneous mass is obtained. If necessary, add a little more liquid.
Fireclay mixtures
They have high heat resistance and are used for laying tiles on the internal and external surfaces of the stove.
Terracotta
The composition includes fireclay dust and astringent additives. The solution has high moisture resistance and can withstand heating up to 400⁰. Glue can be purchased ready-made or made: mix 2 parts of fireclay powder with 1 part of koalin clay and pour the dry mixture into a container of water, stir until smooth.
Fireproof adhesives
They are made on the basis of potassium or sodium silicate with the addition of clay and modifying additives. Maintain operational properties at temperatures of 1200-1650 ⁰С
Adhesive mastics
Silicate and phosphate compounds with mineral additives and fillers. They are moisture resistant and can withstand heating up to 1400 ⁰C.
Auxiliary materials
To complete the work, you will need a metal mesh, screws or dowels for fastening it, plaster to level the base, heat-resistant adhesive, plastic separating crosses or drywall cut into strips, grout, and primer.
Tools for work
- straight, serrated metal and rubber spatulas;
- tile cutter;
- metal brush;
- hammer drill or chisel;
- rubber mallet;
- level, vertical plumb line;
- construction mixer;
- container for mixing the solution.
Technology for laying ceramic cladding on an adhesive base
To attach ceramic tiles to the surface of the stove, a special tile adhesive is used, which has high heat resistance and the required coefficient of thermal expansion. Usually this is a mixture of fireclay with fireclay powder, perlite and plasticizing additives that make the adhesive material plastic and slightly viscous. One of the adhesive compositions proven by many years of practice is Plitonit W brand SuperGlue, Neomid Supercontact and Scanmix Skanfixsuper.
From home-grown solutions, clay adhesives are used, at the rate of 1 measure of clay to 4 measures of sand and 1 water with the addition of PVA and asbestos fiber. When using lean clays, the amount of sand in the batch is reduced by 40-60%.
We carry out the furnace cladding in several stages:
- Cleaning and leveling the masonry surface for laying;
- Marking and calculating the amount of material, laying out tiles, measuring rows and choosing a bond line;
- Laying ceramic tiles in rows;
- Grouting the joints between the tiles with a compensating compound.
Removing and preparing walls for cladding
There are no stoves with perfectly smooth walls; moreover, during use, the walls can play, expand, become covered with cracks and chips. Therefore, before tiling the stove, you will need to clean the walls from dirt and old mortar. If the brickwork “wiggles” along the plane by no more than 10 mm, then leveling plaster can be abandoned; this will only improve the adhesion of the tile adhesive to the ceramic surface of the tile.
In this case, it is necessary to deepen the tile joints and apply a notch to the brick. Cracks and chips are covered with masonry mortar. At least one day before the start of laying the cladding, the brick base under the ceramic tiles is strengthened with a heat-resistant primer.
If the walls of the furnace are finished with good quality plaster, it is necessary to clean, level and strengthen the layer with a primer. The old and cracked plaster layer is knocked down to the brick, the oven walls are cleaned and primed.
To strengthen the plaster mass under the tile cladding, a 10x10 mm reinforcing welded mesh made of 0.4-0.5 mm annealed steel wire is stuffed onto the brick; it can be secured with “bugs” or loops embedded in the seams. Next, ruler-beacons are installed and plastered. If the thickness of the laid material is more than 15 mm, the plaster is applied to the stove in two layers with the first drying for 24 hours, as in the video:
The plaster is prepared according to a standard proportion - to one part cement, three parts clay and a fifth part sand. To ensure good adhesion of the plaster without shrinkage, polyvinyl acetate emulsion can be added to the solution.
Laying ceramic tiles
Tiling ovens begins with laying out ceramic material along the lower and middle tier. This is done to adjust the size of the tile cut and the width of the seam. For hot single-pass stoves, the width of the seam between ceramic tiles is increased to 10 mm; for colder wood-burning fireboxes, the seam is reduced to 8 mm.
To make the first row of cladding, you can stretch a fishing line or install a laser level; laying out the tiles is done with a gap of 7-9 mm between the bottom edge and the floor surface. The walls should be warm, 30-35oC. To facilitate the process of laying under the first row, a guide strip is nailed to the oven wall, perfectly aligned with the horizon.
Freshly prepared adhesive mass sets quickly enough when warm, so it is prepared in small portions, for one or two rows. Before laying, the back side of the tile is sprayed with water or moistened with a brush, after which a layer of adhesive solution 4-7 mm thick is applied with a notched trowel and laid on the wall.
The front corner of the oven body is laid out first, and then the row is pulled along the front and towards the back wall. During the day, more than three rows of tiles are not laid. The seams between individual tiles are cleaned of adhesive mortar and left open.
The next row can only be laid after the previous one has been completely laid out on the wall. The result must be checked with a building level along the horizon. Within 8-10 minutes from the moment of laying, the tiles can be adjusted with a wooden or rubber hammer. The top edge of the laid tile must be perfectly smooth; for a lined stove, it is fundamentally important that the size of the seam be the same everywhere, otherwise when heated, the layer may crack and peel off.
To achieve maximum strength of the cladding, the tiles are glued in staggered rows, but such compositions do not always look beautiful, so most often the stove is covered in straight rows.
Finishing operations
Before laying the tiles, it is necessary to remove the cast iron parts of the door and frame from the firebox. If you place ceramics on top of cast iron, the heated metal will lift the tile layer. After the glue has completely dried, the cast iron is returned to its place and secured to the brick surface with long self-tapping screws with an asbestos cord.
Three days after the completion of gluing the tiles, the seams are finally cleared of glue residues and joints are jointed or grouted with a clay-based compensating compound. The grout mixture is applied to the seams with a rubber spatula and gently pressed along the entire length of the seam. After a few hours, the edges are wiped with a flannel, after which, with a damp finger or rubber float, the depth of the seam is leveled, making it the same over the entire surface of the cladding. After final drying, all grout material is carefully removed from the surface of the tile.
bouw.ru
Start of main work
Preparing the base
- remove the old paint layer with a wire brush. If tiles were used as cladding, remove them with a chisel, starting from the bottom of the stove and moving upwards;
- deepen the seams of the brickwork to ensure high-quality adhesion of the mortar by 5-10 mm;
- secure the construction mesh with slight tension along the plane of the surface. Fix with dowels or self-tapping screws so that the caps protrude 10-12 mm above the wall.
Applying plaster
Treat the base with ready-made plaster or prepare it yourself by mixing 0.2 parts sand with 3 parts clay and 1 part cement. If the surface has significant depressions (up to 10 mm), apply the solution in two approaches. Check the evenness of the surface with a level.
After the plaster has dried, apply a heat-resistant deep penetration primer.
How to cover a stove so it doesn't fall off?
- make markings using a plumb line and level for the desired laying pattern, take into account that work should begin from any lower corner;
- spread the adhesive with a notched trowel on the back surface of the tile or apply it to the stove;
- press the element to the base, lightly tap it with a mallet;
- lay the remaining tiles, inserting crosses or plasterboard between adjacent lamellas;
- After finishing the work, leave the decorative coating to dry for 1-2 days.
Working with seams
To mask the seams, you can use the remains of the solution used for installation or a special, heat-resistant composition of various colors:
- Using a rubber spatula, spread the mixture at the joints and level it;
- inspect the seams and, if necessary, grout again to fill all voids;
- Use a damp sponge to carefully remove excess grout; do the final cleaning of the surface of the tiles after 2-3 hours, when the grout has hardened slightly.
You can start using the oven after 6-8 days.
Selection of adhesive composition
Finishing the stove with tiles requires the correct choice of adhesive. A large part of success depends on this. The wrong approach will lead to dire consequences. Namely, the tiles will begin to fall off, because the applied solution, which is not heat-resistant, will not be able to withstand the temperature and will collapse.
According to the method of use they are distinguished:
- Adhesive for continuous application. This composition is used to glue the main types of ceramic tiles. This is done with your own hands in this way: a layer of no more than one centimeter is applied to the surface, on which the material is laid.
- Spot solution. It is also used to cover a heat source with a decorative layer. But it is better to use it for finishing adjacent surfaces.
When choosing an adhesive for tiles, you need to take into account the heating temperature of the oven.
The adhesive for oven work must have - heat resistance. This is the primary condition.
You can make this composition yourself. The main thing is to follow the technology correctly. Take:
- four parts sand;
- two parts clay;
- two parts of cement (M400-500);
- one part of liquid glass;
- fiberglass can be added.
Additionally, after kneading, add 1 kg of salt for every 10 kg of solution. Used within one hour. This creates an excellent tile adhesive that can easily be used to tile any surface.
How to cut tiles?
Before the trimming process, you need to make markings using a marker and ruler. Then fix the tile in the tile cutter so that the line is located under the cutting roller. To avoid chipping, lubricate the guide frame and roller with machine oil. When the lever is lowered, the tile breaks.
It is possible to cut with an angle grinder and a stone or steel disc coated with fine-grain diamond. The grinder should be operated at low speeds.
Plastering the surface is a simpler option for finishing a stove, but a ceramic coating has great advantages: a heating device with this design is easier to keep clean, and maintenance does not require the use of special detergents. Also, due to the properties of ceramics, the heat transfer of the furnace increases.
Laying tiles on a continuous layer of adhesive
Ceramics must be insensitive to high temperatures
How to glue heat-resistant tiles to a stove:
- First of all, you need to prepare a solution and let it sit for 15-20 minutes.
- Then a small amount of glue is applied to the stove - approximately enough to lay 3-4 fragments.
- The mixture is leveled with a notched trowel. If the surface is not too smooth, add another layer of mortar to the tile itself.
- The tile is glued, tapped with a mallet and trimmed.
- Several rows are dried and only then do further work begin.
- After the tiles have dried, the seams are sealed with a special heat-resistant grout.
Applying tile adhesive
The simplest installation option is cladding using tile adhesive, which is specifically designed for finishing work on fireplaces and stoves. For some craftsmen, compositions based on cement and PVA are more preferable. In some cases, table salt is added to the glue, which can absorb excess moisture.
An excellent option for fixing ceramic tiles is clay. It has characteristics such as heat resistance and ductility, becoming only stronger from exposure to high temperatures. To prepare a clay solution, you must use river sand, the amount of which should be three times less than the amount of clay. The consistency of the composition should resemble thick sour cream.
You can buy special building mixtures in construction stores. They are ready for use; all the master needs to do is add water and mix the composition thoroughly. The amount of glue prepared can be large. Because it takes a long time to set. If it dries out, water can be added at any time.
Overview of methods
Carrying out tiling work
Before covering the stove with tiles, it must be heated again. It is better to prepare the mounting solution in small portions. The starting point for installation is the bottom corner. To apply the solution to the tiles, it is convenient to use a notched trowel. If there are unevenness on the walls of the oven, it is better to spread the mixture with a trowel, which will avoid the appearance of air cavities under the tiles (because of them, the lining can crack due to uneven heating). The recommended glue thickness is indicated on the packaging.
The element coated with the solution is pressed to the base: to adjust it, it is tapped with a rubber hammer. To ensure that the tile seam is uniform, it is equipped with special crosses. The tiles are installed row by row, removing excess mortar with a damp sponge. Upon completion of tiling, the seam is filled with a special heat-resistant grout using a rubber spatula.
Let's start with the tool:
- Roulette. Required for frequent and accurate measurements;
- Marker, pencil, chalk. For marking tiles and surfaces;
- Level. Can be simple or laser. Lining a stove with ceramic tiles requires high precision. A laser level is preferable because it is more convenient to work with and it is a high-precision device;
- Tile cutter. Essential tool for cutting tiles. What size and thickness fits the tile cutter depends on its model. You can also purchase a “ballerina” as an additional attachment for the instrument. It is designed for cutting round holes;
- Pliers. They are used when “biting out” small parts of tiles from the edge. For example, under the hinges of stove doors;
- Spatula. It is advisable to have several types of them. You definitely need a notched metal spatula. The height of its teeth determines how thick the adhesive solution will be applied to the tile. For ease of work, you need a regular metal spatula, no more than 15 cm long. They can be used to both apply glue and remove excess mortar from a notched trowel. Rubber spatula about 5 cm, for applying grout;
- A “trowel” and a long spatula (from 50 cm). They are required for pre-plastering;
- Mallet. Rubber mallet. Laying tiles on the stove requires good adhesion to the surface; for this, a mallet is used. The tiles being laid are tapped with it for better distribution of the glue.
This is where we are done with the tools required for tiling work. Professional craftsmen have it, so if you don’t plan to ask the question “how to tile a stove,” then you shouldn’t pay much attention to the need for equipment.
But the owner of the object being repaired will have to worry about consumables.
Crosses. They set the required distance between the tiles. The best option would be to lay out ceramics with crosses, the size of which is from 2.5 to 3.5 mm.
Rags. Tiling a stove involves a lot of dirt, so you should always keep rags nearby for timely cleaning.
The entire process of covering stoves with ceramic tiles, including with your own hands, is carried out in several stages.
First of all, all layers of old plaster are removed. Preferably before brickwork. A hammer and chisel will help you cope with this task. As a result, nothing should crumble or fall off; Next, a metal mesh is attached to the entire surface of the oven; After this, the plaster mixture is diluted according to the instructions on the bag.
Compliance with the exact recipe when mixing any solutions is very important, as is the timing of the work (how long it dries, when and how it can be used); Using a “trowel” and a spatula, apply the prepared solution to the stove and level it. The smoother the result of plastering work, the more economical the tile adhesive will be used, and the work will be faster and more convenient.
In this case, there is no need to strive for perfection; the surface will be leveled when it is time to glue the tiles. Depending on the initial condition of the repair object, it may be necessary to apply the plaster solution multiple times, with each layer drying, according to the instructions for the mixture; The base should finally dry out. All bulges and other bulges are removed. The level checks the vertical. The deviation should be no more than 1 cm, since a thick layer of the composition, when lining the stove with your own hands, will greatly complicate the work and reduce its quality.
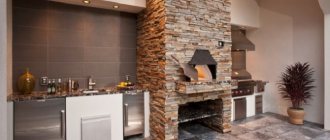
Fireplace cladding with porcelain stoneware and granite
Having a working fireplace in an apartment is the dream of many homeowners, and it starts with an idea. The collaboration of creative solutions from an artist, a master stove maker, a designer, and a preview of photos and videos of already made fireplaces help in solving three primary tasks. Creation of a single, individual fireplace shape for a given room, determination of the required materials and consumables, and the very lining of the fireplaces with porcelain stoneware or granite.
Preferences for facing a fireplace with porcelain stoneware
Depending on the size of the room and location of the fireplace, its type, parameters, various shelves, protrusions, style, design features and finishing material are determined. Good results are obtained when facing a fireplace with porcelain stoneware, interesting design solutions at a low cost and an exceptional, presentable appearance, the most respected detail of the interior. Why do stove masters prefer to line fireplaces with porcelain stoneware? So:
- A unique material in terms of physical properties, comparable in characteristics to natural raw materials. In some positions it even surpasses it, because it is not only produced from these raw materials, but also undergoes additional processing.
- High frost resistance allows for cladding of outdoor fireplaces, fences, arrangement of garden paths, cladding of bathhouses, garages, and house facades.
- Does not interact with a variety of chemical elements, even with concentrated alkalis and acids.
- One of the most important characteristics is its strength and high heat resistance.
- Porcelain tile cladding for fireplaces is stain-resistant and easy to clean.
- The design of the fireplace determines the type of facing material used.
- Matte porcelain tiles are used where there are combustion products, traces of soot remain and there is a possibility of frequent contamination.
- Porcelain tiles that imitate natural stone have a non-slip, stain-resistant surface.
- Porcelain tiles have an extremely low water absorption rate, and if the EN standard defines the optimal value as 3%, then for porcelain tiles this figure averages 0.05-0.5%.
- Resistance to mechanical stress is expressed in resistance to scratches and fracture formations; according to these characteristics, porcelain tiles exceed natural stone three times, ceramic tiles one and a half times, and wall tiles twice.
- Manufacturers of porcelain stoneware “hold” a fairly wide range of products from 200x200 mm to 1200x1800 mm, and the most popular tile among consumers is 600x600 mm.
- Surface roughness or slip resistance, this property is more relevant for floor coverings in private housing, where the instructions recommend using one type of stone, and another in public places.
- The hardness of the front surface is reflected in the appearance of damage and scratches on the fireplace.
Attention: The weight of one square meter of products will help you identify low-quality porcelain tiles. Tiles with a thickness of 10 mm should ideally weigh 22 kg. Less weight indicates a low density of the material.
Type of porcelain stoneware
There is nothing superfluous in this design with porcelain stoneware.
It is determined by the surface of the tile, processed using different technologies and leading to some changes and improvements in the properties of the material. Tiles are divided according to processing methods:
- A matte product is when the stone is not mechanically processed after firing.
- Polished tiles, finished after cutting one side.
- Semi-polished with partial surface cutting and polishing, creating a textured effect.
- Satin tiles with crystals applied to the tiles before firing.
- A glazed product, when enamel is applied to the base and the whole thing is fired.
- Rectified tiles of standardized sizes with additional calibration.
- A structured product, when pressing produces an imitation of the texture of stone and wood.
Facing works with porcelain stoneware
A combination of different materials in decoration.
What elements can diversify the appearance of a room? It is worth thinking about using porcelain tiles, the same mosaics, relief, smooth tiles, matte, glossy porcelain tiles to create diverse interior elements that decorate the appearance of the room. In most cases, the selection of stones for cladding a fireplace is not limited, except for the use of decorative stone in the area of contact with an open fire. It may be noted that facing the fireplace with granite is not suitable for decorating the firebox area. Granite can crack when temperatures exceed 600ᵒC due to polymorphic transformations of quartz. When fireplace finishing is not needed:
- The fireplace body is made of thick walls and is made of two bricks.
- The surface of the material used is well polished.
- The masonry was done by a craftsman or with your own hands, resulting in smooth, precise joints with jointing that do not require facing.
- Disputes between supporters of fireplace finishing and their opponents do not subside. Some believe that cladding increases the warm-up period and consumption of combustible materials, opponents object and see the benefit of finishing in its slow cooling and longer heat transfer to the room.
- They believe that lining fireplaces with granite or porcelain stoneware allows you to spend less fuel and increase the energy efficiency of the chimney system.
Preparation for finishing work
The surface for cladding can be new or used and in need of updating. Porcelain stoneware for facing fireplaces combines the plasticity of ceramic products and the hardness of granite, is easy to process, holds high temperatures well and does not scratch. So:
- Regardless of this, the surface under the cladding is cleaned of dust, solution particles, and dirt.
- A metal object is used to prepare the seams and deepen them by about a centimeter.
- The verticality of the surface is checked by two nails driven into the top of the fireplace, and ropes with weights at the end attached to them.
- Horizontalness is determined by a flat strip periodically applied to the wall during the laying process.
- Porcelain tiles for facing a fireplace are not a light material; in order for the tiles to lay well and last a long time, the surface is covered with a chain-link mesh with a fine mesh of one and a half centimeters.
- The mesh is fastened with nails driven into the seams or galvanized self-tapping screws screwed into drilled holes.
- Marking is being done. A projection of each fireplace wall is first drawn on the floor with chalk. Each tile is numbered on the face, and the edge is marked with the number of the adjacent tiles.
Attention: This point is especially important when laying out patterns or ornaments, when selecting colors and their shades, and when combining materials.
- The edges, as a rule, are formed not by whole tiles, but by parts of them, which must be correctly measured and cut.
The finishing trend itself:
- Cladding fireplaces with granite or porcelain tiles starts from the bottom corner of the fireplace with a whole tile.
- The glue is applied to the base of the fireplace with a notched trowel and the surface is prepared for two or three tiles; it is no longer recommended by experts.
- Suitable glue is one that can withstand high temperatures, this includes fire-resistant mastics and cement-based adhesives.
- For facing complex surfaces, elastic additives are added to the cement base.
- The packaging of the mixture is supplied with information about the recommended layer, which is carefully applied to the mesh, trying to obtain the most even surface possible.
- If the attempt is unsuccessful, it must be repeated, but after the first layer of glue has completely dried.
- The tile is gently pressed to the base and gently tapped with a rubber hammer as needed.
- Small, dividing, plastic crosses, purchased in advance at a hardware store, will help you get equal gaps. You only need two of them for each side of the tile, you can do the calculations yourself, and the ridiculous price won’t force you to strain yourself with calculating the number of crosses.
- The facing of fireplaces made of granite or porcelain stoneware along the very edge is completed with cut tiles.
- Laying tiles is accompanied by constant removal of adhesive residues from the surface, without waiting for it to dry completely. Otherwise, the surface may be scratched.
- It is best to remove the adhesive with damp foam. The clean surface “rests” for a day, dries, and then the joints are grouted.
- Experts called this process jointing.
- Preparation of the jointing solution is carried out by dissolving the required powder from special dry cement-based mixtures with water. Mix thoroughly until smooth, allow time to settle and mix again.
- The tile seams are coated with a rubber spatula, and the grout is trimmed with a sponge. After 15 minutes, wipe the tiles with a slightly damp sponge.
- An hour and a half later, after the mass has set, the final beauty is achieved with soft flannel.
- The tile brightens under your hands and seems to thank you for its clean, washed surface.
- The artist’s final touches and strokes include applying a special compound to the seams that repels dirt. The fireplace will delight the eye for a long time with its neat, clean surface and beauty.
Of course, fireplaces have transformed into modern designs and serve more decorative functions than heating ones. You don't put logs in them, and no dangerous embers fly out of them, but they help create truly diverse interiors, helping to highlight functional areas. Moreover, each homeowner independently determines the diversity of design elements in relation to their premises.
You need to know: what temperature can porcelain tiles withstand?
Before tiling their dacha, many people are interested in whether certain types of tiles, in particular porcelain stoneware, can withstand high temperatures. And can it be used for lining a stove? The answer to this question is very simple. Porcelain stoneware is a heat-resistant material that can withstand heat of more than 900 ᵒC. In addition, if there is a pattern that is applied to porcelain stoneware, it is also able to withstand such temperatures. To prevent porcelain tiles from falling off, they must be attached to special heat-resistant mastics (gypsum base will not work) that can withstand the same temperature.
In order not to make a mistake when choosing porcelain stoneware, you must follow the following recommendations:
- When choosing porcelain tiles, it is best to ask for a passport or certificate, which will indicate what temperatures this or that brand of porcelain tiles can withstand, and not only heating, but also cooling to a certain temperature.
- This material has practically no limitations and disadvantages compared to other types of materials, for example, clinker tiles.
- Correctly selected material for cladding is the key to a beautiful stove and comfort.
The material on which the porcelain stoneware is attached also plays an important role; special heat-resistant adhesives must be used. Some use a variety of clay-cement mortars with the addition of asbestos fibers for better adhesion of porcelain stoneware to the walls of a stove or fireplace.
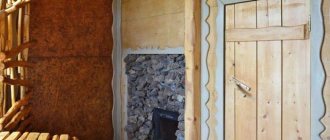
How to lay tiles on a stove so that they last for many years. Now you definitely won’t fall off from the heat
In my village, most houses are heated by stoves and our house is no exception.
It’s convenient to heat food, water and boil a kettle, and it’s quite economical in terms of costs. But over time, the tiles on the wall slowly began to peel off, which are located near a hot place, which does not look aesthetically pleasing and is dangerous, since the tiles can fall at any moment. In this article I will share advice on how to lay tiles so that they do not move away or come off due to heat.
The first step is to remove the old tiles, starting from top to bottom. This can be done easily with a spatula, but as carefully as possible.
It is also important not to touch the bricks that are part of the stove.
Unfortunately, I did not photograph the dismantling process, but I think that everything here is extremely clear. (We scroll through the gallery).