Pros and cons of external cladding
In addition to functional and decorative advantages, several operational advantages can also be mentioned:
- You can provide space for a hob, a stove bench, or a water heating tank.
- Increasing the service life of the metal if the stove is made of metal sheets that are connected by welding.
The disadvantages can only be associated with non-compliance with brick cladding technology, due to which the masonry may fail. In addition, the outer brick layer will make the stove larger.
Important!
It is necessary to use high-quality facing bricks without chips and cracks, otherwise a crack may spread across the entire facade due to deformation.
Additional materials
In addition to the brick you will need:
- metal sheet 0.5mm;
- asbestos cardboard, 1 sheet 10mm;
- sand;
- clay;
- pure water.
Sand and clay can be replaced with a ready-made refractory mixture. The amount of mortar depends on the area of the masonry. The water must be purified - it is impossible to get rid of water stains, and mineral impurities weaken the solution. Clay can be either white or red - only its fat content is important. The sand is sifted and washed on stretched burlap.
Basic criteria for choosing bricks for lining
The choice must be approached very carefully, since not only the appearance, but also the quality and performance characteristics depend on its correctness. We will not describe the requirements for bricks, but simply recommend which one to use.
Brick for lining:
- White silicate.
- Yellow facing.
Both of these types are made from high quality white clay and Portland cement. First of all, they are highly resistant to mechanical damage, high density and excellent thermal conductivity, not only transferring heat into the room, but also retaining it for a long time.
Video description
An example of how to line a stove in a bathhouse with brick is shown in the video:
You can finish the masonry at the level of the heater, bringing it only to the top of the heating unit body. Or you can extend it to the ceiling, also lining the chimney. It depends on the design of the stove, its location and the desires of the owner. You just need to remember to promptly remove the protective film from the structure.
If old bricks were used in the work, the heat shield can subsequently be lined with porcelain stoneware or tiles. If you purchase new material for the work, you can choose a stone of a different color or with a decorative surface, and immediately carry out the masonry with jointing.
Another option for decorative cladding using brick-like clinker tiles Source giropark.ru
Preparation for use
Before using the bathhouse in operating mode, the masonry should be allowed to dry under natural conditions for several days. But even after this, you cannot immediately heat the stove at full power. It is better to use it 2-3 times in test mode, burning one load of firewood, so as not to raise the temperature to the maximum.
Thanks to this, the solution dries well and evenly and adapts to operating conditions.
Properties of mortar for laying a brick oven
The mortar must firmly bind the masonry, forming a single brick monolith. People call such masonry “casting”. They are distinguished by increased strength and even if you start breaking it with a sledgehammer, you won’t be able to divide it brick by brick - entire spans of 3-4 bricks will fall off.
Important!
We will look at how to make the solution yourself, but to improve the quality it is recommended to buy a ready-made mixture for diluting with water or a special silicate-based shrink adhesive.
Installation of a metal stove with a remote firebox in a log house
Let's consider the option of installing a fireproof anti-shrink wall made of LV mineralite. A special fastening method will allow installation in the log house before it shrinks, and the floating design of the fastening elements will prevent the rigid wall from deforming.
Minerit LV
Minerite
Step 1. Prepare the opening in the wall. We cut it out with a chainsaw according to the markings.
Hole in the wall
Step 2. Cover the inner surface of the opening with mineralite. We saw the mineralite sheet into three pieces. We cut out two vertical pieces based on the height of the opening minus 10 cm. We cut out the horizontal part with a length equal to the width of the opening minus 2 cm. The width of the mineralite section should be equal to the thickness of the timber or log from which the wall of the bathhouse was built.
Step 3. We nail foil to the inside perimeter, and then mineralite. First, we fix the vertical sections with nails, then the horizontal ones.
Step 4. It is necessary to make an opening in the mineralite sheets, which will protect the wall from the heat of the stove. The remote furnace firebox will pass through this opening. We take measurements of the remote firebox, then make markings with a pencil and cut the sheet so that there is 3 cm on each side between the remote channel and the sheet.
Installation of foil and mineralite. Finishing of the opening can be done both before and after installation of the main slabs of refractory material
You can do it differently - first we fix the sheet on the wall, and then we cut the opening for the remote firebox.
Mounting mineralite to the wall
The sheet is fixed, you can cut out the opening
Step 5. Drill oval holes in the sheet for self-tapping screws. When shrinkage occurs, the screws will move downward inside these holes, while the sheet will remain motionless. We fix the foil insulation on the wall (with a stapler), and then use self-tapping screws and a washer to fix the mineralite sheet (we mount the sheet on the steam room side).
Step 6. We attach the second layer of mineralite with an air gap of 3 cm. To do this, you need to purchase a mounting kit with ceramic or steel bushings.
Mounting kit
Once again, you need to drill oval holes, but be sure to make sure that the fasteners of the first and second sheets do not end up at the same point.
The photo shows a diagram of the installation of a protective screen made of mineralite. Double-layer sheathing. If the stove has an external firebox, make an opening according to the instructions
When joining two sheets at 90 degrees, we make cuts at the ends at 45 degrees for a more aesthetic appearance.
After installing the sheets, we install the stove on the base. We adjust the legs, making sure that the external channel is located exactly in the center of the opening cut in the mineralite. We take foil-coated basalt wool and place it tightly between the walls of the outlet channel and the mineralite. In this case, the foil should “look” towards the steel walls of the channel.
Adviсe
Craftsmen use different methods of installing stoves and protecting walls. So, for example, in a log bath it will be more convenient to install mineralite on a wooden sheathing. Antisepticize the 50x50 mm bars, drill holes for self-tapping screws and fix the sheathing posts exactly vertically. The mineralite will already be fixed to this sheathing with self-tapping screws.
Lathing
If you plan to cover the wall from the inside (from the steam room side) with mineralite for further finishing, for example, with a coil, and finish the portal with brick from the outside, then it is worth carrying out the work in the following sequence:
- From the side of the steam room, fix a sheet of mineralite;
- cut a hole for the outlet channel;
- secure the horizontal guides from the plasterboard profile. Fasten the strips with self-tapping screws at the top of the opening, along the bottom and exactly above the opening for the fuel channel;
- install the vertical posts of the sheathing from the profile, fix them with self-tapping screws through the shelves;
- take basalt wool and lay it between the sheathing posts;
- sew up the opening with mineralite (from the dressing room side);
- install the stove in its place;
- Now, on the side of the dressing room, fill the opening with brick (don’t forget to put insulation in the cracks), and on the side of the steam room, apply decorative finishing with stone.
Lathing and insulation
View from the steam room and dressing room
Fixed furnace portal
Walls and chimney after finishing with a coil
The process of finishing the oven itself
The work on installing the furnace does not end there. Be sure to install a water tank and a heat exchanger, if they are provided for in the design, install the chimney in accordance with fire safety rules, prepare and lay the stones in the mesh.
How to prepare masonry mortar
The solution itself is prepared from three ingredients - Portland cement, water and gypsum sand. It is necessary to mix the ingredients until a light liquid texture is obtained that flows from the trowel when taking the solution.
Important!
After mixing, there should be no lumps or solid inclusions in the solution - they will not allow the solution to “seize” and create a strong masonry.
The thickness of the seam on the masonry should be no more than 3-5 mm along its entire length - this is the basis for performance properties and a presentable appearance.
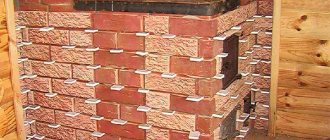
Laying brick rows
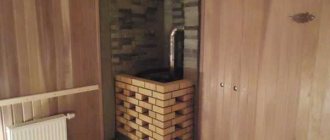
The brick “lining” of the stove should be half a brick thick.
It is erected at a certain distance (up to 100 mm) from the steel body so that it does not burn out due to overheating. The greater this distance, the longer the stove will last; but if there is a need to quickly heat the brick case, the gap is reduced to a minimum of 10 mm. Seams can be made with a width of 2 to 5 mm, ideally 3 mm.
Without sufficient experience, applying such a thin layer of mortar using a trowel can be difficult, so it is better for a beginner to do it directly with his hand.
It is better to moisten the bricks before applying the mortar to improve adhesion.
Metal stove lined with bricks
Row No. 1 must be checked with a building level - it must be strictly horizontal.
In the 2nd row it is necessary to leave several holes through which cold air will be sucked into the space between the stove and the brick wall. To install such vents, it is not necessary to break off the quarters from the bricks - you can simply rotate them 90 degrees (poking them outward).
After laying the second row along the corners of the future case, it is necessary to pull the nylon cord strictly vertically - to do this, you need to drive nails into the ceiling and into the seam between the 1st and 2nd rows. These will be guidelines that will help you draw the corners without distortions.
If, when hammering a nail into the ceiling, it deviates slightly to the side, it can easily be corrected with a hammer, simultaneously checking the verticality of the stretched cord with a plumb line.
Even better is to install an ordering rail. The risks present on it will help to lay out the rows strictly horizontally, so that constant monitoring by the building level will not be required.
Step-by-step instruction
Now we will analyze step by step how to install and cover an iron stove with bricks in the country.
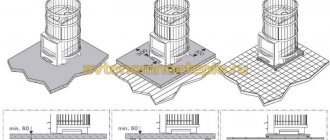
Arranging a foundation for a metal stove
First of all, the metal structure must be placed on a reliable foundation. It is performed in two possible forms:
- Concrete monolith.
- Low masonry of 2-3 bricks.
Important!
The base must be on the surface of the subfloor and connected to the foundation of the house. Therefore, the masonry is made directly on the foundation or laid during the construction of the house on the site of the future construction of the furnace. If the foundation has already been erected, then holes are drilled through the base for the stove and both bases are pierced with metal reinforcement, and then additionally reinforced with concrete.
To cast a concrete monolith, it is necessary to make wooden formwork.
Preparation
After the base is made and the stove is erected on it, the metal surface must be prepared.
How to line an iron stove with bricks with your own hands: choosing tools and materials
Metal stoves are often installed in small private houses or outbuildings, where there is not enough space for massive brick structures of this type. Such a stove has many positive qualities, but it is not able to retain heat for as long as a real brick one. Therefore, the question very often arises of how to line an iron stove with bricks with your own hands and thereby achieve greater heat transfer, but at the same time not increase its size too much.
How to line an iron stove with bricks with your own hands
Building materials and tools for lining the stove with bricks
It is not difficult to carry out this work yourself if you have basic bricklaying skills and prepare all the necessary tools and building materials in advance.
Tools
Tools and equipment for work you will need:
Tools needed to line a stove with bricks
1. A trowel for applying mortar and collecting its excess after installing the brick in place.
2. A hammer with a pick will be needed to separate the required part from a solid brick.
3. Jointing is needed to refine the seams.
4. The mooring cord is used to control the evenness of the masonry of horizontal rows and corners.
5. Order, which includes:
- a special strip that maintains the evenness of the masonry along the entire height of the building;
- holder that secures the rail;
- the wedge raises a certain masonry element to the desired level.
6. The plumb line provides control over the verticality of the structure.
7. The levelness of the horizontal rows is verified using a building level.
8. The rule in this case will serve as a stand under the building level when checking the evenness of the masonry walls in relation to each other.
9. A shovel is needed to mix the solution.
10. Container for mixing the solution.
Construction materials
The choice of materials must be approached with the utmost responsibility if you want the stove to operate efficiently and without interruption for a sufficiently long period of time.
1. You need to choose a brick for the stove of high quality with pronounced fire resistance properties. It must be solid, that is, have no voids in its structure. You can purchase a material that has a relief pattern on the outside or a perfectly smooth version. Sometimes the relief of a brick allows you to make the masonry a decorative addition to any room.
Red burnt solid brick is what is required for lining the furnace
The amount of brick is calculated based on the size of the metal furnace and the additional area around it into which it is planned to be expanded. In addition, it is necessary to take into account the base for the stove, which should consist of one or even two rows of solid masonry.
If the stove will be lined on top, as well as a brick chimney, it is worth calculating these parameters.
It is also worth considering how best to lay the brick - install it on a narrow side (this will be more economical in terms of material consumption, but will negatively affect the efficiency of the stove) or on the wide side.
If you make a rough calculation, without taking into account the thickness of the seams, then the initial data will be the total surface area of the planned masonry and the side area of one brick. Further actions are simple - dividing the first value by the second will give the required amount of material in pieces. When making an accurate calculation, the thickness of horizontal and vertical seams is also taken into account. But we should not forget about creating a “reserve” of 5–10%.
2. For high-quality masonry, you cannot do without the right mortar, which will not crack when drying and in the future, when the brick walls are very hot.
If you have no experience in preparing clay mortar, it is better to use a ready-made dry heat-resistant mixture
The easiest way is to use ready-made fire-resistant building compositions for laying stoves, sold in specialized stores in the form of dry mixtures. They already contain all the necessary components for high-quality work and preservation of the masonry in extreme temperature conditions. The process is greatly simplified - the main thing is to mix the solution from the finished mixture to the desired consistency in accordance with the instructions included with it.
You can do it another way by making a traditional clay-based solution.
However, it must be remembered that this is a rather complex process, since the clay must have a certain fat content, and the mixture must have optimal proportions. To do this, you need to conduct tests by mixing and drying several different versions of the solution, which are made up of different parts of clay and sand. Only after conducting such an experiment and carefully evaluating the resulting samples will it be possible to make the right choice.
We can say that composing such mixtures is an entire art, the secrets of which are kept by stove masters. Such mortars are necessary for laying brick kilns, where smoke and gases released during fuel combustion pass through the channels, so the seams between the bricks must be extremely reliable, and a good clay mortar can ensure tightness. But in order to line a metal stove, it will be enough to use a ready-made dry mixture.
3. In addition to these basic materials, you will need a sheet of heat-resistant and waterproofing material, which is placed under the base of the stove. Roofing material is a good choice.
4. If you plan to completely close a metal stove, including one with an upper brick vault, you may need metal profiles (corners or strips) for the lintels along which the masonry will be carried out.
Prices for masonry mixtures and special-purpose adhesives
Masonry mixtures and special-purpose adhesives
Preparation for the process of laying facing walls
When installing a metal furnace, a rigid non-combustible base must be prepared for it in advance, so in most cases the area for lining it with bricks will already be ready. If the base does not meet the requirements, and it is decided to do the lining some time after installing the potbelly stove, then you will have to dismantle the chimney in order to remove the metal stove from the place where it is installed for the period of preparatory work. This process is carried out to thoroughly prepare the site.
- If the floor is concrete and strong enough, then a waterproofing material - roofing felt - is laid over the installation site of the stove and future brickwork. The sheet of roofing material should be 100 ÷ 150 mm wider than the base area.
— When the base is ready, the metal furnace lining will run along its edges, so the size must be appropriate.
— The base for installation is laid out in one or two continuous rows and left to dry. The time for complete hardening of the solution can be found from the information on the packaging of the masonry mixture.
One or two continuous rows must be laid as a base
— After the laid base has gained the necessary strength, the stove is installed in place, and it can be immediately connected to the chimney.
— At the corners of the base, four bars are installed exactly vertically, which will need to be aligned with during laying.
Installed vertical bars will be a good help for smooth masonry
- If the floor is wooden and reliable, the work can be carried out in the same way as on a concrete base, but it is still better to remove some of the boards and make a strong foundation.
— When the boards are removed, a small pit is made in the underground soil for a strip foundation - its depth can be from 30 to 50 cm. This parameter will depend on the height of the brick walls being built. It should be located in the place where you plan to install the walls of the outer lining of the furnace.
— The bottom of the pit is strengthened with cushions of sand and crushed stone. Then formwork and reinforcement cage are installed there.
— Next, concrete is poured into the pit (usually in a 3:1 ratio of sand and cement) and left until it sets completely.
— After the foundation has set well, 120 ÷ 150 mm of soil is removed from the site inside it, crushed stone is poured and compacted onto this place and a reinforcing mesh is laid.
— Then this area is filled with concrete mortar, 50 ÷ 70 mm thick, leveled and left to gain strength.
Poured concrete base for further installation of the furnace
The brick base will be laid out on this site. When using this technology, one row of continuous masonry is sufficient. But waterproofing material still needs to be laid on the site.
Such a foundation is necessary if the walls of the furnace will be laid out all the way to the ceiling, and the chimney will also be built from brick. If the walls are built only to the height of the furnace, and the floor underneath is sufficiently reliable, then a foundation is not necessary.
- When arranging a site for installing a stove and facing walls, you need to take into account that it should be 60-80 mm larger around the perimeter of the future structure.
Approximate diagram of the relative position of a metal furnace and brickwork
- It is imperative to leave a gap of 100 or even 120 millimeters between the walls of the metal stove and the masonry - it will be a good air gap and will allow you to keep the stove hot for a longer period.
Is it possible to install a stove and line it with bricks on a wooden floor?
Sometimes a metal stove is already installed on a wooden floor, and at the same time you really don’t want to start the labor-intensive work of pouring a separate foundation for it. If it is possible to maintain the “status quo”, that is, leave the stove in place, only by covering it with brickwork?
It turns out that this is also quite possible, but, of course, subject to a number of conditions:
- The first is training in proper heat insulation of the base (in principle, it should already be there). In this capacity, you can use a sheet of asbestos with a thickness of about 55 mm, laid on a wooden flooring and covered on top with a 1.5 ÷ 2 mm metal sheet, so that its area is sufficient for both the installation of the stove and the laying of its brick cladding.
- Secondly, a wooden floor must have the necessary strength potential to cope with the increasing load on it. Here it’s a little more complicated, since you’ll have to make certain calculations.
The strength of the floor is ensured by flooring boards (their thickness must be at least 40 mm) and joists (or floor beams if the floorboards are laid directly on them). The ability of the joists to withstand the load depends on their condition (it is clear that rotten or sagging parts must be replaced). But the main thing is the cross-section of the lumber from which they are made.
This means that in order to make a decision about the permissibility of installing a lined stove directly on the floor, you will have to carry out an audit - temporarily dismantle the flooring in the area where the heating device is planned to be placed. This will allow you to see both the dimensional parameters and the condition of the lag.
To assess the load-bearing capacity of the logs, you can use the table below. It shows the permissible, maximum and unacceptable loads on the logs, expressed in kilograms per square meter. Moreover, the indicated indicators are calculated for a lag installation step of 600 mm - as the most “running” one.
| Lumber cross section | Span length of a log or beam (distance between support points) | ||||||||
| 2 m | 2.5 m | 3m | 3.5 m | 4 m | 4.5 m | 5 m | 5.5 m | 6 m | |
| BOARDS | |||||||||
| — 100×50 mm | 733 | 587 | 489 | 419 | 367 | 326 | 293 | 267 | 244 |
| — 150×50 mm | 1650 | 1320 | 1100 | 943 | 825 | 733 | 660 | 600 | 500 |
| — 200×50 mm | 2933 | 2347 | 1956 | 1676 | 1467 | 1304 | 1173 | 1067 | 978 |
| BRUS | |||||||||
| — 200×100 mm | 2867 | 4693 | 3911 | 3352 | 2933 | 2607 | 733 | 2133 | 1956 |
| — 200×200 mm | 11733 | 9387 | 7822 | 6705 | 5867 | 5215 | 4693 | 4267 | 3911 |
| LOG | |||||||||
| — Ø 200 mm | 6912 | 5529 | 4608 | 3949 | 3456 | 3072 | 2765 | 2513 | 2304 |
| — Ø 220 mm | 9199 | 7359 | 6133 | 5257 | 4600 | 4089 | 3680 | 3345 | 3066 |
| Load parameters with the required safety margin for beam deflection in blue. | |||||||||
| The maximum permissible load parameters in green in the table . | |||||||||
| Inadmissible values (more than twice the norm) are highlighted in red | |||||||||
All that remains is to determine this very load on the floor in order to use the table to navigate the issues of permissibility of continuing work according to the “simplified scenario”, without pouring the foundation. But the reader will certainly be helped with this by a calculator for calculating the total load on the floor, which will be the sum of the mass of the stove itself with all its features, and the weight of the future brickwork.
The calculator is intuitive, and there should be no issues with its use. The calculation program used a standard red solid ceramic brick, 250×120×65 mm in size, with an average weight of 4 kilograms as the facing material in the calculation program. The weight of the masonry mortar is also already taken into account by the calculation algorithm.
Calculator for calculating the total floor load from a brick-lined metal stove
Go to calculations
If the resulting value fits into the “blue field” of the table above, then you can afford not to pour the foundation.
What else should you consider before starting masonry?
When moving on to lining the iron body of the stove with bricks, it is necessary to take into account some nuances that will make the work easier and ensure effective safe operation of the heating device.
- Any stove installed in a wooden house or against a wall made of flammable material must be separated by heat-resistant insulation.
Insulation can be made from asbestos boards, isover and other fireproof materials. It is better if such an insulating screen is made even in two layers, as shown in the photo.
A double heat-resistant screen will reliably protect walls from fire
In addition, the heating device, as well as the chimney, must be located at least 200 mm from the wall.
- 25 ÷ 30 minutes before the start of brick laying, it is recommended to immerse it in cool water. This process is carried out to strengthen the brick and to ensure that its porous surface does not immediately dry out the mortar placed between the blocks, drawing liquid out of it.
Pre-soaking the bricks will make the masonry especially strong.
If the mortar dries naturally, the materials will be provided with good adhesion and the masonry will be quite strong.
- It is very important to carry out the laying in a row, without starting several rows at once - this can disrupt the entire order of the work, and it will turn out sloppy.
- Having folded 2-3 rows, it is necessary to immediately “join” the seams while the solution remains wet and plastic. When carrying out this process, you must immediately remove any excess masonry mortar that appears.
Decorating seams with jointing
- Laying a “quarter brick”, that is, installing it on a narrow edge, is somewhat more difficult than laying a “half brick”. If, nevertheless, for the purposes of economy, this particular option was chosen, then during installation it is necessary to carry out especially careful constant monitoring of the vertical and horizontal planes.
“Quarter brick” masonry will require special care to ensure that the walls are vertical and horizontal
The process of lining a metal stove with bricks
- Between the vertically installed bars, the height from floor to ceiling, a cord is stretched perfectly horizontally. In the process of raising the masonry, this landmark is also moved higher. Each row is aligned using this tensioned level-beacon.
- The width of vertical joints between bricks is usually from 5 to 7 mm, horizontal from 8 to 10 mm.
- It is very important for ventilation, the active flow of heat into the room by the convection currents created in each of the rows or to leave a small hole through the row. Sometimes the masonry used to decorate an iron stove is made “lattice” with numerous holes.
“Lattice” masonry around the sauna stove
In this way, for example, they lay bricks when lining sauna stoves so that the heat warms up the room faster and, at the same time, due to the thermal inertness of the bricks, the walls of the heating device themselves do not cool down longer.
- The laying of the first row occurs in the usual way, but it must be done perfectly, as it sets the direction of the entire wall.
- After laying out and pressing the bricks of the first row, excess mortar must be collected immediately. If the brick is difficult to install due to excess mortar, then it is knocked down with a rubber hammer.
For the first rows of masonry there are special requirements for evenness in the vertical and horizontal planes
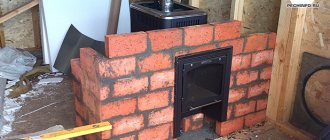
- When lifting the masonry and reaching the door of the ash pit, and then the firebox, it is very important to carefully pay attention to the side of the window being laid out where the hinges are located. When laying each of the bricks next to the doors, you must check how freely they open.
The masonry should not interfere with the free opening of the doors
- Laying is done up to different levels of the furnace. Sometimes it is finished at the level of the stove or even the chimney is covered with it. However, in the latter case, the metal chimney pipe must be assembled into an extremely reliable structure and from the most resistant materials, since it will no longer be possible to reach it after the work is completed.
Ventilation holes must be left near the chimney.
Several ventilation holes must be made in the brickwork around the chimney.
- The masonry should be clean and neat, therefore, after laying several rows, it is necessary to clean off the solution that has not yet hardened, and wipe off its remains with a damp cloth.
After completing the masonry, it should dry well, preferably naturally, without heating. In this case, the likelihood that the mortar on the seams will crack is reduced.
Video: example of lining a sauna stove with brick
Prices for refractory bricks
Fire brick
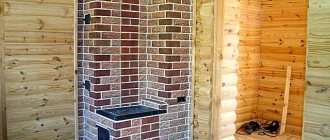
Options for lining a metal stove with bricks
In addition to covering the potbelly stove completely or up to the level of the stove, some people choose other options, covering only a certain part of the body with brick.
Only the back part of the “potbelly stove”-fireplace is covered with bricks
In this case, a small potbelly stove serves as a firebox for the brick part of the stove, and its back wall is neatly embedded in the main brick structure. Such a stove can serve as a fireplace for pleasant evenings, warm the room, and on a built-in shelf you can warm up a kettle or, after returning from the rain, dry clothes and shoes.
The upper surface of the stove is not lined - it serves as a hob
This option is suitable when you need to have a wider hob. The bricks laid around it, heating up, will serve as its continuation. The metal body is covered on all sides with brickwork, so you can’t accidentally get burned on it. The heat from such a structure will take about three to four times longer than from a “bare” stove, so the work to transform a potbelly stove into a full-fledged heating structure is worth setting aside time and putting in the effort.
The stove is completely built into the wall and turned into a fireplace
Another option for turning a compact modern potbelly stove into an aesthetic fireplace, whose back wall opens into another room, where it is also lined with brick. The heat transfer from such a stove-fireplace increases several times, and it looks much more respectable. Here the potbelly stove looks like a fireplace insert, and the appearance of massiveness of the building is created due to the neatly placed masonry around the metal stove.
Homeowners are also offered ready-made construction kits made of natural or artificial stone, which allow them not only to cover a metal stove, but also to simultaneously build a fireplace portal that will become a real decoration of the room.
Video: cladding a metal stove using a fireplace kit
Depending on which part of the metal stove requires lining it with brick, you can come up with other, your own options. The main thing in the work is to avoid mistakes in the design of combustion waste disposal and to comply with all necessary safety measures.
Conclusion
A potbelly stove lined with brick retains heat longer and allows you to consume less fuel. Masonry significantly increases the aesthetic qualities of a simple stove. If desired, the efficiency of the potbelly stove can be increased by installing a sandwich mesh. It protects the chimney from burning out and accumulates heat. Often the front side and top are left open. This way the stove warms up the room faster, but due to the reduction in brick area, it releases the heat faster. Clay mortar is ideal for stoves, but is demanding on room humidity. If the logs are old, it is better to remove some of them and pour a cement foundation.
People have been wondering how to line a potbelly stove to preserve heat since the time of the revolution. The brick absorbs some of the heat, which is safer to use and reduces the risk of getting burned. You can dry things, fruits and berries on the masonry. A potbelly stove has been helping out in the cold for more than one generation; it never ceases to be in demand and loved by all summer residents. Covering a stove with brick is an affordable and quick way to improve it and keep the house warm. A budget method that does not require special skills.
Foundations
Cast iron sauna stoves with a brick lining are installed on a concrete base. Installation on a wooden floor is allowed if the joists and flooring boards are of sufficient strength.
Our furnace requires a foundation. It is done as follows:
- A pit is dug 50 cm deep. Its size is 15 cm larger than the dimensions of the stove in length and width.
- Sand is poured onto the bottom in a layer of 10 cm and compacted. The next layer will be crushed stone, also compacted.
- Reinforcement mesh is laid.
- M200 cement mortar is poured.
- Leave to gain strength for two weeks.
A layer of roofing material is laid on the finished foundation for waterproofing. A steel sheet is placed on top, which should protrude 40 cm in front of the front side.
Wall masonry
The lining of the stoves is done in a quarter (on an edge) or in half a brick. Large thickness reduces the efficiency of the stove - it will overheat, rapid draft will appear, and most of the heat will go through the pipe. In this case, the brick itself will not warm up enough and heat the room worse.
Work begins with laying the first row of continuous flooring. The second row can also be made continuous. Next steps:
- In the third row, two 60 mm vents are left in the side walls;
- Before laying the fourth row, a stove is installed, the door is placed on the plane of the wall, the door frame is wrapped with asbestos;
Asbestos is laid around the fire door
- Three more rows are laid out along the perimeter with continuous masonry;
- Corner No. 40, 350 mm long, is placed on the top of the sixth row above the door;
- The seventh, eighth and ninth rows are continuous masonry around the perimeter;
- In the tenth row we again leave two holes;
- The eleventh row is the final one.
How to cover a fireplace
Choosing your own individual interior for a heating stove in a room and deciding what to cover the outside of the fireplace so that it pleases the eye is a very responsible matter. When designing fireplaces, they can be covered with a wide variety of materials. Depending on the material of the fireplace itself, it can be faced with either brick or tile. In addition, today a fireplace designed in a high-tech style using chrome-plated metal elements, silver-plated or even gold-plated, looks very elegant in the house.
Alternative finishing methods
Two alternative methods are used:
- Painting bricks with paint, varnish, possibly with additional external finishing of the seams.
- Plastering.
Brick painting is widely used. Heat-resistant paints, varnishes, and lime whitewash are used. The stove itself, made entirely of refractory brick, looks very interesting and will fit perfectly into any interior.
Whitewashing the stove
In this case, you can use special mastics for sealing fireplace joints, applied using a mounting gun. The cheapest option is whitewashing with lime using a sprayer in a thick layer, then painting with facade paints. Whitewashing will hide minor defects, painting will give the desired color and make the whitewash durable and not markable.
Plastering is another alternative method. The stoves are plastered with the same solution that is used for masonry. It is advisable to rub and smooth the plaster so that you don’t have to putty later. There is much less data on putties that adhere well to stoves than even on tile adhesives.
Any plaster creates a shell around the stove with worse thermal conductivity than brick material. Thus, the thermal efficiency of the furnace is reduced, the efficiency decreases by 5-10% and the time during which the furnace warms up to the desired temperature will also be lower by 20-30%. If you want an efficient stove, it is advisable not to plaster it at all.
Noticed a mistake? Select it and press Ctrl Enter to let us know.
Required Tools
To organize your work you need the simplest tools. If there is no electricity on the site, you can do without mixing with a drill and do everything by hand. To work you will need:
- Trowel for laying bricks and cleaning off excess mortar.
- Pickaxe for dividing bricks (if necessary).
- Plumb to maintain even vertical masonry.
- Water level for horizontal leveling.
- Container for solution.
- A shovel or drill with an attachment for mixing the solution.
- Joining, if desired, make neat seams.
- Sieve for sifting sand 1.5*1.5mm. Burlap is used for washing.
- An abrasive attachment for a drill for cleaning finished masonry from excess mortar.