In the process of heating the room, a sauna stove sends about half of the heat into the air, or more precisely, into the chimney, so the idea of building a sauna stove with a water circuit not only looks attractive, it is a great way to solve a lot of problems at the same time. If, of course, the sauna stove with a heating circuit is made at a more or less acceptable quality level.
A sauna stove with a heat exchanger: what is it?
The idea of using as much heat as possible from a stove is not new. A good application is to use it to heat the coolant. For your information! The principle of any heat exchanger is to ensure maximum contact of an insulated liquid carrier with a heated surface to increase heat transfer between them.
Many designs have been invented to implement this. Let's look at them according to the purpose of the heated liquid.
Application area
Wasted heat can be used for two purposes:
- for heating water to be used for washing;
- for heating rooms.
Of course, such goals can be combined if the stove is powerful enough. After all, we will, in fact, be taking away part of the heat that would otherwise be used to heat the steam room (or atmosphere)).
Scheme of heating water in a remote tank with a samovar-type heat exchanger (video with explanation, see below)
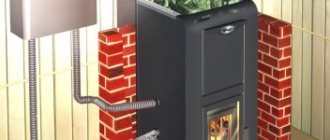
Bath stove with water heat exchanger
This is the first time. We are talking exclusively about water (no antifreeze), the consumption of which depends on the number of people who can wash in the bathhouse at the same time and other factors. In any case, you can’t do without a spacious tank. And here again you have options for where to place it:
- some place the tank directly on the stove , which must have an appropriate design for this. Water is supplied to the washing room from the steam room;
- others use a heat exchanger , and the tank itself is placed in an adjacent room, from where it is connected by two pipes to the heat exchanger.
Both designs of stoves with a tank have a right to exist, and the choice is yours.
Bath stove with heat exchanger for heating
If instead of a tank you connect a heat exchanger with a radiator, you get an autonomous heating system .
Here again you have two options):
- or create a design that is based on phenomena such as convection and gravity;
- or force the coolant to forcefully move in the system - for this you will need a pump, and therefore electricity (! A separate section is devoted to electric stoves).
If the bathhouse is small, then there is no need to bother with even the simplest system, because usually the stove is enough to heat adjacent rooms . But what matters here is what kind of winters you have. It happens that a small bathhouse needs additional heating.
It was already mentioned above that it is possible to combine heating of water for washing and heating. In fact, you can make two parallel systems, and use antifreeze rather than water for heating. For this purpose, one heat exchanger will need to be placed inside the stove, and the second - on the chimney. From the point of view of increasing the efficiency of the furnace, this option is simply excellent.
On a note! When creating a heating system, do not forget about the expansion tank , which will absorb excess coolant.
Brick or metal
The choice of furnace material matters only from the point of view of individual preferences and conditions:
- Price . Based on the cost of the final product, purchasing a metal furnace will be cheaper than purchasing material and paying workers to build a brick furnace. If you do the masonry yourself, the final cost will decrease due to the deduction of payments to hired workers, which will significantly affect the price.
- Bath area . Metal stoves take up less space, so if the area is small, the choice is definitely in favor of a metal product.
- Difficult to install . A brick stove requires a separate foundation, which lengthens the installation period; a metal stove is installed on a lighter base. The wood-burning sauna stove is quite popular and is practical.
- Sometimes the decisive factor is a photo of a factory-made metal stove - the range of modern manufacturers is distinguished by functionality and attractive design.
Whatever material the stove is chosen from, installing a heating circuit will make the choice more successful.
Types of devices
The furnace provides several options for placing heat exchangers:
A coil or water circuit is a steel structure that can be located both inside the furnace and outside , for example, between the furnace wall and the casing. Its use is not limited to metal stoves - water circuits can also be built into brick ones.
The shape and size can vary significantly from a simple C-shaped, once bent tube with fittings , which is located inside the firebox, to a water jacket around the entire body.
IMPORTANT! The correct location of the metal pipe inside the furnace is always such that the open flame does not touch it in any area. It should be remembered that even stainless steel is subject to oxidation in a flame.
A large tank that touches the walls of the furnace with a wall or bottom (or both) can also be considered a type of heat exchanger.
For your information! By taking heat away from the stove body to heat water, you reduce the operating power of the stove.
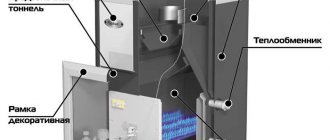
But in the design of all furnaces there is an element that in most cases (but not in all!) becomes the cause of significant heat loss - this is the chimney, where very hot furnace gases are sent (if the furnace does not have a smoke circulation system).
The second type of heat exchangers tries to correct this shortcoming. For this purpose, either a small flow-through tank of 5-10 liters , communicating with a large tank outside the steam room, or a full-fledged tank, from where hot water is supplied to the washing room. (In the latter case, there are more difficulties with fastening.)
Photo: samovar-type heat exchanger
Photo: heat exchanger tank on a pipe
By the way! The external tank, among other things, also serves as a heater for the room in which it is installed (dressing room or washing room).
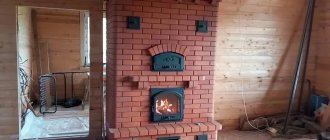
Making a potbelly stove
Initially, it is necessary to draw up a drawing diagram indicating all the dimensions of the parts and prepare the necessary tools for performing metal work (welding, grinder, pliers) and materials.
After cutting the metal, the following actions are performed:
The main elements are welded at right angles: the bottom and walls. Except for the front.
It is important to know! It is recommended to install the bottom of the heating structure at a distance of at least 30 cm from the floor level. Installed metal legs will help reduce the strong temperature effect on the floor covering
The furnace space is subject to zoning, namely, a grate or a sheet of metal is welded between the firebox and the ash pit, in which backlashes are drilled to remove ash.
- It is necessary to make an opening on the front wall to mount the doors. Now the front part can be welded to the remaining elements.
- Hinged hinges are added to the sides, after which the doors can be installed according to the location diagram.
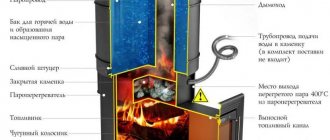
A chimney pipe must be welded at the top of the stove structure. After completion of the work, all seams are cleaned and checked for defects. The next stage is the installation of the water jacket.
How it works
It is easy to guess that in the case of a flow-through water circuit or a tank mounted on a chimney, it is necessary to ensure constant circulation of liquid between it and the storage tank outside the steam room.
This can be done either through the natural laws that water obeys (and such a system is considered open), or with the help of a pump that provides forced circulation.
IMPORTANT! Natural circulation based on gravity and convection is preferable. Connecting pipes must have a diameter of at least one inch and a length of no more than 3 meters.
Look at the diagram above, which clearly shows how the pipes should be positioned so that the water rises and falls freely. Below is a video explaining the diagram.
DANGEROUS! Before lighting the stove, make sure there is water in the system!
Video
Watch a short video that explains the above diagram of a stove for a bath with a heat exchanger for water (this principle can also be used for heating) and shows an example of its budget implementation:
Installing a coil on a chimney
For small steam room ovens, heat exchangers can be installed directly on the chimney. The design of a water heating coil is practically no different from built-in heat exchangers; the only inconvenience is the need to install an additional storage tank for hot water.
Many owners of steam rooms install both types of heat exchangers on the heater stove, the internal one made of alloy steel and the external one made of copper or a copper alloy. The first water circuit is used to produce hot water and boiling water, the second is constantly filled with liquid and looped into the heating system.
Popular furnaces with heat exchangers
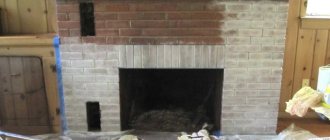
Cast iron stoves are deservedly popular among lovers of Russian baths, but how are they combined with heat exchangers? As it turns out, they combine perfectly.
Cast iron stove
To get started, we recommend visiting the website of the Petrozavodsk stove manufacturer Karelia. Among the products offered to visitors are components, among which there is a disk-shaped heat exchanger, apparently attached to one of the walls of the furnace. Thus, you can purchase both a stove and an exchanger at once. As an option, they also sell mounted tanks for the chimney.
Cast iron stove with heat exchanger for a bath. Photo source
Vesuvius stove
Vesuvius stove with heat exchanger for a bath
The stove manufacturer Vesuvius also provides the opportunity to simultaneously purchase a stove (and in its catalog you will find both steel and cast iron stoves) and a heat exchanger . The buyer has a choice of three models - two “samovars” for the chimney, differing in capacity, and one rectangular heat exchanger, which takes heat from the stove wall.
photo of heat exchangers on the Vesuvius website
Stoves for baths "Termofor"
There is a message on the Termofor website that the manufacturer took into account customer preferences and produces the most popular models - Tunguska 16 and Tunguska 24 - with already installed heat exchangers , which require an external location of the storage tank. The material of the exchangers is high-quality food grade stainless steel, 2 mm thick . Depending on the buyer’s choice, the placement can be varied by installing it either on the right or on the left wall of the stove.
Useful video
Termofor sauna stoves with a heat exchanger may be built well, but there are negative reviews. Watch the video and see what it looks like:
Several alternative options
Despite the fact that the options described above are the most popular and considered optimal, I decided to briefly mention some alternatives. In fact, they are varieties of stove heating, but have their own characteristics.
For example, if you have such capabilities, then you can install a diesel fuel boiler in your bathhouse. But this option requires a separate room (diesel fuel does not smell much), and you need to think about fuel storage.
There are also pyrolysis heating boilers. The undoubted advantage of such a boiler can be considered a very long, almost complete combustion of fuel. The disadvantage is the high cost and difficulty of operation (for example, raw wood does not burn in it).
It is also possible to use long-term combustion boilers, capable of burning a separate batch of fuel for up to 5 days, maintaining the desired temperature. There are even options for high-quality graded coal. But this is rather an “industrial” option, which is not suitable for a good traditional bath.
DIY making
Despite the availability of different options for sale, you can try your hand at making a heat exchanger yourself. It's not that difficult if you have welding experience. In any case, it’s easier than making a stove from scratch.
But before you get started, you need to do a little calculation.
Calculation of heat exchanger power and area
It was already mentioned above that heat exchangers connected to the body take away part of the furnace power. Therefore, the first rule will be the following:
IMPORTANT! The heat exchanger power should not be more than 1/10 of the furnace power.
The second rule is related to the length of the pipes: if the system is gravity-fed, then you should not extend the pipes further than three meters. The pump in the system eliminates such restrictions. But the pump is installed more often when the coolant is used to heat rooms. However, if the storage tank is not located too high, you can only wash with a hose. If this is inconvenient, then you need to either take the tank into the attic and insulate it, or install the same pump.
The third rule concerns the volume of the heat exchanger (if it is a small flow-through tank and not a coil). The water in it should heat up within a couple of hours. If it’s longer, then the volume is too big. If it is faster, then it is better only at first glance - the water should not boil, this will cause scale, steam, testing the expansion tank, and other problems.
Now, actually, the calculation itself:
The power of the heat exchanger depends on its area: 9 kW for each square meter of exchanger . The area is quite simple to calculate: if it is a coil, then multiply the circumference (3.14 * diameter) by the length of the pipe. If this is a “samovar” heat exchanger, then take the diameter of the inner pipe, multiply it by the number Pi, and multiply it again by the height of the “samovar”.
Power = resulting area in sq. meters * 9 kW.
If the exchanger hangs on the chimney, you can ignore the rule of deducting its power from the power of the stove. Only if he is on or in her body.
You can calculate the power required to heat a room using the same principle as for a steam room, that is, based on the volume of the room. In the steam room, a kilowatt per cubic meter is taken, but the adjacent ones do not need high temperature, so focus on half the value.
Knowing how many kilowatts are needed to heat a washing room, you get the area of the heat exchanger, and from it the length of the pipe for the “samovar” or coil.
Let's consider a couple of options for self-manufacturing heat exchangers.
Let's assume that you decide to increase the efficiency of the stove by installing a heat exchanger on the chimney.
- The thickness of the steel required for this is 2.5 mm.
- In addition to the sheet material, you will need two pipes with different diameters.
- The smaller one should be adjacent to the chimney pipe, the larger one should be 5-10 cm wider than the first one.
- Two circles are cut out of sheet metal to fit the diameter of the larger pipe, then a hole is cut in the center to fit the diameter of the smaller one and everything is carefully welded.
- You also need to make holes for the pipes through which water will come and go.
- The pipes are threaded and must match the diameter of the connecting pipes.
ADVICE! After checking the tightness of the seams, installation on the chimney and routing of pipes, it is recommended to insulate the heat exchanger using mineral wool and foil - this will dramatically increase the rate of water heating.
Another option for a heat exchanger for a chimney is a coil made of a copper tube with a diameter of 10 mm, which is made to tightly wrap around the chimney pipe. 1.5-2 meters of pipe is enough. The ends of the coil are inserted into the nuts, flared under the fittings, and then the fittings are screwed to the nuts.
Note! The copper tube must be flared exactly under the cone of the fitting so that they eventually fit tightly against each other. Be careful because this is where leaks can occur in the future if you flare at an uneven thickness.
Here are a couple of videos on the topic:
Video
How to bend a copper tube yourself with a pipe bender.
Without pipe bender.
Principles of installation, connection and safe operation
- Installation options depend only on the choice of location of the exchanger. The most difficult thing will happen if you decide to place it inside a finished oven , where it was not originally planned. For this you will have to disassemble the case and make holes. It is much easier to use a hanging structure or put a coil or a “samovar” on the chimney pipe.
- As for the pipes that connect the heat exchanger to the tank, for a gravity-flow design it is important to observe slopes, and also remember that the fastening of the pipes should not be rigid - allow them to “walk” freely during thermal expansion.
- The material for pipes is best copper , and connections are brass . When purchasing seals, pay attention to their ability to withstand high temperatures.
Operating safety depends on your awareness. The main thing is not to forget about two things:
- when leaving the bathhouse, you need to drain all the water from the system;
- You should not start heating without making sure that the storage tank is full of water.
If a brick oven with an internal water circuit is flooded and you forgot to add water in time, it is better not to do this when the oven is heated.
It is also important to prevent the liquid from boiling in the system.
Sauna stoves with a heat exchanger: reviews
Reviews from consumers whose washrooms receive hot water from a heat exchanger in a steam room or whose bathhouses are heated with its help are usually positive.
According to one of the users, he kept a boiler in the bathhouse for some time to heat water, but for the sake of saving money he decided to switch to a cheaper design. And after thinking a little more, I didn’t buy a ready-made one at all, but twisted the coil myself and installed it inside the oven. I'm pleased with the result.
Also, those who purchased a stove with a built-in water circuit do not complain, because the water becomes hot in an hour and a half, and the steam room arrives in two.
There are no problems with the heating systems either - the radiators installed in the cold dressing room by another bathhouse owner solved the problem of cold, the stove copes well with heating the combined washing room and steam room, and with heating the dressing room.
***
Are you convinced that a sauna stove with a heat exchanger is better and more profitable than a boiler? It will heat the adjacent rooms and provide hot water for washing. And at the same time, the efficiency of the stove will increase if you hang the exchanger on the chimney pipe. Exchangers are inexpensive, but it’s easy to make them yourself. In general, we recommend an affordable solution.
Bottom line
To provide heating for a home, several options are usually considered. Popular gas or electric equipment runs on expensive energy resources. The most economical type is heating and cooking furnaces with a water circuit. They are easy to build yourself, which results in noticeable financial savings. This type of heating involves a combination of traditional brick construction and modern technology. As a result, the home receives the necessary warmth and comfort. In addition to brick ones, they often make metal stoves with a water circuit with their own hands. By ensuring proper maintenance of your heating system, you can guarantee a suitable microclimate in your home for many years.