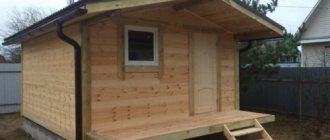
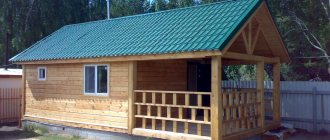
Even on a small plot, the owner wants to have a house and a building for couples’ procedures. This is quite possible if you build a mini-bath. The compact structure can be easily placed even on a tiny plot of land. A competent approach to its design allows you to get an object that will become a real decoration of the territory. The materials for its construction are available to most, and the process itself is not particularly complicated. This allows you to arrange such a structure on the site without the help of specialists.
A mini sauna on your site will allow you to spend time with health benefits
general information
Such buildings are objects that include a steam room, as well as a relaxation room. Often among the rooms of a miniature bath there is a washing room. Sometimes it is combined with a steam room, in some cases it is absent. A maximum of two people can steam in it at the same time.
In conditions where the owner of a suburban area has limited funds, such a structure is an excellent choice. In the case of using frame technology during work, attention should be paid to vapor barrier materials - their quality and proper installation. If the steam protection is poorly designed, the object will collapse in a short period. Its recovery will be impossible. The insulation material should be selected with special care; it must be highly resistant to moisture.
In this video we will look at a cube bath:
What is dangerous to save on when building a bathhouse?
A bathhouse is a specific structure that requires compliance with safety rules. Therefore, you cannot thoughtlessly save on all materials. The purchase of building materials should not be based on the lowest price, but on the basis of quality and suitability for use in high temperature conditions. Study the raw materials approved for use in bath structures, analyze the pricing policy of construction stores and purchase high-quality materials in exactly the quantities required for the job. If carrying out independent calculations is an overwhelming task for you, seek advice from specialists. This way you can save money, but still get the materials you really need and of high quality.
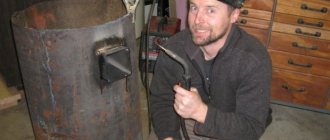
Another integral part of the bathhouse, which is not recommended to skimp on, is the stove. It must be a certified design, purchased from a store and passed a safety test. Homemade stove structures may save time at the first stage of construction, but will require additional time to be spent on manufacturing and maintenance.
Advantages and disadvantages
A do-it-yourself mini-sauna for a summer cottage is a good replacement for a standard structure for steam procedures. Even such a small object has certain advantages. The main ones are often mentioned:
- The object takes up little space. This is especially important if the land plot is small.
- The cost of construction is insignificant. Its construction requires a small amount of building materials.
- Compact dimensions allow the building to easily fit into the landscape design of any site.
Such buildings have only one drawback: there is little free space inside. You can’t expect any special comfort, but it is quite enough for two people.
Wood sanding
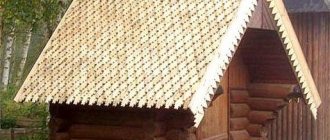
Then we prepare the log house for painting. The log will be processed everywhere, from the end - this is the loosest area that can cause damage to the log.
Start with the simplest and smallest wall. It's worth tinkering with the corners, the circle of the grinder doesn't reach everywhere, you'll have to work with a chisel. The ends are processed at the end, they are sealed with mastic. It is convenient to use white; it will be easier to paint. Sanding allows you to show the beautiful structure of the wood and natural pattern.
Dry the base for 1 day, then apply glaze. After this, it is good to walk over the surface with sandpaper. Then the paint is applied in layers, the first one is dried for half a day, but it is better to leave it for a day, then a new layer is applied, which gives a matte shine.
Project development
Even if you plan to build a small bathhouse, you cannot do without developing a project. Therefore, before starting work, it is necessary to draw up a plan. It is necessary in order to determine the dimensions of the future structure. And also its presence will allow you to quickly resolve the issue with the location of the rooms. Typically, when constructing such structures, the following functional areas are distinguished:
- Waiting room. An area of 1.5×2 m will be sufficient for it.
- Restroom. Its optimal size is 2x2 m.
- Shower room. This room should have dimensions of 1x1 m.
- Steam room. The dimensions of this zone are 1.5x2 m.
Based on these dimensions of the main premises, the owner can get a structure with the following dimensions: length - 6 m, height - 2 m, width - 2.5 m. But even such a compact bathhouse will be quite functional and will provide convenience when receiving paired procedures.
Create a bathhouse of any shape, there are no limits to your imagination
Explanation of the picture
The diagram shows the levels of equipment location relative to the bathhouse floor and the direction of water movement in the water heating circuit from the stove. The movement of water is caused by the temperature difference between the water before and after the heater. Heated water becomes lighter and, like air, rises, and colder water takes its place. Therefore, the water supply pipe is connected at the bottom of the tank, and its second end is connected slightly higher, as shown in the diagram.
In the hot water tank, he installed the simplest fittings for a toilet flush tank, that is, the tank is filled to a certain level, which can be adjusted.
Before using the shower, for safety reasons, both phases must be turned off.
Pouring the foundation
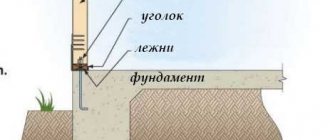
The construction of any structure begins with the creation of a foundation. When arranging a miniature object, this point should be paid special attention to. Due to the fact that its structure is made of wood, the weight of the building will be light. Therefore, it is unwise to spend money on a heavy foundation. A better solution would be to create:
- support-column foundation;
- strip base with a shallow burial level.
The second option is the most suitable if the site is dominated by loose, soft soils. The first is chosen for areas where hard soil predominates and digging a trench becomes a difficult undertaking.
To construct a lightweight foundation, it is necessary to lay stones over the entire area allocated for the construction of this facility. A layer of clay should be placed on top of them and then compacted. Upon completion of this work, you can proceed to the next step - laying waterproofing.
If you decide to build an object on a strip foundation, then the first step is to dig a trench. At its bottom it is necessary to arrange a sand cushion. The layer thickness should be 150 cm. After this, roofing material should be laid as a waterproofing material. Then the wooden formwork is installed. The next step is to fill the trench with concrete.
In order to build a high-quality foundation, you need to take care of purchasing concrete pillars in advance. They are buried in the ground at a distance of 1 m from each other. This type of foundation is relevant if the owner plans to build a frame-type building. A pile-screw foundation requires no less attention. Speed of installation is its main advantage. Proper design of this type of foundation allows, upon completion of the work, to obtain a high-quality structure characterized by high strength characteristics.
When creating it, a distance of 2 m should be maintained between the piles. They can be dug into the ground manually. To make this task easier, you should use a hole drill. In this case, it is necessary to pay attention that these elements are immersed in the soil below the freezing level, which is located at a depth of 200 cm from the surface of the earth.
Video
Bath frame
Sizes, of course, are up to everyone’s taste. The whole trick lies in how the bathhouse is designed. It's very easy to do. The main frame was welded from 25 angles. For transitions: floor-wall, wall-roof, the corners were welded with shelves to each other. Don’t forget about the corners for the entrance (steam room) and outer doors.
Lightweight design
To allow water to roll down, I made the roof of the bathhouse sloping and “broke” it into two parts. The first is the dressing room, has a slope in one direction, with a difference of 10 cm. The second part is the bathhouse itself, located at an angle of 90 degrees to the first with a slope height of 20 cm from the highest point of the dressing room.
Strengthening the structure
I also additionally strengthened the floor with one corner in the middle, along the steam room compartment, and to strengthen the structure - another one on top across the steam room. Another corner, for rigidity, in the middle of the partition between the steam room and the dressing room. Horizontally from the wall to the inner door. We drill as many holes for screws in the corners as you think necessary in order to hold the block on them.
Attaching wood to iron
Having cut the 50th beam - dry larch - to the size of the corners, screw the bars to the corners with screws. We nail one-inch dry boards, also made of larch, onto the bars, cover the floor of the bathhouse with them, not forgetting about the hole for the stove (what kind of bathhouse, even a small bathhouse, without it!), the inside walls and the roof. Without relying too much on the dryness of the boards (which I was convinced of myself after a couple of years - gaps appeared between the boards), to improve the insulation we glue cheap ceiling tiles to the walls.
External cladding of a bathhouse with wood
The outside of the bathhouse is lined with one-inch boards located parallel to the ground. We begin sheathing from the bottom up so that the boards lie, slightly overlapping, on top of each other. Your bathhouse at the dacha will greatly benefit from this. Don’t forget to varnish the boards twice later.
Stove, pipe and bath insulation
We install iron (can be made of stainless steel) in the bathhouse: a stove of the size you need, and a pipe, a hole for which we first cut in the roof. Take a pipe of such length as to maintain a distance of 1.5 meters from its end above the roof to the roof itself. And don’t forget about the spark arrestor on top of the pipe.
We install the stove on bricks with a two-centimeter gap from the wall. This gap is quite enough to install insulation between the wooden wall and the stove so that the wall does not burn.
Without further ado, I secured the insulation to the wall. I had it (at first - 25 years ago) in the following order: asbestos fabric, thickness 1 mm, galvanized sheet on it - 1 mm, asbestos sheet - 5 mm and galvanized again. Again - when replacing the stove - I left the first two layers adjacent to the wood, and put fire-resistant polymer fabric on top of them.
Both the initial and subsequent insulation are enough to prevent the boards from burning, even in a hot oven. We line the second, long wall of the stove with bricks the width of the brick so as not to get burned (a small bathhouse in the country is a hot business).
We make a hole in the roof with a diameter larger than the diameter of the pipe in order to lay insulation between the roof and the pipe.
I personally made a hole in the roof 4 centimeters larger, fixed it on the transverse ceiling corner, and so that the boards did not burn, I wrapped the pipe with insulation and lined it with pieces of asbestos board on 4 sides. It rains, of course, but the simple steel stove is like new for 14 years, without rust.
Sewing the internal partition
Having installed the stove, we sew up the frame of the partition between the dressing room and the steam room with a board. We install shelves in two rooms. Don't forget to install the doors. And the final touch. We cover the roof with roofing felt or any material that suits your taste that meets the necessary tasks. A small bathhouse in the country with your own hands is another way to get pleasure and cleanliness, naturally. Enjoy Your Bath!
To my shame, I want to admit that this building was the last to be built. There was everything: I made greenhouses with my own hands and such a structure as a pergola for grapes was already standing, but somehow I never got around to doing such a necessary task.
Wall installation
Building the walls of a mini-bath becomes a simpler task if the owner has opted for a frame-type structure. Such an object for paired procedures is easier to construct. The inside of a frame made of wood must be sheathed with timber.
The outside of the building is decorated with a block house. This solution allows you to provide a spectacular look for a compact building. You can also choose a finishing option that matches the design of the garden house. When selecting materials, special attention should be paid to their fireproof properties.
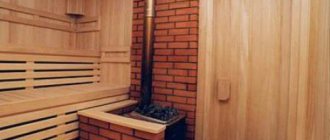
Interior finishing work
The walls are covered with certain types of wood. Due to high temperature and humidity, chipboard and linoleum cannot be used. Natural wood - alder, larch, cedar, linden - is suitable for cladding. They retain heat indoors.
Wooden lining is considered the best option for finishing the room. It is mounted on the sheathing to prevent contact with the insulation and waterproofing.
Wood paneling is also used for the ceiling
In the steam room it is important to create the effect of a thermos. And this is achievable with proper installation of the insulating layer
It is attached to the underside of the floor beams and secured with a rough layer of filing. The foil insulation is mounted below and pressed with rolling slats - the basis for fixing the lining.
The stove is the basis for the bath. For small rooms, simple devices that you can make with your own hands or replace with an electric furnace will suffice. The second option is preferable due to minimal air pollution and high safety, but it costs additional and considerable costs.
Important! To avoid fire, the place for the heating elements is lined with non-combustible materials. Distance to wooden parts – from 20 cm.
Insulation options
When creating a mini-bath, one of the important points is its high-quality insulation. Before doing this work, it is necessary to eliminate all the cracks that are present in the walls. When installing a layer of thermal insulation, it is optimal that its thickness be at least 15 cm. In regions with harsh climatic conditions, this figure can be increased to 25 cm. The process of laying the material occurs staggered. This technique allows you to completely eliminate the appearance of cold bridges. If they are present, the heat will quickly leave the bath. This cannot be allowed.
To create a layer of thermal insulation, you can use a variety of materials:
- mineral wool;
- sawdust with clay;
- expanded clay
If you need an inexpensive solution with high performance, then you can hardly find anything better than polystyrene foam. Many are skeptical about its use in the bathhouse. But it still provides good thermal insulation performance. A 12 cm thick layer of insulation based on it is enough to replace an 80 cm layer of mineral wool. This material can operate effectively in the temperature range from -100 to + 80 ° C.
After laying the insulation, a vapor barrier membrane should be fixed over it. When performing this work, you must try not to damage it. It is best to eliminate joints and any resulting cuts using special adhesive tape.
Water heating
Unkas bought a 1.2 kW electric heating element. with automation, these are now sold in almost all stores, a brown cylindrical body from which a heater and a temperature sensor probe stick out. It has a large hysteresis in temperature, so if you set it to 40 degrees, it will not overheat the water and will work once. And since it is located in the lower part of the tank, in the middle part, from which water is drawn for the shower, the temperature will be slightly higher.
The transition from the hose to the metal is made using fittings of the appropriate diameter and secured with clamps. Unkas hoses were installed only for cold water. Where hot water comes, there should be galvanized or stainless steel.
Unkas has also provided a second option for heating water - from the steam room stove. The water starts to heat up when there is no electricity, from the “kalach”. The kalach is a half-inch U-shaped pipe that lies in the stone container and goes around the base of the chimney, that is, it is located in the hottest zone of the stove. The incoming end lies on the body, and the outgoing end is raised 5 cm higher. What it looks like from the shower.
Unkas did this because there were no stoves with a similar design, with a factory circuit, on sale; now there are many such stoves on the market. This design heats the water to 40 degrees so that it does not overheat, otherwise you can get burned by boiling water.
Unkas notes that this system is balanced, has stood the test of time and fully meets his needs.
Water supply and drainage
The costs of building a miniature bathhouse can be minimized if you arrange a compact and efficient drainage system. To create it, it is necessary to carry out excavation work and dig a small hole with a volume of 100 liters at some distance from the structure. Inside it should be installed a barrel that does not have a bottom. Thanks to it, the walls of the pit will be prevented from collapsing.
The next step is to install a pipeline , which should go directly from the steam compartment. If the bathhouse will be used in winter, then the plastic pipe should be deepened to a depth of 1 m. To ensure that there is always hot water in the bathhouse, you need to spend money on purchasing an electric heating element.
It can be used to easily heat a small volume of water. This will significantly save time on lighting the stove in the mini-bath. The water container should be placed higher. In this case, it will be possible to use it without swapping. Some owners of such structures additionally install a mixer to control water flow.
The drain installed in the mini-bath can, if desired, be connected to the sewer system of the garden house. This option makes it possible to reduce the costs of installing this system. Communications should be located at a slight slope. This will prevent liquid from stagnating in them. At the bottom of the pit into which the used water will flow, it is worth laying a layer of expanded clay or coarse crushed stone. It is necessary to install an insulation structure on top so that the pit does not freeze over in winter. For this, laying a layer of soil and clay will be quite sufficient.
Location Features
In addition to a successful box design, you will need to choose the right place in the country where you can build a bathhouse without occupying the most valuable areas of the territory. On the other hand, the steam room should be located at a sanitary distance from the dacha house in order to ensure a fire safety distance and a minimum of smoke in the area in front of the house.
A typical design for a simple mini bath involves building a room in the space between the remote toilet and the dacha building.
The second option is the most common. In this case, the structure is placed as far away from the house as possible, preferably closer to shrubs or trees that shield the box from the wind.
A bathhouse can be built in the so-called sanitary zone of the dacha, and the site for the foundation, even without taking into account the height of the piles, must be located above the drainage pit or septic tank.
Ventilation device
Comfort when staying in a mini-bath will be ensured only if the owner takes care of creating a competent ventilation system. Without it, you will have to constantly smell an unpleasant odor. To get rid of it, you will have to make a lot of effort. The installation of an effective air exchange system will ensure maximum effect from taking paired procedures.
During the construction of a compact object, care must be taken to create a small glazed window. It is optimal to place it opposite the front door. You can also create a hole in the wall instead, which should be equipped with a damper. If there is no shortage of funds, then you can purchase an exhaust or supply opening of the required dimensions.
Building a mini-bath with your own hands on a country plot, the area of which is limited, is a good solution. Also, such a facility is suitable if there is a great desire to take paired procedures, but there is no money for the construction of a large facility.
A mini-steam room can be built with minimal time and money. Any gardener can easily cope with this task, even without serious skills in construction. The operations performed during the construction of the facility are simple, so it is enough to spend a little time to get a mini-bath on the site. It will not only provide an opportunity for bathing procedures, but will also decorate the area.
Photo examples of ready-made baths in the country
Before starting the construction process, it is necessary to develop a working design and draw up a detailed drawing indicating the technical parameters of the future structure. Original and popular options for budget bathhouses in summer cottages, built with your own hands, in our photo selection.
A functional frame bathhouse on a summer cottage is an accessible and relatively cheap construction option for home use. To reduce construction costs, you can create your own project and use only inexpensive and practical materials. A compact heating stove, made by yourself, will also help to significantly reduce the cost of servicing the finished bath.
Choosing a site for construction
The location of the building is chosen taking into account its design; if the building is erected on a foundation, its placement in the dacha is determined by SNiP standards. If it is a mobile or ergonomic structure, or a converted shed without a foundation, it can be placed literally anywhere.
General requirements:
- it is prohibited to place a bathhouse closer than 5 m from the red line;
- if the building is wooden, it should be 10–15 m away from the residential building;
- It is better to remove the bathhouse from the reservoir or block - 15 m;
- It is recommended to build on a hill.
To save on insulation, choose a place protected from the wind.
Materials for production
The material for an outdoor shower can be any depending on the type of design chosen and the imagination of the builder. For more solid shower designs, you can use wood, translucent polycarbonate panels, natural and artificial stone, plywood, and metal pipes. The walls of the shower stall can be lined with clapboard or tiled .
The floor can be river pebbles, artificial porcelain tiles or other stone. Such a floor does not splash water and will protect a person from slipping on a wet surface. This flooring option is suitable for open outdoor shower options . A wooden grate is also an excellent option for the floor - it is an environmentally friendly and non-slip material.
Communications
It is necessary to design the location of communications at the initial stage of developing a mini-bath. The wiring must be hidden under the casing, and it is laid in special metal sleeves. The cable should be taken with double braid. It is also necessary to make grounding. For lighting, choose sealed lamps. They can be mounted both on the ceiling and on the wall.
Ventilation is an important element in the design of every bathhouse.
It is more logical to use a tank in which the water will be heated from the heat of the stove. An important point is the arrangement of ventilation; for this purpose, ventilation grilles are made in the ceiling with exits under the roof slope. Don't forget to build a drainage hole where the water will flow. It should be of unusual size; a porous stone is poured inside, which serves as a certain filter.
How to choose a site for construction
The construction of a bathhouse usually begins with choosing the most suitable location and drawing up a construction plan
When preparing calculations, it is important to comply with the rules and regulations that govern the conditions for locating a steam room in the residential sector. The specific structure must be located at a distance of no closer than 1 meter to the boundary of the neighboring plot
If there are wooden buildings in the neighbors' yard, there should be more than 15 meters from them to the bathhouse.
A separate bathhouse or one built as an extension to a house can only be built taking into account the rules and regulations regarding natural, plant, and protected areas. The permissible distance to a reservoir is 5 meters, an artificial well with drinking water is 12 meters, tall trees are 4 meters, and a forest area is 15 meters.
In the house
You should plan the construction of a steam room in your home at the building design stage. The bathhouse will require special waterproofing, finishing, and processing of materials. More often they make mini-rooms, but they are spacious enough for a comfortable stay. The advantages of planning a residential building with a bathhouse include the following factors:
- Saving space in the garden area;
- Possibility of free movement between rooms, without the need to go outside;
- Simplified firebox. All necessary materials are located in the living area;
- Close location to the bathroom.
The disadvantages of organizing a bathhouse right in the house include a high fire hazard. Even high-quality and systematic treatment of a room with fire retardants does not provide 100% protection against fire and smoke. Additional vapor barrier will also be required. Due to high humidity, complex ventilation will have to be done. Good air exchange can be ensured by installing expensive internal equipment.
Extension to the house
It is possible to attach a bathhouse to a residential building only if the house is made of brick or foam blocks. In other cases, being too close may be unsafe. You can use a ready-made terrace or fill a separate area with the foundation for a sauna. Before laying the floor covering, it is necessary to consider good protection from moisture and a high-quality sewer drain.
You can make a bathhouse extension 2 years after the shrinkage of the main residential building. It is easy to bring communications into the room and make it heated. Disadvantages include a high risk of fire due to open flame. The danger increases if the frame part of the dacha extension is made of budget timber or poorly processed wood materials. Dirt and debris from the firebox easily enter the house, and high humidity destroys the wall covering, leading to inevitable frequent repairs.
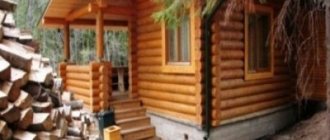
Freestanding
The best option for building a bathhouse on the site. The easiest way to make it is from a log house. You will need a lightweight foundation, timber for making a roof truss, and basic material for the walls. Construction will take a minimum of time. You can safely implement your favorite design and furnace equipment with any characteristics.
The disadvantages include the use of an impressive area for construction and a large amount of building materials and improvised means. Due to the distance from a residential building, heating costs will increase, and attempts to save money will lead to a deterioration in technical parameters.
Finish line
An integral part of every sauna is the stove. It can be made independently from sheet material or a large-diameter metal pipe. In another version, it is laid out of brick, but in this case it can take up a large space. For small spaces, it is better to use electric options that are purchased ready-made.
Stove for a small bath
A shelf is installed inside the steam room. It is better not to use coniferous wood for it, because... When heated, it may release resin, causing burns. Good material for it would be aspen, larch, linden or oak. If the space is small, a width of 40 cm will be sufficient; it is more convenient when there is a footrest. The fastening material must be flush so as not to burn the skin (it must also be made of stainless material). It is better if the entire structure is assembled on dowels.
Shelves for a small bath
For wiring, you must use a double braided cable. It is better if it is non-flammable (usually the marking has the prefix “ng”). Be sure to lay the conductor in the corrugation. There are no switches installed in the steam room itself. The lamps used are waterproof with an IP68 index.
Make sure there is good ventilation. To do this, you can install an adjustable supply valve, as well as anemostats with an outlet to the gable through the roof. This will be enough to ensure that all moisture is removed after taking a steam bath.
As you can see, there are no restrictions on what you can build a small bathhouse from. Choose the option that suits you best.
Construction of a building
The process of building a bathhouse can be divided into several separate stages. Each of them has certain characteristics.
Foundation and floor
Under a wooden bathhouse you need to make a strip foundation. It is suitable for different types of soil and can withstand the weight of a two-story building. Construction of the foundation:
- Mark the boundaries of future construction and trenches.
- Remove all trash from the designated area, cut down trees, and uproot stumps. If possible, remove the fertile layer.
- Dig trenches. Their depth depends on the freezing point of the soil. The suitable range is from 50 to 80 cm.
- Place a 20 cm layer of sand at the bottom of the dug trenches, pour water over it, and tamp it down.
- Assemble wooden panels from boards and bars. Cover the inner sides of the boards with thick polyethylene film. It is needed to prevent the cement from leaking out.
- Put together the panels into a single formwork and install them along the boundaries of the trenches. Spread with bars.
- Tie a reinforcing frame from reinforcement and install it inside the trenches.
- Pour cement mortar. Stretch it evenly over the entire base. Tamp the solution so that air bubbles come out.
The foundation will take about 30 days to dry. After this, you can dismantle the formwork, level out the unevenness, and begin further work.
Construction of a strip foundation (Photo: Instagram / artem_pososhkov)
Walls
Construction of walls:
- Before laying the crowns, you need to cover the concrete base with liquid mastic and lay out 2 layers of roofing material.
- It is recommended to cover the beams for the first crown with used motor oil to protect them from rotting, the spread of fungus, and mold.
- The assembly of the crowns occurs through choppers, which are driven into the drilled holes. It is necessary to lay out jute or flax between the crowns.
- The rounded timber is placed in special grooves, which are located in the corner joints.
A frame house is assembled differently. A strapping crown is fixed on top of the foundation. Vertical racks with braces are installed on top of it. The entire structure is connected by an upper strapping crown.
Windows and doors
The arrangement of window and door openings can be done in two ways:
- Cut openings in the finished log house using a chainsaw.
- Designate the location of doors and windows in advance. Lay out the timber in a certain sequence.
The ends of window and door openings need to be reinforced with metal corners.
Windows for a bathhouse (Photo: Instagram / tovary_dlya_bani_)
Ceilings and roof
Arrangement of the roof, ceilings:
- Ceiling beams are fixed on top of the last crown at intervals of 60 cm from each other.
- Identical pieces of boards are placed on top of the ceiling beams, which will be the rough ceiling.
- Separate sections of the rafter system are assembled on the ground, installed on top of the ceiling beams, and assembled into a single system using lathing.
- A vapor barrier wire is secured to the sheathing with a construction stapler.
- A counter lath is placed on top.
The last stage is the installation of roofing material.
Communications
Communications are an important stage in the construction of any private house or bathhouse. If you do not lay a water supply pipeline or install a sewer system before starting interior finishing, problems with dismantling may arise.
Electricity
Wires can be laid over the finishing material, closing them in special protective boxes. You can also hide them inside the walls if you pass them through corrugations made of non-combustible material.
Sewerage
Sewage drains in summer cottages are carried out to drainage wells or septic tanks. They are assembled from large-diameter plastic pipes, since this material is cheap and more resistant to chemicals and liquids.
Septic tank (Photo: Instagram / aqua_search.ru)
Water supply
To assemble a pipeline for supplying technical and drinking water, it is better to use plastic pipes. The system needs to have a drain point so that liquid can be removed before the onset of winter.
When laying a pipeline along the street, it is important to protect it from the effects of cold with a special protective casing
Wall treatment
When treating wooden surfaces in the steam room, you cannot use chemical antiseptics or fire retardants. Surfaces can be impregnated with special oils or wax for saunas and baths.
Thermal and waterproofing
Thermal and waterproofing consists of several layers - a vapor barrier film, a wooden frame made of bars, insulation, foil film, slats, and finishing material.
When purchasing insulation, you need to consider what zone it will be used for. For the dressing room, you can use mineral wool. For a washing room or steam room, it is better to choose foam glass.
What to heat - choosing a stove
When choosing a stove for a sauna, first of all you need to pay attention to the power. This indicator must correspond to the volume of the steam room
The presence of uninsulated areas and the material used to make the door are also taken into account. According to the type of fuel, sauna stoves are as follows:
- Wood-burning. The classic version of the firebox allows you to create a special atmosphere. A ubiquitous tree does not require additional communications. You can independently prepare all kinds of varieties to create different effects.
- Gas. Units of impressive size can only be connected by a qualified gas technician. In such stoves there is no need to constantly add firewood and control the flame. They have no firebox or ash pan. Gas furnaces significantly increase the fire hazard of the entire structure.
- Electric furnaces. Miniature devices heat the room evenly and quickly. The installations are absolutely safe, with great functionality. Due to the high electricity consumption, the operating cost will be high.
Useful tips
The construction of a small private bathhouse on a personal plot is a complex and responsible undertaking. To get a decent result of your work, experts recommend drawing up a detailed plan for the construction process. This will simplify the passage of the main stages of work and avoid serious mistakes.
Step-by-step instructions for building a mini-bath include the following steps:
- Choosing a location on a building site.
- Construction of a foundation for a bathhouse.
- Construction of walls, partitions and interfloor ceilings.
- Installation of the rafter system.
- Thermal insulation, waterproofing and vapor barrier of walls, ceilings and floors.
- External insulation and cladding.
- Installation of heating equipment and chimney.
- Laying floors, installing door and window structures.
- Communications supply.
- Internal cladding of premises.
- Selection and arrangement of furniture, bath accessories.