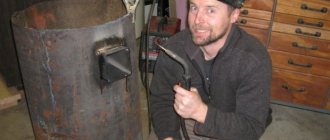
If you choose this option, the most important thing is to find the right tire. A tire from a tractor or combine is best suited, since the diameter is quite enough for the height of an adult. In addition, you will need a bag of cement and sand. The manufacturing procedure is as follows:
- Using a sharp knife and a hacksaw, cut out one side of the tire, leaving the side. It is more convenient to cut along circles on the tread. You should not use a grinder, as the rubber will begin to crumble and stick.
- We choose a flat area, clear it of turf along the diameter of the pool or a little wider, then fill it with a sand “cushion”.
- Fill a circle about 15 cm thick with cement and install the tire.
- We level the cement and pour in a couple more buckets to be safe.
- We decorate the sides of the pool. There are no limits to imagination here - they can be painted, mosaic, stone or brick.
After completing the work, you need to wait about a week for the concrete to completely harden - the DIY wheel pool is ready, you can enjoy water treatments!
Pros and cons of a concrete ring pool
Among the positive characteristics of a DIY pool made of concrete rings are:
- Long service life. With a competent approach and the use of high-quality consumables, a home pool can be used for 100-150 years.
- Excellent strength qualities.
- High level of resistance to deformation changes.
- Increased resistance to negative environmental factors, in particular to precipitation and sunlight.
- Compliance with hygienic parameters.
- Simplicity in arrangement.
- There is no need to use an additional waterproofing layer - a waterproof material.
- Short terms of construction of an artificial reservoir.
The disadvantages of a DIY pool include:
- careful handling of concrete rings is required when loading/unloading;
- quite heavy weight of the structure.
Measures to preserve heat in the bowl
The sun does not always cope with heating a bowl of water, especially on a cloudy day. To do this you will have to use electric heaters. To reduce heat loss from water and save electricity, the bowl must be insulated. You can use the help of specialists who will apply a heat-protective layer by spraying. You can make thermal insulation yourself from foam boards with a density of 35 kg/cu. m. Seal all seams between the slabs with water-repellent mastic.
Construction materials
It is recommended to take concrete grades M 350-M 400, with frost resistance parameters F 100, water resistance parameters W 6. To model your pool, you need a heavy concrete solution with hydrophobic and plasticizing additives. The required density of the solution is obtained using a vibrator and a vacuum pump - this method minimizes the size of the capillaries so that cavities do not appear in the concrete.
Figured bowl project
Composition of the solution for filling the pool bowl - the proportions of the components are indicated for 1 m 3:
- 0.60 t - Portland cement M 400;
- 1.60 t medium-fraction sand;
- 60 kg - silica;
- 0.8 t fiber fiber;
- 1 kg – plasticizing additives;
- W/C ratio - 0.3.
First, water is added to the concrete mixer, then fillers and cement. If the bowl is large, building a pool will require ordering the solution from the manufacturing plant with delivery. To build a concrete pool, it is recommended to follow the following steps in turn:
- Develop a project and construction manual - it could be a pool made of concrete blocks, a monolithic bowl, a prefabricated structure or a pool made of a concrete ring;
- Prepare the foundation for pouring concrete or installing blocks;
- Install embedded structures;
- Assemble the formwork;
- Concrete and reinforce the bottom of the pit;
- Perform layer-by-layer concreting of the bowl;
- Lay waterproofing layers on the walls and bottom of the pool;
- Finish (plaster and paint the pool) and decorate the area around the pool;
- You will also need special paint for concrete pools - it must be waterproof and durable. Hydrostone paint fully corresponds to these characteristics.
Waterproofing walls
The construction of the bowl is almost complete; all that remains is finishing work. One of them is wall waterproofing:
- liquid waterproofing is applied to the inner surface of plastered walls. Moreover, before this, it is advisable to trim the surface with fiberglass having a cell size of 5x5 mm;
- in case of high groundwater, treat the walls with a penetrating primer before applying waterproofing. It will create water-repellent protection. Some manufacturers provide primers with an additional elastic compound. It is applied with a spatula to the wall after the primer has dried;
- waterproofing the outer surface of the bowl walls requires coating them with a weldable or liquid composition. For reliability, you can treat with both compounds at once;
- All that remains is to test the bowl before finishing. Fill a pool of water full, make a level mark on the wall and do not drain it for 15 days. During this time, high-quality waterproofing will keep the level in place except for a small proportion of natural evaporation of water;
- finishing the inner surface of the walls is a kind of waterproofing. The inside of the bowl can be lined with tiles laid with water-repellent adhesive or stretched PVC film welded to the size of the bowl.
Gabion pool
For those who do not know what a gabion is, let us tell you: it is a stone laid dry in a steel mesh frame. Gabions are characterized by low cost, ease of installation and high strength. The shape of such a design can be any, from rectangular to round. It all depends on the shape of the mesh that contains the stone. For us, gabion is an excellent basis for making a stone pool affordable and original in appearance.
The technology of work is very simple. We make a concrete bottom (its diameter should be slightly larger than the contour of the gabion). Place a steel mesh container on the bottom. You need to lay the stone in it layer by layer, after which a durable film is mounted in the inner cavity of the stone bowl. Its edges are fixed to the upper gabion belt. That's it, the design is ready.
Its bottom and sides are very strong and stable, and waterproofing is provided by a thick film.
We produce reinforcing mesh
You dug a pit under the bowl with a reserve. We will also make the bottom of the pool larger in size. It is enough to make the area of the slab 400 mm larger than the dimensions of the bowl. This will create resistance to moving soil. First you need to make formwork around the perimeter of the bowl, then start tying the reinforcement:
- For reinforcing mesh, it is sufficient to use rods with a diameter of 10-14 mm. In general, the more mobile the soil and the greater the depth of the bowl, the thicker the reinforcement should be used.
- On turns and curved areas, lay reinforcement 10 mm thick, but with smaller spacing to increase strength. Thin reinforcement can be sold in coils and is easier to bend to the desired shape.
- Based on the fact that the thickness of the bottom plate will be 200 mm, the reinforcing frame must be made 100 mm thick. Its upper and lower planes should deviate from the upper and lower surfaces of the slab by 50 mm. You can maintain this distance from below by laying the reinforcement of the first row on brick stands.
- Lay out the rods of the first row over the entire bottom area to form a grid with cells 200x200 mm. Tie them together with knitting wire. At the tie points, tie vertical rods to hold the second tier of the mesh. Tie a mesh similar to the first tier to the resulting racks.
- When laying horizontal rods, bend their edges up at the walls at an angle of 90°. After concreting the bottom, they should remain sticking out. When pouring concrete on the walls, you will tie the vertical posts of the reinforcing belt to them.
Concrete ring font
Indeed, why “invent” a container when there are ready-made well and sewer rings? The standard size of such a structure (from 1.2 to 2.5 meters) will be quite sufficient for the construction of a small swimming pond.
A concrete ring pool does not need a waterproof film if you make a concrete base for it and properly insulate the joint between the walls and the bottom. It is better to place the ring on a layer of cement mortar, which will fill all the gaps and reliably connect it to the concrete platform.
We also note that you can do without concreting the bottom. To do this, it is enough to lay a ready-made concrete cover on the sand preparation, which is used for inspection wells. In this case, all you have to do is seal the hatch hole.
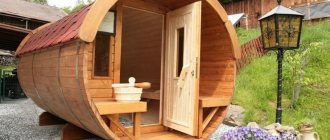
If installing a monolithic concrete font seems too complicated and time-consuming to you, consider installing a font made of reinforced concrete rings as an option. They come in different diameters - from 80 cm to several meters. The most suitable diameter for a hot tub is 1.5 m or more. When choosing, please note that the rings must have a lock - a rebate.
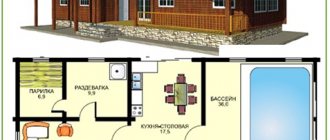
Outdoor swimming pool: dimensions and 3 stages of construction
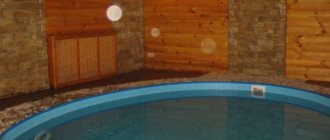
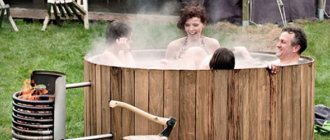
An outdoor font has a beneficial effect on the body. An outdoor font for bathing began to be used as a vessel for taking water procedures back in the days. Modern technologies have not only brought back this product from the past, improved the invention, but also helped to re-evaluate its benefits. Using a hot tub in the open air, a person receives pleasure and unity with nature, breathes easily, cleanses himself of toxins, and hardens himself with the help of a natural temperature contrast. His muscles relax and he enjoys aesthetic pleasure from natural wood.
Content:
People who plunge into a vat or round bathhouse in the winter experience indescribable sensations. Hot water and light frost in combination give a feeling of lightness and extraordinary freshness from the temperature difference.
Outdoor baths include a number of healing features that give the human body a rejuvenating effect that cannot be achieved in other bathing options.
In addition, various aromatic oils can be added to the vessel to cleanse the respiratory tract of harmful microbes. The most common type of do-it-yourself font is made from round concrete. A concrete font is a kind of home pool.
Outdoor baths include a number of healing features that give the human body a rejuvenating effect that cannot be achieved in other bathing options.
The construction of such a structure is a rather labor-intensive process:
- The first step is to dig a pit with a depth no less than the height of an average person (dimensions approximately 1500x1600 mm, plus or minus 170*200 mm for laying a sand cushion and applying reinforcement).
- If you plan to have a water drain at the bottom of the pool, then you should dig a trench to the wall the same size as the pit, and lay a drain pipe there. Typically, a water pump is used for these purposes.
- After the pit is dug, sand is poured to the bottom, it is moistened and carefully compacted. The thickness of the laid sand cushion is approximately 800*100 mm.
Then a reinforcement grid with a diameter of 8-9 mm is attached to the bottom and to the walls. It is secured using 5 mm wire brackets. The grille should be positioned 49x69 mm from the walls. The formwork is installed 149x169 mm from the walls, raised to 119x149 mm - a side that controls the rise of water along the edges of the pit.
The design of the font made of concrete rings
The walls are supported by wooden beams, which ensure the reliability of the formwork so that the mortar is poured correctly and along the contour. The cement mortar is poured into the constructed formwork, and as it hardens, concrete rings are formed.
Works:
- As the cement hardens, the surface of the sides is leveled.
- Wait for the structure to dry for a month.
- When the concrete has hardened well, the formwork is removed and a screed is made on the floor of the font.
After the screed is done, they proceed to leveling the walls using a plaster mixture. The plaster is applied with a spatula in a thick layer to avoid the appearance of air bubbles and hiding unevenness. The next step will be to carry out waterproofing work.
The design of a font made of concrete rings must undergo certain preparation
For waterproofing, sheets of roofing felt or other material based on rubber filler are used.
After the plastered layer of the wall has dried, they begin laying out decorative tiles. The tiles are laid using waterproof glue, and the tile seams are sealed with waterproof grout. The last step is to install the staircase, which can be walled into the floor. Near the pool you need to install a drain to remove water, which is covered with a metal grate.
How to make a stainless steel font
The font can also be constructed from stainless material. The main condition is that you need to decide on the location of the bath. When placing this type of hot tub indoors, a good ventilation system is necessary to avoid the appearance of dampness and mold.
Most often, they prefer to do a bath outdoors or in a bathhouse:
- The building is being erected from monolithic reinforced concrete.
- First, a pit is dug - 1.9x1.8 m, depth 0.9 m.
- The walls are raised by another 49 cm, the depth is 139 cm.
The pit is laid out with a thick film. In those places where the font is adjacent to the foundation, the film is fixed to the walls with clamping strips. You can press it with bricks, they also hold the structure securely.
The font can be built from stainless material
A reinforcement cage is attached inside. For these purposes, reinforcement No. 10 is ideal, with a pitch of 199 mm.
The reinforcement must be placed in the thickness of the concrete; we will place a brick underneath the rods. The gap between the rod rods and the walls of the pit should be at a distance of 7-8 cm. The wooden formwork is assembled. It is made to a height, the walls will rise - the total height is 149 cm. Before pouring concrete, fittings, water and sewer pipes are installed in the bathhouse pit. To retain heat, you can use extruded foam boards. A stainless steel container is immersed in the structure, a stove for heating water is placed on the side or under the building (pipe diameter is 2 m) and cement mortar is poured from the sides to give it a round shape. The structure dries out within 25-28 days. The container can be painted with metal paint or covered with enamel.
What is good about an outdoor swimming pool?
You can construct a wooden or metal staircase adjacent directly to the font tank. It is also necessary to provide a water drainage point. The font, like any structure, must be carefully looked after. The care rules are quite simple.
The font, like any structure, needs to be carefully looked after
The following conditions must be met:
- Do not keep the font filled for more than a day. A vessel installed outdoors cannot be used as a swimming pool.
- Protect the structure from direct sunlight (cover required). To a greater extent, this rule applies to wooden fonts. Wood tends to delaminate when exposed to sun and heat.
- Do not use abrasive cleaners when cleaning the hot tub.
- Do not install the hot tub on a heated floor, or near stoves and heating devices (recommended distance of at least 50 cm).
- Do not leave water in the hot tub to prevent the liquid from freezing. If the water freezes, the font may become deformed.
It is advisable to keep the font closed with a lid, thereby ensuring long-term preservation of the device. The heated hot tub can be used outdoors all year round. Hot air, steam and heat are the best means for preventing colds, stress, fatigue, and depression.
Bath font: dimensions (video)
Installed in a high-quality manner and in the correct order, the font will ideally decorate both the bathhouse and the garden plot, thereby inspiring the good habit of cooling off in the font after taking bath procedures.
Attention, TODAY only!
>
oteplicah.ru
We concrete the bottom ourselves
Concreting the bottom requires preparing a large amount of solution. It is necessary to add water-repellent additives to it. In addition, they will increase the strength of concrete. For such work, it is advisable to order a ready-made solution in a mixer.
If, in order to save money, you decide to prepare the solution yourself, you will need a concrete mixer and at least 2 assistants. You will prepare the solution in a concrete mixer. One assistant carries and spreads concrete along the bottom of the pit. The second assistant will level it. The pouring must be continuous in one day to create a monolithic slab.
As you fill the bottom with the solution, pierce it with a sharpened wooden stick to allow air to escape. It is better to use a vibration machine. It can achieve high concrete density. Fill the bottom with the solution until its thickness above the upper mesh reaches 50 mm. To make it easier to measure the thickness, place beacons from vertical rods or make marks on the formwork. After pouring the entire bottom, cover the slab with film for 10 days to allow the concrete to harden.
It is carried out at the final stages of work after the waterproofing has completely set to the concrete surface and has been tested for strength.
Each material has its own requirements:
- Tiles and tiles should have a rough surface, so a glossy finish will not work.
- The mosaic should also be rough, but not porous, otherwise its moisture resistance is reduced and the risk of destruction of the finish increases.
- PVC film must be sufficiently strong and dense, resistant to mechanical damage.
Mosaics are used to decorate the pool.
All types of material must have good moisture resistance.
In addition, the material must be:
- easy to install and maintain;
- affordable;
- repairable (with the ability to replace individual elements - for tiles).
For laying tiles and mosaics, a special adhesive with increased moisture resistance is used. After laying, the tile joints must be treated with antifungal agents.
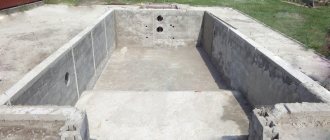
Digging a pit
The work of excavating soil is very difficult, so it is better to use an excavator to help. By the way, this is another important factor influencing the choice of location of the bowl. It will be necessary to provide free access for equipment and space for excavated soil. Otherwise you will have to dig with a shovel.
Before digging a pit, apply markings to the ground that define the contours of the bowl. Drive wooden stakes around the perimeter of the building, connecting them together with construction cord. When marking, add 800 mm to the width and length of the bowl. A spare distance will be needed to install the formwork with spacers. Increase the depth of the pit by 500 mm from the total depth of the bowl. This will be required for backfilling and pouring concrete on the bottom slab.
Having drawn the contours, proceed to excavation. If equipment was involved, the final cleaning of the bottom will still have to be completed with a shovel.
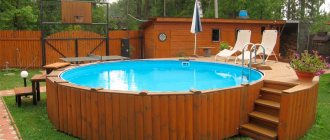
Wooden pool
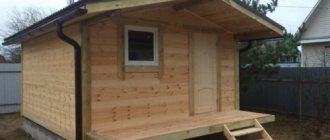
Another way to make a pool from scrap materials with your own hands is to use wooden panels or timber. Both designs are ideal for country-style cottages. They look great against the background of other wooden buildings and are erected quite quickly.
The idea of this technology is reminiscent of gabion technology: the basis of the pool is a power frame, which stands on a concrete bottom or on a dense sand preparation. Ideal tightness can only be ensured by a skillfully assembled wooden barrel, therefore the use of a film membrane is mandatory for our design.
The panel pool is built in two stages: first, a strong wooden frame is assembled on a prepared site, on which boards made of boards are attached.
Preparatory work
Preparation for the manufacture of the pool is carried out depending on the method of installing the bowl.
2 options can be used:
- Surface installation. This option is most often used when installing a bowl indoors. This makes it easier to connect wiring and communications and carry out repair work.
- Burying the bowl into the ground. It is produced in outdoor bowls.
In both cases, it is necessary to prepare a flat horizontal area, make a layer of sand bedding and cover it with geotextiles. Then a layer of roofing material (waterproofing) is laid, on which a concrete bottom is placed.
Each stage requires careful checking of the horizontal position so as not to obtain an unwanted slope of the bowl. It will redistribute the loads, which will reduce the strength and reduce the working life of the structure.
Pools made of gabions and a concrete ring - we make them for centuries
If you want to build a stronger and more reliable pool with your own hands, pay attention to the following two options, which are implemented from such available materials as gabions and a ring of concrete. They are easy to work with. Gabions are metal (steel) frames into which ordinary stones are placed. The shape of such structures can be different. You need to purchase a durable film, a base mesh and mix the concrete.
Gabion pools
- On the site under the pool, pour a concrete base. Its geometric parameters are taken to be slightly larger than the size of the future font.
- Lay a steel mesh on the concrete and place stones on it (in separate layers).
- Attach the film to the inside of the pool. It is necessary to protect the structure from moisture.
- Fix the film (as securely as possible) on the upper edge of the gabion.
That's all. Your mini-pool is ready. It will delight you with its high strength, long service life and quite decent appearance. You can also quickly and easily make a font at your dacha from a ready-made concrete ring. Choose the diameter of such a product yourself. Rings with a cross section of 1–2.5 m are available for sale. Buy the one that suits you. To build a bowl from a ring for summer swimming, you will need construction sand, concrete mortar and geotextiles. The work is carried out as follows: dig a pit, focusing on the dimensions of the ring used, make a cushion of sand, lay geotextile material on it, and concrete the bottom.
After this, lower the concrete product onto the prepared base. Fill all the gaps with sand and compact it. It is advisable to additionally decorate the completed pool in some unusual style. You are allowed not to concrete the bottom of the future ring pool with your own hands. Instead of this rather labor-intensive operation, you can place a finished concrete cover under the ring. Such products are used for arranging inspection wells. The main thing is not to forget to seal the hole that is present on such covers.
Types of ponds, their advantages and disadvantages
To create a pond at the dacha near the house, before starting work, you should consider various options for constructing such a hydraulic structure. The characteristics of the main material of the object, delivery methods, and its cost are analyzed. It is also necessary to optimize the placement of the bowl on the site - it should be in harmony with the surrounding landscape design and buildings. You should pay attention to the positive and negative characteristics of the selected material for construction.
| Indicators | Characteristic |
| Price | The cost of the material is low |
| Strength | High |
| Service | Simple and affordable |
| High ductility | Allows you to create ponds of various shapes |
| Hardware Compatibility | Allows the use of various engineering tools |
| Term of use | Long term |
| Indicators | Characteristic |
| Duration of work | Long lasting |
| Nature of the construction process | Painstaking and time-consuming |
| Exposure to sub-zero temperatures | Covering with frost-resistant material is required |
| Waterproofing | To maintain optimal conditions for living organisms of the aquatic world |
| To increase useful life |
1. Film - represented by butyl rubber, polyvinyl chloride and polyethylene film.
Advantages:
- mobility;
- the possibility of forming an arbitrary shape of a reservoir;
- ease of installation;
- the likelihood of being used for urgent repairs to eliminate leaks in cast or rigid waterproofing of a pond;
- ease of repair in case of damage.
Flaws:
- there is a high probability of damage to the integrity of the material from physical impact and ultraviolet rays;
- the need to construct coastal ledges;
- it is impossible to lay out without creating folds in ponds that have right angles;
- limited service life;
- danger of small children falling into the pond;
- the need to mask the edge of the film;
- average cost.
2. Rigid molds in the form of a finished bowl are made of plastic and fiberglass.
Pros:
- have high strength;
- equipped with coastal ledges;
- the ability to move to another place;
- relative ease of installation;
- Possibility of repair for minor damage;
- ease of maintenance.
Minuses:
- limited size;
- strictly defined bowl shape;
- difficulties with transportation;
- the possibility of gradual destruction of the material under the influence of the sun;
- due to the slippery surface, there is a high probability of children falling into it;
- high price.
3. Made of concrete.
Advantages:
- high strength of the structure;
- long service life;
- creating a pond of any size and configuration;
- ease of maintenance;
- concrete structures are compatible with various engineering equipment;
- low cost.
Flaws:
- the need for lining with a frost-resistant agent;
- labor intensity of work;
- the need for waterproofing with liquid glass to extend the service life and maintain the biological balance required for the normal existence of the aquatic world;
- duration of installation work.
Thus, despite the few disadvantages, a concrete pond has undeniable advantages over other materials used to create a pond. In addition, concrete can be used to recreate both a buried and raised pond.
Let's start construction
We have divided the process of building a concrete pool with your own hands into several steps. The result is a detailed guide that will help you do everything yourself.
Construction layout
Any big undertaking must begin with drawing up a plan. You need to draw a bowl on paper indicating its dimensions. The drawing also needs to reflect the location of the equipment and its connection to the pool and the electrical network.
Decide on the depth of the bowl. If it is intended exclusively for adults, then 2 meters is just right. If for children, then it all depends on their age and height. When installing a diving board, the depth must be at least 2.5 meters.
Planning is a serious and responsible matter. Under no circumstances should you rush. Do not start work until you are sure that your drawing is correct and specific.
Only after creating a detailed plan for this can work begin.
Digging a hole and preparing a pillow
The next step will be choosing a location, digging a pit and preparing a cushion for the foundation.
The place should initially be as level as possible. Electricity and water supply should also not cause problems for the future tank. Pay attention to these two points when choosing a location.
We clear the area of plants and large stones, and then begin digging a hole. You can do this yourself, but this approach will take a lot of time and effort. If possible, contact a team of private workers or even the services of an excavator. This will significantly speed up the process and bring you closer to finishing the job.
Pit requirements:
- The bottom of the pit is 20-30 centimeters lower than the bottom of the future pool;
- The walls of the pit with a margin of 15-20 in each direction from the walls of the concrete bowl;
- The side walls should have a slope of 6-7 degrees to the outside;
Compliance with these requirements simplifies the installation of the pool. If they are violated, you will either not be able to complete the work at all, or you will do it with big problems.
Next, we install all the pipes that will be supplied to the pool. A bottom drain and side nozzles are installed, and from them the pipes go up. It is advisable to cover the holes tightly with a rag or film to prevent dirt from getting in during construction work.
After finally digging the hole, you need to prepare a cushion for the foundation. There is nothing complicated, you just need to pour the compounds in several layers and level them out. The first layer is 15-20 centimeters of sand. Next comes crushed stone 5-10 centimeters high.
It is recommended to make the first layer of cement mortar for the pillow. In small pools you can do without it.
We level each layer using a board with a level attached to it and compact it. If you are pouring cement, let it harden completely and only then proceed to further work.
In the bathhouse or on the street?
One of the issues that needs to be resolved before installing the font is whether you will install it inside the bathhouse or outside. Both options have positive and negative sides. If you place a font in a bathhouse - in a relaxation room or in a washing room, it will significantly increase the humidity level. Good ventilation is needed to remove excess moisture. It can be done, but with active ventilation, much more time and fuel is needed to heat the premises.
Outdoor fonts have their downsides. If temperature changes and cold water are perceived by many only as a plus, then few people like to sparkle with naked bodies. By the way, we can easily eliminate this drawback: install a fence that will cover the font. A budget option would be several poles with stretched banner film or something similar. For stationary use, polycarbonate canopies are often made.
When there is open water in the room, the humidity rises