We make a frame pool with our own hands from scrap materials and take advantage of the opportunity to swim throughout the summer season. Before you make a frame pool with your own hands, you need to carefully study the instructions proposed in the article, according to which you can assemble all the necessary structures. Proper installation of a frame pool in a country house with your own hands begins with preparing the site, which must be level and withstand a significant load.
Step-by-step instructions allow you to assemble a frame pool with your own hands from an edged board and the most ordinary plastic film. Special materials can also be used for coating.
If you want to assemble a frame pool with your own hands at your dacha, then simply follow all the recommendations written in the article step by step, and this will allow you to make a high-quality and durable structure.
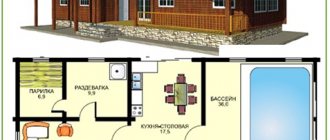
Swimming pool for a summer residence: types and features
They can be classified into two categories: temporary and permanent. Permanent - structures that have a foundation or are dug into the ground. You can’t just move such a structure to a new place and put it away for the winter. They are often made from monoliths, concrete blocks and bricks. The inner part is laid with PVC film, a plastic bowl or other materials that help insulate it from water.
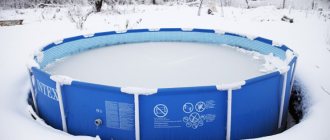
Temporary ones include those that can be easily assembled for the winter, decomposed or moved to a new location. Most often these are inflatable rubber pools or frame structures.
Wooden frame pool
Therefore, to decide what type of structure you need, consider whether you are going to fold it for the winter or plan to leave it on the site.
- Inflatable. If you doubt that you want to take care of your pool or don’t want to buy bulky structures, then an inflatable pool is for you. They are made from fairly durable materials and are easy to assemble and disassemble. The disadvantage is its volume. An adult will definitely not be able to swim, since the height of the largest structures is just over a meter. Service life is maximum 5 years.
- Frame. If you still want a deeper option, but don’t want a monolithic bulky design, this option is for you. It costs more, and installation takes longer and is more difficult. This is a collapsible pool that you can assemble with your own hands. It consists of pipes that serve as a frame and a film that ensures tightness. The depth can reach two meters.
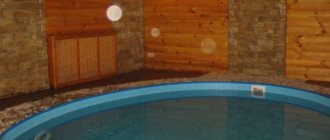
- Stationary. This species is permanent. Suitable for those who cannot imagine life without a swimming pool. The process of installing such a reservoir is quite long and painstaking, but it will last for centuries. First, a hole is dug and the foundation is poured. Secondly, the sides of the reservoir are built. Third, waterproofing and insulation of the walls are carried out. The fourth stage is decoration. The entire work may take several months. It requires regular cleaning and maintenance.
By type of installation they can be divided into:
- superficial. There is no need to dig a deep foundation for them, since they are located on the surface of the earth. This option is used for temporary structures. If the pond is more than one and a half meters deep, water pressure can destroy the walls. Although it is quicker and easier to assemble, it will require purchasing or making a ladder;
- partially buried. For such structures, a small base is dug. This is the golden mean, which helps to save time and provide greater strength and durability. Suitable for deeper reservoirs, as the soil will hold the walls and prevent them from collapsing;
- in-depth. It is convenient to dive into such structures, since they are at ground level. These ponds look good and do not spoil the landscape design with bulky structures. If you have planned a large deep pool, then you cannot do without special equipment. The disadvantages include the fact that such structures require pumping stations, a filtration system and are quite difficult to maintain.
What needs to be analyzed
A normal desire for a person is to use his products for as long as possible. This is usually possible with good preparation and careful planning. This approach also applies to the construction of a swimming pool. Please pay attention to some points.
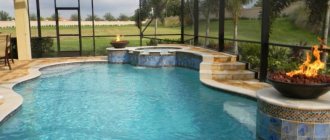
Swimming pool next to the house
- Neighborhood with buildings and vegetation. It is quite possible to place the container next to the house, but if this is done next to the pantry where food is stored, then the rodents that may visit there can damage the structure, which will lead to its partial or complete destruction. On hot days, shade from trees is a salvation from the scorching sun. But for the pool, such “partners” can be disastrous. For example, the root system of trees, growing, can damage the bottom. In a strong wind, a broken branch will destroy the frame when it falls. In addition, when falling leaves fall into the water, they contribute to the development of bacteria and algae, which will require frequent water changes and pool cleaning. It is better to avoid areas that are under high-voltage transmission lines. This, in addition to electromagnetic radiation, poses a risk of electric shock.
- It is better to plan for the construction of a pool on an area that has a slight slope. This will make it possible to simplify your task with draining used water, since it will be able to flow away by gravity. It is great if the soil is clayey, because it has good density and also does not allow water to pass through. In addition, such a coating will support sufficient weight without deformation, which could lead to a change in the configuration of the structure.
- Wind. The issue of determining the preferential direction and strength of the wind is very important. The air flow can raise clouds of dust and dirt, which will settle into the water. It is best to locate the pool on a certain side of the building so that it covers the pool from gusts of wind. It is useful to take this parameter into account when choosing the shape of the pool. If it is a rectangular container, then it should be placed with the long side facing the wind. In addition, holes for overflows must be made in the far part, where the wind predominantly blows, then the garbage will flow into the drain on its own.
Optimal depth
Depth. The deeper the better. This rule does not apply to a home pool. Of course, I would like to perform breathtaking, spectacular jumps from a springboard, but this may be unsafe. If you still have such a desire, then in a place intended for diving, you can make a depression of up to 2.5 meters or more. But the optimal distance from the water surface to the bottom is 1.5 m. It is in such conditions that you can feel safe, swim calmly, and, if necessary, just get back on your feet. When there are children in the family, then the depth needs to be made even less. For younger children, it may not exceed 50 cm. Nothing prevents you from forming the bottom into several levels. This will require considerable effort, and subsequently you will need to carefully monitor that children are in a safe area. Additionally, you can erect a partition from mesh or other material that will prevent the free movement of children outside the territory allocated to them.- Communications supply. You need to think in advance about how the pool will be filled. Will a long hose be used for this or will a stationary system be implemented by supplying the pipeline directly to the location. In addition, if the pool operates for a long time, it will require cleaning, which can be done automatically using special pumps. They require electrical energy to operate. This means that cable routing will need to be done. It is worth considering the importance of ensuring good insulation and grounding so that no one in the water is harmed.
- Lighting. Will swimming occur only during the day or do you want to spend time in the pool in the evening. In this case, you should think about good lighting. It can be placed either on top of the pool or directly in the pool itself. There are many solutions for this, which will be discussed below.
Wooden pool designs and their advantages
You can make a wooden frame pool with your own hands or buy a ready-made construction set. Such reservoirs can be either temporary (frame) or permanent. In the second option, the bowl is filled with concrete and the walls are covered with wood.
Frame pool for a summer residence
Will a wooden pool be easy to use? Will the wood deteriorate under constant exposure to moisture? No, the manufacturers promise that this design will last up to 15 years. This is achieved by treating all wooden parts with professional solutions.
A timber pool is easy to make with your own hands and will fit perfectly into the landscape of your garden plot.
Preparation for construction:
- choice of location. Think about where exactly you want to place the pond. Placing it near trees is not a good idea. Although they provide shade, they also pollute the water with debris. As a result, you will have to clean it more often. And the roots can break the tightness;
- Think in advance about how you will fill/drain water. You can resort to one trick: choose an area with a slight slope, this will make it easier to drain the water;
- site preparation. Regardless of which pond you choose, inflatable or frame, you need to clean the area under it. The area must be level. It is worth getting rid of the grass, as it will rot. If the structure will stand for quite a long time, it is better to dig a small depression under it and compact the earth so that the bottom does not move in waves under water pressure.
- Particular attention should be paid to the choice of material for the manufacture of the pool. If it is wood, it is necessary to apply several layers of water-repellent coating in advance.
Which frame to use
Manufacturers of frame pools prefer a frame made of steel profiles - pipes of round or (more often) oval cross-section. The metal base absorbs and distributes the load from the weight of water poured into the pool well and dampens vibrations. However, such a frame is quite expensive.
It is cheaper to use wood with appropriate processing, and it is not necessary to take an edged board or timber; both a shalevka and a half-edged board will do.
You can also use panel materials - thick plywood, chipboard, OSB and the like. However, timber and boards will still be useful, at least as racks and struts.
Important: the wooden parts used to create the pool frame must be impregnated with an antiseptic and protected from water with special coatings (varnishes, paints).
If you plan to build a pool with a podium around the entire perimeter or part of it, you should also use wood. However, in this case it is advisable to take a planed board or deck board (decking). They also need to be protected from water and microorganisms.
Installation of a frame pool at the dacha
To install a finished frame pond, follow these instructions:
- We dig a hole under the pond. The instructions indicate that the diameter of the pit should be one meter larger than the frame, that is, you need to retreat half a meter on each side;
- You determine the depth of the hole yourself, depending on how much you want the structure to be dug in (minimum depth 25-30 cm);
- the bottom needs to be leveled, compacted, stones removed;
- then add sand (at least 15 cm), compact it;
- to ensure that the bottom retains its shape and the roots do not tear our film, you can line it with geotextiles;
- We begin assembling the frame according to the instructions provided;
- the base of the pool must be insulated with polystyrene foam or other material, and the cracks must be filled with sand;
- We straighten the PVC film as much as possible and fix it with tape;
- Fill the reservoir with a small amount of water (up to 20 cm), lay out the film so that there are no folds. Under water pressure it is leveled. Adding water a little at a time, lay the film;
- install belts, stiffeners and other fasteners;
- We insulate the sides from the outside down to ground level;
- install the filter and pump.
So the construction of the frame pool has come to an end, you can enjoy it!
Installation of the pump box
We install a sediment box, which will also act as a platform for the stairs.
Photo: Fastening the bar
Set aside the width of the board from the edge, use self-tapping screws to secure a block to which the walls of the box will be attached and additionally fixed.
Photo: Box installation
After this, you can begin to lay the walls, leaving space for hanging the door. In the corners, just like the walls of the pool, they are joined into grooves.
Photo: Installation of the pump box
How to build a pool using a frame method
If you are not looking for easy ways and want to create a wooden pool with your own hands, you will need boards (from 3 cm), blocks (6x6 or 5x5 cm). The amount depends on what size pond you prefer. One block is needed for one corner of the structure. Next, the shields are knocked down, which will be the edges of our reservoir.
Scheme of a wooden frame pool
On the prepared area you need to make notes and put up shields. The frame is almost ready.
Useful additions
Since it is extremely difficult to fill even a small pool manually, renew the water in it and drain it, a pump should be a mandatory addition to the swimming area. The choice of a specific equipment model depends on the volume of the pool, the desired pumping speed and other nuances.
Also useful are filters, installations for heating water, illuminating it, and so on. The photo below shows a water heating system from a solar collector.
In addition to equipment, other devices will also be useful - for example, a sliding or regular canopy.
And, of course, relaxation near the pool cannot be imagined without a comfortable place to relax - sun loungers, sun loungers, umbrellas and so on.
Have a good holiday!
How to properly communicate
Now we need to figure out what to do with the left holes. First, you need to clear a place for the drain pipe; to do this, you need to pour out a little crushed stone and lay the pipe. It should protrude beyond the concrete level by 15-20 cm. In this case, a slope of several degrees should be made for better outflow of water. It is also necessary to insert a pipe into the overflow hole and connect it to the sewer system (if you plan to drain water into the sewer). Attach a hose or pipe to the third hole from which water will flow into the pond.
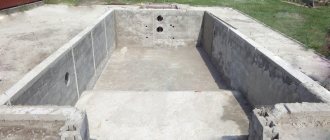
Pool foundation
Frame options
In addition to the described wooden frame made of timber and boards, you can use a homemade welded or prefabricated frame made of rolled metal. It is best to use a rectangular pipe with a cross-section of 20x40 mm for racks, a corner or strip for piping and struts.
By raising the posts 1.5...2 m above the pool level, you can stretch an awning over it or install a polycarbonate canopy.
Another practical and inexpensive option is a pool made from pallets.
Pallets installed along the contour are tied into a single structure with boards or timber; metal plates can also be used. In this case, there is no need to install racks buried in the ground - the connection between the enclosing elements is sufficient. Installation inside the fence of an additional protective layer of thick plastic or rolled material (roofing felt, old linoleum, any other flexible flooring) is not necessary, but it significantly increases the strength of the structure.
Prefabricated model from slats
The second, even simpler version of a do-it-yourself pool is made from timber. It is very simple in design and does not require special skills.
The design is obtained in the form of a polygon, where you can choose the number of angles yourself. For it we will need slats of the same length. Each rail must be drilled from both ends at the same distance (optimally 10 cm). You will need to stretch a strong, flexible wire into the holes formed. The slats themselves must first be soaked with a solution to remove moisture.
You need to prepare plugs from wood that will secure the wire at the bottom. You need the same number of them as the corners of the reservoir.
The structure is assembled in this way:
- the wire is bent into a ring or tied into a knot;
- the plug is put on;
- The slats are gradually strung to the desired height. One rail is directed in one direction, the other in the opposite direction;
- the upper end of the wire is bent and tightened.
We cover the finished structure with PVC film and secure it with buttons.
This option can be used as a blank. You can add water filters, a pump, or increase the size. And if you buy a plastic liner, you can create a full-fledged durable pool for adults.
The most important thing is capacity
When constructing such artificial reservoirs, the main element is a waterproof container. It can be purchased ready-made (for example, a round container with a diameter of about 3 m will cost 14...16 thousand rubles, including the frame and everything necessary for installation) or made independently.
Basic requirements for the bowl:
- high density and strength of the material. Recommended films and fabrics made of polyvinyl chloride with a density of 650 g/m2;
- smooth surface, especially facing the inside of the pool. Glossy fabric is easier to clean from any dirt and disinfect;
- completely waterproof. Since the container cannot be solid, special attention is paid to the tightness of the joints of the panels;
- good resistance to ultraviolet radiation, frost, high temperatures, mechanical strength (resistance to puncture, tearing).
Industrially produced containers meet the requirements listed above; when creating a bowl yourself, you should choose high-quality awning fabric with the smoothest possible surface.
To connect panels of fabric, use a hair dryer with a temperature range of 70...600 degrees. The temperature is selected according to the recommendations of the fabric manufacturer; a crevice nozzle is used for directed action. An overlap of 20...30 mm is required.
The cut bowl is assembled on a large, flat surface. Heat the overlapped edges of the panels to the recommended temperature and carefully roll them with a special roller to seal the seams.
The upper edge of the bowl (it is cut out in advance with a reserve) is folded twice, heated again and rolled. Next, grommets are mounted on the canvas - metal double-sided ring-holes. To install them, you need a special press or available tools. The pitch of the eyelets is no more than 50 cm.
Budget wooden pool
The most budget-friendly swimming pool at your dacha can be assembled with your own hands from long wooden beams. We will need thick beams that will serve as racks, long thin beams that will serve as walls.
How to make a frame pool with your own hands:
- prepare the area: remove a 15-20 cm layer of soil, fill it with sand, compact it tightly;
- we make holes for the posts at the four corners of the reservoir, insert our supports (the entire part that will stand in the ground must be covered with resin);
- fill the free space with crushed stone;
- We align the posts, pull the cords to check the level;
- the remaining supports are placed along the cords, at the same distance (about a meter);
- we nail pre-processed horizontal boards;
- the racks need to be reinforced with spacers;
- We put PVC film inside (you can use an awning for trucks);
- A hair dryer is used to glue the film. Under the influence of high temperature, the film begins to melt and by going over it with a silicone roller you can glue the two parts of the film to each other;
- We fix the film on the outside.
The outer side can be covered with wood, covered with stain or varnish. Then your pool will be in no way inferior to expensive store-bought options.
Pool finishing
Another way to quickly create a wooden frame pond at a low cost is pallets. They are not difficult to purchase in warehouses. This option is similar to the previous one, the only difference is that the wall parts will already be ready.
Installation principle:
- dig a 30 cm deepening;
- fill the hole with fine gravel or sand to a depth of 15-20 cm, level it;
- We fasten the pallets together with nails, corners and anything else we can find;
- We drive wooden pegs around the structure, which will ensure the strength of the walls;
- fill the hole with concrete, wait several weeks for it to dry;
- cover the pool bowl with PVC film and secure it to the outer walls;
- decorate.
The dream of a pond in a summer cottage is not so fantastic. With a little effort and time, you can dive into your own pool after a hard day at work.
Preparatory work
Pool markings
- The selected area of land is thoroughly cleared of debris. The grass is being mowed, which will only interfere with the entire construction.
- The territory is marked in accordance with the selected project. If a rectangular and square shape is chosen, there are unlikely to be any difficulties, but if a polygonal pool is planned, you need to listen to some tips. So, if the structure is octagonal, then you can proceed in the following way. The central point of the selected territory is determined. A wooden peg or a piece of metal reinforcement is driven into it. Take a rope that does not stretch. A loop is made at one end that will move freely along the landmark. Its length should correspond to half the width of the future structure. Another element with a pointed end is attached to the second end, which can be used for drawing. A circle is drawn. Two perpendicular lines are drawn through the circle to divide it into 4 parts. Pegs are driven in at the points of contact with the circle. The distance between them is measured, it should be the same. Then 2 more perpendiculars are lowered to each of the drawn lines. Points are also marked with pegs. The distance between the pegs is measured again. Next, all the pegs are connected to each other using a rope or fishing line. Another method is to first mark a square on the site. Its side should be equal to the width of the entire structure. To make it even, it is necessary to clearly control the equivalence of the diagonals. A string is stretched between four pegs. Using a tape measure, each side is divided into 3 equal parts. Two more pegs are driven in. There are 4 marked points on one side. Next, the marks are connected to each other so that you get a square with beveled corners. The result is an octahedron with equal sides. Hexa and other polygons can be drawn in a similar way.
- It is necessary to dig a small pit inside the marked figure. If the structure is planned without deepening, then the excavation must be made at 40 cm. The bottom of the pit must be formed in such a way that there is a slope towards the middle. A hole is dug there to a depth of 20–30 cm with dimensions of 50×50 cm or more. It is filled with gravel and will serve as drainage (in order to speed up the removal of liquid that may overflow, you can lay a sewer pipe inside the drainage hole and lead it to the drainage receptacle). The entire plane is also covered with a 20 cm layer of gravel and compacted well. The remaining space is filled with sand and compacted using a manual or mechanical tamper.
- If the structure is planned with a large depth, then everything is done according to the instructions given above, but the depth of the pit will be the same as calculated by the design solution.
- At this stage it is also necessary to summarize the planned communications. If the water supply will come close to the structure, then you need to lay it in a trench. The depth of the trench should be below the freezing point of the ground level, so that frozen residual water does not rupture the pipes in winter. You can use metal, polypropylene or polyethylene materials. In the latter case, installation will be carried out quickly and without the need for soldering or welding. In the case when the entire structure is collapsible, then the liner can be made on top, and during cold periods simply drain all the liquid from the pipes.
In other options, the pool can be placed not on the ground itself, but on wooden panels. To do this, you need to knock them down from an edged board according to the shape of the future structure. This solution will allow you to create a ventilated bottom. This will prevent the development of various fungi due to exposure to moisture.
Determining the location
At the second stage, the location of future construction is determined. Experts advise adhering to a number of rules:
You need to make sure that there are no bushes or trees nearby. Such a neighborhood will not end well. The root system can destroy the sides, and falling leaves will force you to clean up several times more often. To quickly warm up the water, the site must be well heated by the sun.
It is important to provide protection from the wind. The ideal option for the foundation would be clay soil. It is a natural barrier to aquifers. Organizing the most simple and effective pool requires that all communications be located next to the pool.
Having made a decision, do not be lazy to schematically depict the structure on a sheet of paper. Indicate the main components - supply, drain, filter, lighting devices.
Beams. Longitudinal location
Next, according to the project, it is necessary to install beams on vertically located supports. This is the next step in building a deck around the pool.
Triple or double beams are installed according to the load. In the case where there is no more than 12 feet between adjacent beams located in one row, then double beams are installed, as in this project under consideration, where between each two nearest beams there is no more than ten feet.
The cross-section of the longitudinal beams can vary, ranging from 2x4 inches to 2x12 inches. This choice will depend on the number and distance between adjacent lines of longitudinal beams. It is best to use as few supports as possible; accordingly, there will also be fewer beam lines, and the distance between them will be greater. But then you won’t have to dig a lot of holes for supports, which are not so easy to build.
The fourth picture is a diagram of the beams. The dimensions of these items are 2 x 10 inches.
Figure 4. Beam diagram
We install waterproofing
When the concrete is completely dry, we waterproof the pool. Experts recommend insulating the entire surface.
Liquid rubber, PVC membrane, bitumen or roofing felt sheets that are laid overlapping can cope well with this. Due to the large area of the pool bowl, you should not forget about the costs, since waterproofing mixtures are not cheap.