- Construction and repair
- Do-it-yourself pool inside the bathhouse
30. 06. 2017
People who enthusiastically spend time in the bathhouse are not averse to throwing themselves into a cold snowdrift after visiting the steam room. However, such eccentricity is only possible in winter. But to the great relief of those who like to change the heat to the cold, the problem can be solved. To do this, you will need to build a small pool right in the bathhouse, which you can do yourself.
- 2 Construction and types of an indoor pool
2.1 Project gallery
Convenience and feasibility of a swimming pool in a bathhouse or sauna
They try to make the bathhouse multifunctional in all sorts of ways. Often, the owners of a room for water procedures have a desire to achieve special comfort from staying in it. Therefore, they decide to create special auxiliary sections in the bathhouse, allowing them to relax even better.
In many cases, bathhouse owners think about additional water procedures. It’s not for nothing that buildings where you can wash and take a steam bath were built next to the pond. This allowed, upon leaving the steam room, to immediately be in the cool water. Referring to ancient times, they began to make artificial reservoirs in the bathhouse.
The best solution is a small pond
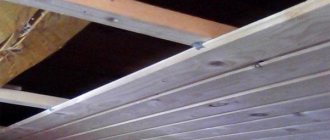
The main thing is that the dream of building a swimming pool in a bathhouse is not dashed by too small a building area. However, even this barrier can be destroyed if you decide to build a swimming pool on the site next to the bathhouse. If there are no obstacles to creating an artificial reservoir directly indoors, then you can safely get down to business. There is no need to be afraid of increased humidity due to the pool inside the bathhouse. A structure with water that will not come into contact with the walls will not spoil a wooden room.
Positioning relative to the floor surface
By and large, the entire variety of pools can be divided into two main types: in-ground and non-in-ground. Recessed structures require the installation of a “bed” - a recess relative to the floor level into which the pool bowl is installed. Non-buried pools are installed with their soles directly on the floor surface.
Here, it is necessary to note the following pattern. The greater the volume of water held in the pool bowl, the deeper it should be positioned relative to the surface level. What is good about the recessed design:
- Theoretically, the volume of water held in the bowl is limited by its strength, to a much lesser extent, since it is additionally supported by the mass surrounding it.
- These structures are easy to use, even for people with limited mobility, since the water's edge is below floor level.
- Such systems can be very well equipped, due to the fact that the equipment can also be placed in hidden cavities, channels and other communication systems. Without bringing them out.
- Finishing requires a significantly smaller area, since the outer part of the bowl is hidden to varying degrees under the surface.
Non-recessed structures are much easier to install, since they do not require a “bed”. This is especially convenient when the idea that it is worth organizing a pool with your own hands in a bathhouse came after the bathhouse was built and began to function. This quality negates dismantling work in the plane of the floor and excavation work below it.
A word from Experienced! It’s unlikely that you’ll be able to build a deep enough swimming pool in a sauna with your own hands. For example, if the height of the ceilings of the washing room does not exceed 2200 mm, then with a pool depth of even 1500 mm, the free space above the water level in practice will not exceed 500 mm. And this is negligible. These designs are good for outdoor use, especially in conditions of varying terrain. Then, to ensure a convenient approach to the water's edge, it is enough to organize a small podium, and in conditions of a steep fall you can do without it altogether. Obviously, a non-buried pool has a limitation on capacity, since it is determined by the load-bearing capacity and strength of the walls.
Design and types of indoor pool
The construction of an artificial reservoir in a bathhouse depends on the size of the planned room. If the area of the selected area allows, then it is recommended to create a separate room for the pool. When there is very little space, you should build a swimming pool in a washing bath. It is necessary to think through these details when designing and creating the foundation, since building a pool involves digging a large pit.
Before construction work, you should decide what kind of artificial reservoir is needed. Still, pools differ not only in size, but also in design.
There are 3 types of indoor pools:
- stationary - a durable and reliable option, because it is built on the basis of a reinforced concrete bowl in a previously dug deep hole;
- prefabricated - a mobile, easily dismantled structure that will appeal to those who need a pool from time to time;
- SPA is a hydromassage variation of a water tank used for certain procedures.
Project gallery
The pool is located next to the wash station
For convenience, the pool is equipped with sides
The edges of the concrete bowl are lined with beautiful stone
This structure is only suitable for a spacious bathhouse
The pond occupies almost the entire area of the room
This type of pool does not take up much space
All walls around the pool are tiled
Dim backlight is used for lighting
Order a ready-made project or make it yourself
Nowadays, various versions of ready-made standard projects are posted on the websites of construction companies. It is not difficult to find the right one among them. It is only recommended to make sure that there is a schematic drawing of the object with a detailed description of the materials required for its construction and calculations.
Unfortunately, such services are not very cheap (if you order only a project). If the company is engaged in turnkey construction, then all documentation comes as a gift. When constructing it yourself, you need to take into account that it will be extremely difficult for one person to erect the structure.
Drawing up drawings
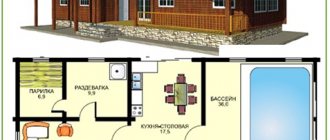
In a bathhouse 5.6 m wide and 12.2 m long, a pool can be built next to the relaxation room. It makes more sense to place the shower and steam room on the other side of the building.
An area of about 25 square meters has been allocated for the pool. meters
The design of a bathhouse with a swimming pool even includes a bathroom and a terrace.
The pool was built in a spacious separate room
When building a small bathhouse, the pool should be 3–4 meters wide.
The figure shows top and side views
Microclimate standards for different types of baths
Russian bath is a steam bath with a humidity level of up to 60-65% and a temperature of 45 to 70 °C, with a dressing room and a steam room.
Hot Russian bath - the temperature in the steam room can rise to 90 °C and above, and the humidity is maintained at up to 35%.
A Turkish bath or hammam is similar to Roman baths with ceramic finishing, has a soft microclimate, the highest steam content in the air - humidity up to 90-100% with temperatures up to 45 ° C. Usually this is a complex of rooms with different temperatures.
Finnish sauna is a sauna with high air heating (up to 100 °C and above) and not very high humidity - about 10%. Almost no steam in the air. It consists of a large dressing room for relaxation, a steam room and a shower.
You can also name Japanese water baths, Roman baths - these are national baths and are rare in our country. There are also special sports saunas that maintain extreme humidity. They are intended for training athletes.
The above indicators must be maintained regularly and are different for each type. You cannot get, for example, a Finnish sauna and not monitor the humidity level so that it reaches 40% - then it is no longer a Finnish sauna, but a place harmful to health. Many people wonder how to control the moisture content in the air? Maintaining the temperature is not a problem, but the humidity...
A special device has been created for this - an air dehumidifier with a built-in hygrometer, and only it can help regulate the moisture level. The hygrometer built into it will regularly measure moisture levels and signal the dehumidifier to either begin drying the air or stop working when the target is reached. The humidity level you need is set in the settings as optimal, and then the device independently controls the environment you need. This process will help you keep your bathhouse in proper condition. You just need to understand that the dehumidifier cannot be placed in the bathhouse itself, because the conditions are not at all intended for equipment! The dehumidifier is installed in the anteroom, near the exit from the steam room. You can read in more detail what a dehumidifier is.
Ventilation in a bathhouse is an essential aspect of any bathhouse, because it is the key to a healthy microclimate. Natural ventilation is most often arranged, but mechanical ventilation is absolutely necessary for the constant use of saunas or baths. But ventilation will not be able to fully optimize humidity levels. The use of ventilation and a dehumidifier will be an ideal tandem for a healthy microclimate in your “steam room”.
Any bath or sauna is a gift to our health! But if it shows signs of exposure to high humidity, wooden shelves and walls swell and collapse, wiring and metal parts rust, tiles become moldy and fall off, and the smell of dampness cannot be eliminated - this is a serious problem and must be dealt with decisively. There can be no talk of health in such a bathhouse. If you do not deal with dampness for a certain time, repairs will be required at significant costs.
What causes microclimate disturbances in the bathhouse?
Incorrect or unproductive ventilation in the bathhouse can lead to stagnant zones and accumulation of dampness, which allows the development of mold and mildew on the walls or on the wooden finishing of the bathhouse. An unprofessionally constructed bath structure, lack of waterproofing or insulation of the building’s foundation leads to cooling of the floors, the appearance of condensation and constant dampness. Mechanical ventilation did not work, the vents were closed, there was no air circulation - dampness and the ensuing “unhealthy” consequences were guaranteed to appear. Humidity level is not controlled during use and when the room is empty
It is important not only to monitor the moisture level, but also to constantly influence the optimal indicators. Without this, dampness will be a constant cause of problems.
How to remove dampness in a bathhouse
1.
Open all dampers and doors, ventilate all rooms of the bathhouse after use until completely dry. But this can be time-consuming and inconvenient if the bathhouse is used in winter, and is only suitable if it is used from time to time.
2.
Ventilation system. If there is forced ventilation, turn on the exhaust fan and ventilate the room to the desired hygrometer reading level. Check the cleanliness of ventilation ducts, remove debris and dust in places where fungus or mold may develop. Treat the channels with antiseptic agents.
The best way to spend time for your body and peace of mind in winter is in the steam room. But which one should you choose? How to set the temperature there correctly to really improve your health?
Selection of construction raw materials
First of all, you need to carefully select concrete to create the foundation of the pool inside the bathhouse. The water absorption coefficient of this construction raw material must be high, that is, it is best to use class W-8 concrete.
No less important requirements apply to the waterproofing of an artificial reservoir. Builders advise protecting the pool structure from water by covering it with polyvinyl chloride film - a quick and inexpensive option.
This material is a barrier to water that can seep into the concrete structure of the pool.
As a facing material for a pool, it is wiser to choose:
- porcelain tiles, since their absorbency is lower than that of ceramics, which are porous and can become covered with mold and bacteria;
- mosaic cast from glass, which makes it dense, waterproof and durable;
- polyvinyl chloride film, which is well suited for cladding, as it can be easily cleaned and does not deteriorate under the influence of natural and chemical phenomena.
Many of those who are planning to make a pool inside a bathhouse are inclined to choose tiles. In order to avoid mistakes when purchasing it, you should find out the water absorption coefficient of this material. If it is no more than 3%, then there is nothing to worry about and you can safely purchase construction raw materials.
Plastering walls
As soon as everything is dry, it is necessary to plaster the surface with cement-sand mortar. Its thickness should be 2–3 cm. Since this concerns a pool where water will constantly be present, it is better to use waterproof compounds with latex. Then the plaster will hold strong and for a long time, and thanks to the additives it will be much more elastic and gain better water resistance.
An important step is waterproofing, since we are talking about water. The most economical and fastest option is to use PVC film. It covers the entire surface of the pool bowl. A more expensive and reliable option would be when the inside of the concrete bowl is covered with a special waterproofing material. This could be “Osmosil”, which needs to be applied in two layers to a pre-moistened surface. After which the final layer will be a special adhesive composition, which includes latex. This glue can even hold glass.
Materials and tools
To build a swimming pool in a bathhouse, you need the following materials:
- liquid concrete;
- small pegs;
- metal fittings;
- tiles and other coverings for finishing the object;
- tile adhesive;
- wooden boards (to create railings);
- sifted sand and stones;
- block (it is convenient for them to compact the layers of backfilling of the pit);
- waterproofing film;
- pipes.
The volumes of materials depend on the dimensions of the pool. For example, for an artificial reservoir of standard size (4.9 * 2.9 m), 8.09 m³ of concrete and 28.4 m² of facing material are sufficient.
When building an artificial reservoir indoors, the following tools and fasteners will be useful:
- roulette;
- rope;
- steel wire;
- shovel;
- shut-off valve;
- self-tapping screws
Construction of a stationary brick version
Another good option is to build a permanent pool made of brick. To do this you will need:
- Solid red ceramic brick;
- Coarse, sifted sand;
- Crushed stone;
- Gravel;
- Ribbed reinforcement with a diameter of 1.5 cm;
- Concrete grade M400;
- Geotextile membrane;
- Water-repellent additive for mortar;
- Liquid glass;
- Antiseptic substance;
- Primer;
- Some more materials that will be discussed further.
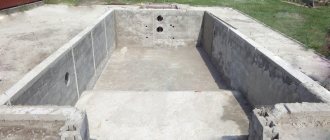
Excavation
The excavation work is identical to that carried out during the construction of a reinforced concrete bowl for a stationary pool:
- We mark the territory and dig a pit 40-50 cm deep than the expected depth of the bowl. Next, a drain pipe is installed, the soil is compacted tightly at a slight angle towards the drain
- A layer of geotextile is laid. On top of it is a twenty-centimeter layer of crushed stone. If the groundwater is close to the base of the pool, then it is worth securing drainage pipes along the edges of the pit. We compact it.
- Pour a layer of sand (10 cm), moisten it with a small amount of water and compact it tightly.
Concreting
- A layer (10 cm) of waterproofing membrane is laid on top with an overlap. We seal the seams with construction tape, the edges should slightly overlap the walls.
- We create a reinforcement belt in increments of several centimeters. The result should be a reinforced mesh with cells of 4-5 square centimeters.
- Pouring concrete mortar. Let it dry for two weeks.
- When constructing brickwork, each row must be sealed with a metal mesh (five millimeters). At this step, water pipes are installed.
Waterproofing and finishing works
We plaster the walls with a latex-based solution. Apply a layer of primer and then an antiseptic. We attach the painting mesh and repeat the process. We install additional elements (injectors, drain, etc.). We paint the walls with rubber paint for greater insulation from moisture. We carry out interior finishing work (it is best to use glass mosaics, as unevenness and other wall defects can be easily eliminated). We carry out external waterproofing. We use a water-repellent mixture. We insulate the walls of the pool from the outside. We use polystyrene foam blocks
Pay attention to the density of the insulation - it should be 40 or more kilograms per square meter. We glue the resulting gaps with construction tape or use a water-repellent solution
We fill the space between the walls of the pool and the soil. A mixture of sand and gravel is best suited for this purpose.
Recommendations for use
To use the pool in the bathhouse comfortably, it is recommended to do the following:
- Before filling the pool with water, treat the lined walls and bottom with an antiseptic composition against fungi;
- fill the concrete bowl with tap water, not river water, which does not pass through special filters;
- do not use hard water for the pool, as it can cause limescale to form on the walls of the pool;
- periodically check the pH level, which should be in the range from 7.2 to 7.6, and remove silt and algae from the water;
- use long-term chlorine or a coagulant in granules to destroy bacteria in water;
- create lighting in the pool so that the bottom does not seem dark.
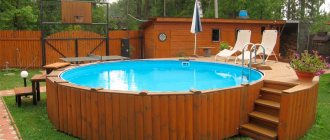
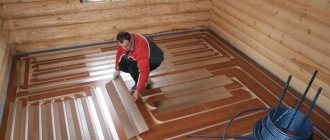
Above ground hot tub with plastic bowl
For such a bowl you don’t even need to rebuild the rim
The easiest way to make a pool is to purchase a plastic bowl and place it at floor level. Then only the supply and discharge pipes will be under the floor, and all other appliances can be placed in the basement. Minimum excavation work, no risk to the foundation, no costs for waterproofing and no complex calculations. From the purchases: the bowl itself, facing panels (you can use the remains of the lining), water pipes made of cross-linked polyethylene or polypropylene, connectors for them, as well as additional devices: pump, filtration system, water heater, skimmer and pressure gauge. You can monitor the quality of water yourself, without automation.
Complex tools are also not needed. A standard gardener's kit will be enough: a jigsaw for trimming the front panels, a mallet for fitting them, the simplest soldering iron for assembling pipes, a sensor, a utility knife and a screwdriver for installing the electrical part of the system.
Those who want to have a built-in automated pool will have to look into excavation robots.
If you are planning to equip your first pool, you will not be able to provide for all the nuances. Therefore, it is best to use ready-made projects, which indicate all the necessary pipes, leads and components. Examples of projects are attached to the article. You can change the parameters of the bowl as you wish. But in no case should you reduce the power of filters or pumps without a reason, otherwise the system will not be able to cope with the load.
Video “How to build an indoor pool”
To create a full-fledged pool in the bathhouse, there must be certain conditions. However, despite the difficulties, the dream of swimming in a pond immediately after visiting the steam room is feasible. To do this, you need to carefully consider the recommendations for constructing a pool and do not forget to care for it, resorting to chlorination procedures and mechanical cleaning of the reservoir.
- Author: Ksenia Zubkova
I am a philologist by training and have been writing texts for more than 5 years. Rate this article:
- 5
- 4
- 3
- 2
- 1
(0 votes, average: 0 out of 5)
Share with your friends!
Peculiarities
Regardless of the design of any pool, not every steam room can accommodate one.
The main task when preparing a bathhouse for placing a swimming pool is waterproofing the wiring, walls and ceiling. You can’t just take it and put it in a ready-made steam room. Therefore, it is better to take it into account at the planning stage, otherwise adaptation to the premises will cost much more money. Given the large volumes of water, the water supply system must also be fully prepared for the installation of a swimming pool. A regular foundation drain (which can be done in a small shower) will not work. Here you need a full-fledged drain and it must be equipped according to standard sewerage rules. True, there are cases when the sewer system cannot cope with huge volumes of water.
The building is designed taking into account the location of the pool - on the street, under the same roof with a steam room, or in another room.
Another important issue is the placement of utility networks. These include ventilation, water filters, lighting, and drainage systems.
Waterproofing
In many ways, the choice of waterproofing type depends on the individual idea of the pool. If tiles are used as a finishing material, then it is advisable to provide liquid waterproofing of the bottom and walls. Only after this can you begin laying tiles on a hydrophobic composition.
It should be remembered that ceramic tiles cannot be used for such a tank, since they have a porous structure: they not only absorb water well, but are also an excellent environment for the formation of fungi and mold. You need to purchase porcelain tiles, which, of course, are more expensive, but more reliable. As an alternative, you can consider glass mosaic tiles.
If PVC film is used for finishing, additional waterproofing is not needed. If desired, you can treat once with a penetrating liquid composition. When choosing such a finishing material, preference should be given to more durable types - at least 3 millimeters thick.
To prevent slipping in the pool, you need to choose a rough film rather than a smooth one. You can choose any colors: plain, with a pattern, the effect of stone chips or mosaics and others.
Inhalation of salt vapors
A salt bath will give you a huge dose of health. This is a room in which one or more walls are decorated with Himalayan salt. When heated, the substance releases healing steam with a high content of trace elements necessary for the human body.
If it is not possible to visit a special bathhouse, you can prepare a solution and pour it over the heater. To do this you need to take:
- any salt - 1-2 tbsp. l.;
- warm water – 1 l.
Pour salt into a jar, pour water and stir. The solution is ready. Arriving at the bathhouse, periodically water the heater with the solution. That's all, let's enjoy the life-giving vapors.
An anecdote on the topic: I was looking for salt and found cognac! Screw salt, I'm looking for lemon!
The salt bath will pleasantly surprise you! As usual, everything ingenious is simple! Dear ladies, be sure to use this healing product to feel like a true queen always and everywhere!
That's all. Don't forget to subscribe to news and recommend information to friends. Bye!
Wisdom quote: Without salt, you can’t live without will (folk proverb).
Preparing for construction
Having decided on the model of the pool, you need to calculate its dimensions. If a recessed option is chosen, then a circular bypass path with a width of at least 0.9 meters will be required. When choosing the size of the pool bowl, you need to start from the size of the average person and the purpose of the bath: a bathtub for dipping an adult man should have a size of 2.2x2 m and a depth of 1.5 m. A swimming pool should be at least 5–6 meters long. That is, if the size of the pool is defined as 2.4 meters wide, 8 meters long, then the size of the room will be at least 4.4x10 m.
A floor-level pool or spa pool with hydromassage does not require a bypass path and therefore takes up less space. However, in the interior, a bathtub located in the center of the room always looks better.
The foundation of the pool should not be in contact with the foundation of the building, which can also affect the size of the bathtub.
When developing a project, it is necessary to complete:
- calculations of loads on the bowl;
- technological scheme of water purification;
- diagrams of location and connection of communications;
- calculations of material requirements.
Equipment diagram and operating principle of the overflow pool
If the pool communications are connected to public networks (power supply, water supply, sewerage), the project will require approval of the project by the relevant authorities.
If the developer does not have special knowledge, it is better to entrust the development of the project to a company specializing in pool design. Yes, it will cost money, but there will be no doubt about the safe and comfortable use of the pool.
Selection of materials for construction
The choice of materials greatly influences the cost of the entire structure. The main requirement for materials for building a swimming pool is low water absorption. The bowl can be made from the following materials:
- monolithic hydraulic concrete with reinforcement;
- metal;
- bricks with reinforcement;
- plastic.
Monolithic hydraulic concrete is the most common type of bowl; it is reliable and durable. The disadvantages include the complexity of the structure, the slow maturation of concrete (a month), and the busy nature of the structure.
A concrete pool bowl is the most reliable and durable option
A metal bowl requires professional execution and equipment for high-quality welding of seams, but this method significantly reduces the time required to complete the work.
A metal bowl will significantly reduce the construction time of a pool
A bowl, constructed from selected well-fired solid plastic molded bricks with reinforcement, is also a fairly reliable option. The disadvantage is the difficulty of finding suitable bricks and the busyness of the design.
Construction of a brick pool bowl is a long and labor-intensive process.
A ready-made plastic pool bath is the most budget-friendly option: it is easy to install, does not require design calculations or additional waterproofing and finishing, and is often sold complete with the required equipment.
The plastic bowl is easy to install and does not require calculations or additional waterproofing
Waterproofing the bowl
In order to prevent the pool bowl from leaking, it is necessary to perform enhanced waterproofing of the walls and bottom. Today, the building materials market is filled with offers of various materials. Let’s make a reservation right away: in order for our pool to serve for a long time, there is no need to try to use materials with a short service life, such as polyethylene, roofing felt, roofing felt, glassine.
To waterproof the bowl we use:
- adhesive waterproofing - rolled materials and membranes laid in 2-3 layers depending on the technical characteristics;
- coating waterproofing made from compositions based on dry construction mixtures, which is also applied in 2–3 layers;
- special PVC film, which is also a finishing material.
Waterproofing, carried out in accordance with the manufacturer's instructions, will allow the pool to remain waterproof for many years.
Pool bowl finishing
To finish the bowl, we also choose materials with low water absorption:
- special tiles for swimming pools;
- mosaic;
- PVC film.
Tiles and mosaics for swimming pools have almost zero water absorption, which guarantees the hygiene of the coating - mold and algae will not appear on it. Manufacturers take into account the specifics of surfaces, so collections of such tiles contain a sufficient number of additional corner elements with a rounded profile - this allows you to avoid accidental injuries.
You can also choose a panel with images on a marine theme: fish, dolphins, starfish, ships, and so on, which will certainly decorate any pool.
Mosaic with a marine theme looks impressive
Attention: tile adhesive and joint grout must also be hygroscopic.
The most economical option for finishing a bowl is PVC film. This is a four-layer material with excellent waterproofing characteristics, strong and durable, allowing the use of detergents. The film is produced with a smooth and rough surface.
When purchasing, ask for installation instructions and a certificate of conformity: all materials must be intended for use in swimming pools.
Video: finishing the pool with PVC film
Determining the quantity of materials
The need for material is determined by the dimensions of the selected pool in accordance with the drawings.
The drawing indicates the main dimensions and layer-by-layer composition of the structure
Knowing the dimensions of the pool, it is not difficult to multiply the length by the thickness and height of each element. Using this pool as an example, we calculate the required volume of concrete, the pool width is 2.4 m in the clear, the wall thickness is 0.3 m:
- concrete preparation under the bottom: 9.4 x 0.1 x 3 = 2.82 m3; concrete B 7.5 is used;
- monolithic concrete bottom slab made of hydraulic concrete B 25: 7.6 x 3 x 0.35 = 7.98 m3;
- side surfaces of the bowl (concrete B 25): (7.6 + 3) x 2 x 1.55 x 0.3 = 9.86 m3;
- technical room (concrete B 25): (1.5 x 3 x 2 + 3 x 1.45 + 1.5 x 1.45 x 2) x 0.25 = 4.43 m3;
- steps (B25 concrete) 1.5 x 1.5: 2 x 0.7 = 0.79 m3.
In total, to build a pool bowl you will need (rounded up) 3 m3 of grade B 7.5 concrete and 23.1 m3 of hydraulic concrete grade B 25.
For reinforcement, you will need ribbed reinforcement Ø12, connected with wire into a mesh with a cell of 100x100 mm.
For floor screed, the need for cement is determined as follows: the required volume of cement-sand mortar with a composition of 1:2, where one is the volume of cement, and two is the volume of fine sand, is 7 x 2.4 x 0.02: 2 = 0, 3 m3, of which cement - 0.1 m3 or 100 liters. Water should be from 80 to 95%, that is, at least 80 liters. To prepare this amount of cement-sand mortar M 200, you need:
- water - 80 liters;
- cement M 400 (500) – 160 kg;
- sand - 320 kg;
- plasticizer, regular liquid soap or dishwashing detergent.
Waterproofing from groundwater is carried out with geotextiles laid on soil compacted with crushed stone. The material consumption will be 75 m2, taking into account the overlap of the seams.
For waterproofing the bottom, roll materials are used, for example, a built-up waterproofing material of the KhPP-2.0 brand. It will be required for 9.4 x 7.6 = 71.44 m2 of area. With a roll size of 10x1 m, an overlap of 0.15 m and laying in 2 layers, 20 rolls of material will be required.
To waterproof the bowl, it is easier to use coating materials, such as Ceresit or Penetron. According to the manufacturer, the consumption of the Penetron material is about 1 kg per 1 m2 of surface; to prepare a waterproofing solution, take 1 part water to 2 parts dry mixture. For two-layer waterproofing of a pool bowl with an area of (7 + 2.4) x 2 x 1.55 + 7 x 2.4 = 46 m2 (rounded), 46 kg of dry mixture and 92 liters of water will be required. With large unevenness, potholes and cracks in the surface of the bowl, the flow rate will increase.
To waterproof the pool bowl, special products are used, for example, “Penetron”
You will also need finishing material - special tiles or mosaics for a pool with an area of 72 m2, including lining the bypass paths. When purchasing tiles, be sure to purchase a waterproof tile adhesive.
Required Tools
To complete the work you will need the following tools:
- building level;
- roulette;
- measuring tape;
- trowel;
- tamping;
- equipment for digging a pit;
- concrete mixer;
- vibrating hammer.
Scrubbing
Salt is perfect for scrubbing. It is especially good in combination with honey, which has a protective, moisturizing, anti-inflammatory, nourishing, rejuvenating and anti-cellulite effect.
Honey sweetness
To prepare a simple but incredibly effective scrub, you need to stock up on:
- medium or coarse salt – 2–4 tbsp. l.;
- homemade honey - ½ tbsp.;
- cinnamon essential oil – 3 drops.
Place all the ingredients in a container, mix and fill a jar or plastic container with the mixture.
We come to the bathhouse, take a steam bath, and whip ourselves with a broom. We leave the steam room and rub the skin with a viscous mass, wait 5 minutes, rinse off. Apply a nourishing mask and cream.
A scrub made from honey and salt fights cellulite and excess weight. It also has softening, exfoliating, cleansing, nourishing, restorative, and protective properties.
Coffee vivacity
To prepare the scrub you will need:
- sea, table or Himalayan salt - 3 tbsp. l.;
- ground coffee – 3 tbsp. l.;
- honey – 3 tbsp. l.
Place all the ingredients in a container, mix and fill the jar with the mixture.
After leaving the steam room, we wipe the body and apply the scrub with light movements. We massage for 3-5 minutes and wash off the mass. Then we cover the skin with a nourishing cream.
This scrub tones, invigorates, calms inflammatory processes, effectively fights “orange peel”, makes the skin soft, soft and smooth.
Oily bliss
To prepare an effective remedy, you need to arm yourself with:
- salt – 3 tbsp. l.;
- honey - 3 tbsp. l.;
- olive oil – 1 tbsp. l.;
- burdock oil - 1 tbsp. l.;
- castor oil – 1 tbsp. l.;
- linseed oil 1 tbsp. l.;
- ginger essential oil – 1 drop;
- cinnamon essential oil – 1 drop.
Place all the ingredients in a container, beat the mixture until creamy, and fill the plastic container.
Apply the substance to the steamed body, rub with light massage movements, wait 5 minutes and rinse.