Every summer resident dreams of having his own swimming pool, which will allow him to relieve fatigue after a working day, keep his body in good physical shape, recharge with positive energy and simply refresh himself on a hot summer day. Many consider such a structure an unaffordable luxury, however, if you want to build a concrete pool with your own hands, it will be inexpensive. To do this, you will need certain skills, knowledge of technology and the availability of the necessary construction tools.
Today there are quite a lot of building materials that allow you to create a concrete pool at minimal financial cost. These economical options will be discussed.
Briefly about construction
The process of constructing concrete block pools is not very simple as some people think. Some choose concrete rings as walls, but this also does not simplify the task. This is due to the following features of this work:
- It is very important to properly ensure that the pool bowl does not come into contact with groundwater. Their constant exposure can negatively affect the condition of the material. In addition, in some cases they may contain unfavorable substances.
- The pool bowl must also be well sealed from the inside. Water may not have a very good effect on the condition of the blocks.
- The masonry must withstand a significant volume of water. It is worth understanding that 1 cubic meter is one ton. The average pool holds about 15 cubic meters of liquid.
IMPORTANT! There should not be any weak points in the walls, since it is in such parts that the first cracks often occur, which over time leads to leakage of the entire bowl.
Thus, building a pool from blocks with your own hands is not a very simple task. Despite this, the result is worth some hard work.
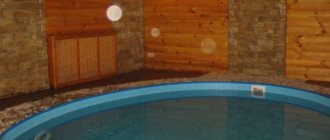
Wood-fired sauna with pool
Why is a wood-burning bathhouse so popular now? After all, you can heat with other fuel... Check out the benefits of a wood-burning sauna:
- You don't have to save money;
- A wood stove heats stones faster;
- This is an environmentally friendly fuel.
Having built a turnkey sauna from a log with his own hands, the owner “risks” giving himself and his loved ones an unforgettable experience from the smell of natural wood and a luxurious feeling of comfort from thoroughly warming up the body in the steam of the sauna.
And if, after warming up in the bathhouse, you have the opportunity to immediately move into a cool pool with a large volume of water and enjoy swimming, then you can significantly strengthen yourself and improve your health. A house that has a bathhouse with a swimming pool and a large billiard table in one of the rooms will become warm and hospitable for a large family or a group of loved ones.
Of course, a sauna with a swimming pool will be an excellent opportunity to relax at the dacha or in a country house.
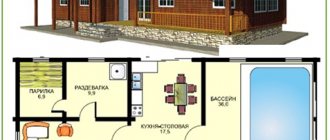
Design
First of all, before you start building a pool, you should develop an appropriate plan. It will allow you to theoretically evaluate the possibility of constructing a given architectural object, as well as preliminary calculate the estimate for this process. If you don’t have at least an approximate diagram, you shouldn’t start taking any action to implement the idea.
The following details should be considered:
- It is necessary to determine how many people will use the pool at the same time.
- You need to think about the overall dimensions of the future object: width, depth and length. It is also worth determining the shape of the bowl. It is believed that the most optimal area is between 25 and 40 square meters. In this case, the depth should be from 1.5 to 2 meters.
- The thickness of the bottom and walls should also be thought out in advance. It should be influenced by the types of soil, the depth of groundwater, the depth of the structure, etc. The worse the soil quality, the more significant the walls should be. This also applies to the base - the deeper the bowl, the more reliable it should be.
Pool design in 3D - A communication scheme should also be developed. It must indicate the sewer system, the location of all filters used, the skimmer, stairs for entry and exit, as well as lighting, if provided.
- Special attention should be paid to methods of emergency and planned water discharge.
As soon as all the above nuances are thought out in the plan, you can immediately begin to carry out the work.
Planning
When designing a house, it is better to immediately take into account the presence of a swimming pool on the site. The arrangement of the entire local area depends on this. After all, you will need to calculate how much space the bathing container, seating area, and seating will take up.
In order to take everything into account, it is better to draw up a diagram, where it will be indicated what will be located where.
To calculate the volume of the pool, you need to take into account the number of people living in the house, and also decide for what purpose the pool is needed. It’s one thing when you just need to cool down in the heat, and quite another if you want to have a full swim.
Typically, the depth standards for a container on a site are 1.5-1.8 m. The width and length can range from 3 to 5 meters. But these figures are conditional, since when developing a project, you will have to take into account the available area and the need for other components of landscaping the local area. Some people only need a swimming pool, and a fancy one at that, while others, in addition to the tank, need a garden with fruit trees, flower beds and lawns for swimming. It is worth deciding on the preferences of all family members.
It often happens that the construction of a swimming pool has to begin when a house and other buildings already exist. In this case, you need to look for a suitable site, clear it, and perhaps move some objects to another place.
If you decide to install a pool at home, it is advisable to do it on the ground floor. And in this case, you should definitely think about its arrangement even at the stage of installing the foundation of the building.
If there is an idea to build a pool on other floors, you will need the help of specialists who will accurately calculate whether the building can withstand such a load.
Pit preparation
Before starting work on digging a pit, it is worth clearing the area of any existing vegetation. First of all, this applies to a variety of shrubs and trees, if available.
Preparing a pit manually with the help of human resources and appropriate equipment in the form of a shovel is advisable only in cases where the pool is quite small.
If the thicket of such a structure is large enough, it is best to resort to the help of an excavator. Renting this equipment often costs as much as hiring a team of workers. That is why there will be no additional expenses in this case.
It is worth noting that the dimensions of the pit should be slightly larger than the dimensions of the pool bowl . This is due to the fact that various equipment, formwork and cushions must be placed in the additional space.
IMPORTANT! To prevent the earth from collapsing from the walls of the pit, experts advise digging at a certain small angle to the vertical.
Selecting a location
The construction of the swimming pools with your own hands, shown in the photo, begins with the selection of the ideal place for their placement . Be sure to take into account the following points:
It would be great if the chosen location consists of clay soil, which, in the event of a waterproofing failure, can stop water leakage.
- The site should have a natural slope of the soil. In this case, it will be easier to carry out the work of digging a pit and you can immediately decide where it is better to install the drainage system.
- Tall trees should not grow near the future pool, the root system of which can sense the moisture nearby and begin to reach towards the walls of the structure. As a result, the waterproofing can be easily damaged. The greatest danger is posed by trees such as poplar, willow, and chestnut. Therefore, if trees grow in the chosen location, they should be eliminated in advance so as not to subsequently restore the damaged structure.
- It is undesirable for low-growing trees to grow in the selected area, the leaves of which will constantly fall into the bowl, and during flowering, the pollen that gets into the water will turn it yellow.
- You should pay attention to which direction the wind blows in your summer cottage. The pool should be placed in such a way that air movement is along the bowl. In this case, debris and dirt will begin to stick to one side, along the edges of which the drain system should be installed.
- Construction of a pool on a site with your own hands should be carried out closer to the water supply to facilitate its filling.
Preparing the base
It is worth constructing a cushion under the pool because in this case concreting will be much easier. In addition, such a base allows you to extend the life of the object. The backfill under the pool bowl should be made of sand and crushed stone. This mixture must be spread evenly along the bottom of the pit and compacted thoroughly. Its height should be between 25 and 35 centimeters.
To waterproof the bottom, you can use polyvinyl chloride (PVC), bitumen or roofing felt. These materials are lined in one or several layers. Be sure to lay them with an overlap of at least 15 centimeters. The edges of the materials need to be placed on the walls of the pit.
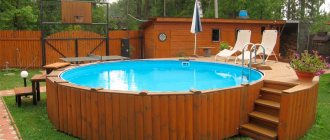
How to build a swimming pool at your dacha with your own hands
Building a pool with the help of professionals is quite expensive, and that is why many people decide to build a pool in their country house with their own hands. The pool, in addition to aesthetic satisfaction, brings other benefits. You will always have settled, warm water for watering plants (unless there are added chemicals in the water), children will forget about gadgets and focus on improving their body health, and much more.
All that remains for you is to choose the most suitable model of a stationary pool and start creating it. But you shouldn’t rush, but rather evaluate all the nuances of the land plot and the needs of all family members.
Swimming pool at the dacha
How to choose the right place to install a swimming pool?
Once your pool is built, you will need to continually maintain and maintain it. Therefore, already when creating a construction plan, pay special attention to the following features, which can also be found in the thematic video below.
- Clay soil is most favorable for building a swimming pool. If a water leak suddenly occurs, such soil will not allow it to spread far.
- Use a location where the slope of the landscape is natural. This will allow you not to worry about choosing a place to install the drainage system. In addition, this situation greatly simplifies the creation of the pit itself.
- Avoid trees. Such plants have a strong root system. And when they sense water nearby, they will grow in its direction. The result of this may be breakdown and failure of the entire structure. The most active are poplar, chestnut, and willow. So it’s better to remove them or choose a place as far away from them as possible. Another disadvantage will be leaves in the water or pollen, which will have to be constantly removed. The work of cutting down trees will not hit your wallet as much as renovating a swimming pool.
- Placement relative to the wind. The wind should generally blow along the bowl of the pool. Take a closer look at which direction the wind most often blows in your area. In this position, particles of debris and dirt will be along one wall. This is where the drainage system should best be installed.
- Having a plumbing system as close to the structure as possible.
Planning calculations
Anyone can make a swimming pool at their dacha on their own , but before that you need to choose the right shape that will best fit into the landscape of the site and make calculations. Its size and shape depend on the purpose of the pool.
The rectangular and elongated shape is ideal for swimming. The round bowl is practical for adults and children to relax and splash.
A separate issue is the depth of the reservoir. One and a half meters of depth is considered enough for full swimming and jumping from the edge of the pool. If you plan to jump from springboards, then choose a depth of at least 2.3 m. To achieve maximum effect, you can make a smooth transition between different depths. You should not make a sudden transition, because it is unsafe.
Choosing a pool bowl - buy or make it yourself?
For those who decide to build a pool with their own hands , the most difficult stage will be making a pit and filling the bowl. The bowl itself can be bought in any color and shape. After purchasing it, you just need to bury it in a ready-made pit. Finished bowls are made from different materials.
Plastic
Polypropylene is the main component. Advantages: resists fading, can survive the winter with water, is environmentally friendly, has high resistance to mechanical influences. Thanks to its smoothness, there will be no sediment or other deposits on the walls.
Not recommended for use where there is constant sun. When exposed to heat, the bowl moves in waves due to the expansion of the material. When the temperature drops, the walls move back.
Plastic pool bowl
Composite
The base component is fiberglass. The binding material is polymer resins. The difference from the first option is the high cost. Such bowls do not expand at high temperatures.
You can also make a pool bowl yourself from scrap materials. This option has its advantages:
- the cheapest option;
- perfect fit of shape and size;
- no need to transport (large ready-made bowls are problematic to transport).
Composite pool bowl
Most often, concrete is used to create bowls at home. It's easy to buy and easy to use. All you need is concrete, sand and water. Making a full-fledged bowl takes a lot of time and money, so designs with a concrete bottom and walls made of another material have now become popular:
- blocks of expanded polystyrene (significantly insulate the entire pool);
- sheets of steel (ensure quick installation due to being fully equipped with the necessary fasteners).
Pool construction (finished bowl)
To install the finished bowl, you must follow the instructions below. It describes the process of creating a swimming pool at the dacha with your own hands from polypropylene or composite .
Marking the area for the pit:
You need to hammer in pegs that will mark the corners of the bowl. Tie the pegs with rope and get straight edges. If the shape is unusual, then you need to use more stakes to detail the pit.
Marking the pit
Then you should make outlines around the entire perimeter. To do this, you need to step back one meter from the stretched edges. According to the marking, you need to cut off the soil and drive in another row of pegs. You need to dig a pit starting from this marking.
Excavation stage:
- the depth of the pit should exceed the depth of the bowl by half a meter;
- pour a 20-centimeter ball of sand onto the bottom and compact it well;
- put a metal mesh on top (will make the foundation more durable);
- pour a concrete solution 25 centimeters thick;
- Allow the foundation to harden completely.
Warming stage:
- lay geotextiles over the concrete;
- lay polystyrene foam blocks 3 cm thick on top in order to insulate the bottom from the cold in winter;
- cover the blocks with durable and thick film;
- Before installation, it is necessary to carry out insulation work on the bowl itself (expanded polystyrene blocks and polyethylene are also used).
Installation work and connection of all systems:
- installation of the finished bowl on the prepared foundation;
- connect the necessary systems;
- we “shoe” the pipes into protective sleeves (you can use tape for fixation - this way they will remain in place when pouring concrete).
Installation on the ground
Hydraulic structures should be laid during the preparation of the pit. In order for the drainage of water to be optimal, a slope should be made at a level of 4 to 8 percent, that is, about 2-4 centimeters per meter of bottom. It should be directed in the direction in which the drain will be installed.
IMPORTANT! Before installing the base, it is worth equipping all sewerage systems that would allow water to be drained from the pool. Also in the additional reception area you can place pumps, filters and other equipment.
The drainage hole must be below the water level. In this case, all the water, if necessary, can completely leave the pool bowl.
Plastic liner lined with brick
Here the situation is simple. Buy a plastic liner for the pool. They are inexpensive and come in different sizes and shapes.
Even when purchasing, consider how the water will be drained - from below, through the bottom drain, from the sides, through nozzles, or over the edge - with a skimmer. Lay pipes according to the type of water drainage when preparing the foundation for the pool.
Installation on the ground
After you have brought the bowl to the site, prepare a flat area for it. It will be necessary to remove the fertile layer of soil with vegetation and make bedding according to all the rules - as described above.
A plastic liner lined with brick is an excellent option for a pool or bathhouse and more
When draining water from the pool at the bottom, it is advisable to make a pit where the pipe should be led out. Equipment can also be located here - pump, filter, etc. With a screamer and a side drain, the pump will in any case be below the water level, so everything is organized more simply here.
Sometimes the liner is placed directly on the sand, sometimes a podium is laid out from the same brick, and the bowl is placed on it. It all depends on the type of soil. If they are not heaving, then you can put them on sand, but on clay and loam soils you will have to make at least some kind of foundation.
If you want, you can lay polystyrene foam under the brick (or on it) - there is no such thing as excess thermal insulation. You can also cover the sides of the bowl with this material, and only then cover it with brick. Great thickness is not needed - 3-5 cm is enough.
Another option for a brick-plastic pool
The waterproofing and rigidity of the walls is ensured by the liner, so there are no special requirements for the masonry and its finishing. Do as you please.
Recessed installation
The liner can be partially buried in the ground. With this option, only the depth of the pit changes. After installing the bowl (with or without thermal insulation - decide for yourself), you will need to fill the gap between the wall of the pool and the pit. This can be previously removed soil, gravel or sand.
Gravel and sand are an option for heaving soil, excavated soil is an option for normal soil. You compact the backfill and begin to cover the protruding part with bricks. Actually, that's all - finishing work remains.
Concreting the bottom and installing a base on it
To prepare the solution for concreting the day, cement is used, the grade of which is not lower than M400. A pure sand-cement mixture should not be used, since certain additives and additional water-repellent substances must be added to it, which will allow the material to withstand aggressive and quite difficult operating conditions in the future.
When preparing the solution, it is necessary to use less water than usual. The result is a semi-dry mixture. Its main advantage is that the ripening period is significantly reduced. Often it is only 7-10 days instead of 28 days.
Water-repellent concrete can be made either using a concrete mixer at home or ordered from the appropriate enterprise. But in the first case, the work must be carried out together, since in no case should premature setting of the components be allowed.
Depending on the additive, after filling you need to wait from 4 to 10 days . As soon as the concrete reaches the required characteristics, the construction of walls can begin.
Option one - monolithic pool
First you need to finally decide on the geometry of the future reservoir. It should be noted right away that the larger the size of the reservoir, the greater the material costs will be. The minimum depth of the pool is 1.5 meters, otherwise it will be uncomfortable for an adult to swim. The walls and bottom will “steal” approximately 50 cm of the thickness of the bowl. This must be immediately provided for by making the pit a little deeper, longer, wider.
STEP 1: design. Before digging a pit, you need to develop a design for water supply and drainage systems so that the reservoir can function normally. It is possible to develop a pit only after the final determination of the location for the location of highways (filling, drainage). To prevent the foundation pit from collapsing, it is recommended to make walls with a slight slope (5° is enough).
STEP 2: filling the bottom, tamping waterproofing. To proceed to arranging the drainage cushion, the bottom is covered with a fifteen-centimeter layer of sand and a fifteen-centimeter layer of crushed stone. After falling asleep, the pillow is compacted and roofing material is spread over it, which serves as excellent waterproofing. To improve waterproofing properties, it is better to lay roofing felt in two layers so that its edges touch the walls (20 cm on each side).
STEP 3: reinforcement. Before pouring the bottom surface, a metal frame must be created. When arranging the latter, class A3 fittings are used. The rods are connected with wire. The use of welding in this case is prohibited, since traces of corrosion will appear in the weld areas over time. The interval between the rods is 10-50 cm (horizontal direction), 20-30 cm (vertical direction). The horizontal frame is best laid on small stones (average diameter 3-5 cm). It is important that the frame is located as close as possible to the center of the concrete screed. For a more reliable connection of vertical and horizontal rods, the latter need to be bent around the perimeter of the bottom.
STEP 4: Filling the bowl. At this stage, the concrete bowl of the pool is poured. It is clear that it is better to fill the walls and bottom in one go. This approach will give the structure maximum tightness and strength. In practice, this is extremely rare, so the bottom is filled first, then the walls. In this case, it is advisable to provide a slight slope (2-3o) for drainage, i.e. There is no need to make the bottom absolutely flat. You can use a pipe located at the bottom of the wall as a drain.
Important: in order to provide the bottom with high strength, it is recommended to use special vibration installations when pouring the solution, which allows for better compaction of the mixture. After this, the solution should harden and stand for 7-10 days. If the construction of a pool is carried out in the hot summer, it is recommended to wet the concrete with water daily. This will prevent cracking of the structure.
In order not to waste the precious time needed for the concrete mixture to harden, you can begin arranging communication systems. To arrange a drain, a trench is dug into the hole and a pipe is laid. Of course, the pipe is laid at a slight slope to the sewer. In this case, the water moves by gravity and water stagnation is eliminated. When pouring concrete, this pipe must be plugged so that the solution does not accumulate there.
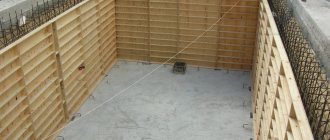
After the bottom hardens, formwork is constructed for the vertical walls. Planed boards or plywood are most often used for formwork. The second option is considered preferable. The minimum distance from the vertical slope to the formwork (future wall thickness) is 40 cm. Next, vertical reinforcement is performed in the formwork, which is connected to the horizontal.
Then the concrete solution is poured and compacted, preferably using vibrating machines. After the concrete walls harden, the formwork is knocked down. You can move on to the final stage: sealing joints, impregnating the bowl with water-repellent compounds, lining and other finishing operations. The lining of the finished pool bowl can be finished with a large number of modern building materials. In this case, the owner can refuse to use decorative finishing in favor of the simplest and most modern method - covering the internal surfaces with PVC film. This material significantly increases the tightness of the bowl, giving it a blue color that is pleasing to the eye.
At the last stage, equipment responsible for supplying, purifying water, and disinfecting the entire pool is installed in the finished concrete pool. Then an easily removable drain valve is installed. A ladder, gangway and other “accessories” can also be installed. At this point, construction is considered completed. You can safely fill the reservoir with water and start enjoying pleasant water treatments.
Reinforcement
Reinforcing the bottom of the pool is a mandatory step. In this case, the height of the concrete layer should be about 20 centimeters.
In the reinforcement process, ribbed reinforcement is used. Its cross-section should directly depend on the operating conditions of the pool. But the diameter should not be less than 12 millimeters. The spacing of the twigs should be 20x20 or 30x30 centimeters. It can be equipped with one or two belts. The second option is often chosen in the presence of soil heaving forces.
NOTE! The reinforcement should be recessed into the concrete by 5 centimeters. That is why it is laid on bricks, which give the desired size. The distance between layers should be 10 centimeters.
Walling
In most cases, walls are built in one row of blocks. Due to the fact that these products are quite massive, they can easily withstand the mass of water that will be in the pool.
The first two layers of blocks must be laid on ordinary concrete mortar with water-repellent properties. As for the third row, it is best to reinforce it. This sequence must be continued until the construction of the wall is completed.
The reinforcement can allow the blocks to gain greater rigidity and resistance to the mass of water in the pool. That is why other methods for constructing walls of hydraulic structures of this type do not exist.
Interior decoration
You should not assume that interior finishing of a swimming pool is a fairly simple task that anyone can handle. In fact, it must be carried out in accordance with certain rules and recommendations.
First, the surface of the blocks must be impregnated with an appropriate primer. It is best to choose a deeply penetrating composition that has antibacterial properties. You can also apply an antiseptic on top of this material.
After the preparatory work has been done, it is worth putting an appropriate construction mesh on the block wall. After this, you can begin the plastering process.
If the embedded parts are installed after the walls are covered with mortar, then a special cord should be laid around the perimeter of the products . In this case, all joints must be sealed with sealant.
Fill the bottom
After the frame is made, prepare and pour concrete mixture onto the bottom of the pool. To increase strength during the pouring process, use a vibrating device that will compact the solution.
After pouring and leveling (don't forget to maintain the slope), you need to wait a week until the slab hardens. If the weather is hot, then during this time wet the concrete surface with water 2 times a day.
After filling the pool bowl, you can not waste time and start preparing communications for draining water into the cesspool.
Waterproofing
Waterproofing the pool should be done in the same way as this work is carried out in relation to the foundations. The easiest way is to use a coating material. It is enough to apply it on the outer wall of the structure, after which you just need to wait for it to dry.
Film waterproofing material can also be used, but in this case you should choose the highest quality and most expensive products. This is due to the fact that the operating conditions of the pool are quite difficult.
In cases where the soils are quite heaving, it is necessary to fill the walls with a metal section before waterproofing work. The top can be plastered with a small layer of mortar.
What equipment and materials will be needed?
The construction and installation system for a swimming pool includes the following elements (materials, tools, equipment):
- fittings;
- pump;
- facing film;
- pipes;
- nozzles – 2 pieces;
- skimmer;
- protective finishing and waterproofing fabric;
- fasteners;
- sand filter;
- crushed stone;
- polyurethane foam;
- hacksaw;
- welding machine or wire;
- excavator or shovel (for large or small structures, respectively);
- construction tape (can be replaced with paper clips);
- flange units;
- ladder.
You will also need a concrete mixture, but in small quantities, since it is intended to fill block cavities along the entire height of the structure.
Insulation
In order to reduce the financial costs of heating water in the pool, it needs to be insulated after waterproofing work has been carried out. It is important to understand that heating several tons of water by 1 degree will require quite a lot of electricity. Due to the fact that this structure is buried in the ground, the sun will have minimal influence on it.
For thermal insulation, builders recommend using foamed polystyrene. It performs its main function well and does not absorb water. In addition, various microorganisms do not multiply in such material. Polystyrene is not eaten by insects, so it cannot be damaged in this way.
It is worth noting that it is best to choose high-density thermal insulation material. This figure must exceed 35 kilograms per square meter.
NOTE! Installation of polystyrene should be carried out in two layers. It is necessary to lay it in such a way that it overlaps the joints of each other. Additionally, water-repellent mastic should be applied to the seams.
Other Important Details
The recess around the perimeter of the pool can be filled in various ways. For this purpose, soil dug during the construction of the pit is often used. But in cases where the soil is quite heaving, crushed stone can be used. It needs to be poured into the hole and compacted quite firmly.
On top of the perimeter of the pool, you can fill it over crushed stone, on top of which you should lay a tiled covering. It is best to use a material with a matte surface. This will increase the level of safety near this hydraulic facility.
Types of blocks
Today, various types of blocks are used to build a swimming pool. First of all, this applies to the following types of material (we do not consider foam blocks, since the walls of an immersion pool must be as rigid as possible):
- Concrete blocks.
- Aerated concrete blocks.
- Cinder blocks (read about cinder block pools below)
- Expanded clay blocks.
The choice of material for the construction of walls should directly depend on operating conditions, climatic factors, as well as the availability of appropriate financial resources.
Table of advantages and disadvantages of materials for the construction of swimming pools
Each type of block used in the construction of swimming pools has its own advantages and disadvantages. That is why, before choosing this or that material, it is worth carefully analyzing these factors in order to understand how best to build the structure.
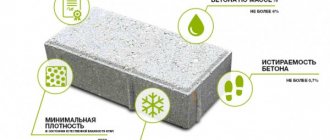
| Block types | Advantages | Flaws |
| Concrete blocks | High strength, fast construction speed, simplicity, versatility, resistance to low temperatures, ease of installation. | The need to waterproof seams, high cost, impossibility (or limited) use on heaving soils. |
| Aerated concrete blocks | Light weight, ideal geometry, fairly simple installation process. | Low frost resistance and high water absorption, the possibility of fungus spreading in the pores, the presence of shrinkage. |
| Cinder blocks | Relatively light weight and not very significant cost. | Low environmental friendliness, presence of blast furnace slag, low frost resistance, high level of water absorption. |
| Expanded clay blocks | The highest strength, high frost resistance, low water absorption, low cost, no shrinkage. | Relatively heavy weight and not very good geometry, making it difficult to build a flat wall. |
Before choosing one or another type of blocks, it is imperative to evaluate its positive and negative qualities. This will help build a better and more reliable pool that will last for quite a long period of time .
DIY pool made of foam blocks
If you have long dreamed of having your own pool, but limited finances separate you from realizing your dream, the ideal option is to build a bowl with your own hands. By using brick or blocks as the main material for construction, you will not only save your budget, but also achieve excellent rigidity and durability of the pool.
Specifics of building a brick pool
The average cost of a finished swimming pool in a construction center can reach several thousand dollars. Therefore, in the hope of saving money, developers decide to build a permanent brick pool with their own hands.
To implement such a project, it is not at all necessary to be a licensed builder and have many years of experience working on a construction site. However, you shouldn’t count on quick and easy results.
There will be many technological nuances in the developer’s work, the observance of which is necessary in order to ensure that the pool meets a number of requirements:
1. Protection of the building from groundwater
Flooding of a brick bowl with groundwater can lead to its premature destruction. In view of this, it is important for the developer to achieve sealing of the bowl from their influence.
2. Sealing the bowl from the inside
Water will have a destructive effect on the wall material from the inside, so it is important to work on insulating the walls with special materials.
Pool design diagram
3. Focus on durability
A considerable volume of water will exert pressure on the walls of a brick pool (we are talking about 12-18 cubic meters of liquid, which a medium-sized bowl can hold). The developer must take this point into account and correctly calculate everything at the project development stage.
4. Soil heaving
The brickwork from which the walls of the bowl are built is also influenced by soil heaving forces. Therefore, if there are any defects or if the brick laying technology is not followed, the wall may collapse.
5. Organization of water drainage
It is important for developers to properly organize the water drainage system. To do this, a pit is dug next to the bowl, and a pipe from the drain hole and equipment for filtering it are placed in it.
6. Arrangement of overflow holes in the walls
To control the water level in the pool, overflow holes will need to be installed in the brick walls.
As you can see, there will be many difficulties in the process of work. A bowl built from brick consists of separate fragments and is not monolithic, so it is important to ensure its rigidity. The porous structure of the brick also adds problems to developers. Because of this, you will have to work hard on high-quality and reliable insulation of the pool both inside and outside.
How to build a brick pool with your own hands? Technological aspects
If all the difficulties do not frighten the individual developer, he can roll up his sleeves and begin work on building a brick pool bowl. It consists of several main stages:
1. Construction of a pit
Once the size, shape and configuration of the pool are approved and the design is drawn up, developers begin work on the site. It begins with marking the area for digging a pit. Use a measuring tape to measure the boundaries of the pool, and then mark them with pegs and rope.
After marking, a pit is dug. Its dimensions should be 50-80 centimeters greater than the width and length of the pool, and 30-40 centimeters greater than its depth. The walls of the pit are carefully leveled, and the bottom is thoroughly compacted manually or using special vibrating equipment.
Digging a pit
2. Digging a pit for laying communications
Do not forget that communications will have to be connected to the pool in the future. This is a water supply and drainage system, as well as pumping and filtering equipment. These units are placed in a pit, which is dug next to the pit. The pit and pit should be connected by a ditch into which the pipes will be laid in the future.
3. Preparing the pit for installation of the bottom slab
The first step stated that the depth of the pit should exceed the depth of the pool. This is necessary then to place a special plate on the bottom.
Decoration
Once plastering has been completed, you can begin installing the selected tile covering. It can be either ordinary tile or mosaic. Today, a large number of different versions of these products are sold, as a result of which anyone can create their own unique and original style of pool terrace.
IMPORTANT! Experts recommend laying tiles with water-repellent adhesive. Additionally, the walls and bottom can be painted using rubber paint. It will serve as a waterproofing layer.
Instead of tiles and sealants, a special PVC film is sometimes used. It is a glass fiber reinforced material. Due to the fact that it is sold only in finished form, such a product does not always fit the configuration of the pool.
How to calculate the amount of material, how to choose it?
First, a drawing of all the walls of the bowl is made, the number of blocks for each plane is calculated (4 walls and a bottom), after which the results are summed up. The easiest way is to calculate the area in m2, and then multiply the result by the number of blocks per 1 m2.
A standard cinder block has dimensions of 390 × 190 × 188 mm. It is easy to calculate that 1 m2 contains 13.6 blocks.
Attention! This value is not entirely correct, since the thickness of the seams is not taken into account. However, when calculating, a supply of material is always needed, so the result is increased by 10%.
Let's say a pool with a depth of 1.5 m has a length of 6 m and a width of 3.5 m:
- Bottom area: 6 × 3.5 = 21 m2.
Area of long walls: 6 × 1.5 = 9 m2.- Short wall area: 3.5 × 1.5 = 5.25 m2.
- Total surface area of the bowl: 21 + (2 × 9) + (2 × 5.25) = 21 + 18 + 10.5 = 49.5 m2.
- Number of cinder blocks: 49.5 × 13.6 = 673.2 pcs.
- We add a 10% margin and get: 673.2 + 67 ≈ 740 pcs.
It is necessary to take into account that the calculation was made for walls of half a block. If you plan to make thicker walls, the amount of material is increased accordingly.
You can choose any cinder blocks, except expanded clay blocks. They absorb water and are less durable. Solid cinder blocks are needed, since hollow ones will not withstand the load from water pressure or from possible soil movements.
Practical recommendations
There are also several practical recommendations for building a swimming pool that you should pay attention to:
- The pool should be built away from trees. This is due to the fact that their roots can damage external waterproofing and insulation. In addition, in this case there will be no need to constantly remove leaves from the water.
- The simplest and most convenient shape for a pool is square. Rectangular or with rounded corners.
- Marking the area for the pool should be done using pegs and a stretched cord.
It is imperative to pay attention to all the recommendations of experienced builders . They will make your work easier, faster and more reliable.
Choosing a bathhouse project
Steam room project
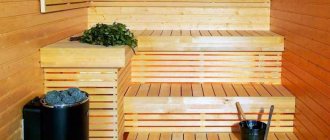
The most important place in any bathhouse is the steam room, so when choosing a design for a foam block bathhouse with a relaxation room, you should first think about this room. To do this, first of all you need to decide what you want. This could be a sauna or a Russian bath.
If you prefer a sauna and decide to create it yourself, you must remember that the volume of the room and the calorific value of the stove must match. Therefore, in saunas, ceilings are usually kept small, up to 2.1 meters, otherwise drafts may form.
Based on these dimensions, the size of the shelves for sitting is also taken. So the top shelf should be about 1 meter below the ceiling. Each subsequent one should be 40–45 cm smaller. It is this distance that ensures a comfortable position and allows the legs to rest on the lower bench.
Note! This arrangement of steps assumes that the first step will be 55–65 cm high. This is quite acceptable, since in most cases they sit there with both feet on the bench. There are also children sitting there, calculating the steps for which is quite problematic.
If you are considering a ready-made bathhouse project made from Russian-type foam blocks, then low ceilings, on the contrary, can become a serious problem for preparing steam. This is due to the fact that the finished steam rises and accumulates there. If the ceiling is low, then a sufficient amount of steam will not be able to accumulate there and a few strokes of the broom will completely dispel it.
Also, for the “Russian bath” the instructions require taking into account the need to ventilate the steam room to remove waste steam. To do this, you must have a good opening window opposite the door. Sometimes powerful exhaust systems are now used for this, but this breaks traditions, and bath traditions are sacred.
Pool project
The design of a bathhouse with a pool made of foam blocks has its own peculiarity. Since even at the stage of building the foundation you will need to create a separate foundation for the pool. Since the pool can be of two main types, the arrangement of the foundation for it varies significantly.
Advice: It is not worth tying the foundation of the pool and the building, since they have different loads. This applies to both sunken and overhanging pools.
So you can choose a pool that will be level with the floor of the bathhouse, or have a slight elevation. To build such a structure, you will need a fairly substantial foundation pit, 30–50 cm larger than the size of your pool. If you are considering a bathhouse project made from 6x4 foam blocks, then you cannot place such a pool in such dimensions.
For small projects of foam block baths, the best choice would be elevated pools. They differ in that their base is flush with the floor, and the walls rise to the height of the pool. The foundation for such a water receiver is built solid, but to a depth not greater than the depth of the foundation of the walls. Thanks to this, the labor intensity of work is significantly reduced.
Ready-made bathhouse projects made from foam blocks often offer rounded shapes of pools, but if you will do all the work personally and, moreover, are trying to save money, then it is better to choose straight lines.
But it is worth noting that rounded shapes look much better, but this only applies to pools that are flush with the floor. For elevated pools, a rectangular shape is more preferable.
Which roof to choose
According to the method of roof arrangement, the following types are distinguished:
- Shed - mainly used for small buildings, it is quite cheap, one of the easiest to create and has a low windage. The disadvantages include a small angle of inclination due to which snow may accumulate and a not very attractive appearance.
- The gable roof is one of the most popular. Its advantages include a large angle of inclination, which eliminates the accumulation of snow, an attractive appearance and the possibility of arranging an attic space. The disadvantages include high windage, and greater consumption of materials, which increases the cost of creating a roof.
- Multi-pitched roofs are among the most beautiful and expensive. Otherwise, their characteristics are similar to a gable roof.