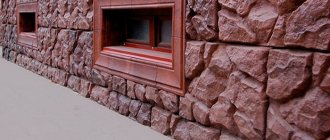
A blind area is a protective structure for a house in the form of a wide path around the perimeter of a private house or building. The protective function of the blind area, and the most important one at that, is to protect the structure from moisture. The blind area is also necessary for thermal insulation of the foundation, for ease of movement near the structure and simply for beauty. Let's look at each of the functions in more detail.
Externally, the blind area is a bulk or solid tape that encircles the entire perimeter of the house.
A pedestrian path of this type near the house makes it very easy to move around. In Russia, the soil is wet most of the year, and without blind areas the life of pedestrians would be very difficult. As with residents of a private house, including those who find it more convenient to walk, when necessary, around the perimeter of the house along a path than on the ground.
Important! When walking along the blind area along high-rise buildings, be careful, as snow or icicles may fall, and an act of hooliganism is also possible.
This path protects the foundation of the building from moisture. All sediments are in contact with the blind area and do not have access to the foundation of the structure.
It has a specific purpose, it is simply necessary for any structure.
And of course, protection against freezing of the foundation is an extremely important function for the building structure.
Requirements for building blind areas in accordance with GOSTs and SNiPs
There are many opinions on what size the blind area should be. The regulatory documentation provides only a minimal amount of information regarding the dimensions of the track. We'll talk about them below.
Dimensions
The law specifies what the width of an asphalt path should be, depending on the type of soil underneath it.
If the soil is sandy, then the width of the blind area should be at least 70 cm, and if it is clayey, from 100 cm.
A well-made blind area will protect the foundation from the harmful effects of moisture.
The clear meanings that a design should have are not spelled out anywhere. But practice shows that blind areas made of reinforced concrete are poured 10 cm thick, and those made of asphalt concrete - 5 cm.
The length parameter depends directly on the perimeter of the building around which the path is laid.
The blind area around the building is lined with concrete slabs.
Slope
The slope of the blind area, according to SNiP 2.02.01 80, should be in the range of 1-10%. The slope angle depends on the terrain on which the building stands. If the terrain is flat, the angle is made larger. If there is a slope, then the slope of the blind area is minimal. The main thing is to ensure the outflow of water away from the base of the building.
It is important from the very beginning to ensure that the soil around the house does not get wet. In addition, this reduces the load on the foundation waterproofing.
Expansion joint
When laying a path, it is necessary to ensure the presence of expansion joints. The seams are located at the corners of the blind area. Seams should be left along the entire length of the blind area every 1.7-2 meters. If this is not done when arranging the blind area, when sub-zero temperatures set in, cracks will appear on the path and destruction will begin.
Without it, the building will not look attractive, even if expensive and beautiful materials are used to decorate the facade.
Possible errors in the process
Errors can occur at any stage of blind area production; it is not enough to know the technology, you need to strictly adhere to it. For example, a poorly compacted base or the presence of construction debris will lead to emergency landing of layers and destruction of the integrity of the waterproofing layer and concrete coating.
Typical mistakes when making a concrete blind area near a house:
- A crack in a structure appears when the base is uneven; as a result, a layer of crushed stone is filled in with different thicknesses, and different load-bearing characteristics are formed by zone. Incorrectly tilting the profile of the excavation, made in rainy weather or melting snow cover, leads to the accumulation of water at the base of the house from the soil saturated with moisture.
- The absence of expansion joints between the blind area and the foundation will cause the formation of cracks. At high temperature conditions, internal stress zones are created in the blind area near the walls of the facility, which contribute to the occurrence of cracks and fractures in concrete.
- It is not permissible to use sand containing clay and dirty water in the process of preparing the concrete composition. This will lead to a deterioration in the consumer properties of concrete and a reduction in the service life of the blind area.
- The completed structure does not have a drainage system.
- A wider structure with incorrectly positioned slopes in relation to the roof overhang was installed.
- A separate drainage gutter was not installed under the water tap installed in the basement of an individual house for irrigation work. A leaking shut-off valve or a leaky drain hose installation allows water to collect at the base of the house.
- The base has not been compacted. Small thickness or uneven laying of the sand and gravel cushion will cause shrinkage, and tears will appear on the surface of the concrete.
It is not allowed to use fragile facing material on a concrete surface. If the expansion joint passes under a fragile element, it will crack.
What can a blind area be made from?
There is a large selection of materials from which blind areas can be built, from stone and crushed stone to clay and concrete. The blind area is often finished with PVC panels to look like concrete or others like stone.
Clay
The big advantage of clay blind areas is that they can withstand large temperature changes. Clay is very flexible, so such a blind area is not afraid of severe frosts. While other blind areas would be covered with cracks, the clay one heroically remains intact. She's cheap. And anyone can easily make it.
The blind area can be used as a path - it can be disguised and made one piece with the decoration of the local area.
Concrete
It is recommended to build a wide concrete blind area so that water drains well. Cement for such a blind area is used with waterproofing. The structure is quite durable, but at cold temperatures it cracks. In terms of financial costs, the average option between all blind area options.
The blind area can have two minimum sizes, depending on the type of soil - 70 cm for sandy and 100 cm for clay.
From asphalt and asphalt concrete
The most budget option for making a blind area is an asphalt blind area. The big plus is that at a low price the material provides a long service life.
If a pit was dug for a house, then the width of the blind area on any soil should extend beyond its boundaries by at least 40 cm.
From paving stones or paving slabs
The most expensive blind area is made of paving stones. She looks very presentable. Often in self-respecting cities, important roads are made of paving stones.
Paving stones can be used to create beautiful designs using a variety of colors.
Laying the material is carried out in the same way as on paths, but a layer of waterproofing must be laid at the base.
If the owner of the house wants to lay out a blind area from paving stones, but his financial means do not allow him to purchase it, he can make the paving stones with his own hands and lay them himself.
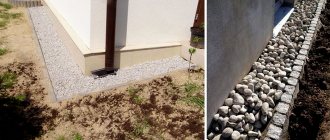
Soft blind areas
The soft blind area consists of a top layer that allows the layer to pass through. It is not uniform and decorative. The most commonly used are crushed stone and gravel.
The simplest and most inexpensive option is a soft blind area.
Sometimes it is called a flexible or hidden blind area.
Polypropylene fiber
Universal polypropylene reinforcing fiber for adding to the solution.
More details
The addition of these plasticizers helps prevent delamination of the concrete mixture and also increases its mobility, so that concrete can be laid with high quality without vibration treatment.
In addition, plasticizers can reduce the water requirement of the mixture by 10–20% and reduce the amount of cement in it without loss of strength by at least 10%.
As a result, given the low consumption of plasticizer, it comes out free.
Due to the fact that CemAqua and Plastix are supplied in liquid form, packaged in 10-liter canisters, it is easy and convenient to dose and add to concrete mixtures.
After gaining strength, the concrete blind area must be treated with CemAquaStop - a complex moisture-repellent surface treatment agent. The water repellent eliminates the appearance of efflorescence, increases the durability of the surface, virtually eliminates its damage by fungi and mold, eliminates soaking and water absorption in the direct contact of moisture, without reducing the vapor permeability of the surface (the material “breathes”). As a result of using “CemAquaStop”, a very thin hydrophobic coating is formed on the surface of the material - an invisible layer of polymer, which, when exposed to moisture, closes the pores of the material and prevents water from penetrating inside. After treating the blind area with a water repellent, the frost resistance and durability of the treated material increases several times.
The use of modern materials when concreting a blind area allows us to produce a high-quality and durable product, which ultimately saves money, time and effort. The CemAqua and Plastix plasticizers, as well as the CemAquaStop water repellent, can be purchased in Leroy Merlin stores, online stores, and also wholesale from the manufacturer.
You can buy CemPlast, CemBase CEMMIX without leaving your home, with discounts from 5 to 33%!!!!
Buy on Ozon
Buy on Yandex.Market
Buy on Wildberries
Buy at Leroy Merlin
Or you can find the nearest official dealer in your region on our map
← Strong and durable blind area: how to prepare cement mortar and what additives to use
How to make a concrete floor in a private house →
Return to list
Comments
How to make a blind area with your own hands
Making a blind area around the house with your own hands will not be difficult. It is important to take into account the fact that when starting work on the blind area, you must make sure that the roofing is completed, the canopies and cornices are installed and the ground is already prepared.
Such a covering can be installed on dry sand or on a concrete base.
Calculation of blind area and volume of material
Take measurements of the perimeter of the building around which the blind area will be laid. Calculate how wide you need to make it.
Next, you need to calculate the amount of material that will be needed in construction work.
Another quality requirement that should not be forgotten is the use of only sand without clay impurities for preparing concrete.
We calculate the volume using the well-known formula for calculating the volume of a figure:
V = a * b* c, where
a, b, c – length, width and height,
V – volume.
We substitute the values into the formula and find out how much material we need to purchase.
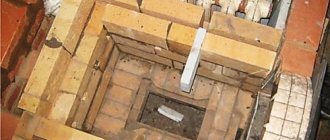
Creating a Section Drawing
When all measurements have been made, it is necessary to depict the blind area device on the drawing. Make a cross-sectional drawing. Write down all the layers you will create and their exact sizes.
You should get the following layers:
- Compacted soil.
- Sand. Thickness10 cm.
- Concrete. Thickness 10 cm.
- Sand-cement mixture. Thickness 5 cm.
- Small-piece concrete paving slab.
It is also not allowed to use dirty water. All this leads to a decrease in the strength of concrete.
Make sure that the drawing is drawn up correctly, make sure that all characteristics and parameters comply with regulatory requirements.
How to pour a concrete blind area
Once the drawing is ready, you can proceed to the main work.
Place pegs at the level of the outer edge of the path to make it easier to navigate. Dig a small pit and compact it. Spread crushed stone over the pit area. The layer of crushed stone near the building itself should be thicker (15cm) than at the edge (10cm). The structure is then filled with concrete.
If there is a water outlet from the base of the building, a separate gutter must be provided under the tap to drain water.
Note! Concrete comes in different types and is designed for different temperatures. In order not to make a mistake, choose a concrete class from B15 and higher.
You can purchase the mixture in the store, and if you wish, it is quite possible to mix the concrete yourself, the main thing is to maintain the correct proportions of the components:
- 1 part (hereinafter referred to as “part”) of cement,
- 3 parts medium-grained sand,
- 4 hours gravel,
- 0.5 tsp water.
To ensure a homogeneous concrete solution, first mix water and cement, and then add the remaining components.
The bottom of the trench should be sloped away from the house.
Production of paving stones or paving slabs
Paving stones are not a cheap pleasure. If financial capabilities allow, then purchasing and laying paving stones or paving slabs will transform the appearance of the yard.
If you are not ready to spend a lot of money on buying paving stones, there is an option to make it yourself.
The blind area is finished with paving slabs using a cement-sand mixture or mortar.
You will need: cement (grade 500), sand, dye (optional), superplasticizer and mold. Ready-made forms come in a variety of types in hardware stores: plastic, polyurethane and rubber.
Mix all the ingredients, lubricate the mold with a special emulsion, but you can also use a dishwashing solution.
Slowly fill the mold with the solution and place it on the vibrating table. If this is not available, many resourceful craftsmen use a washing machine in centrifuge mode. Then move the mold to a place convenient for you and cover with oilcloth or film so that the moisture does not evaporate in large quantities. If this is not done, cracks will soon appear on the paving stones.
The paving stones can be laid on a compacted sand bed. It has a beautiful appearance, but is more expensive than tiles and somewhat more difficult to install.
After complete drying, the mold with the future paving stones is placed in hot water for a few moments to make the insides of the mold easier to remove.
The resulting paving stones will be even stronger if they are stored under film for two weeks, and then outdoors for about the same amount of time.
Preparatory activities
Don’t forget about the tools needed to build the path. Dig a trench, level the soil, mark the area with pegs and rope, and mix the concrete.
Since the paving slab coating is not as durable as a concrete monolith, the base for its installation is made more dense.
Curb installation
The presence of a curb is not at all necessary. Its construction depends solely on the wishes of the owner. Professionals recommend installing curbs, since shrubs and trees can grow in close proximity and can negatively affect the integrity of the foundation.
You need to dig a trench 15 cm deep, spread geotextiles at the bottom, install a border and fill in a layer of sand that does not reach the top of the trench.
If you plan to place a curb, then install it along the rope and pegs, and level them with a hammer. As a rule, rubber is used. Next, the curbs are sealed on both sides with concrete.
Laying tiles
Place gravel in the trench, then sand. Tamp down and moisten with a little water. The third layer is a mixture of sand and cement. Compact using a hammer and a log. Level the surface with a flat board.
The entire further drawing depends on the first line, so accuracy is very important.
To ensure the tightness of the top layer, all seams between the stones must be carefully sealed with a cement-sand mixture or cement mortar.
Lay the first slab, separate it from the curbs by a few millimeters. Use tile crosses for this. Level the tiles with a rubber hammer.
When laying a row, check the evenness and slope with a building level.
Once all the tiles are in place, use a hose to thoroughly hose down the tiles with water. If there are gaps between the tiles, fill them with grout, then sweep away the excess.
Arrangement of a soft blind area
The essence of a soft blind area is that the top layer consists of crushed stone. The structure of the soft blind area is as follows: the bottom layer is soil, then comes clay, then waterproofing is installed. Then sand, geotextiles and the final layer - crushed stone.
A very important point when installing a soft structure is the presence of a slope of the waterproofing layer made of polyethylene or clay.
Work order
The DIY device involves performing actions in the following sequence:
- first you need to mark the blind area on the ground;
- digging a trench around the perimeter of the building to the depth of the blind area (depending on the thickness of the layers of bedding and concrete);
- compacting the base;
- installation of formwork panels and fastening them together;
- laying bulk materials (sand, crushed stone) with compaction;
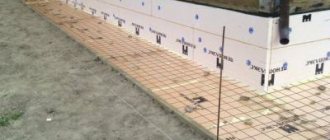
- laying reinforcing mesh;
- installation of boards that will act as expansion joints that prevent concrete from cracking in winter) in increments of 2 meters;
- laying concrete and its compaction, leveling;
- ironing of the surface;
- waiting for time to gain strength, caring for concrete.
It is important to ensure a distance between the blind area and the wall of approximately 2 cm. This gap will allow structures with different weights to settle independently of each other and prevent cracks from appearing. Concrete gains full strength in 28 days at an average daily temperature of +20 degrees Celsius. If the air temperature is lower, it will take longer. The formwork can be removed after reaching 70% strength.
Caring for concrete involves periodically wetting it. To prevent moisture evaporation, the blind area after pouring is covered with film or burlap. These measures will prevent the appearance of cracks during hardening.
An additional measure could be insulating the element. To do this, extruded polystyrene foam is used, which is placed under a layer of concrete on a bedding. Insulation is relevant when the depth of the foundation base is higher than the freezing depth.
Is it necessary to insulate the blind area?
An insulated blind area has a beneficial effect on the temperature even in the house itself.
It is not always necessary to insulate the blind area. If the ground on which the building is located is on solid ground and temperature differences are small, then there is no need to insulate it.
If the foundation of the building is not very deep, then insulation is also not needed.
Pros and cons of building on your own
Concreting a blind area is a process that requires a significant investment of labor, money and time. Therefore, implementing such a design on your own will provide significant savings to the family budget. When carrying out a step-by-step process of filling the formwork with concrete mortar, it proceeds without difficulties and does not require special construction experience.
Advantages of pouring a concrete blind area yourself:
low operating costs, while creating the same consumer properties, making concrete blind areas durable and simplifying their maintenance;- many design options - today there are many color and texture effects that create an expensive look for the cement base;
- Properly processed and hermetically installed concrete is practically resistant to water;
- creating an anti-slip surface;
- creation of a heat-resistant structure.
The disadvantages of installing a blind area yourself appear with large dimensions of buildings, marshy soils and sloping terrain of the location of the house. In this case, special engineering solutions, calculations and development of an individual flow chart for the work will be required.
You will find a lot of important and useful information about the construction of concrete blind areas in this section.
Problems associated with the blind area device
- If incorrect calculations are made and the blind area turns out to be too narrow, then it will be absolutely useless and will not protect the foundation in any way.
- If the technology for filling the path was incorrect, then this will soon manifest itself in the form of various types of destruction.
- If the slope of the blind area is not ensured, the water will stagnate at the foot of the structure.
- If you do not insulate the blind area, the foundations of houses exposed to frosty winters will begin to collapse.
Ready-mixed concrete requires maintenance for at least one week. To prevent it from cracking when it dries, it must be regularly shed with water.
There is a myth that you can’t build a blind area in the fall. No, this is not so, but on the contrary, it is better to do the blind area in the spring or autumn. If you still want to do this in the summer, then it is better in the morning, before the air temperature warms up.
Autocad. Knots. Download ready set
You can download nodes in AutoCAD here. The DWG Features set contains:
1) Assembly units. Working drawings of prefabricated reinforced concrete structures of one-story industrial buildings.
2) Album of design solutions:
- arrangement of combined roofs, AutoCAD roof units;
— AutoCAD wall units;
— sound insulation of partitions, ceilings;
— arrangement of hydro-, thermal insulation and drainage of the underground parts of the building;
— construction of sports grounds and fields;
— landscaping, drainage.
3) Units and details of coatings of residential buildings.
4) ROCKWOOL knots.
PS The additional resource contains CAD drawings and is available for download: https://www.rockwool.ru
free online course from Alexey Merkulov
Source
How to repair a blind area yourself
If the cracks are very small, it is enough to fill them with a small amount of cement mixed with PVA glue and grout. Sealants and fillers can also help.
If the cracks are very noticeable, then you need to treat them with a hammer drill, clean them, lay the channels with a primer, then dry them and fill them with concrete.
The blind area is a necessary part of the arrangement of buildings. Fortunately, you can arrange it yourself.
If you do everything correctly, in accordance with regulatory documents and installation rules, then the option of self-installation will be quite cheaper than with the participation of professionals. It’s everyone’s personal choice how to make the blind area, but the main thing is to do it.
What does it represent?
The blind area is an external basement waterproof concrete structure in the form of a continuous path along the perimeter of the building, sloping from the wall towards the surrounding topography of the local area. Its arrangement involves a tight but movable connection to the base of the house.
The structure is a layered “pie” consisting of materials that together keep the foundation dry. The basis of such protection is in proportion: a compacted, even underlying layer of sand (crushed stone, clay), waterproofing and a coating - concrete, which ensures the waterproofness of the structure.
Return to contents
Standards
The construction of a blind area, like any other building structure, is based on a number of standards, norms, regulations and rules. Basic standards:
- The angle of inclination of the blind area is regulated by GOST9128-97.
- The requirements for the concrete base of a blind area with the function of an access road are contained in GOST 7473-94.
- The parameters of width and thickness are considered in SNiP2.02.01-83.
- SNiP2.04.02-84 justifies the choice of the angle of inclination and recommends the construction of a clay castle as a blind area around external water supply networks, wells and wells.
Many of the listed documents are now not mandatory, but they reflect vast experience in arranging blind areas in various designs.
The owner of the house, who decides to build it with his own hands, may not thoroughly study the regulatory technical documents on the construction of the blind area. But it is necessary to comply with the general average requirements for the parameters and materials of the blind area, otherwise it will only perform the functions of a drain.