Miscellaneous
The decorative covering of a door deteriorates over time and loses its attractiveness. If the old paint is cracked and peeling in places, it is recommended to remove the old coating before applying a new coat. But it also happens that the surface has only lost its shine, has become dull, or spots have appeared on it, but the layer itself lies smoothly and has retained its integrity. In such cases, there is no point in carrying out work to remove the old coating. It will not be possible to qualitatively remove the old layer of paint that has retained its strength. It is difficult to remove. As a result, you can only damage the doors or get a surface whose quality is much lower than the original version.
Features of painting over an old layer
At first glance, painting a wooden door over an old layer seems like a trivial matter: just go ahead and paint it.
Painting the door
But in fact, in order to paint a wooden door and get a surface that will be no worse in quality than factory painting, learn a few rules:
- The surface of the door, regardless of its condition, must be carefully prepared. Against the background of the old paint, cracks and potholes are invisible, but after applying a new layer they will appear and ruin all your efforts.
- The right choice of material for painting an interior door. It’s not just a matter of proper selection of color, surface texture or the strength of the film formed. It is important to consider the compatibility of materials. Many paints are not compatible with each other, and if chosen incorrectly, the old coating may curl or bulge when it comes into contact with the new material.
- Decide on the correct paint application technique. For doors with a complex structure, it is possible to obtain a smooth and neat surface with proper selection and combination of painting techniques and painting tools.
The last rule, common to all cases of working with paint, is to strictly follow the instructions for applying the selected paint material.
Which paint to choose
First, decide what paints are used to apply to the door:
- Alkyd enamels. This is the most affordable option. Film strength is average. The advantages include a large range of colors and compatibility with MDF, fiberboard and wood. The main disadvantage is the long drying time and the characteristic pungent odor. Among materials of this type there are a large number of glossy coatings.
- Acrylic enamels. This type of paint is a water dispersion of acrylates. The main advantage over other compositions is the absence of odor and quick drying. In addition, the color palette, represented by hundreds of colors, allows you to create unique shades yourself. To protect the surface, it is additionally coated with parquet transparent varnish.
- Oil-based tinting paints are great for transforming interior and entrance doors. Absorbing into the wood texture they give it a unique shade. The only condition for their use is wood, without any coating.
Variety of paints and varnishes
- Nitro enamels. They dry quickly, but at the same time the volatile, caustic solvent evaporates, which can cause poor health and even poisoning. If you take precautions and use personal protective equipment when working, then this option deserves attention. After the solvent has completely evaporated, the coating becomes safe. It is considered a high-quality and fast method of painting.
- Colored varnishes, glazes. These materials are used for painting varnished door panels. Used in cases where there are no significant cracks or chips on the base. To fully restore the varnished surface, the old varnish must be removed, or you can refuse to re-varnish and paint over the interior doors after puttying.
Surface preparation
The quality of painting depends on proper preparation of the product. The process consists of the following steps:
- One of the selected methods removes all old paint from the door block. It is more convenient to carry out the work on the sash removed from its hinges and laid horizontally. All accessories are removed from the canvas, since protruding elements interfere with operation, and during cleaning they can be damaged.
- The next stage is sanding. Designed to remove minor defects, paint residues, and burrs. Sanding can be done with sandpaper wrapped around a wooden block. Working with a grinder will go faster. A vacuum cleaner is connected to the dust removal tool.
- Before plastering a wooden surface, determine the type of paint and varnish material used. For transparent varnishes, choose a composition that imitates the color of wood. If wooden doors are to be painted with opaque enamel, putty can be used in any shade.
- After the putty has dried, final sanding is performed. First comes the rough grouting with a medium-grain abrasive. Finishing is carried out with fine grain.
- After removing the paint, dark spots may remain on the wood. If you want to cover an old wooden door with clear varnish, try bleaching the problem areas with a mixture of chlorine and water in a ratio of 1:3.
Material Compatibility
It is not so easy to understand the modern variety of materials. Chemical compositions for the uninitiated person are a secret behind seven locks, and when buying a material to apply to old paint, many rely on luck, hoping that the old layer will not react in any way to contact with the new chemical. There are some recommendations according to which you should select the material depending on what the door is painted with.
Variety of colors
Therefore, before you go for paint, you need to clarify what the canvas is painted with.
- Epoxy and polyurethane compounds contain aggressive solvents. Cyclohexanone or xylene are capable of destroying materials that are reversible polymers obtained by natural curing (nitrocellulose, vinyl, copolymer-vinyl chloride compounds). Simply put, epoxy or polyurethane paint will destroy the coating made with nitro paints.
- Epoxy and polyurethane materials are applied only over the same compositions or primers, maintaining drying intervals for each layer.
- Silicate compounds are generally not applied over any other types of paints.
- Alkyd paints are not aggressive and can be safely applied over any material.
- Copolymer-vinyl chloride compounds and compounds based on chlorine rubber are applied only over acrylic, epoxy, and silicate materials.
Important! To update the door, it is better to use paint of the same type as the previous layer.
Compatibility table
Despite the recommendations of the material compatibility table, it is better to use an experimental test: apply the new material to a small area of the canvas and see the reaction.
Choosing the shade of interior door designs
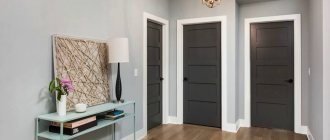
The range of paints makes it possible to implement different design solutions, so the question of how to cover the surface does not arise. Three color trends are visible in the design: delicate, light shades; bright shades of yellow, red; dark shades. When choosing a color, adhere to the following principles:
Shades of colors
- Shades of chocolate and cherry add luxury and sophistication.
- In the bedroom and children's room, choose light colors that create coziness and comfort.
- Solid wood doors are suitable for log houses.
- In a room with antique furniture, artificially aged ones look great.
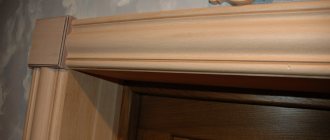
- The color of the door frame is made darker (lighter) than the walls.
Features of working with different surfaces
If the old door looks good, but the coating has only faded and worn out, then it can be quickly updated by such an event as painting the door without removing the previous layer. The tactics of work will depend on the type of coating available:
Painted doors
This option will cause the least amount of trouble with preparation and has every chance of getting a high-quality surface. To paint interior doors with your own hands, just thoroughly wash the surface of the door to remove dirt and grease stains, and fill all cracks and gaps with putty. It is better to take automotive epoxy paints with a hardener. Such putties do not shrink when dry, and all defects can be repaired in one go.
After the putty has dried, the surface is sanded with fine (120 grit) sandpaper. It is better to use a vibrating sander on large flat surfaces (counters, panels). The main task when working with a painted door is high-quality painting, which is achieved by applying several uniform layers of material. The duration of the work will directly depend on the time it takes for the next painted layer of the door to completely dry.
Old painted door
Lacquered doors
If you decide to renew the varnish surface by applying a new layer, it should be taken into account that all defects will remain visible.
Important! Secondary varnishing rarely gives the expected results. As a rule, the surface should be close to ideal. If you don’t want to tinker with the old coating, then it’s better to paint varnished interior doors that have lost their appearance or coat them with a tinted glaze.
The main difficulty in this situation is selecting putty to match the base material. But the wooden surface is not monochromatic in nature. Even if you spend a lot of time and use several shades of putty, you will still end up with stains on the canvas.
How to remove paint
When restoring doors and windows, or any other wood products, the first task is to remove the old paint. Scraping or sanding with a knife is an activity for those who are very patient. It takes a lot of time and the process moves very slowly. There are several methods for faster removal.
Warm up with a hairdryer
A new one costs about $25-30, but for one-time work it is unwise to buy it. Can be rented at a hardware store. The surfaces are cleaned of paint as follows: direct a stream of hot air onto the painted product, literally after a few seconds bubbles appear, which are removed with a spatula or scraper.
Restoring a wooden door begins with removing old paint or varnish
The temperature in the treated area is quite high, so wear gloves. And a little more about safety precautions: you need a well-ventilated room or outside.
One note: you should not set the temperature above 250oC. At high temperatures, wood loses most of its strength and then quickly collapses. So don't overheat it.
When removing paint with a construction hairdryer, the process goes faster than when processing with sandpaper, but still, it will take a fair amount of time.
Paint removers
There are more than enough different chemical products on the market to remove old paint. They are called "washes". They are sold in jars of various sizes and look like a gel - a slightly colored or completely transparent gelatinous mass.
When choosing, pay attention to what surfaces they are intended for processing. It is necessary to clean the wood - it should be present in the purpose “for wooden surfaces” or something similar.
Apply the paint remover with a brush, spreading it over the entire surface from which the paint needs to be removed. After some time (from 5 to 40 minutes) the paint will begin to rise. You also simply scrape it off with a spatula.
After treatment with a remover, simply remove the paint with a spatula
The smells when working with this product are also not the most pleasant, and you may even get a headache. So the room should also be ventilated. For people prone to allergies, it is better to work with a mask. There is one trick: cover the treated surface with plastic film. This can be either ordinary film (you can use old one - throw it away anyway) or food film, which is sold in rolls. But it’s easier with regular film: spread it out, tuck it in, and that’s it. The gel works better under the film - there are fewer “unremoved” areas left. In addition, the smell is not so strong.
When using paint remover, it must be removed from the surface before painting. First, wipe with a dry cloth, then with a damp cloth, then wash and allow the surface to dry. Only then do they begin further processing.
Folk way
This trick is from the arsenal of an old carpenter. Here you need a film in a roll, a spray bottle and acetone. Pour acetone into a spray bottle and spray the solvent out of it. Immediately roll out the film. It is necessary to roll it so that there is as little air under the film as possible. That is why food film is used - it does not allow air to pass through and has sufficient elasticity. After 15-20 minutes the paint comes off without any problems. It can also be removed using a spatula or scraper.
There are not only ready-made compositions, but also traditional methods for removing paint from wooden surfaces
But some carpenters claim that acetone and all other solvents destroy the structure of the wood. There is another method. It requires more time, but does not damage the wood. You will need a large plastic bag, larger in size than the door, or two, put on both sides. You will also need cotton non-fading rags and clean kerosene. Wrap the doors tightly with rags, pack them in a bag, pour 0.7-1 liters of kerosene into it, tie everything tightly, seal it and leave it for a day. Then you peel off the paint, but do not “expose” the entire surface at once, treat it in parts, otherwise the paint will harden again.
Door painting technologies
The quality of the door coating depends on the tool, application method and professional skills of the craftsman.
Tools
Door painting is done using the following tools:
- Brushes. It is not recommended to paint the entire canvas with just one brush. If you lack experience, the surface will end up with streaks. It will not be possible to apply a thin, even layer of paint with a brush. But without this tool it will not be possible to paint hard-to-reach places, corners, layout patterns or panel margins. Therefore, when painting canvases with a complex configuration, first work with a brush, painting over problem areas.
- Roller. Repainting panel interior doors is done with just a roller. The roller bobbin must be fur, polyamide or polyacrylic. These materials are resistant to most aggressive solvents.
Important! For painting work on door restoration, foam rollers are not used.
Working with a brush
- Compressor (spray gun). A spray bottle will allow you to get an even, thin layer. The result is a perfectly smooth coating. The process of applying paint is much faster than manually.
Related tools you can’t do without:
- gloves;
- paint tray;
- rags;
- masking tape;
- sandpaper;
- putty knife;
- and what you have at your disposal: stools on which you will place the canvas, or sawhorses.
In addition to paint and varnish, prepare putty, primer and solvent.
Operating procedure
Preliminary activities
- To reduce fuel consumption and ensure maximum operating convenience, it is advisable to dismantle the door. The place where to place it is selected based on the properties of the selected paint. It is better to treat wood with nitro enamels or alkyd compounds outdoors (on the veranda, in the yard, under a canopy).
- All fittings are removed - handles, latches, etc. If some elements are non-removable (for example, glass inserts), they are securely closed (with tape, PVC tape). As a last resort, a layer of lubricant is applied. This is necessary so that these areas of the door are not stained with the coloring composition during operation.
- Cleaning the base. This is where the stage of properly painting the door leaf begins. All previously applied layers are removed - as a result, the tree should be completely bare.
- Assessment of the condition of wood and the degree of its damage. This allows you to choose the right compositions (priming, impregnating) and type of paint.
At this stage, it is advisable to reconstruct the door leaf if its performance for some reason is not satisfactory. For example, if it is necessary to re-hang the hinges, you can select wood. If you need to rearrange the handle, make drillings.
Fabric preparation
- Sanding wood. At this stage, you can level out minor material defects (scratches, dents), which will make further painting easier. If you work with a household grinder, it won’t take much time, and the quality of leveling will be high. It is only necessary to regularly remove wood dust and monitor the condition of the base.
- To get rid of dark spots, it is advisable to “lighten” the wood. In everyday life, chlorine bleach is used, additionally diluted with water (3 to 1).
- After the canvas has dried, it is impregnated with an antiseptic composition and dried again.
- The remaining defects (small cracks, for example) are eliminated using putty.
- The door prepared in this way is subjected to repeated finishing sanding.
Coloring order
- The stability of the canvas is checked. If necessary, to protect the base, film or old cloth is placed under the door.
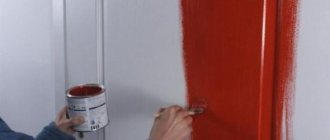
- First of all, the paint is applied to particularly difficult areas - protrusions, curly bends, and the like. That is, for everything that does not fit the definition of “flat surface”. If you are processing a paneled door, you should start by applying the composition to its recesses.
- It is correct to completely paint the door in three steps. First, the LCS is applied in a horizontal direction, from top to bottom. After the layer has dried, paint again, but with a vertical movement of the roller. The third “approach” is done similarly to the first.
This technology will ensure uniform color of the door and the complete absence of various grooves, dried drops, gaps, stains, etc. In addition, applying the composition in several layers increases color saturation. If the paint was repeatedly diluted with a solvent during the work process, this is especially important. The processing of the canvas with varnishes, stains, and glazes is carried out according to the same scheme.
The owner himself will have to decide what paint to paint any of the wooden doors in his own home. What needs to be taken into account and what criteria to focus on when purchasing LCS is noted, and in some detail. The choice is yours, DIYers.
Painting schemes
First, a little theory. The interior door can be panel or panel. Depending on this, the execution scheme and the order of staining will depend.
If it is a panel-type canvas, then painting is carried out in 3 stages:
- Coloring begins from the upper corner in the transverse direction. The movement of the brush goes from left to right.
- the second layer of paint is applied in the longitudinal direction.
- the third layer is similar to the first.
Please note that three layers cannot be applied at once; after each coating, time must pass for the composition to dry.
For work, it is better to use a roller, as the brush may leave streaks.
If it is a paneled door, then first all the recesses are painted with a brush, and then the rest of the panel, but with a roller.
Stages of work
All work can be written in the form of the following algorithm:
- It is better to remove the door and twist the fittings. If there is no such possibility (or desire), then handles, hinges, locks and glass are sealed with film and masking tape. It will be difficult to remove the paint. The tape must be removed before the paint dries.
- Washing and drying the door surface.
- Removing peeling areas, filling defects, sanding. Each layer is sanded after complete drying.
- Selecting the type of paint material.
- Applying a primer (paint diluted with the same type of solvent). This will improve adhesion and reduce the likelihood of bleed through putty areas.
- Applying the required number of layers of paint or varnish.
How to paint wooden doors?
The market for construction and finishing materials offers an extremely wide range of paint and varnish products. The quality of painting a wooden door with your own hands is largely determined by the correct choice of paint coating. First of all, you should focus on the condition of the door leaf.
The old door will require restoration work to eliminate wood defects. In such cases, several different wood processing products are used sequentially. It is recommended to select formulations from the same manufacturer, as this will ensure their full compatibility. A door that has not yet been used will require much less effort when painting.
Choosing paint
There are 2 options for covering paints and varnishes for wood:
- Transparent coatings. This group includes various varnishes, impregnations, stains, protective compounds, etc. Such materials do not hide the natural structure of wood, but, on the contrary, emphasize it. It is recommended to use on newly purchased doors that do not have visible defects and have not yet been restored, because all defects will become more pronounced after applying such a layer.
- Opaque paints. Coatings for wooden doors that cover the entire wood structure. A large selection of compositions allows you to paint canvases in any color and shade, depending on the overall interior and personal preferences. They come in matte, glossy and translucent. They are used both for doors that have already been used and for recently purchased products. There are acrylic, alkyd, polyurethane, oil and nitro paints.
Useful tips for beginners
For ease of work and control over dipping the tool into paint, use a paint tray.
After purchasing the brushes, it is recommended to comb them out a little and soak them in water for a while. Firstly, this will prevent fallen hairs from reaching the surface, and secondly, it will soften the stubble before work.
It is more convenient to paint the canvas if it is located in a horizontal position. This way you won’t get unsightly streaks if there is too much paint in the corners and sides of the door leaf. Many people use specially prepared sawhorses for convenience, or take the easier route and place the door on 4 stools.
Protection of fittings from smudging. This is not a whim, but a reasonable step. It is advisable to twist it and put it aside for the duration of the work, but an option to protect it is also suitable, for which it is recommended to use masking tape.
Drips resulting from painting can be easily removed if you use a sponge, and then hide its traces by going over the area with a roller.
While the painted canvas is drying, make sure that no accidental dust gets on it or that a stray midge does not stick to it. To do this, it is better to do coloring in a special workshop.
Video on how to properly paint entrance blocks in a house or apartment:
You can update interior or entrance doors in different ways. Painting without removing the old layer is the easiest and fastest method, which home craftsmen most often resort to. The result of the work: a beautiful door without much effort!
Voted over 169 times, average rating 4.6
Comments
Ira 01/30/202015:56 It’s better not to paint interior doors. the paint will stink for a long time
Grade
Add a comment Cancel reply
We recommend reading
Miscellaneous Interesting glass decoupage technique, DIY door decoration Do you want to update the decor of your favorite room, but don’t want to start again...
Miscellaneous Recommendations from professionals on choosing a door frame for interior doors To install a door, you will need to choose the right door…
Miscellaneous Main distinctive characteristics of moldings for interior doors Manufacturers offer door designs of standard sizes, ...
Miscellaneous What is the purpose of installing brushes on interior doors? To make using the interior door convenient and not separate...
How to create imitation wood
To do this you need:
- The canvas is painted with light beige, gray or yellow paint and then dried.
- Using a brush, apply liquid soap to the surface.
- Everything is covered with dark paint, and the soap is washed off.
- If you have a veneered door, you can take note of another method. For this we use a special brush. We walk it through the soft fibers with movements that would resemble combing. The surface is painted with dyes of different colors. The texture will be changed so that the surface will have swirls that resemble wood grain. Sand the surface after it dries.
- If everything is done according to the rules, then even beginners in this business will be able to paint. But first, it’s better to practice a little so that the front side comes out perfectly.
You now know how to touch up a chip on a door and how to paint varnished doors; here it will be important to take your time and properly prepare the surface. And after applying the dye, you won’t have to think about repairing the door for a long time.