SHARE ON SOCIAL NETWORKS
FacebookTwitterOkGoogle+PinterestVk
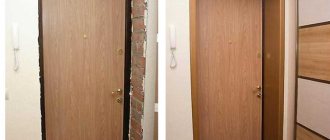
The door is the element that serves as a distinction between rooms. At the same time, it is important to choose not only the door leaf itself, but also such details as trim on interior doors - this is the framing of the frame, which allows you to hide joints and other imperfections, thus completing the design of the structure at the entrance to the room. How to choose the right piece of furniture will be discussed in this article.
Platbands on interior doors in a contrasting shade
Why do we need platbands on interior doors?
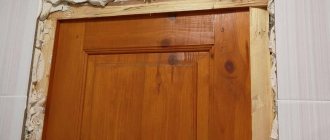
Platbands are an important part of the door structure in the form of flat or three-dimensional strips of various widths, thicknesses and shapes. The main purpose is to design the doorway around the perimeter in order to disguise the places where the door frame is attached to the walls. In addition, correctly selected platbands will give the doorway a finished and beautiful look. Moreover, they can become an accent in interior design.
Scheme of using platbands in the design of a doorway
When choosing platbands, you should not adhere to an exact match of the material and color with the door leaf - they can be matched to the color of the furniture or walls. It is this criterion that underlies the purpose of the casing - whether it will perform a purely masking role or serve as an original accent.
Cashing is needed not only when installing swing doors, but also in the case of designing sliding and folding panels, as well as for finishing portals and arches. Most often, platbands are sold complete with a door frame or leaf. Then they are made of identical material and have a standard shape. If we are talking about the original design of the doorway, then the platbands can be purchased separately, or they can be made to order. You can make them yourself. Photos of do-it-yourself platbands for interior doors amaze with their beauty and variety.
Design
It’s good when the interior design matches the design of the doors and a similar texture is used in the implementation of the project. The door leaf continues the style of the room, its walls, ceiling, floor. Finishing with platbands will complete the composition of the room, making it decorated and functional.
Beautiful door frames help visually dilute the room, make it brighter and more interesting. It is necessary that the color of the structural elements goes well with the door, wallpaper, and floor covering. The materials of the products should harmoniously complement each other.
Classification and types of platbands for interior doors
It is difficult to imagine a home consisting of several rooms without doors. Even in a studio apartment, entrances to individual rooms, such as a bathroom or pantry, are necessarily limited by doors. At the same time, you need to choose as a whole, paying attention to additional details, such as handles, locks and door cashing. Photos demonstrate their diversity and widest choice, as they are distinguished by shape, color and material.
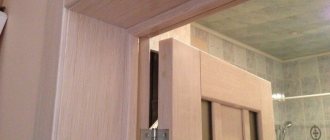
The platband hides irregularities and the junction of the frame and the wall
Material is one of the main criteria that underlies the classification of platbands. For their manufacture use:
- tree;
- MDF;
- metal;
- plastic;
- ceramics.
Depending on the method of fastening, the platbands can be external, which are mounted on the outside of the box, internal or telescopic, which are more complex in the installation process. According to the structure of the cavity in the middle, trims on interior doors can be hollow, serving as cable channels, as well as monolithic or simple.
Helpful advice! For interior doors, it is better to select hollow platbands, which are used as cable channels. This functionality allows you to hide shortcomings that arose during installation, as well as hide wires. In this case, the cable is carefully laid in special grooves and attached to the wall.
As for color, most often the platbands are matched to match the door leaf. Particularly popular are models with wood colors, as well as white trim on the door. Platbands are also classified by shape. They can be flat, semicircular and figured or embossed. They are also distinguished by size, which depends on the size of the canvas itself.
Most often, the color of the trim matches the shade of the door leaf
Wooden door frames
Wood is the most popular material used in the manufacture of platbands. Its main advantages are environmental friendliness, reliability and long service life. In addition, this design looks very attractive and suits various types of door panels and the style of rooms.
Another big advantage of wood is the possibility of making cashing of different configurations. This feature lies in their intraspecific classification, according to which they are divided into:
- flat or rectangular - they are distinguished by ease of execution and at the same time affordable price, therefore they are considered the most popular;
- semicircular - have a rounded shape over the entire width. In this case, the radius is selected individually - from pronounced to barely noticeable;
- relief or figured door frames, photos of which surprise with their special design. In their production, valuable wood is used, which makes it possible to accurately convey the shape, but this significantly affects the cost of the product;
- carved - an elegant and expensive option. Looks pretty impressive. Therefore, with their help you can radically change the interior of any room. At the same time, such cashing is not suitable for every style of room decoration.
Wooden door frames
Plastic trim on doors and MDF cashing
Plastic platbands are a practical material, as they are resistant to moisture and ultraviolet radiation, do not deform and do not require special care. Any dirt can be easily wiped off with a wet sponge and a small amount of detergent. Also, plastic cashing can withstand temperature changes, which is important when choosing a material for a bathroom or kitchen.
PVC trim on doors is also characterized by a variety of colors and textures, which significantly expands the possibilities of choosing the desired tone in accordance with the tone of the door leaf, furniture or walls. However, the main advantage of the material is its low price, which is justified by the same low strength of plastic products.
Cashing interior doors made of MDF is also considered a budget option. They completely imitate wood, but are much more affordable in terms of price. At the same time, the performance characteristics of such models are in no way inferior to wooden products, and in some characteristics, on the contrary, they have an undeniable advantage. MDF cash does not rot, which affects the long service life of products made from this material, and this factor has a positive effect on their service life.
Note! The main disadvantage of MDF is its tendency to swell when exposed to moisture, so it is not recommended to install casing made from this material in rooms with high humidity.
The shape of MDF cash can be flat or rounded, which imitates wood as much as possible.
Plastic platband with cable channel
Interior door trims made of metal
Metal door trims are best suited for finishing entrance doors - on their outer side. At the same time, they will be relevant when framing interior openings in rooms decorated in modern styles, such as hi-tech, loft or minimalism. It is the cold shine of metal surfaces that brings the missing chic to the listed types of design. The material for cashing is most often stainless steel or aluminum.
As for practicality, products made of stainless metal are the most durable and are also resistant to high humidity. They do not burn and are difficult to scratch. Aluminum is much softer, so you need to be as careful as possible with it. It is metal trims that should be installed on metal doors, especially since you can make them yourself.
Docking methods
There are 3 mounting methods.
Docking at an angle of 45˚
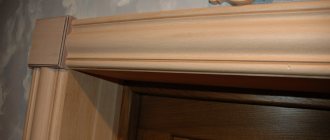
During installation, it is impossible to do without trimming the areas where the individual parts of the kit are connected. Trimming at an angle of 45˚ is most often used. It is ideal for any type of finishing, successfully hiding areas of cuts .
Joining at an angle of 45˚ hides areas of cuts
Docking at an angle of 90˚
The platbands are connected at an angle of 90 degrees. The top trim board is placed between the right and left sides.
Docking at an angle of 90˚
Docking at 90˚ with imitation jumper
This installation method is used to create an unusual interior design.
Great for historical simulation
Shape and dimensions of platbands for interior doors
As mentioned above, platbands for interior doors can be flat, semicircular, rounded or embossed in shape. A separate category is made up of cash in the form of a capital, where the upper part has a special decorative shape. Depending on the installation method, they can be overhead, which are secured using special nails, or telescopic with mounting ridges, which are inserted into the grooves of the door frame.
Various forms of door frames
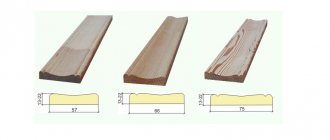
The size of the door frames also matters in the design of the room. Their length depends on the dimensions of the opening, and the width of the trim for interior doors is mostly standard, ranging from 7 to 10 cm. It is these dimensions that make it possible to close the technological gap, creating a beautiful and impressive look.
Decorative cashing can be much wider, reaching 15 cm. Such products are mainly made to order. At the same time, the most practical and popular are narrow strips, the width of which does not exceed 7 cm. The minimum width is 3 cm. If you decide to use narrow trims, then you should take into account the fact that they must completely close the technological gap.
Note! According to SNiP requirements, the technological gap between the side posts of the door frame and the wall must be at least 3 cm wide.
Interior door trim width: features of sizing selection
Before installing platbands on interior doors, it is necessary to take into account their main purpose - to hide defects between the door frame and the wall, so they should be several millimeters wider than the technological gap. The choice of cashing is also determined by other factors, in particular, it depends on the location of the doorway.
Common sizes of door frames
For example, for a door located in a corner, it is better to choose narrow products for installing door frames. You should also give preference to products with a minimum width in the following cases:
- if the doorway is located very close to the walls that frame it;
- if the door has an oblong and narrow shape, then a wide frame with dimensions of 7 cm or more will look simply ridiculous on a high panel;
- when the door leaf is decorated with a large number of decorative elements, the only function of the platband is to mask the technological gap between the frame and the wall;
- if the opening is located between walls of different widths.
- Narrow door trims are also purchased for the purpose of banal cost savings, since the narrower the product, the less it costs. Therefore, they are installed in cases of decorating the doors of utility rooms, as well as for framing inspection hatches.
Metal door frame
Previously, this type of platbands was used exclusively for the design of entrance doors if they were made of metal.
Modern designers advise using metal trim when rooms are designed in loft, high-tech, techno, and modern styles.
It is in such interiors that a cool gloss is welcomed, and the decor contains elements of steel and aluminum.
Telescopic trims for interior doors
A special category of platbands is telescopic cashing, and it is necessary to take into account its peculiarity before installing platbands on interior doors. Externally, these are planks with characteristic curved L-shaped parts along their length. It is thanks to these elements that the platbands are installed on interior doors, inserting it into the groove of the door frame. The design feature makes it possible to adjust the thickness of parts within a range of several centimeters. Most often they are used in cases where the wall thickness is slightly greater than the thickness of the box.
Telescopic platband for interior doors
Do-it-yourself installation of platbands on interior doors of this type is simple and does not require much time, as it is done using liquid nails. This feature is the main advantage of telescopic platbands. Since the use of nails is not implied, the outer surface of the parts looks more attractive, as it remains smooth.
The standard width of the telescopic casher ranges from 6 to 8 cm, and the size of the shelf inserted into the groove is approximately 4 cm on the outside. Telescopic platbands can be flat, or have a semicircular or shaped shape. For the production of such models, different materials are used: wood, MDF, chipboard and aluminum.
Important! It is better to use telescopic platbands made of wood. Since aluminum models inserted into a wooden groove may fall out over time. This is due to the fact that the wood of the groove is sensitive to changes in temperature and humidity, so the door frame may simply dry out after a while.
Preparatory stage
The first step in this stage will be sawing and installing the trim. The next step in the preparatory phase will be to determine the method of fastening. Based on the decision you make for yourself, you may need the following things to work:
- Stapler, construction staples
- Hammer
- Nails
- Self-tapping screws
- Screwdriver
- Polyurethane foam
- Rubber mallet
- Primer mixture
- Liquid Nails
Of course, you won’t need all of the above things at the same time. To work, you will only need those elements that will be needed in a particular case. Nails and screws will be required for metal and wooden trims. They are used to provide better adhesion to the elements. However, in this case, you will also have to think about camouflage at the attachment points. To prevent any spaces from being visible, you can use a primer mixture or other known methods of masking.
Liquid nails are most often used for lighter models. Gluing the platbands will not be difficult, it is a really easy and quick job, but screwing them on will be much more difficult. You also need to avoid damage to the coating itself, but using glue in this case will allow you to keep all the elements in their original form and not spoil the parts.
Cash at the door: tips for choosing the right model
In order for the door design to look natural, attractive and at the same time not conspicuous, it is necessary to pay special attention not only to the choice of door leaf, but also to cashing, taking into account a number of factors.
The platband can become the highlight of the interior
Before attaching trims to interior doors, you should take into account that the overall appearance of the doorway is affected not only by the width of the trim, but also by the material from which they were made, as well as the tone and texture of all elements and their combinations with each other. It is especially important that the platbands are in harmony with the door leaf. For example, a large-width plank will look massive, overloading the visual perception of the structure, and an opening with an excessively narrow platband will look unfinished.
Considering these features, it is necessary to follow the following recommendations when choosing platbands. For a room in the minimalist style, you should take straight trim on a flat door to match the color of the canvas. Their width should be from 6 to 8 cm. The ideal size in this case would be 6.4 cm. Semicircular planks with a width of 7 cm are considered universal. These models are suitable for decorating doors in any style, but you should not use them to frame narrow doors.
Related article:
Repair of interior doors: interesting ideas for restoration of paintings
Benefits of canvas renewal. Surface restoration options depending on the door material. Interesting techniques for decorating canvases.
In the design of a room in Baroque, Country or Provence style, it is better to use figured planks with patina or with the texture of aged wood. In this case, it is better to abandon narrow strips, since the pattern will be faintly visible on them. The ideal width in this case is 10-12 cm. It is best to use natural wood as the material.
The method of installing extensions and trim on interior doors is also of great importance. It can be cut at either a right or an acute angle. The length of the cashing must correspond to the height of the opening and the width of the floor plinth.
Platband on a sliding interior door
From MDF
For such cashing, different coatings are used. The most common are paper strips with a laminating layer. It is not recommended to wash them with water, and even the floor covering next to them should not be heavily wetted.
In appearance, the frame, which is finished with veneer, is no different. The disadvantage is low water resistance.
From MDF
How to install platbands on interior doors
Before attaching trims to interior doors, you need to prepare the tools for the job. In this case you will definitely need:
- a simple pencil, tape measure, level, miter box and square for marking;
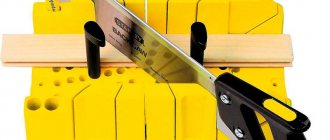
- miter saw or hacksaw with fine teeth;
- a hammer if fastening to the wall is done using nails.
In order to understand how to properly install platbands on interior doors, you need to understand the installation method and take the necessary measurements. First, mark the corner of the cut and accurately calculate the length of the platband blank, which is cut with a miter saw. If you don’t have a power saw, a miter box will help you cut the cash at an angle of 45 degrees.
Helpful advice! To properly saw off cash without chipping, you need to firmly press the side edges of the workpiece to the frame. If there is a gap, the cut will not be smooth.
Simple fastening of flat strips is usually done at right angles. In this case, the vertical planks are simply connected end-to-end with the horizontal one. Installation of parts made of wood or MDF of complex design is done after cutting them down at an angle of 45 degrees.
Installation of door frames
Installation of platbands on interior doors: 4 methods of fixation
There are four ways to fix the planks on the wall.
The first method involves the use of finishing nails. The easiest way to nail cash on wood or MDF is with nails without heads. At the same time, the mount is reliable, but if necessary, it can be quickly dismantled. Before nailing trims to interior doors, you need to select the correct size of finishing nails. It is calculated individually, taking into account the thickness of the platbands. The optimal length is 40 mm, since after passing through the bar, the nail must enter the body of the box at least 20 mm.
The second method uses liquid nails. You can fix the cash without nails, using a special adhesive composition. The advantage of this method is that the place of fixation is not noticeable, but the disadvantage is the low strength of fastening and the difficulty of dismantling. In addition, the use of liquid nails is possible provided that the surface of the walls is perfectly flat.
The third method is fastening with self-tapping screws. This method is similar to fastening with nails, only instead of them, self-tapping screws 25 mm long and no thicker than 6 mm are used. Preliminary markings are made on the workpiece for holes with a range of 50 cm. In this case, the heads of the screws must be recessed into the body of the platband. For this purpose, the hole on the front side of the bar is slightly widened. The place of fixation can be hidden by painting over it with a wax pencil.
The fourth method is fixation with beaks. In this method, fastening occurs through beak-shaped locks located directly on the cash. To fix it, the tenon connector is inserted into the middle of the recess on the box and pressed until a characteristic click appears.
Installation of wooden trim on the door
Installation of telescopic platbands on interior doors
The main advantage of telescopic cashing is the ease of installation and the fact that the place of fixation is almost invisible. Such models are more expensive, but at the same time, the price of installing platbands on interior doors will cost much less. Moreover, it is easy to make it yourself, following the instructions. The disadvantage of this method is that during dismantling, MDF platbands can delaminate, and over time, the joints gradually collapse, so additional treatment with an adhesive composition will be required
Before installing the telescopic trim on the interior door, you need to decide on the method of fixation. They attach the cash to the wall using liquid nails, but on condition that the walls are perfectly smooth. If there are irregularities, it is better to use nails or screws. Installation should begin from the door opening side, since the presence of hinges will prevent the strip from being perfectly fixed to the frame. It will be necessary to indent with the same step in all three directions.
Helpful advice! As a rule, glue is not used to attach plastic door frames, since such a connection is unreliable. It is best to use a profile to fix plastic slats.
If the door is located at an angle, installation is carried out using the letter G. It is possible to saw the plank using a narrower part. The platband is installed only on one side and only if the wall is very thick and the slopes are intended to be finished in a different way.
Assembly diagram of a telescopic door frame
How to attach platbands to interior doors
The high price of installing platbands on interior doors, as well as the cost of most construction work, encourages you to do this type of work yourself. In this case, just follow the instructions below:
- It is necessary to measure the height of the vertical parts. To do this, the platbands are placed directly on the floor, and the baseboards go end-to-end to them. Measure and set the bottom point of the 45 degree angle on the workpiece;
- insert a bar with a cut line mark at an angle into the miter box and cut off the excess part;
- Next, the blanks are attached to the wall so that they can be slightly bent from above;
- then the planks are attached to the box. At the place where the nail is driven in, a wooden beam wrapped in fabric is applied to the workpiece, and the strips are placed on the pins by lightly tapping with a hammer;
- The corner is given an even shape by bending the upper unfixed parts of the cash, placing a horizontal part under them. At both ends of the part, a 45-degree angle is marked with a pencil. The excess part of the platbands is cut off;
- fixing the horizontal bar and strengthening the vertical parts;
- Fastening the platbands at an angle of 90 degrees is done with horizontal or vertical seams. The choice depends on the preference of the owner. When installing a door cashing with your own hands at a right angle, only flat-shaped blanks are used. The cut areas are treated with varnish or acrylic-based paint.
Fastening the platband with nails
You can not only secure cash on your own, but also make it yourself. To do this, just follow the instructions and tips on how to make trim on interior doors.
Door cashing performs an important function not only in framing the doorway, but also in the overall design of the room. This detail allows you to hide the technological gap between the door frame and the wall, thus giving the door leaf a complete look. When choosing platbands, you should take into account the design style of the room, the material and size of the interior door, as well as the dimensions of the opening itself and its location. The width of the technological gap should not be overlooked. Taking into account the tips given in the article, you can quickly and beautifully decorate the doorway yourself.
Installation
Installation technology depends on the type. All of the above differ in the installation method.
Installation is carried out after the systems are installed and the polyurethane foam has completely hardened. If there is a special recess, it should be thoroughly cleaned of dust or foam that has fallen on it. If not, then you should clean the foam in an area 2 centimeters wide and deep.
After completing the preparatory work, you can move on to the main ones. You should start by adjusting the strip that is prepared for the upper part. It is cut first in length and then in width. To fit and trim correctly, you first need to place the wrong side in the place where it will stand, making marks on both sides. Then connect these marks with one line and use a jigsaw to cut evenly. After this, you can start working with other slats. You can adjust the side ones using the same method.
The length should be given special attention. Check to see if there are any gaps between the panels. The top one should lie horizontally on the two side ones and clearly fit against them. If everything works out, you can perform the fastening. First you need to attach the platband so that no gaps are noticeable. It should be set according to the level. When fixing, make sure that the connection points do not move. Adjust if necessary and you can even wedge it with slats or bars.
After completing this process, take a can of foam and blow out all the gaps between the plank and the opening. Initially, perform foaming pointwise, on both sides. Wait until the foam sets. Then complete the process completely. Blow out any space that is left. After complete drying, you can remove excess polyurethane foam with a sharp knife.
Installed
Telescopic extensions are installed using the same method, but there is some difference in the connection technology, which are built on top of each other. To do everything correctly, adhere to a phased distribution of work. It is not recommended to first assemble a wide shield, or mount it in one piece. To begin, install the first plank along the entire length of the opening, secure it, and only then proceed to the second row. This is important, since when the polyurethane foam cools, the connection may be broken. It is not possible to install all three telescopic bars at the same time.