Extensions are vertical posts, as well as one horizontal strip, which serve to “encompass” the door frame, that is, to increase its width. Such planks are made from MDF, fiberboard or solid wood. Installation of doors with extensions must be carried out after the basics and features of this process have been studied.
Additional strips are purchased together with the door block itself, but you can also buy them separately. These products have a very simple design, so any master who has at least once dealt with doors will cope with the installation task. You can also make door panels yourself from slabs or other lumber.
Characteristics of the door panel
First you need to understand what extensions for interior doors are. This is an element of framing the slopes of the doorway, which allows you to do without leveling them with plaster and forms a single ensemble with the door and platbands. That is, if the thickness of the walls in the opening is greater than the thickness of the installation box, then the remaining open plane is decorated with extensions - straight rectangular planks.
The advantages of this design method:
- ease of installation and a minimum of time to bring the opening to a clean state;
- aesthetic appeal;
- the ability to design all interior transitions in the same style by selecting decorative strips to match the color of the doors;
- the mechanical strength of slopes and their resistance to damage, in contrast to those plastered and painted or covered with wallpaper;
- increasing noise insulation between rooms by filling the cavities behind the extensions with insulating materials.
Extensions can also be used to trim openings without doors Source autogear.ru
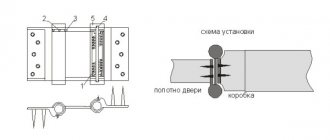
Installation of extensions without a groove
Mounted extensions
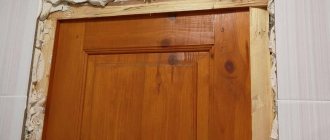
After installing the door in the doorway, it is necessary to measure the remaining uncovered part of the wall (slopes). If the extensions have to be cut along the long side, then it is better to do this also in a furniture workshop. There you can also order the edging tape sticker on the two ends of the extensions (both on the side adjacent to the door frame and on the side of the platbands).
If the slopes are not plastered, then the extension should be secured as follows: take a wooden plank or a small beam and attach it to the slopes so that the extension can be secured on top of this plank, while maintaining its verticality (horizontal for the top extension) and right angle between it and the door frame.
With smooth plastered slopes, you can do without an additional wooden plank, provided that there is no need to leave any space between the extension and the wall.
Installation of the top panel
- Attach the extension to the bar.
- Fill the remaining space between the wall and the extension with polyurethane foam. To make the foam harden faster, spray it with water.
- Trim off any excess hardened foam.
- Secure the trim.
What are they?
The door extension does not have a wide variety of shapes, sizes and design features. And yet it can be classified according to at least two criteria: material of manufacture and profile shape.
Materials
These products are made from the same materials as door leaves. This is mainly solid wood, MDF and chipboard:
- Wooden extensions can be uncoated, painted or varnished. The former are cheaper and can be finished to your liking. The latter, as a rule, are sold together with door leaves and frames and have a texture and color similar to them.
- Slats made of wood-like materials are always finished with artificial or natural veneer, lamination, and paint. And they are also produced to match the main products.
Veneered MDF panels Source images.ua.prom.st
For reference! Extensions for entrance doors are made from the same materials, but of greater thickness, since they have to withstand more serious loads in the form of random mechanical impacts, and work in more difficult temperature conditions. But they try not to use chipboard, since it is not resistant to moisture and is quite fragile.
Profiles
If you look at the cross section, you can also find differences. There are two types of them: simple and type-setting (or telescopic):
- Simple ones have a rectangular cross-section and are a regular flat plank with or without a decorative coating on the front side. Their standard thickness is 10-16 mm, the width varies from 30 to 200 mm from different manufacturers, and the length corresponds to the height of the door frame - from 1900 to 2300 mm. Sometimes simple extensions are produced with an unfinished end edge.
- Telescopic extension for a door: what it is can be understood if you know how wall panels or lining boards are connected to each other. It always has a groove on one long end, and the same groove, straight edge or ridge on the other.
Extensions: with edge, without edge and telescopic Source vseprodveri.ru
Since typesetting products are more functional, we will tell you more about them. They do not differ in length and thickness from simple ones, but on the edge they may have additional slats that form a groove. The width can be 90, 100, 120, 130, 150 and 170 mm. By combining these dimensions, a panel of the required width is assembled. You can slightly change the size by tightly moving or pushing apart the extensions - this can be done by long ridges or connecting strips that are inserted into opposing grooves.
Note! Such extensions can only be installed in boxes with a groove cut at the factory and framed with L-shaped platbands.
This is what the frame of the opening with assembled telescopic molding looks like Source satkastroymaterialy.rf
Platbands on the front door
If the extensions are a continuation of the box, filling the slope of the opening, then its completion can be called the platband. There is also a large selection here.
Purpose and varieties
The immediate task facing such an element as the platband is to frame the doorway. These interior elements are decorated with them. Modern door frames can be divided into the following categories:
- flat;
- rounded;
- curly.
The first option allows docking in any form. But rounded and figured platbands can only be sawn at an angle of 45 degrees . In this case, it is necessary to have a special device called a miter box.
Curly trims are sawed at an angle of 45 degrees
In addition to the shape, platbands can be divided into:
- Monolithic;
- With built-in cable channel.
The use of monolithic elements can be considered a classic option for framing doorways. But cable channels began to be placed in platbands in order to “hide” excess wires from prying eyes. These structural elements are made of PVC and consist of two parts. One is attached to a wall or box, and the other serves as a decorative cover that covers the wires laid inside.
Methods for installing trim on the front door.
Platbands according to the method of fastening can be divided into:
- Invoices;
- Telescopic.
Overhead platbands are installed using fasteners, and telescopic ones using a comb.
The first method involves fastening elements using nails driven through the body of the platband into a box or wall. Other types of fasteners can also be used, which will be hidden under the decorative element.
Telescopic platbands are installed using a special comb inserted into a groove on the extension or additional strip. In this case, you can use glue to firmly fix the part in its place.
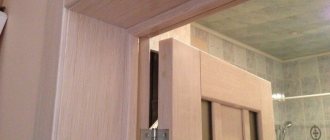
Installation features
Before installing the door extensions, you need to select them. At the same time, paying attention to the following points:
- compliance with the material of the canvas. If it is made of solid wood, then it is better to make decorative elements from the same material. If they are veneered or made of MDF, the wood in the opening will look unnatural;
- color and texture. It is most logical to purchase both the door and all the accompanying elements at once. As a rule, they are always in stock in the store. For uncoated wooden products, select a suitable paintwork;
- size. First of all, you need to look at the width of the extension so that it covers all the free space of the opening. For example, if there is 160 mm from the box to the wall, then take simple strips 200 mm wide and cut off the excess.
When measuring the thickness of the opening that needs to be lined, do this on all sides - on the sides and on top. Moreover, in each plane at least 3 measurements should be taken at different levels. They may differ due to the unevenness of the walls. In this case, they focus on the maximum value.
Attention! If the box has grooves for mounting telescopic extensions, their depth must be taken into account.
Benefits of using extras
Extension sizes
As you can see, the technology of fixing the extensions allows you to avoid such a tedious procedure as plastering the slopes. A correctly selected additional element makes the slope smooth and beautiful, no matter how bad the slope looked before. However, if the space between the extension and the wall exceeds 3-4 centimeters, it is better to additionally secure the extension using small wooden blocks screwed to the wall.
In cases where you do not have the opportunity to use factory-made additions, you can make their man-made “analogue” from laminate or MDF panels. This solution will make it possible to create “diverging” slopes (not located at an angle of 90 degrees relative to the door frame).
Video description
This video shows how to take correct measurements and install the frame:
Installation can begin after the foam has dried around the already installed door frame.
See also: Catalog of companies that specialize in the sale, installation and finishing of windows and doors
Installation of simple extensions
A corner for access can be selected on the door frame; it must be completely cleared of foam and debris. If there is no recess, the foam behind the block is cut to a depth of 1-2 cm, making a groove of the same width in it.
Installing extensions on interior doors is done as follows:
- Adjust the planks to size, starting from the top, cutting them to length and width if necessary. The edge that goes behind the box is cut in width, and the bottom end that touches the floor is cut in length. The joint between the vertical and horizontal strips should be smooth, at an angle of 90 degrees;
- all elements are inserted into the opening in the designed position, laying the top panel on the side panels and inserting the cut edges into the prepared recesses;
- the parts are wedged, achieving a tight fit to the box along the entire length;
- again with a level they check the correct position of the extensions;
- The space between the walls of the opening and the cladding is carefully filled with polyurethane foam with a small coefficient of expansion when hardening.
Filling voids with polyurethane foam Source gid-str.ru
It is better to foam a few points first, and when the product sets, fill the remaining voids with it. To prevent the foam from pushing the panels inward during the polymerization process and deforming them, it is advisable to install spacers between the parallel planes.
If the door is installed in the opening of a wooden wall or a wooden frame is pre-made in the opening, the extensions can simply be screwed on with self-tapping screws, after drilling them and countersinking the holes for the caps. After installation is completed, these holes are closed with matching plastic plugs.
Types of door frames
Extension strip
Known examples of door frames that require the use of extensions for their installation are divided into two types:
- products equipped with a groove for mounting an extension;
- door frames that do not have such a groove.
In the first case, the additional elements are fixed in the groove of the box with one of their ends, while the other of them remains free. The second option for installing the extension involves fixing it on the door slope without rigidly securing one of the sides.
You can make the addition yourself
The additional elements are usually made in the form of strips of laminated MDF, having the appropriate color (preferably matching the color of the trim and door frame). Sometimes (in order to preserve the color scheme of the interior) elements of a different, more suitable color are used as additions. A large selection of additional elements, differing not only in color, but also in width, allows them to be used when finishing slopes of any size. The main thing is that the width of the blanks you choose allows you to fill the uncovered part of the slope with a minimum of waste.
Installation in non-standard situations
If there is no groove in the box, and the opening is very deep and cannot be covered with a simple addition, you can choose any of the options below:
- Use the telescopic system by placing the first plank behind the box, wedging it and fixing it with polyurethane foam, as is the case with simple extensions. After the foam has dried, add a second row, foam it, and again wait until it dries completely. And so on until the opening closes.
- Shields of the required width are assembled from the extensions, fastening them on the reverse side with transverse slats or overlays every 40-50 cm.
Shield of two additional parts Source i.ytimg.com
Self-production of door trims: material
The following materials are used for self-production of extensions: MDF, chipboard, wood, plastic. Wood is considered the most environmentally friendly material, but under unfavorable conditions of use, wood can deteriorate. Therefore, additional processing is required, which means additional funds and effort.
More often, of course, MDF is used; chipboard is inferior in quality to this material, but it is quite suitable for an internal entrance door, and the cost of chipboard is acceptable.
Using MDF, you can make additional elements yourself
Plastic is also used for additions, but ordinary plastic is not suitable. It should be a material of increased strength, and it is good if it is reinforced with metal. And yet this is a rare option; MDF is used much more often.
Do-it-yourself door additions step by step
First, measure the width of the wall, the one that needs to be covered. Take a plank that is suitable in width, it can also be lining. The extension should extend slightly under the edge of the box, for which the sides are cut slightly at an angle. This will create a neat chamfer. Next, using a grinding machine, you need to bring the surface to absolute smoothness.
Before proceeding with the installation of extensions, experts recommend first taking correct measurements of the door and doorway
Progress of further work:
- In order to prolong the life of the wood, impregnate it with a high-quality antiseptic;
- Then the planks can be painted with stain, and the shade of the stain is matched to the color of the door;
- When the boards have dried, coat them with two layers of varnish to reliably protect the material from moisture;
- Well, if the extensions are made from chipboard or MDF, the process is greatly simplified - you cut out the strips of the required width, and the sections are lined.
It is also important to install the accessories correctly. Telescopic ones are installed in special grooves, and straight ones can even be placed on liquid nails. But for an uneven wall this is not the best option. Usually homemade extensions are attached with self-tapping screws. First, the locations of future fastenings are marked, then holes are drilled, the outer screws are tightened first, and then the central one. To strengthen the structure, you need to tighten a few more screws.
Alternative: how to replace door trims
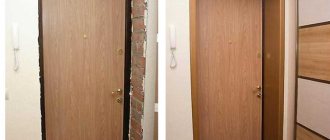
In fact, there is no truly worthy alternative to extras. For example, the owners ordered a door frame, but it does not match the width of the wall. Many people decide to approach the problem creatively, using putty or even wallpaper to get rid of such a difference. But the whole idea is broken, and it is clear that the replacement is not equivalent.
You can decorate a doorway beautifully only with the help of high-quality and practical additional elements
Therefore, to decorate a doorway, it is more correct to use extensions. This gives the entire structure a monolithic quality that will look harmonious with the appearance of the entire room. Yes, such panels make the installation process easier.
Strengths and weaknesses of the design
Before using any construction or finishing material, you need to clearly understand what pitfalls await the repairman. In addition, you need to know the advantages and clearly decide for yourself which building material to choose.
Advantages of telescopic design
It’s worth starting with the advantages of the Eurobox, which builders highlight:
- economical consumption of time resources. The builder does not need to spend a lot of time leveling doorways and adjusting the surface. The box easily stands on any surface, while ensuring quality and aesthetics;
- economical use of finances. There is no need to waste materials on processing the jambs and finishing them; Euroblocks will perfectly hide all the imperfections;
- quality and long service life. This design is assembled similarly to a construction set, so it will last a long time;
- wide choose. A very large size range, as well as a choice of colors and materials, will allow you to choose the best option for any doors, interior and doorways;
- universal indicators. A similar box can be used regardless of the type and type of door being installed;
- decorative properties. The frame looks very attractive and can give the doors an attractive appearance;
Don't miss: Reasons for poor quality construction
- possibility of parsing. In case of dismantling, the structure can be easily disassembled and then reassembled;
- does not require additional equipment during assembly;
- a small amount of materials and tools. in order to build a high-quality structure, you do not need to use a large number of tools and materials.
These are the main advantages that distinguish the Euroblock from the classic box.
Design flaws
What can be attributed to the weaknesses of the design:
- price. Compared to a regular box, a telescopic construction set has a higher price category.
Therefore, it is better to overpay and choose high-quality and reliable material than to suffer with installation and installation.
Mostly the box is made of:
- solid wood;
- sawdust;
- metal material.
Such products are sold by the meter.
Reference! Manufacturers recommend purchasing a box together with the canvas in order to clearly select the color and material of both design elements. Also, the consumer can independently choose from two color variations: classic and contrasting.
What is a telescopic box?
This device consists of several strips connected into a single whole.
Reference! That’s why the box is called “telescopic”; this definition applies to objects consisting of several parts.
The peculiarity of this design is that the main components of the box do not move, they are fastened into a single figure, allowing you to create a dense mechanism. It is because of this design that all parts can be easily adjusted, and in the end the user gets a perfect isosceles rectangle.
Telescopic boxes are usually divided into two main classes:
- when the design is a single mechanism;
- when the mechanism is represented by two connecting elements.
These are the basic definitions that can be said in relation to the telescopic box.