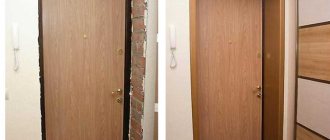
Installing an interior door frame with your own hands is a rather complicated procedure that requires certain knowledge and skills. In hardware stores, door frames are most often sold assembled. But there are also products on sale in disassembled form, that is, a door set consisting of individual door elements is offered.
The main advantage of purchasing disassembled doors is that when assembled on site, they are easier to fit into the interior opening. But before you start installing the product yourself, it is recommended to study the diagram of its assembly and installation, as well as the recommendations of specialists.
Types of door frames
In order to correctly install the door frame in the wall opening, it is first recommended to study the design of the product.
The frame is a load-bearing element of the door structure, which takes on the load of the door leaf. It consists of one horizontal and two vertical strips connected to each other. The box is fastened directly to the walls of the entrance or interior opening.
The load-bearing element of the door forms a flat portal and also ensures reliable fastening of the door itself. On one side of the box frame there are hinges on which the canvas is hung, on the other side there is a hole for the locking mechanism and a strike plate is attached.
The position of the door primarily depends on the correct installation of the load-bearing component (frame). Therefore, this particular stage of work is a priority. Even a slight misalignment will cause the door to close poorly, get scuffed and wear out quickly. It is also important to pay special attention to the strength of the frame, taking into account the weight of the material from which the canvas is made.
Door frames offered on the market are classified according to different indicators. One of them is the technology of assembling the structure: straight, diagonal or tongue-and-groove. Installation of an interior door frame into a doorway is carried out only after preliminary assembly of the structure.
In the first case, the elements of the door frame are connected to each other perpendicularly. In the second, the edges of the planks are cut at 45 degrees. In both cases, screws are used to connect them. The most reliable way to connect a structure is a tenon into a groove, which is cut directly into the plank.
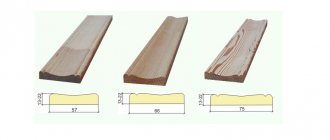
Boxes can also be divided into different types based on the material used. For their production, steel, wood, plastic and MDF panels are used. Today, metal structures are most often installed at the entrance to apartments and private houses. They are the most durable, reliable and durable. Wooden doors are installed in interior openings, and plastic doors are installed on balconies.
Preparatory activities
Before you begin installing the door frame yourself, you need to prepare all the necessary materials and tools. Depending on the type and configuration of the product, their list may differ slightly, but you should definitely have on hand:
- Pencil;
- Corner;
- Roulette;
- Plumb;
- Level;
- Wooden wedges;
- Spacers;
- Additional bars;
- Screwdriver and screwdriver;
- Hammer;
- Bulgarian;
- Self-tapping screws, screws, nails;
- Hacksaw (saw), jigsaw;
- Miter box;
- Chisel;
- Construction foam.
Before installing the box, it is necessary to prepare the surface of the wall of the doorway itself. The old door structure is being dismantled. After this, it is necessary to carefully seal all the cracks, remove irregularities, and adjust the size of the opening to fit the new box.
Significant protrusions are cut off using a grinder, recesses and cracks are sealed with plaster mixture. In order to carry out installation without any particular difficulties, it is recommended to select the parameters of the door structure after preparing the opening in the wall.
Connecting frame strips at an angle of 90 degrees
In this case, the top strip of the box is attached on top of the side strips. The length of the vertical frame elements should be 6 mm greater than the height of the door leaf with the threshold (two gaps at the top and bottom).
Most often, a threshold is not installed in interior openings. Therefore, in this case, the length of the vertical strip = the height of the canvas + the upper gap (3 mm) + the lower gap between the canvas and the floor base (1 cm).
The structure is assembled on a floor base. The top panel of the box is placed on top of the side elements and screwed to them with screws perpendicularly.
If it is necessary to reduce the passage in the wall, additional elements (building timber) are used, which are inserted between the box frame and the wall. The additional detail will then hide the casing. This installation technique can be used if the opening itself is even in height and its width is slightly larger than required.
Decide on the opening and hanging side
If the canvas is installed flush with the wall in the corridor, then it will open into the passage. If there is a wall in the room, then the door will open there. Think about what is more convenient and take this point into account.
To open to the right, the hinges must be hung on the right side, and to open to the left, on the left. To avoid mistakes, stand in front of the door and imagine that you are swinging it open towards you. If it has glass, then the matte side should face the corridor, and the glossy side should face the room.
Connecting planks at an angle of 45 degrees
As in the previous case, before installing the door frame intended for an interior door, the structure is assembled on a flat floor base. The elements of the box frame are laid out on a plane, preliminary measurements are taken, and calculations are made. The structure is assembled from two vertical profiles, a lintel, a rebate and a hinge post.
The height of the vertical slats of the frame is equal to the height of the door leaf + the thickness of the lintel + 2 gaps between the slats and the wall (3 mm each) + the thickness of the threshold (if any).
The length of the threshold with a jumper is calculated in the same way. It is equal to the width of the door leaf + the thickness of the vertical frame slats + 2 gaps between the frame and the entrance wall (3 mm each).
After performing the necessary calculations, markings are applied to the beam and the excess part is cut off. Next, a section for the vestibule is marked on the profile, which is also removed.
Blanks prepared from timber are placed around the perimeter of the door leaf. Pieces of cardboard 3 mm thick are placed between them to obtain the required technical gap.
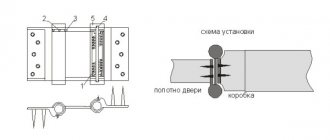
Next, markings are made for the placement of loops on which the canvas will be hung directly. To do this, you need to retreat 20 cm from the top and bottom of the vertical strip of the frame and draw a line. Loops are placed along these lines, their second edges are marked, and self-tapping screws are screwed through the holes to mark the attachment points.
Next, the loops are removed and, according to the applied markings, using a chisel, material is selected from the plank to a depth equal to the thickness of the loops. After this, they are inserted into the resulting recess and twisted.
After this, all the elements of the box are folded together while maintaining the gaps. Their perpendicularity to each other is adjusted, after which the connection is made using screws. It is recommended to make holes for them in advance. In this case, the screws are screwed in at an angle of 45 degrees.
Embed the lock
- Turn the canvas over so that the loops are on the floor, and the opposite side, where the lock will stand, is at the top.
- Position the lock correctly - in the center of the door. The square hole for the handle should be at the top, and the beveled part of the latch should be directed towards the closure. If necessary, the tongue can be easily turned over by simply pulling with your fingers.
- Measure the length and width of the lock mounting plate, as well as the thickness of the door. Make a mark and place the bar strictly in the center of the canvas.
- Turn the lock around and apply it to the door. Mark the center of the location of the mounting holes, drill, and screw in the screws.
- Trace the plank along the contour with a pencil and carefully cut the film with a sharp knife to clearly mark the boundaries of the selection for installation and not damage the edge.
- Remove the lock and separate the cut film from the canvas with a chisel.
- Attach the mechanism to the door, aligning it with the planned location, and mark the width of the body. Measure the thickness of the lock at its widest point and mark it on the canvas.
- Draw boundary lines 2 mm from the edges of the groove on both sides.
- Using a drill with a diameter of 6–7 mm, make holes along the contour of the hole for the lock mechanism. To use the maximum area, arrange the holes in a checkerboard pattern. Act carefully and do not protrude beyond the boundaries of the markings.
- Slowly cut off the drilled wood with a chisel and trim the edges of the groove so that the lock fits freely, but does not dangle.
- Use a chisel to remove the wood little by little until the mounting strip is flush with the wood. Check by applying the lock with the back side rather than pushing it into place - otherwise it will be difficult to remove.
- Place the lock on the side and use a pencil to mark a square hole for the pen shaft. Make a mark on both sides and remember that this figure should be on top and not below when the door is installed.
- Insert a piece of wood inside the groove as a support and use a drill with a diameter of 20 mm to make a hole on one side and then on the other.
- Place the lock in place and secure it with screws, having previously drilled holes for them.
Planting a box on construction foam
Door assemblies (frame, door leaf suspended on hinges and spacers between these elements to maintain the required gap) are installed in a previously prepared opening. The structure is adjusted vertically and horizontally using a building level and plumb line. After this, to secure it, wooden stakes are inserted between the box and the wall of the opening.
It is recommended to approach this stage responsibly in order to avoid door misalignment in the future. The gaps between the door frame and the wall are filled with special construction foam. It is recommended to do this carefully in small portions and thin layers until the free space is completely filled.
Next, you need to wait until the foam is completely dry, and then trim off any excess foam. Then the cracks are closed with decorative trim. The door structure will only be supported by polyurethane foam.
Installation
Installation of an interior door with a frame is carried out independently in several stages:
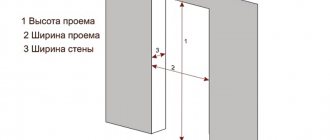
- measure the width of the doors and doorway again;
- lift and insert the box into the opening. Install it on a flat surface to avoid distortions;
- carefully align it and check again;
- secure the box using spacers or regular wedges.
Fastening the door structure
To secure the door leaf to steel hangers, metal fastening elements are used, designed to connect frames under plasterboard slabs. At least 4 such fasteners are needed.
Do-it-yourself installation of an interior door frame in a wall opening step by step:
The fully finished door leaf (already with fittings) is hung on hangers fixed in the frame. Cardboard spacers are inserted into the gaps between the canvas and the box frame. After this, the hangers are screwed onto the outside of the door frame.
Next, the door block is inserted into the wall opening and secured with wedges. The structure is leveled and the places where the suspension is attached are marked. In these areas, the material is selected, that is, a recess is made for the plates. After this, the door is leveled again and the plates are fixed to the wall.
The recesses with inserted hangers must be plastered, and the resulting voids must be filled with construction foam.
If a through installation option using anchors is used, holes for such fastenings are made in advance on the side of the box profiles. To do this, marking is done first. 2 anchors are fixed on each side.
At the point where the fastening is located, first drill a hole with a diameter of 14 mm (for the plug) with an electric drill, then a hole with a diameter of 10 mm (for the anchor). Next, the door frame is installed in the opening, fixed, and holes are drilled for anchors in the concrete wall of the opening. The installed anchors are covered with platbands.
This method of fastening is quite durable and, accordingly, more reliable.
Dismantling
If the doors are not installed in a new room, but the structure is replaced. Then you can install the door frame yourself only after the old one has been removed. The door frame is dismantled in the following order:
- The platbands are removed and the elements of the box are disassembled.
- Fasteners and anchor bolts are unscrewed.
- The strength of the opening is checked and, if necessary, it is strengthened.
It is worth disassembling the door frame very carefully so as not to damage anything and thereby increase the amount of installation work in the future. If it is necessary to replace the door frame, it is recommended to dismantle it in advance so that there is time to prepare the opening. It is almost impossible to remove the door frame without damaging it. Therefore, after removing old components, you will need to install new ones.
The door catches the frame: how to fix the problem?
If, after installation, the door leaf rubs against the frame, the door closes with difficulty or does not close tightly, it is necessary to find out the reason.
Led the box
In such a situation, the first thing to check is the correct installation and reliability of the door hinges. If they are not the reason, it means that the box was deformed as a result of swelling of the construction foam due to significant temperature changes.
To eliminate the resulting defect, the door frame must be drilled through and connected to the concrete wall using long screws or anchors. The holes are then decorated with plugs.
Selecting Tools
First of all, before starting installation work, you need to choose the most suitable tool. The quality of work depends on it. To complete this task you will need:
- saw. Make sure it is well sharpened and has small teeth. This will prevent the formation of chips and cracks;
- a screwdriver and a set of attachments for each type of fastener;
- drill and set of drills. It is important that the drills can drill a hole in concrete and other hard building materials;
- tape measure for measurements and a pencil for making marks;
- fasteners. These could be self-tapping screws, dowels or even anchors;
- polyurethane foam. Needed for foaming holes;
- spacer elements. They are necessary to securely fix the box in the doorway. They can also be replaced with wooden wedges.
It is worth noting that this list is not universal. A more precise choice of tools depends on a number of factors, for example, wall material, mounting method, and so on.