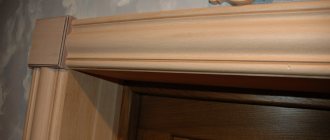
The additions allow you to hide the opening between the door frame and the platband during the installation of swing doors, and to create a partition when installing sliding door structures and portals. From the article you will learn about the types and features of additional strips, methods of their installation. A description of the installation technology will help you install the additions at home yourself.
Types of additions and their features
Additional trim strips are not installed on all doors. But only in openings whose width exceeds the dimensions of a standard frame for swing doors - 140 mm. Such elements are needed only when decorating wide partitions. Also, extensions are indispensable for the design of portals and openings of sliding doors.
Types of extras:
- Simple or ordinary , extensions are smooth rectangular planks. Their ends can be straight or rounded, with or without an edge. Installation occurs by tightly joining the elements with the end parts.
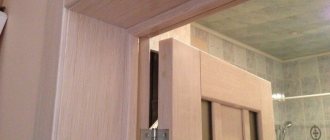
- Telescopic strips have grooves on one or both sides. They are mounted to the door frame and connected to each other using the tongue-and-groove principle. Telescopic extensions allow you to adjust the width of the cash without cutting it: by pulling out or plunging the bar into the groove.
- Combined boards are a narrow board 20-50 mm wide, connected to a platband.
Additional elements are made from MDF, chipboard, natural wood; plastic and metal are less common. The most common material is MDF. Manufacturers perform decorative coating only on the front side.
Manufacturer sizes of extensions can vary significantly from line to line. Here's an example of averages:
- the standard thickness of the extensions is 10-16 mm;
- width ranges from 30 to 200 mm;
- maximum length - 2500 mm.
When choosing additional elements, the following nuances should be taken into account:
- The installation technology depends on the type and design features of the extensions.
- It is most convenient and profitable to buy connecting elements together with the door leaf from the same manufacturer’s line. In this case, they will fit together perfectly during installation. When using products from different lines, the technological grooves may not match, and materials will have to be adjusted.
Clearance requirements
The gap between the door leaf and the top crossbar, as well as the side vertical bars, should be 3 mm.
The bottom gap depends on whether the door is installed after laying the flooring (laminate, linoleum, carpet, etc.) or before. In the first case, the gap between the leaf and the door leaves 10-15 mm. If it is intended to lay a covering, then the thickness of the material is added to the specified value.
It is necessary to leave gaps between the frame and the opening. Here wedges will be inserted to level the box and polyurethane foam will be laid.
In modern houses, builders take into account the size of the doors when making openings. In old buildings, openings may be of non-standard sizes. In this case, too wide ones are bricked. If the size of the opening is slightly less than the required size, use a plane to cut off the outer part of the counter beam. The hinged beam should not be made too thin, since it bears the weight of the door hanging on its hinges.
General procedure for installing interior doors with extensions
Before installing additional elements, the door block should be secured in the opening.
The polyurethane foam should be carefully trimmed and not interfere with further actions. There are general principles for installing additional panels:
- Before starting work, it is important to accurately determine the size of the expansion strips.
- Measure the thickness of the opening using a tape measure and level. If a box with a groove for telescopic extensions is installed, its depth should be taken into account.
- Measurements are carried out on all sides (sides and top) at least at three points of the plane. It is a mistake to determine the thickness of the opening only from the top and bottom; the dimensions of the walls can vary significantly. This most often happens in old houses. Focus on maximum performance.
- Determine the required length of the additional strips. For horizontal - measure the distance between the edges of the box (not the grooves). Keep in mind that the top panel will later have to be attached to overlap the side panels. For end ones, measure each from the top edge or groove of the box to the floor.
- Select additional strips that cover the width of the partition. Make marks with a pencil on the extensions and cut them to size. To control the accuracy of sawing, place the planks against the opening and, if necessary, adjust their sizes.
- Install the prepared elements in the doorway and secure them. Installation methods for various types and designs of extensions vary.
How to take measurements correctly
To do this you will need a tape measure with a retractable mechanism.
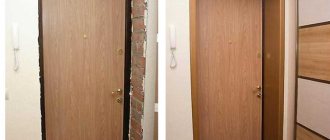
If the old door is being replaced, measurements can be taken in two ways:
- measure the removed canvas (height and width), and then buy according to ready-made data;
- start taking measurements after removing the old box.
Doorway measurements Source evimso.com
In a new house, openings usually initially have standard dimensions, which are indicated on the plan. But just in case, it is better to measure the height and width of the opening. To determine the required horizontal parameters of the canvas, you need from the obtained numbers:
- subtract the width of the box x 2
- add 5 mm for installing hinges and free opening.
When calculating the height, the vertical of the opening is measured, from it you need to subtract the height of the threshold (if there is one) and the opening gap from 2.5 to 4 cm.
Measurement parameters Source goodlinez.ru
The data obtained is compared with standard door sizes. If the difference is small, the width and height of the opening can be reduced with additional additions. If the results differ significantly from standard norms, then you can do different things:
- narrow or widen the doorway;
- order the production of doors according to existing standards.
Before deciding on such drastic measures, it is better to invite a specialist to take measurements and voice his conclusions.
Regular or classic straight
Simple strips are easiest to install on polyurethane foam.
The described technology is designed primarily for the fact that the door frame has a groove for additional elements. However, the described method is also suitable for other types of blocks. The thickness of the additional element must correspond to the groove cut located on the door frame itself. Typically, it has dimensions from 10 mm to 16 mm.
Installation technology for conventional additions:
- Take measurements of the opening and trim the panels. If you don't have a circular saw, you can use a jigsaw. Apply masking tape to the front part along the cut line - this will reduce chipping.
- Prepare a U-shaped structure from the extensions. To do this, use self-tapping screws or small nails to attach the top strip to the upper parts of the end panels.
- Insert the resulting structure into the groove of the door frame. If there is no groove cut, the extensions are attached flush to the quarter of the box using self-tapping screws.
- Secure its position with masking tape and check the vertical level. If necessary, use spacer wedges from available material
- To attach the panels to the wall and add rigidity to the structure, use polyurethane foam. Inside the gap between the extension and the wall, apply horizontal strips of foam every 10 cm. Before foaming, wet the surfaces with water.
- After the polyurethane foam has hardened, all that remains is to cut off its excess and install the trim.
Optimal time for installation
Complete installation of doors is not an easy task and quite dirty, so you need to choose the right stage of repair, at which you can already work on the openings. Having carefully studied the installation process, you begin to understand that you need to choose a moment so that:
- on the one hand, the installation did not affect the condition of the repairs made, so that the wallpaper, flooring and other elements were not damaged;
- on the other hand, so that the door covering cannot be damaged during repair work.
There can be no clear answer in this case. The following options are possible:
- if you have to remove the old box, expand or narrow the opening, then it is better to do this in the first stages of repair;
- if the standard dimensions of the products and the doorway completely coincide, you can begin installation after finishing the ceiling and walls;
- you can divide the process into two stages, first mount the box, and hang the canvas and trim after wallpapering;
- If the installation of the door frame is entrusted to experienced specialists, then the installation can be postponed until the final period of repair.
Stages of installing an interior door Source termosys.ru
By the time of installation, all elements must be purchased. When assembling it yourself, you need to stock up on tools. If the installation will be carried out by invited specialists, then you need to clarify what consumables the customer must purchase (spray foam, fasteners, etc.) and what the contractors provide.
Telescopic
To install a telescopic door, it is important to have a factory-cut groove in the door frame.
There are planks on sale with a width of 90-400 mm and a length of up to 2300 mm. Installation of telescopic extensions:
- When preparing panels, consider how many grooves there are on the element. More common are planks equipped with slots on both sides. In this case, break off the back part, an L-shaped spike will form. It is necessary for mounting in the groove of the box.
- Perform trimming. In size, the top bar will have to “lie” on both sides on the end trims or come into contact with them at 45 0 C in case of a cut. Insert the top panel into the box, measure the side pieces according to it and cut them.
- If the opening requires a wider structure, it can be easily assembled from several panels. They are joined using special thin connecting strips. This element is also called a “slit extension” - it acts as a “spike” connecting the opposing grooves in the elements. It also allows you to keep the canvas flat. In this case, additional fixation of the canvas on the reverse side with bars is necessary.
- Secure the prepared elements in the grooves of the box, check with a level. Secure them with polyurethane foam.
Extensions-platbands
Combined extensions are a combination of extensions and platband and are sold as a single set.
They do not require major fastening; liquid nails or glue are sufficient. But such planks are not suitable for designing wide openings. Installation of additional trims:
- Clean the grooves of the box from the mounting foam.
- Trim the top strip of material to fit the box groove. The side panels should only be trimmed at the bottom as there is already a notch at the top to fit the top and bottom pieces together tightly.
- Insert the L-shaped tenon of the trim frame into the box.
- Attach the structure to the wall using liquid nails or a glue gun.
If the combined products do not completely cover the wall opening, they can be used in tandem with telescopic slats.
Attaching hinges, thresholds and hanging doors
Before inserting the interior door, you need to secure the hinges to the frame and door leaf. The technology may differ depending on the shape of the loops.
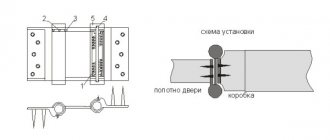
The hinges differ in design and purpose:
- Straight or card - the most common type, which is attached using side plates;
- Angled ones are similar to straight ones, but the shape of the plates is different to allow the door to move in both directions. They are used on rotary or pendulum structures;
- Screw-in ones, which have a rotating axis and pins instead of plates. Such models are not suitable for heavy doors;
- Hidden with a recessed hinge are quite expensive, so they are used on premium doors.
Types of door hinges Source dvervdome.ru
- Italian ones resemble furniture hinges. Usually found on products from European manufacturers.
Hinges can be attached to the surface (overhead), installed in cut-out recesses (mortise), or screwed in (screw-in).
Before installing the hinges, you must first determine how to properly install an interior door with a frame. There are left-handed, right-handed and universal designs.
After this, markings are made on the canvas and box:
- First, step back 20 cm from the bottom and top edges of the canvas and mark the installation locations with a pencil;
- Check to see if there are any knots or other damage at the insertion point on the canvas and frame that will interfere with fastening. If necessary, the location of the loops can be moved 1-2 cm in one direction or another;
- Apply and trace the loops or place marks at the fastening points;
- Carry out a check for free movement, which should not touch the canvas;
- The hinges are fastened in the manner suggested by the design.
- Similar operations are performed on the box, making sure that the connection points match.
Marking for loops Source rabotai-sam.ru
Features of installing sliding doors with extensions
A distinctive feature of the sliding door is its displacement to the side along the guide rail parallel to the wall.
The option of installing extensions on the opening depends on the type of installation of the canvas. There are the following types of sliding doors:
- invoices,
- built-in
In the case of installing overhead doors, the door is attached to one of the walls in front of the opening. The door portal is decorated with simple extensions, cutting them to the required width. Using self-tapping screws, a U-shaped structure is assembled from moldings, inserted into the wall, and secured. The cracks are covered with platbands.
For built-in cabinet doors, the panel is hidden inside the wall. Factory doors of this type already have a fully assembled door frame.
When installing it yourself, simple additional elements are used to cover the portal. They are installed after the door has been hung.
- When measuring and further installing additional components, it is important to provide for a technological gap of 5-10 mm between the panels and the door so that there is no friction when the door moves.
- On the counter part of the portal, a flap is constructed from additional parts for the end part of the door leaf. To do this, a wooden stand is installed level, and a straight extension in size is attached to it. Close the door, mark the area of the slam, taking into account the required gap. After this, the sidewalls are measured and two strips are cut out and glued on both sides of the intended area.
Features of installing locks with extensions
When installing swing interior doors, the lock is installed on the door leaf, and the response cylinder is installed on the frame.
The exception is homemade pencil doors. In this case, a slotted hole for the latch is made in the extension of the counter part of the opening. When installing a sliding door, the lock is cut into the door leaf using standard technology. For the response cylinder, it is important to install a strong wooden stand in the landing area - it will give rigidity to the mount. The extension is firmly glued to the block along the entire plane.
An easily washable dye is applied to the lock tongue. Close the door in such a way that there is an imprint on the door - a place for the striker. Next, attach the plate, trace its outline and make a hole to the depth of the tongue. The plank is secured to the frame with self-tapping screws.
Elimination of defects
Even with experience and skills in decorative finishing of doorways, you can make annoying mistakes. The following tips will help disguise minor installation defects.
1. If the wall is uneven, the wooden frames may bend and the joints may diverge. To avoid this, during installation the joint is additionally secured with a finishing nail.
2. Significant defects in the wall around the door frame are covered with wide planks (10-12 cm).
3. To disguise nails when installing planks of unsaturated colors, it is good to use light furniture wax or sealant of the appropriate shade.
Installation cost
For clarity, let’s compare the cost of products in the online store.
| Type of addition | Material | Size | average price |
| Straight | PVC, eco-veneer | 150x10x2070 mm | 250-320 rub. |
| Telescopic | PVC, eco-veneer | 150x10x2050 | 420-500 rub. |
| Straight | MDF | 200x10x2070 mm | 340-390 rub. |
| Telescopic | MDF | 200x10x2070 mm | 400-560 rub. |
The cost of telescopic products is almost 1.5 times higher than that of straight ones. However, when installing them on wide openings, much less time is spent. For narrow walls, ordinary straight elements are also quite suitable.
Additional elements help to aesthetically design the opening between the door frame and the casing. There are 3 types of extensions: straight, telescopic, combined. The general principles of measurement and preparation for installation are the same for all named types. However, the attachment to the doorway and the joining between the individual elements of the additional group differ. This is important to consider when purchasing and installing extensions.
Briefly about the main thing
Installing an interior door is not the most difficult stage of repair; you can handle it yourself. But there are many nuances that you need to know before you start working. All actions are performed in the following sequence:
- taking measurements;
- preparing the opening for installation;
- choosing a model based on opening method, size and material;
- box assembly;
- installation of hinges;
- hanging the door;
- threshold setting;
- installation of handle and lock;
- fastening of platbands.
Only correct and careful execution of all actions guarantees a successful installation result.
Ratings 0