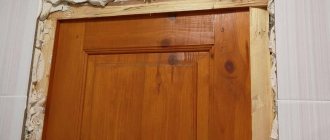
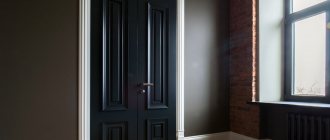
As a rule, the frame of an interior door ideally matches the thickness of the internal partition. But even the most massive external door structure will not completely cover the thickness of the outer wall. There are gaps left that spoil the appearance. After all, from this side you can see lonely trims on the wall, which without contact with the door frame will look very ridiculous. In such a situation, the problem will be solved by additions to the entrance doors. They will visually increase the depth of the hole.
Types of additional elements
Extensions to entrance doors are required when the wall thickness is more than 140 mm . This determines the dimensions of the bar. The second feature is the presence of an end groove for fitting on the box. This design limits the thickness to at least 10 mm. They make an extension 7 mm thick, but in such cases an overlay strip is attached to the edges, which forms the necessary groove.
Running sizes:
- Thickness – 10, 14, 15, 25 mm. Thin ones are more suitable for interior doors. For the entrance group, it is recommended to take 15–25 mm thick panels.
- Width – from 90 to 400 mm. The most popular are 90, 130, 170 mm. You can order the rail of any width. The product is easily made in any workshop specializing in the production of doors.
The length of the bar is not regulated. The home craftsman independently determines the required size and cuts the extensions to length.
Varieties
Wooden overlays are distinguished by design.
- Without edge - the simplest rectangular trim with raw edges. The latter needs to be varnished, painted or decorative trim installed to cover the ends. It is necessary to close them: moisture penetrates into the wood through the end.
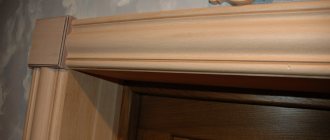
- With edge - a model with a machined edge, sanded and sealed with a protective coating. This product lasts longer. In addition, during installation you can do without platbands. However, you need to be careful during installation. If the plank is cut unsuccessfully, the coating is damaged. If the joint is loose due to a matching angle, the parts left without an edge become the cause of damage.
- Telescopic – universal option. It is a set of strips with grooves on both ends. The elements are joined to each other using connecting strips. This allows you to increase the width of the finish almost unlimitedly. The length of telescopic extensions reaches 2150–2500 mm, so you can decorate any doorway with them as large as you like.
Valera
The voice of the construction guru
Ask a Question
For telescopic extensions, you must choose a special door frame - with a groove and a connecting strip. Also, not just any platband, but an L-shaped one, is suitable. On the inside it is equipped with a protrusion that easily fits into the groove of the extension.
Criterias of choice
Modern doors are often equipped with platbands and extensions. However, when repairing or installing an entrance leaf, it becomes necessary to refinish the slopes.
Select extras, observing the following rules.
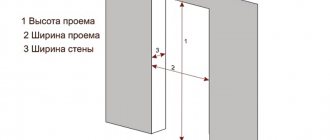
- Measurement is done in two planes, horizontal and vertical. If the walls are very uneven, parameters are measured at 3 or more points. The smallest value is selected from the data. If there is no element of the required width, choose a slightly larger one, since trimming the model, especially without an edge, is not difficult.
- Color and pattern - match the color of the door, baseboard, floor. You can choose contrast or white.
- The thickness of the paneling for the entrance block must be at least 15 cm.
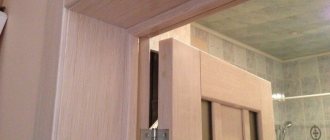
The design of the lining is selected based on the size of the opening. If the slopes are not wide, a regular strip with an edge is sufficient. If the wall thickness is large, you will have to order an extension or take a telescopic one.
The need for extras
Installation diagram of accessories in door openings
Door accessories are designed to create beautiful door portals that will look better and richer. Adding a frame when installing a door is required if there is a gap between the wall and the door frame.
In addition, structures are necessary for:
- Closing irregularities.
- Masking slopes.
- Strengthening the entire doorway structure.
- Preventing door frame distortions.
Finishing door slopes with additional trims
Preparation for installation
Preparation of the opening depends on its condition. If the slopes are plastered and the plaster is in good condition, the preparatory stage consists of removing dust and dirt and treating with an antiseptic primer. If the plaster is cracked in places, it is worth repairing cracks and chips and leveling the surface.
Tools and materials
To install you will need the following:
- additions, pieces of MDF, long-length chipboard scraps, plastic;
- saw or jigsaw;
- plane, hammer, knife;
- level, tape measure and pencil;
- fasteners - galvanized self-tapping screws, usually nails and glue - “liquid nails” are better;
- polyurethane foam.
Installation of elements does not pose a danger to others and the performer himself. However, it is recommended to wear gloves and an apron to protect your clothing and skin.
Stage 1. Control measurement of the opening after door installation
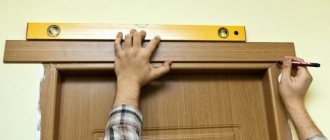
We make accurate measurements of the actual dimensions after installing the door - even if we know the exact factory dimensions. It is necessary to measure the width, height of the vertical and length of the horizontal extension.
Door trims are decorative strips that cover the walls of a doorway. They are installed if the opening is wider than the door frame. Most often, MDF panels are used for this.
Photo 2. Measuring the width of the extension
It is necessary to measure at three points vertically on each side and at two points horizontally (from above).
Photo 3. Measuring the length of the horizontal extension
The additional element must necessarily be adjacent to the door frame, so we measure the length along the width of the door.
Installation of additional elements
Installation of extensions and platbands on interior and entrance doors is carried out using the same technology. They install the overlays after installing and checking the functionality of the door. It is recommended to immediately buy the option with a door frame equipped with a groove. This significantly simplifies further work.
There are several options for installing the extension.
Slot mounting
The technology is the simplest, the same for conventional and telescopic pads.
- Before assembly, it is recommended to once again measure the depth of the opening with the door frame already exposed. The depth of the door frame groove is added to the width. According to the data obtained, the extensions are cut according to width and length.
- Insert the elements into the grooves of the box . To improve strength, lubricate the fasteners - best with “liquid nails.” The platbands are attached to the front door in the same way.
- There is no need to saw down the corners. The top crossbar rests on the side posts in a “P” shape. If necessary, the elements can be temporarily secured to the wall with masking tape.
- All cavities between the extension and the slope are filled with polyurethane foam . If the voids are large, pre-install spacers - chipboard or MDF scraps. They prevent the foam from expanding to push the planks out.
- After hardening, excess foam is cut off with a knife .
When using foam, you can do without screws and nails.
Installation without groove
In this case, the additional strips must be attached exactly butt to the frame . It's more complicated.
- Measure the slopes and calculate the width.
- The planks are trimmed and after sawing, the irregularities are cut off with a plane. The dimensions of the extensions must be very precise.
- to the cut . You will need a hot iron.
- Thin nails are driven into the end of the board in increments of 20–35 cm. If you are going to use glue, 3 nails are enough for a vertical post and 1 for a horizontal one.
- Bite off the nail heads at an angle to make the ends sharp.
- They install the extensions - first the side ones, then the top one. The bar is pressed at the bottom and finished off with a hammer so that the nail fits completely into the door frame. There should be no gaps between the paneling and the frame.
- The top element is placed on the side ones. Check the perpendicularity of the angle and also drive it in.
- The gaps between the slope and the extension are also filled with polyurethane foam.
Valera
The voice of the construction guru
Ask a Question
The foam should be squeezed out in small portions. It takes time to expand - if you overdo it, the foam will squeeze out the firmly fixed extension and deform it.
Installation of platbands
Telescopic platbands are simply placed on the extension, and the gap between the lining and the wall is foamed. If you use a regular kit , do this:
- Measure the doorway. For side elements, the width of the top bar is added to the result.
- The top of the trim is filed at 45 degrees so that the shorter edge faces the opening.
- Install the side elements and fasten them to 2 nails - at the top and bottom.
- They try on the top bar , mark it and file it at 45 degrees according to the marks. It's better to use a miter box.
- The platband is connected and fixed with nails : the top one with 2–3 nails, the side ones with 5–6 nails.
The platband reaches the floor; there is no gap under the baseboard or threshold.
Material of manufacture
The facing element of the entrance door group is made of the following materials:
- MDF;
- tree;
- metal;
- PVC.
The most common are extensions and trim made from MDF. Next in popularity are wooden and metal products. The cost of facing materials may vary. The most expensive are special planks made from natural wood.
Buy ready-made or make your own
What will end up being more profitable: buying ready-made accessories or making them yourself? This largely depends on the front door itself. Most models are made of steel and imitate natural wood in appearance. In this case, you can make the accessories yourself. The same goes for wooden doors.
Usually door extensions come complete with doors
If the metal door has a complex frame made of the same material, it may be better to purchase ready-made accessories; they will fit perfectly with the system and will not spoil the overall appearance. If your qualifications are not enough to make telescopic extensions, then it is better to abandon the idea of making them yourself, since ordinary ones can spoil the appearance of an expensive door. In addition, they can be ordered from door manufacturers complete with a frame, and they will be identical in color to all other parts of the structure.
Decorative trims
They can significantly decorate the interior of a room; they can be made from either natural wood (the most expensive option) or plastic or MDF. Plastic decorative trims have a full set of additional elements that simplify the installation process. With wooden ones you will have to tinker.
Decorative trims
Decorative trims - photo
Their installation begins with cutting down the upper corners. When taking dimensions, you need to keep in mind not only the position of the platband in relation to the door frame, but also the combination of patterns. Some trims have special technological places to facilitate the combination of patterns, and some need to be selected very carefully. Especially many problems can arise during the joining of the top and side trims. If you have little experience in performing such complex work, it’s better not to take it on. Don't waste your time and money in vain.