Category: Interior doors (2 ratings, average: 1,50 out of 5)
Published 08/02/2021 · Comments: · Reading time: 8 min · Views: Post Views: 17,326
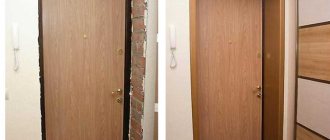
For successful installation you need a suitable door frame. It is very important to choose a frame that fits into the opening and accommodates the door leaves. We will share how to measure, install, install the extension and learn the recommendations of the masters.
Door frame components
First of all, you should familiarize yourself with the structure of the interior door frame:
- hinge beam - this is the part on which the hinges are cut and the door is hung
- the false beam is the part that meets the door. The counter part of the lock crashes into it.
- lintel - upper “ceiling” beam
- threshold - lower part
Thus, in order to assemble the door frame, you need to correctly connect all its parts. But before you start, you need to decide on the dimensions and choose the appropriate material. Doors should look aesthetically pleasing and be easy to clean.
Design options
A door frame or door frame is a connecting element between the door leaf and the opening in the wall. The door frame is its load-bearing part, which absorbs the entire force load.
The door is fixed rigidly in the wall opening; fasteners, trims, additional components, fittings are attached to it, and the door leaf is installed.
The box also performs an aesthetic function. It can continue the overall style of the door or be a separate component of the door structure.
Modern manufacturers offer different types of door frames designed for installing interior doors.
Corner
This is a universal door frame that fits different types of walls. Its design is a frame trimmed with decorative platband.
To eliminate drafts and improve sound insulation characteristics, an additional seal is laid between the frame and the door leaf, tightly closing the resulting gaps between the individual elements of the door structure.
End
End-type frames are designed for arranging doors in the openings of interior partitions made of plasterboard and other thin sheet building materials.
In this case, to increase the rigidity of the door structure, the frame is installed in a steel frame, otherwise the opening mechanism of the door leaf will quickly become loose.
Covering
This version of the door frame includes a frame, extensions, and trim. Also included in the package is sealing material. This is the optimal frame design for interior doors, which does not require preliminary preparation for installation, modification of the product or finishing.
Telescopic
The telescopic design of the box includes a set of strips that are interconnected. The diagram is reminiscent of assembling a construction set and connecting the locks of laminate panels.
Assembly of a telescopic door frame does not require the use of additional fasteners, which subsequently need to be decorated. Also, the prefabricated parts of the box do not require gluing; they are joined in grooves, and the freely moving elements allow you to adjust the force of contact of the box to the opening in the wall.
Choosing material
I don’t have a definite answer here, since the choice depends on your preferences and budget. I will give examples of the most common materials used for door frames.
MDF doors
MDF is a wood fiber board. The doors are cheap, but they look good. The advantages include lightness and environmental friendliness. The disadvantages are reduced impact resistance, poor noise insulation and short service life.
Laminated solid wood
Glued board or "euro-timber".
These doors are not made of solid wood, but of parts glued together under high pressure. The joints on them are practically invisible. The doors are quite durable and cost a little more than MDF. Price and quality are acceptable.
Solid wooden doors
Doors are much more expensive than glued ones. Strong and durable. The disadvantage is incorrect processing by the manufacturer, as a result of which the wood is excessively saturated with moisture.
Doors made of chipboard and fibreboard
Wood-fiber or wood-pressed boards. These doors are very cheap as they are made from leftover material. The advantage of these doors is good mechanical strength and fairly good sound and sound insulation. The disadvantage is low moisture resistance, as well as the presence of a volatile substance in the glue, which has a detrimental effect on health. Another aspect is the complexity of installation, since the screws in such doors do not hold well.
In addition to those described, there are also plastic, glass, aluminum, and veneered ones. Doors with honeycomb filling, laminated, etc.
The choice of material is up to you, but it should be appropriate and practical.
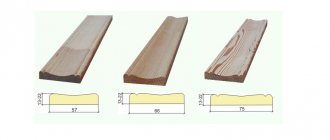
Additional strip
An additional strip is a flat board installed close to the frame or into a groove in it. The extension is used to expand the box. The need for this arises when the thickness of the box is insufficient (the wall is thicker).
Various materials are used for the production of boards: chipboard, MDF, solid coniferous trees, plywood. The product is laminated, stained or veneered to match the box. When calculating the width of the extension, it is necessary to take into account the thickness of the box and wall. The additional strip should compensate for the difference between these parameters. In this case, the thickness of the box means the width of the timber from which the horizontal crossbar and vertical posts are made.
Proper sizing is the key to success!
The standard sizes of door leaves are
- height 2000 mm
- width 600 mm, 700 mm, 800 mm and 900 mm
All other sizes that go beyond the scope are usually custom-made items. (I mean single canvases, not swing ones)
You need to add 70 mm to the size of the door leaf - this is the standard width of the door frame. If the dimensions of the door frame are different, then the size will naturally change up or down. And we also add 6 mm - this is the technological gap between the leaf and the door frame.
Now you need to check how the door frame fits into the doorway. If it needs to be expanded, then we are not in a hurry to break everything at once. We soberly assess the situation - we may have to strengthen the opening with lintels. If you need to reduce the opening, then we fill it with bricks, or “sew on” bars - it all depends on the situation.
IT IS IMPORTANT TO KNOW:
To help you understand what size doorway is needed, look at the formula:
Door leaf size + door frame size + 6 mm tech. gap + 60 mm (30 mm on each side for mounting foam and wedges that will be needed when installing the box)
Usually the dimensions of doorways are controlled at the construction stage, but in older private houses (like mine) there are “hard” discrepancies.
The next important dimension is the gap from the floor to the door leaf. Before calculating it, you need to check the level of the floors for the width of the door “swing”.
You can do this in two ways:
- Using a hydraulic level
On the side walls of the opening we place marks at the same level. We measure the distance from each mark to the floor plane. The difference that you get when measuring should be added to the minimum height of the posts so that when opening the door does not rest on the floor. If you still “miss” this moment, then you can eliminate it only by trimming the door leaf, and this is still a “handjob” :(
2. Using a laser level
If you are the happy owner of a laser level, then everything becomes much simpler. We set the level and, using a construction square, determine the curvature of the floors. The obtained values are taken into account when setting sizes.
The minimum gap is 10 - 15 mm, depending on what kind of floor covering is planned. But it is better to immediately lay linoleum, or carpet, or laminate, and then carry out the installation.
See the table of correspondence between door blocks and openings.
And here is another table of typical door frame sizes
Measuring algorithm
To save on measuring, you can do it yourself. To do this you need:
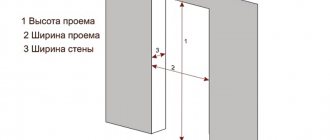
- first you need to clean the walls from the door and frame so that the change is accurate;
- then you need to measure the distance from the top of the opening to the floor in the 3rd place (right, middle, left);
- then determine the distance between the walls (top, middle, bottom);
- For high-quality installation, the thickness of the door leaf of an interior or entrance door is important, not exceeding the opening. Therefore, measure the wall thickness on each side or the box with the addition of a protruding wall.
Don't miss: Tool for inserting locks into interior doors: a set of tools for installing door locks
Important! If it is impossible to remove the frame or door, measurements are taken along the edges of the trim.
After measurements, you need to record the largest results obtained. This will allow you to avoid making mistakes when ordering frames and doors.
Assembling a door frame without a threshold
Let's look at assembling a door frame with your own hands using an MDF frame as an example. We will connect the upper parts at 45°, as this is the most aesthetic way.
1.First of all, you need to trim the parts of the box. This is done in order to eliminate irregularities or manufacturing defects.
IT IS IMPORTANT TO KNOW:
If you have to use hand tools, it is better to use a fine-toothed saw or a hacksaw. Start making cuts from the veneer side so that chips, if any, remain on the invisible side.
2. We “saw” the loop beam and the vestibule at 45°. It is best to do this with a miter saw, but if you don’t have one, you will have to work with a miter box. To avoid unevenness when cutting, the miter box must be secured. We use a hacksaw with a fine tooth.
3. Next we move on to the most difficult part - “sawing” the top of the box - the lintel. You need to clearly set the size and not miss the corners. You can use a tape measure, but there is an easier way. To do this, we apply the lintel to the top of the door and mark the marks “in place” with a sharp pencil. To maintain the technological gap, you can use packaging cardboard - its width is just 3 mm.
4. Mark the height of the loop and false beams. I told you how to find out the required height a little higher. This is the height of the door leaf + the top gap of 3 mm + the bottom gap. If the floors are level, then 10 mm is enough. When opening, the door leaf should not catch or rest against the floor. You should not create a very high gap - 10 - 15 mm is enough for normal air circulation. If the room is damp, then larger values are allowed.
IT IS IMPORTANT TO KNOW:
If there is a difference where the doors are installed and there is no way to correct it, then the height of the racks may be different. The highest point of the difference is taken as zero.
Next, we cut off the racks according to the marks.
IT IS IMPORTANT TO KNOW:
We constantly and meticulously check all the applied dimensions before washing down. If the box turns out to be smaller than the canvas, you will have to buy a new beam.
5. After all the components have been sawed down, we assemble the MDF door frame together, having previously drilled holes with a drill of a smaller diameter to prevent the frame from splitting. For connection we use 50 cm wood screws. It is more convenient to carry out work on the floor, placing cardboard or other material under the box.
IT IS IMPORTANT TO KNOW:
When you tighten the door frame, press its parts as tightly as possible, since the screws will stretch them.
Well, this is approximately the result you should get.
Sealant
It can be of different sections, but the most popular is the tubular section. The seal is laid around the perimeter of the box in such a way as to fill the gaps between the box and the canvas. The main task of this element is to increase the protection of the room from the penetration of odors, noise, dust and drafts. The seal also serves to cushion the canvas when closing it.
For it, special grooves are provided in the door leaf. The seal can also be installed in grooves intended for glass elements.
Assembling a door frame with a threshold
The easiest way to assemble. The fact is that the threshold is usually mounted at 90°.
The threshold is mounted on the entrance or “entrance” doors, separating the cold room from the living room. In addition, the threshold gives the door frame additional strength.
Preparing the doorway and checking the floor level are absolutely identical to assembling without a threshold, but further steps have their differences.
So, here are the step-by-step assembly instructions:
1. File the lintel to its original dimensions. The length of the lintel will be equal to the length of the door leaf + 6 mm for the gap. You need to make two such blanks - this will be the threshold. Do not forget to trim the workpieces, since the factory cut may not be even.
2. On loop and bevel beams, it is necessary to remove the thrust quarter.
To do this, we connect the end of the vertical post and the horizontal one and put a mark with a sharp pencil.
IT IS IMPORTANT TO KNOW:
The size must be transferred with maximum clarity so that there are no gaps. Repairing them in the future is not problematic, but it will ruin the aesthetic component of the doors.
We make a cut to a depth of a quarter with a hacksaw or jigsaw. Be extremely careful not to touch the work surface. It is not possible to fix the “jamb” on MDF doors.
Then, using a chisel or a utility knife, carefully remove it. We repeat the operations for all angles.
IT IS IMPORTANT TO KNOW:
If you use a chisel, then under no circumstances turn it over with its top sharpened side down. When carrying out work, the working part will crash into the material and all the work will go down the drain. The same rule applies when inserting loops.
3. Connect the box. We also drill holes and tighten them with self-tapping screws. The only difference is that galvanized screws are used for the threshold if it is the threshold of an entrance door. They are less affected.
Platband
Installed on top of the door frame. Performs a decorative function, making the appearance of the door more attractive by masking the gaps that appear during the installation process between the wall and the installed door frame.
Door trims are classified according to several criteria:
- according to the material of manufacture and finishing used;
- along the outside of the profile shape;
- according to the fastening method.
The most popular profile shapes include flat, semicircular and curly profiles.
Classification according to the method of fastening divides platbands into two types:
- Telescopic. They are inserted with special wings into pre-prepared slots in the box. To fix them, you just need to apply a little force. The connection line becomes almost invisible. The use of telescopic platbands makes it possible to refuse to use additional elements 1-2 cm thicker than the box. Vertical and horizontal parts can be joined together at an angle of 45° or 90°.
- Invoices . They are nailed with small nails to the door frame or glued.
For the production of platbands, solid wood, plywood, MDF or chipboard are used. A solid wood product can be treated with stain or veneer.
The material and color of the trim must be chosen so that they match the box.
The shape of the profile of the platband affects the expressiveness of the door as a whole, especially if they are complemented by capitals and bedside tables.
The bedside table is a part of the platband located vertically in its lower area. With its help, a transition is made from the platband to the floor or baseboards.
Door frame tenon connection
One of the ways to assemble door frames is a tenon joint. It's not as common as 45° and 90° assemblies, but it does exist.
The joining of parts occurs through tenon joints (see picture)
Usually the achieved rigidity is quite sufficient, but galvanized nails can be added to enhance the strength characteristics.
Single and double doors
Double swing doors with two leaves will look effective in the design. The width of the products depends on the model and parameters of the living room passage. Parameters for such doors are sometimes accepted with an increase of 1.5-2.
Standard dimensions for double systems with a box are 120-150 cm. This allows you to install full-fledged double-leaf structures. The width of double doors is 1-1.4 m.
With minimum dimensions, double doors can be offered with one fixed leaf with a width of ½ or 1/3 of the standard width (for example, one-and-a-half options). The other part of the canvas will be complete. With the optimal opening width, identical sashes are installed, which increases the aesthetics and accessibility of people.