Handles, Accessories
The charm and aesthetics of wooden door handles are incomparable to products made from other materials. Similar products are used for baths, saunas, for entrance and interior paintings. A wooden door handle is easy to make even for a novice craftsman. Made with your own hands, it will please the eye for a long time and cause pride in your skills.
Wooden handle on the bath door
Features of wooden door handles
Since ancient times, door fittings have been made from wood. Later, they were given a worthy fight by steel products and elements made from modern materials. Even today, wooden models are widely popular due to their advantages:
- Properly sanded and processed wood is soft to the touch. A wood handle is not as cool as a metal or plastic handle.
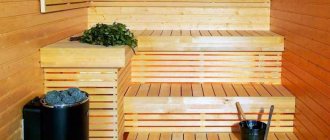
- Accessories made from wood are irreplaceable when arranging baths and saunas. Wooden elements do not heat up to enormous temperatures like steel ones, and the possibility of getting a burn when handling the handle is reduced to zero.
- Easy to make wooden door handles with your own hands. Wood is easy to process, and working with it does not require expensive equipment. Using bars, slats or logs, it will be possible to create a structure of any shape.
- Affordable price.
Despite the significant advantages, wood products also have some disadvantages:
- The strength properties of wood are inferior to steel elements. This fact must be taken into account when constructing a structure that is subject to significant loads. In this case, it is better to give preference to hard wood or metal.
- With prolonged contact with steel surfaces, the wood is destroyed. Based on this, door handles for doors must be selected in accordance with the material of the door leaf.
- In order for a wooden handle to serve for a long time, it should be carefully treated: sanded and impregnated with protective compounds.
Requirements for the design of a bath handle
Like all important things, it is impossible to make a handle for a bath door at random, without knowing how the material and design will behave. It is always hot in the steam room of the bathhouse, and the entrance door to the steam room is usually built massive, with a tight fit in the frame. Therefore, the convenience and safety of using the steam room depends on how correctly the handle for the bath is made with your own hands.
Bathhouse door handles must meet the following requirements:
- The body must be quite massive and durable. In the event of smoke in a steam room or bathhouse, it is much easier to see a bulky arc than a small ball of wood;
- The material should not absorb moisture, have low thermal conductivity and not emit volatile substances when heated.
Bathroom door handles are made of wood, no plastic, rubber, much less metal, even if the hand grip area is insulated with a fabric, leather or felt cover. It is not difficult to wash the body of the handle, but it is very easy to get a burn if you accidentally grip a metal part incorrectly in a hot steam room.
Contrary to popular belief, wooden door handles for bathhouses are quite durable and can serve their owners for one and a half to two decades.
Selection of wood species for the production of handles
Devices mounted on entrance doors must be made of strong wood. Some experts recommend using conifers, which, when heated, emit a pleasant smell that is suitable for human health. But hardwoods, which are distinguished by their excellent textured pattern and good mechanical resistance, are no less in demand.
Advice. It is better to make door handles from deciduous trees so that no resin remains on your hands when gripping them.
For making door handles with your own hands, the following are suitable:
- Oak – characterized by strength, resistance to external influences and hardness. Oak products look respectable and generous, and are amazingly suitable for furnishing suburban mansions and apartments.
- Beech is a desirable species, similar in many qualities to oak. The wood has an unusual pinkish color with a uniform texture.
- Poplar - has very pronounced bactericidal qualities, which is why it is often used when decorating a steam room.
- Linden – has an anti-inflammatory and calming effect on the human body.
Important points
When making a product from a board, consider several important points:
- The bark must be removed from the material, otherwise the handle will not last long.
- All edges of the product are carefully sanded, as are the canvas and the box. At first, you can use a power tool, but you will have to manually adjust the evenness.
Simple products
Simple wooden handles
- All wooden parts are treated with special compounds. This will protect them from moisture (especially if the handle is for the bathhouse door), microorganisms (fungi, mold), and fire.
- To give the handle a tint, use a wood stain of a suitable tone.
- Finishing is varnishing in several layers. At the same time, make sure that there are no drips left on the product.
Handle on the bath door
Manufacturing and installation
The sequence of creating a door handle:
Clean the cut of the tree from the bark, sand it and apply contours to the workpiece - this will be the base of the future handle.
- Use a jigsaw to “go” along the contour and give the tree a suitable shape.
- To add texture to the workpiece, you can use a milling cutter to make indentations in the marked areas of the wooden cut.
- Sand the side ends of the product and chamfer the edges of the workpiece.
- The handle is made from an unusual knot. Remove the bark from the branch and fit the handle to the base.
- Use a saw to trim the edges so that the ends of the handle are in perfect contact with the prepared workpiece.
- Apply epoxy glue to the handle, press it to the base and clamp the parts with a clamp.
- Drill holes in the bases of the handle at an angle, lubricate the dowels with glue and drive them in, thereby strengthening the structure. Saw off excess pegs.
- Leave the handle to dry for one day.
- Coat the product with varnish, wait until it dries completely and install it on the door.
What to expect from wooden crafts
Before we get to work, let’s evaluate the characteristics of homemade fittings. Advantages of a wood handle:
- the design and shape of the product can be very different;
- natural material with low thermal conductivity evokes pleasant tactile sensations;
- for the same reason, wood does not burn your hand on the bathhouse door;
- you won’t have to waste money on accessories;
- “metallists” will not take the pen for scrap;
- If it fails, you can make an even better one.
As usual, there are also shortcomings:
Lightweight version of a wooden handle for a bath
A homemade door handle will amaze the guests of the bathhouse and will become the pride of the owners of the steam room. Constructing a lightweight model will not be difficult. Let's look at an example of creating a pen with a length of 20 6 cm and a height of 10 cm. To work, you will need a board with dimensions of 26 * 10 * 5 cm, a light pencil and a jigsaw.
Method of action:
- Draw a sketch of a pen on the page. It is no more difficult to show the drawing by cells. In order to draw arcs and curved lines, you can use a pattern or improvised round objects of suitable diameter.
- Transfer the contours onto wood and cut out a blank along them using an electronic jigsaw. To obtain an even cut, it is better to use a metal cutting file.
- If desired, you can smooth the shape of the handle and chamfer it, apply a pattern, carve a sketch, or make decoration with a burner.
- Attach the handle to the door with self-tapping screws.
Accessories and devices for baths
General information
Wooden dishes for a steam room are an irreplaceable thing.
It is generally accepted that the use of wood to decorate a steam room and make all kinds of wooden bath accessories is a kind of nod towards traditions, and the objective reason for the presence of only wooden products is that at the time of the formation of traditions there were simply no other materials.
There is, of course, some truth in this opinion, but everything is not so simple. If we analyze the characteristics of the temperature regime in the steam room, as well as the dynamics of the transfer and distribution of thermal energy, we will see that our ancestors chose the most suitable material for use in such conditions.
A wooden bath handle is an original solution.
So, here are some calculations from the analysis of climatic conditions and processes associated with the thermal regime of the bath:
- The air temperature in the steam room of the bath can reach 80 degrees and above. Due to the low density of air, we do not feel the aggressive effects of heat, but as soon as we touch a material with high density and thermal conductivity, we instantly feel its temperature;
- The most dense and heat-conducting material is metal, so when entering the sauna, always remove metal jewelry. Metal products heat up very quickly to high temperatures, and upon contact with human skin they leave burns;
- Wood is a material with low density and very low thermal conductivity. At the same time, wood is strong and durable enough to be used as a raw material for the manufacture of all kinds of products, including wooden grates for baths, tubs, buckets, steamers, ladles, etc.;
- Even at the entrance to the steam room you can see wooden handles for the bath, since a reasonable person would not handle metal ones;
- Wood lends itself perfectly to processing with the simplest tools. This allows you to create products of incredible beauty: wood carving for a bathhouse can turn any interior detail or accessory into a work of art;
- An equally important feature of wood raw materials is its environmental friendliness. This is most relevant in conditions of high temperatures and high humidity, at which most modern materials begin to release all kinds of chemical compounds into the atmosphere, and this, at a minimum, is not useful;
- Many types of wood have a beneficial effect on the human respiratory and nervous systems due to essential oils and resins, as well as many other compounds contained in various tree species. It is known that conifers have a beneficial effect on the upper respiratory tract, calm the nervous system, increase skin tone and blood microcirculation in it, and strengthen hair;
- Wood can be restored, and proper impregnation and processing of this material extends its service life for decades.
A carved wooden panel for a bathhouse will decorate and enliven the interior.
Of course, in addition to decorations and dishes, wood is used to make bath furniture. Shelves, tables, chairs, stools, even wooden lampshades for a bath - all this can be found in almost any steam room.
Selection of raw materials
Certain types of wood are used to make bath products.
When choosing raw materials for the manufacture of bath accessories, they are usually guided by the following considerations: the material should have a low density if it is used directly in the steam room, since low density reduces the thermal conductivity of the product. In addition, the wood must have a high resin content to better resist the harmful effects of moisture.
To increase comfort during washing, you can use denser products, since high temperatures are not observed in the shower. A wooden bath mat that will prevent you from slipping and falling on slippery tiles is best made from species such as teak, nyato or mahogany. These materials have high strength and the necessary resin content for constant moisture.
Wooden bath furniture is not only beautiful, but also functional.
Linden is most often used to make shelves, benches, chairs and other furniture for the steam room. This material has a very low density, practically does not transfer heat and has excellent resistance to moisture. You can also choose Siberian cedar, larch or Karelian pine.
Wood carving in the bathhouse is performed on panels made of Karelian birch, oak, pine, alder, beech and other species. Here the choice is not so important, since the product performs exclusively decorative functions and there is no contact with it.
Door handle in Russian folk style
An example of a carved handle will harmoniously fit into an interior designed in a traditional folk style. The handle will perfectly complement an antique-style door. The design of the model includes 6 parts:
- Base;
- Intermediate bars - two pieces;
- Cubes - two pieces;
- Pen.
First you need to prepare each part separately, fit them together and polish them. Production order:
- Preparing the base: apply markings on a board measuring 36*9*2 cm in accordance with the drawing; Cut corners and semicircles with a jigsaw; If there is no tool at hand, the processing can be done with a semicircular file.
- Make intermediate blocks. In planks with dimensions 6*2*2 cm, make a longitudinal hole with a diameter of eight mm. In the future, dowels will be installed in them to assemble all parts into a single structure.
- Prepare cubes with a side of four cm: cut and polish a block with a cross-section of 4*4 cm, about 10 cm long; Saw the block into cubes; In the taken blanks, make two holes with a diameter of eight mm along the horizontal and vertical axis.
- Make a handle from a block fifteen cm long and a cross-section of 3*3 cm. Drill holes at the end sides with a depth of two cm, a diameter of eight mm.
- Perform decorative carvings on wood blanks: Base. Mark the outlines of leaves, squares and crosses on the board. Using the point of a knife, pierce the upper points of the ornament and cut out the tree, first on one side and later on the other, forming grooves of equal width. First, the leaves are cut out, and later the inner crosses. Pen. The carving is made on 4 sides using oblique lines with the same slope. The depth of the groove is about 3-5 mm. Cubes and blocks are decorated with diamonds and winding lines.
- Assembly is carried out using dowels “planted” on PVA glue. At the same time, it is necessary to cover the surface of the holes and the dowels themselves with an adhesive composition.
- Install the handle on the interior doors yourself using self-tapping screws.
Determine the purpose and choose the method of making a homemade pen
In most cases, a handle is used to open or close a door. With all this, you can make a latch, hook or bolt from wood that will fix or lock the door.
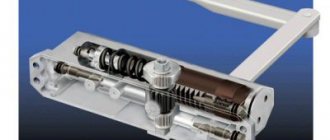
The products shown in the photo were made on a lathe. The small button-style handle
To open a heavy door, it is better to make a full-fledged handle from 3 parts. I would choose the option with a crossbar that is inserted into the supports (above right), which provides the greatest strength to the craft.
Carved handles are not bad in their own way. There are an indescribably huge number of options for such products. To make something similar, you need to have a set of cutters and artistic taste. With all this, light handles can be completely processed with a knife.
I advise you to take a close look at expensive pens: they can be ordinary, reliable and even unique. Such fittings can be cut with a regular hacksaw or jigsaw.
If a handle made of 3 parts is secured with screws through the main element through stands, the product will be very durable. In this case, you should ensure that the stands are at a height that provides sufficient clearance for your fingers.
Flat handles are more popular and are made from boards. I recommend the option located in the photo below on the right: it is more reliable because the clearance of the handle is below the heads of the screws. In this case, the craft will not break along the fibers.
To produce accessories, you need to draw drawings of the parts on the plane of the board, and then cut the workpiece with a jigsaw. Naturally, sanding will be necessary.
Holes for fastening should be provided. They are drilled out from above with a huge diameter to hide the heads of the screws.
It is very convenient to use tree branches to independently produce door handles for buildings in the country. With all this, the uniqueness, simplicity and reliability of the craft are immediately ensured.
Accessories made from natural materials can be decorated with carving elements, applied with pictures or icons using a burner, or treated with a blowtorch. In a more complex version, linings cut with a jigsaw are used. To attach a handle from a branch, you need to prepare several holes for screws so that the fittings do not wobble and are held tightly.
DIY turned wood door handle
To produce a turned handle for interior doors, you will need to master the ability to work on a lathe. Creating a similar model requires the introduction of the following tools and materials:
- Machine with three-jaw chuck;
- Oak block;
- Wood cutters;
- Coarse and medium-grain sandpaper;
- Wax mastic.
Sequencing:
- Prepare the workpiece. A square block of wood should not be cut off much on the sides on one side. Thus, the rounded part will be evenly fixed in the machine chuck.
- Insert the workpiece into the jaws and use a semicircular cutter to give it a cylindrical shape along its entire length.
- Level the surface of the block with the end of the cutter, holding it at a slight angle.
- Use the sharp edge of the cutter to shape the upper part of the handle.
- Leave a certain distance from the edge and carve a base, the back of which will be adjacent to the door leaf.
- Trim the base of the handle with a straight cutter and sand the surface with sandpaper. When sanding, it is important not to overdo it and not to press too hard on the paper, otherwise you may burn your fingers on the rotating elements and break the product.
- Cover the handle with wax mastic. The product gets into the pores of the wood, protecting the material from external influences and giving the handle a matte shine.
- Using the tip of the cutter, cut off the handle from another part of the rough timber.
- Insert the handle into the door.
During the production process, some aspects should be taken into account:
- For processing, it is necessary to take material without cracks and knots; otherwise, when rotating, the workpiece may split and cause injury;
- It is recommended to make a pair of handles from one blank, since turned models are small in size;
- Before sanding and impregnating with a protective compound, all minor cracks on the handle must be filled with putty designed for woodworking.
Manufacturing methods
There are two popular ways of making products from wooden material:
- turning;
- thread.
Turned products
Such parts are made on a lathe; the product cannot be manufactured without special tools. “Balls” and “mushrooms” are made using a similar method. The manufacturing process consists of several stages.
"Mushrooms"
You will need a blank - a wooden board (block) with a section of the required size, which is selected in accordance with the parameters of the product. Leftovers from making the door frame will do. The board must be dry, intact, without cracks or other defects.
Note! The integrity of the blank board is important both for the aesthetics of the finished door handle and as a safety requirement, because such a blank can break at any time during rotation and injure your hand.
“Mushrooms” from a lathe
Manufacturing stages:
- An octagon is made from a blank board; a plane is used for this. It’s faster to work with an electric planer, but if you don’t have one, then a regular manual one will do.
- Next, the hewn workpiece is clamped on a lathe and a cylinder is formed using a chisel.
- Next, markings are applied to it for the future part. The product is formed using a semicircular or beveled cutter.
If you need to make handles for several canvases, then take a block of such length that it is enough for 3-4 copies, then saw them. The surface finishing is done manually using fine sandpaper.
Assortment of turned wooden handles
Carvings
This model is easier to manufacture and does not require special equipment such as a lathe. Tools and materials you will need:
- Board.
- The branch is of a non-standard shape and of such a size that it is convenient to grip the door handle.
- Saw, jigsaw.
- Milling cutter and attachments are optional.
- Drill or screwdriver.
- Sandpaper or sander.
- Clamp.
- Epoxy adhesive.
- Varnish.
- Nog.
Handle blank
Installing handles on interior doors
Inserting handles into interior doors with your own hands begins with marking the location of the fittings. In accordance with established standards, a standard door handle is installed at a height of 80-100 cm from the floor (depending on the height of the residents). The work is carried out in the following sequence:
- Mark the installation location on the door leaf, moving at least 6 cm away from the edge.
- Using a ruler, draw a straight line across the end of the door and continue marking from the back of the door.
- Use a drill to prepare a hole ½ the thickness of the door.
- Repeat drilling on the second side of the blade. It is important that there is no deviation of the hole axis horizontally or vertically.
- Use a chisel to knock out a niche for mounting the latching mechanism.
- Insert the latch and check that its edge is in the same plane with the door leaf.
- Place the two parts of the handle on different sides of the door and guide them through the hole. Tighten the structure with bolts.
- Finish the end of the box with a steel plate - prepare a selection for the tongue and frame, try it on and secure the plate with self-tapping screws.
Over time, you may need to do some minor DIY repairs to interior door handles. At times, to prevent the elements from becoming loose, it is enough to tighten the screws with a screwdriver.
Insulating the front door
With our harsh winters, insulating the entrance door to the bathhouse becomes a very important issue.
In most of our country, winters are very harsh, and bathhouses are usually built separately, unlike Finnish saunas, which can also be located inside a residential building.
We will tell you how to make sure that in winter the desired heat from the bathhouse does not escape into the street, and the frosty air does not penetrate into the bathhouse and does not chill the feet of those who are washing. To do this, you need to mount a certain structure with your own hands.
Insulation instructions:
- we take bars 20 mm thick and nail them along the entire contour of the existing door leaf from the outside so that the bars protrude beyond the edge of the door by about 15 mm;
- We nail insulation around the perimeter of the resulting frame, preferably felt folded in half; the insulation should protrude with its folded side 15 mm beyond the edge of the block;
- You can also install any insulation into the void of the frame that is formed between the bars;
- We stuff a sheet of fiberboard or plywood onto the frame directly to the size of the frame itself, so that the rolled felt peeks out around the entire perimeter of the door from under the plywood.
When closing the front door, the leaf fits precisely into the door block, and the insulation, bending outward, reliably cuts off the possibility of frosty air entering the interior.
DIY wooden door handles: photo ideas
The design of door handles amazes with the variety of colors and designs. The fantasies of woodworking masters are embodied in unusual shapes, beautiful curves and stylistic execution of door accessories.
Features of choosing a door
Wooden doors to a sauna must meet some parameters that are worth knowing before making a purchase. There are certain requirements that are worth listening to.
For example, standard sizes are used for the rest room and the front door, but they should be different for the washing room and steam room.
Door size
A wooden door for a sauna is made according to slightly different parameters. Everything here leads to saving terla.
And first of all, this concerns the dimensions:
Doors should be smaller and they usually correspond to a height of up to 180 cm. Sometimes a size of 150 cm is even used
The width ranges from 55 cm to 70 cm; Here you also need to pay attention to the manufacture of the threshold. It is not recommended to make it less than 15 cm
These dimensions are used only for steam rooms and washing rooms.
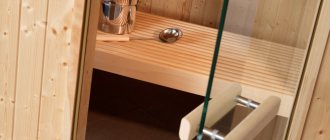
Selecting the material
As we said earlier, wood can be considered the best option.
But you can also use combinations, for example using glass:
Sequence of work
- Clean the board from bark and sand it. Apply a drawing of the future base for the pen onto the prepared surface.
- Cut the workpiece along the contour, thereby giving it a suitable shape.
- Sand the sides and make a shaped notch along the edges using a router.
- The handle itself consists of an unusually shaped tree branch. Remove the bark from it, if necessary, trim and sand it.
- Trim the branch so that it is in tight contact with the prepared board.
- Connect the branch and the base under it using glue. For permanent fixation, clamp with a clamp.
- Drill holes in the base so that they go to the base. Drive the dowels there, pre-coated with glue. Remove the excess length of the pegs.
- Dry the assembled product overnight.
- Cover with varnish or paint after drying and mount on the door.
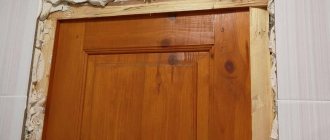
Carving "before" and "after"
Properties of wooden structures
Products made from solid wood have many positive characteristics that make them stand out among structures made from other materials. Therefore, most often they make wooden street and entrance doors with their own hands.
The main advantages of wooden systems include:
- safety for households and animals;
- beauty, aesthetics, attractiveness;
- soundproof;
- moisture resistance;
- natural origin;
- the ability to fit into any interior style;
- reliability;
- durability and strength;
- the ability to update the appearance through simple restoration;
- wooden panels impregnated with a special composition are resistant to increased temperature and fire;
- high-quality products do not deform or dry out.
Having appreciated all the advantages of wooden systems, every owner will give up on other materials and will certainly want to install such structures in an apartment or house. Fortunately, there are a huge number of similar products in specialized stores. Today, every door manufacturer necessarily presents to customers products made of natural wood that are part of a separate line of the brand. Since doors are made from wood in a wide range, anyone can choose a suitable design here, and if one is not available, then simply order it.
But the choice always comes down to price. The higher quality and more beautiful the canvas, the more expensive it will be. It will be cheaper to make wooden doors with your own hands. Therefore, if you have even a little skill in working with such material, design them yourself. This is more profitable for many reasons. Firstly, the price, secondly, the right size right away, thirdly, a stylish, beautiful design according to your desire.
What should a bath door be like?
- Must be made of high quality and environmentally friendly materials.
- Designed specifically for use in conditions of high temperature and humidity.
- Doors from the manufacturer must have the necessary certificates and hygienic conclusions.
- Each door in the bath complex must meet certain requirements and standards, based on its purpose.
- It should be comfortable, safe, reliable and have an attractive appearance.
Doors must comply with all standards and requirements so that in an emergency they do not become an obstacle to vacationers.
We install a door in a log bathhouse
The entrance to the bathhouse is a metal door or a heavy canvas of beams. But in the room itself they install an accordion door (locker room) or a compartment. Sometimes you can find an interior book.
Installation of the structure is carried out in the following sequence:
- They create a pigtail. It will serve as a guarantee of the service life of the door and will prevent the logs from loosening.
- Install the box in accordance with all the rules for proper installation. The use of a level and plumb lines is mandatory.
- After fixing the canopies, the canvas is mounted.
- Fastening platbands.
- The last step is fixing the handles.
https://youtube.com/watch?v=zunCYIKCjcY
The opening can be tied with timber using screws or “tenon-to-groove”.
DIY Wooden Crosses (1 Dz) - Craft Kits - 12 Pieces - Walmart.com
"," tooltipToggleOffText ":" Toggle the switch to get
FREE Next Day Delivery!
"," tooltipDuration ":" 5 "," tempUnavailableMessage ":" Be back soon! "," TempUnavailableTooltipText ":"
We are working hard to get things up and running again.
- Temporarily suspended due to high demand.
- Keep checking availability.
"," hightlightTwoDayDelivery ":" false ", " locationAlwaysElposed ":" false ", " implicitOptin ":" false ", " highlightTwoDayDelivery ":" false ", " isTwoDayDeliveryTextEnabled ":" true ", " useTestingApi " ", " ndCookieExpirationTime " :" 30 "}," typeahead ": {" debounceTime ":" 100 "," isHighlightTypeahead ":" true ", " shouldApplyBiggerFontSizeAndCursorWithPadding ":" true "," isBackgroundGreyoutEnabled} ":" false " locationApi ": {" locationUrl " :" https://www.walmart.com/account/api/location "," hubStorePages ":" home, search, browse "," enableHubStore ":" false "}," "oneApp" : {"drop2": " true", "hfdrop2": "true", "heartingCacheDuration": "60000", "hearting": "false"}, "feedback": {"showFeedbackSuccessSnackbar": "true", "feedbackSnackbarDuration" ":" 3000 "} "," webWorker ": {" enableGetAll ":" false "," getAllTtl ":"