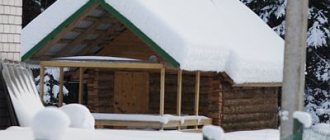
Of the large number of well-known roofing materials, metal tiles stand out for their durability, practicality and attractive appearance . Covering the roof with metal tiles significantly changes the appearance of the building and gives the house a solid and elegant look.
It is made from steel (less often from aluminum or copper) about half a millimeter thick, which is why the weight of the roof is significantly reduced - compared to slate - by 2 times. The material has a double degree of anti-corrosion coating - galvanization and a polymer layer, which reliably preserves the metal for a long time.
Along with the coating, all the necessary additional elements are manufactured - roof ridges, eaves and window corners, valleys, gutters, etc. Several color options are available; sizes and profile patterns differ from one manufacturer to another, which creates the opportunity to choose the most attractive option.
In this article you will learn how to properly screw metal tiles and how to attach metal tiles to the roof of a private house.
What is lathing and its installation
For proper installation of metal tiles, it is necessary to construct a sheathing, which is a wooden substrate in the form of a lattice or a continuous layer . The lathing performs several functions:
- Provides fastening of metal tiles
- Forms the necessary ventilation gap, preventing the under-roofing materials from getting wet from condensation.
- Creates an even plane, compensating for possible unevenness of the rafter system, which facilitates the normal installation of sheets and ensures maximum service life.
IMPORTANT!
The sheathing is installed on top of the waterproofing layer and attached to the rafters in rows corresponding to the pitch of the metal tile wave. Fastened with galvanized nails to prevent corrosion. The material for its manufacture is edged boards, most often 25 mm thick. The material must be dried, free from flaws, rotten areas, and must not be infected with mold or mildew.
Stage 4. Protecting insulation from moisture
In order for thermal insulation to properly perform its functions, it must be dry. Getting wet by just 5% will halve the performance properties of the insulation.
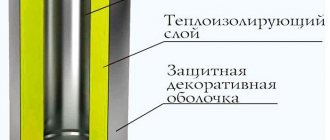
To protect thermal insulation from moisture, vapor and waterproofing films and membranes will be required.
Vapor barrier
Protects thermal insulation from evaporation from the living space.
Laying sequence
The vapor barrier is installed horizontally on the roof slope, starting from the bottom.
Fixation
To fix the vapor barrier, it is attached to the bottom edge of the rafters using a staple gun.
Waterproofing
Provides protection of thermal insulation from condensation. Presented as:
- membranes (they are mounted without sagging, close to the thermal insulation);
- films (during installation, a sag of 20 mm is left).
Laying sequence
Waterproofing is mounted on the outside of the insulation, along the upper edge of the rafters.
Installation of waterproofing begins with the valley (if there is one) - the internal corner that is formed at the junction of the slopes. This roofing element requires careful sealing, since it often comes into contact with precipitation.
A roll of waterproofing is rolled out from the ridge to the eaves. The material should completely cover the valley area.
When the valley is waterproofed, they move on to the slopes. As in the case of vapor barrier, the roll is rolled out horizontally. First - along the cornice, then - higher (and so on - to the ridge).
Fixation
To fix the waterproofing sheets, you should install a counter-lattice made of wooden slats 50x50 or 32x50 mm.
Attention: do not forget about gluing the joints of the hydro- and vapor barrier sheets using double-sided connecting tape!
Two ways to join sheets
Fastening metal tiles with self-tapping screws begins with preparing the roofing sheets. Sheets of metal tiles are overlapped to the width of one wave . This can be done in two ways: from left to right and vice versa.
The difference is that in the first case, each subsequent sheet is slipped onto the previous one, and in the second, it is placed on top of it. The choice of one method or another is dictated by ease of use, type of roof or other considerations and has no effect on the result.
Most often, both methods are used when working, whichever is more convenient.
When joining sheets between rows, they cannot be placed in a checkerboard pattern ; each sheet must be positioned strictly above the bottom one. An exception may be the single inclusion of a fragment of a sheet when filling, for example, the slope of a hip roof or similar areas.
how to fasten metal tiles on the roof with self-tapping screws: photo
All sheets, in addition to being attached to the sheathing, must be fastened together with short self-tapping screws along the joint line to ensure a tight connection and prevent wind from penetrating under the sheet, which can cause it to be torn off.
Choosing tiles: which roofing material to choose
How do you know which roofing material to choose for your home? To do this, you need to study the main characteristics of each of them and decide what is important to you.
Ceramic tiles are one of the most durable, beautiful and time-tested roofing materials. Its main disadvantage is the high price. Then - weight. In addition, the material is very fragile and often has problems during delivery. Installation of such a roof will also cost a pretty penny, since it is labor-intensive and requires a complex rafter system.
Metal tiles are a profiled sheet of metal 0.4-0.5 mm thick, coated with a layer of zinc and a protective polymer coating. Today we present several types of profiles and a wide color palette. With proper installation of metal tiles, the warranty reaches 50 years. Disadvantages can only appear due to poor installation and storage conditions.
Seam tiles are flat, narrow sheets of galvanized metal coated with a protective polymer layer, which are connected to each other using a special curved lock - a seam. This lock completely eliminates the possibility of leaks.
Soft bitumen shingles are a flexible roofing material that can be laid even on round roof elements. The base is fiberglass, which is impregnated with bitumen and covered with inorganic chips. Installation of tiles requires continuous sheathing, which increases the cost of roofing.
Composite tiles - this version of the roofing material imitates ceramic tiles. The base is a steel sheet, the outer side of which is covered with natural stone granules.
Roofing corrugated sheeting – the main advantage of this product is its low price. Today there is a wide range of coatings and colors on the market. It is easy to install and durable.
Slate – today you can find asbestos, metal and soft slate (ondulin). Among the advantages are good sound insulation, maintainability, and durability. The disadvantages include the heavy weight and fragility of the materials.
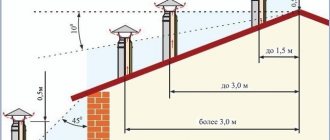
How to attach metal tiles along the eaves line?
Most often, the cornice line is overlapped by a sheet of metal tiles by about 5 cm . This overhang allows water to roll directly into the gutter, eliminating the possibility of contact with the wooden parts of the rafter system.
At the same time, in some cases it is necessary to place the edge of the sheet above the cornice board, which is caused by difficult installation conditions, the presence of steps or other violations of the geometry of the cornice. With this fastening, the water comes off the eaves corner, which is somewhat worse than the first method, but quite acceptable.
Fastening the covering along the frame line
The gutter and eaves corner are installed before installing the sheets to ensure proper water flow.
What tools and additional parts will be needed?
To lay the roof of a house from metal tile sheets, you do not need to buy special equipment or devices. You will only need the tools that every craftsman has at home:
- Electric screwdriver.
- Hacksaw or electric scissors.
- Construction level.
- Pliers.
- Hammer.
- Roulette.
- Chalk or marker.
Do not cut sheets using a grinder or other devices that contain abrasive chips or heat the metal. This may damage the protective coating. It is best to cut metal with electric scissors.
Laying a tile roof is not only the correct installation of sheets, but also the installation of the necessary additional elements, without which the roofing work will not be completed. Such products include:
- Elements for ridges, cornices and frontstones.
- External and internal corner strip.
- Snow retainer bar.
- Flat sheet.
- Skate plug.
- Ridge tiles.
- Bottom and top connection strip.
- Cornice strip and gutter.
Fastening metal tiles to the sheathing with self-tapping screws
How to properly attach metal tiles with self-tapping screws to the sheathing? When installing sheets, it is necessary to take into account the characteristics of the material.
The fact is that the polymer coating is quite easily destroyed when bent or pressed , which is why the protection of the sheet is significantly weakened.
One galvanizing layer will not be able to protect the metal for a long time; corrosion will begin and the sheet will fail. Therefore, it is important to correctly adjust the pressing force of the sheet to the sheathing. The metal tiles are attached to the sheathing according to the following scheme:
- To calculate the approximate number of screws, you can use the following rule: for 1 square meter of roofing you will need 9-10 screws.
- If the paint coating of the metal tile was damaged during installation, the chipped area should be carefully painted over with anti-corrosion paint of the same color.
- If the self-tapping screw is not screwed deep enough, the rubber gasket will not fit tightly to the sheet, which will create a gap into which water will penetrate. Screwing too tightly will push through the material, the coating will peel off and the sheet will begin to rust. A way out of this situation may be to use a screwdriver with a specified screwing force, or to constantly monitor the depth of immersion of the self-tapping screw.
NOTE!
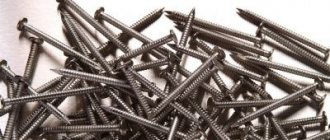
Self-tapping screws must be special, designed for such work. They have a galvanized coating and a sealing gasket made of special rubber. The regular one won't do!
Stage 2. Selecting related products for proper installation of metal tiles
Don't forget about related products for installation work.
- Roofing screws are fasteners equipped with a washer with an EPDM gasket and made of zinc-coated steel.
- Sealing materials are needed to isolate the most vulnerable places from moisture - the joints and junctions of roof elements. They can be produced in the form of tapes or in liquid form.
- Repair enamel aerosol. It will be useful if you need to restore the polymer coating (if it was damaged during installation or transportation of the material).
- Double-sided connecting tape. It is used to hermetically seal the joints of steam and waterproofing sheets. Otherwise, the vapor and waterproofing will not be able to perform its functions - it will allow moisture to pass through.
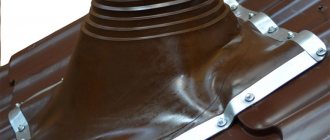
Installing metal tiles around pipes or other obstacles
The scheme for fastening metal tiles is quite simple, but there are moments that are worth talking about separately. All protruding roof elements must be lined around the perimeter with an additional row of sheathing, spaced 20 cm away from them. This is necessary to install a corner covering the joint.
Depending on the location of a particular element, it may be necessary to produce a specially cut sheet corresponding to the size of the remaining space or reaching the next sheet, located in a regular manner. For example, this option can be used to form a drain for a roof window.
Correct pipe bypass with metal tiles
Manufacturers produce parts that correspond to all elements of the roof - internal and external corners, ridges, valleys, gutters, etc. Almost all of them have a single installation requirement - the presence of an additional strip in the sheathing, to which they will actually be attached.
CAREFULLY!
You should remember the need to pre-waterproof all joints from external leaks; such places are most susceptible to this danger. The roof ridge is attached on top of the sheets; its fastening also requires the installation of an additional board along the upper ridge of the roof.
The location of the screws is determined by the size of the element, or according to the rule - at least 3 pieces per linear meter. The requirements for screwing force are the same as for sheets - control and inadmissibility of pushing.
Now more about installation work
In general terms, the whole process looks extremely simple. This is due to the fact that ordinary available tools are sufficient to get the job done. But, as practice shows, many home owners do the installation incorrectly. Therefore, a detailed analysis of the installation will allow you to avoid numerous mistakes and damage to metal products.
Stages of laying a metal tile roof
- Cornice strip. These roof elements must be installed before installing the tiles themselves. The planks are mounted on top of special gutter holders for drainage. To perform this task, galvanized screws are used and placed at a distance of 30 cm. The eaves elements should be overlapped by 10 cm.
- Lower valleys. The joints of the slopes must accommodate the valley. Therefore, it is laid before attaching the metal tiles. The basis, as a rule, is boards, which are laid out as continuous flooring. The use of waterproofing is a mandatory element.
Advice! A special seal should be laid between the lower valley and the metal tiles. It must have a porous structure and excellent adhesion properties.
- Adjunctions. To create a perfectly sealed connection to pipes and walls, an additional internal apron is installed. The lower junction bar is applied to the walls of the pipes, and a mark is made along the upper edge. After this, a groove is installed along the marked line. The apron is attached from the bottom wall of the chimney. If necessary, the bar can be trimmed. It is fixed with roofing screws.
Fastening metal tiles to eaves and roof ridge
This stage has its own characteristic features. When it is necessary to install cornices, the profile sheets are mounted with a protrusion beyond the bar, approximately 5 cm. What is the purpose of this arrangement? The lip will allow water to flow down the roof directly into the gutter. If you do not make such a reserve, water will constantly fall on the wall or be blown under the roof.
To prevent the bottom cut from sagging, the outermost sheathing board should be slightly thicker than the rest.
Each sheet of metal tile is fastened slightly above the stamping. Basically, the offset is about 7 cm. When the top cut is located too high from the stamping, it becomes necessary to install a ridge board above the sheathing. Also, we must not forget about ventilation gaps. They should be evenly spaced between all sheathing elements.
The next step is attaching the metal tiles at the highest point - to the ridge. Screws are screwed along the outer row into the deflections of the waves.
How to install metal tiles around pipes and other obstacles
The process of laying material around pipes can be called one of the most difficult stages. This is due to the large amount of work. It is necessary to install a structure that can effectively drain flowing water to the sides.
As already mentioned, the apron will act as the basis. Boards are attached to the pipe, which continue the sheathing. The adjacent profile is cut to 15 cm in length.
The first stage of assembly is the installation of the lower parts of the apron. After this, proceed to the side elements.
The lower part of the apron should be tightly covered with tiles. Then fix the top apron. To ensure a tight fastening, use a mallet to level the sheets of metal tiles in certain places. Then you can begin installing additional accessories.
Common fastening errors
- The most common mistake is incorrectly joining the sheets together, creating cracks or gaps into which the wind rushes in . Frequent exposure to gusts of wind over a fairly large area of the sheet will sooner or later tear it off the sheathing. In addition, one often encounters an incorrectly cut edge of a sheet, covered with a corner in such a way that water flows freely under it.
- All places where water can accumulate or penetrate require special attention and local additional waterproofing.
- When installing metal tiles, various situations may arise that require a non-standard solution. It must be taken into account that in any case the general requirements must be met - no cracks, no possibility of water penetration, parts of the sheets must be located in the direction of water flow.
- Common mistakes include the absence of a counter batten when installing the sheathing, which eliminates the possibility of air circulation.
- It is not recommended to use roofing felt or similar materials using bitumen, as in the summer it melts, sag and emits a suffocating odor.
- Under no circumstances should you use self-tapping screws without a sealing washer and gasket.
Preparatory activities
Before laying metal tiles step by step:
- The squareness of the slopes is checked. It is desirable that the difference in lengths between the diagonals does not exceed 2 centimeters. If this value is greater, then there is a skew of the slopes, and this circumstance will significantly complicate installation.
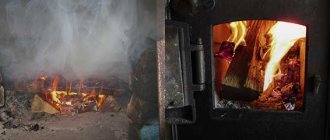
- An antiseptic treatment is performed. The wooden elements that make up the rafter system are coated with special impregnations and fire retardants. Once the roofing material is laid, this will no longer be possible.
Advice from experienced professionals
- Metal tile sheets are quite thin. You can only walk on them in soft shoes, stepping on the lowest points of the wave at the locations of the sheathing strips.
- The self-tapping screw must not be allowed to turn when screwing, as this will reduce the adhesion force to the wood many times over.
- Installation of a pitched roof can begin on the right or left , whichever is more convenient, but if the roof is hipped, installation begins exactly in the middle, for symmetry in the design of the slopes.
- The self-tapping screws must be twisted strictly perpendicular to the plane of the sheet, otherwise a depressed area will appear on the side of the slope.
- Typically, the purchased metal tiles come with detailed installation instructions. It is recommended to study it carefully, since all types of material have their own characteristics, which must be known and taken into account during installation.
fastening metal tiles with self-tapping screws: diagram and tips
Recommendations for caring for a tile roof
In order for your roofing to be reliable and serve you for many years, it is not enough just to adhere to the roofing installation technology; you also need to ensure proper care of the structure during operation. To do this you need:
- Inspect the roof periodically.
- Constantly check the roof slopes and all ceilings for defects and leaks.
- Maintain the valley in a timely manner - remove the upper part, which closes, and clean the lower part.
- Eliminate identified defects - if a scratch appears on the sheet, it can be easily eliminated using a special corrector.
Igor Petrov
Blogger, builder with 20 years of experience, family man
Kinds
How to lay metal tiles correctly depends on what type it is. Existing models differ in wavelength and height. The thickness of the steel determines the indicator of ultimate strength and durability, as well as cost.
Wide variety of models Source autogear.ru
The available varieties differ in a number of parameters:
- Profile type. The shape of the outer surface can be symmetrical, asymmetrical, or trapezoidal. They do not differ in quality, so the choice depends only on the personal tastes of the building.
- Protective covering. To achieve the required strength indicators, the metal is coated with an anti-corrosion composition based on zinc, aluminum and other materials. Spraying provides reliable protection against contact with air, which causes rust formation.
- Decorative design. It is selected based on the design style of the building, as well as on the personal taste of the owner. Its task is to give the coating a spectacular appearance, while providing additional protection from the environment.
Decorative coating is made from various materials. The most affordable is polyester. It is well suited for any climate, but is easily damaged by mechanical stress. A more durable option is plastisol, a polymer material based on polyvinyl chloride. It is not susceptible to corrosion, but in hot regions it melts under sunlight.
Any color scheme for modern design Source www.stroy-krov.ru
Pural protects well from corrosion and easily withstands adverse weather conditions. Therefore, before covering the roof with metal tiles with your own hands using such cladding, you need to take care not to subject it to plastic deformation. A better option is PVDF. This coating withstands mechanical damage well, does not fade in the sun and can last for decades.
Stage 5. Installation of tiles. Basic Rules
- Installation can be done in one of two ways. If the stacking of sheets begins on the right, then each new one is superimposed on the previous one. If it’s the other way around, then the previous sheets are superimposed.
- In order to ensure correct installation, four sheets of tiles, located overlapping relative to each other, are first grabbed, aligned, and only then finally connected with one self-tapping screw.
- Self-tapping screws must be of high quality, because the service life of the roofing largely depends on them. These must be galvanized screws with sealing heads made of propylene rubber, hermetically filling the hole when tightened.
- A thickening appears at the junction of the four sheets. It needs to be removed, for which part of the corner is cut off or the capillary ditch located under the stamping line is straightened.
Additional elements
In addition to the above eaves and ridge strips, when installing a metal roof, you may need the following products (full list here):
- Snow guards. They loosen the snow masses falling from the roof, making their fall relatively safe for building structures and for humans.
- Junction strips . These products frame the joints between tiles and all important structures, such as chimneys and ventilation pipes.
- Corners and valleys . They protect all corner roof structures.
- Low tides . Used to redirect flows of rain and melt water.
- Horse.
Additional elements
Roof insulation
Before installing thermal insulation, a vapor barrier is first placed on the rafters. The maximum layer of material to retain heat is 25 cm . An antioxidant film is mounted on it, and fastening occurs with wooden blocks to the rafters.
To ensure that precipitation flows into the drain, fix the thermal insulation with a slight allowance (2-3 cm).