Izospan is an insulating film coating. The main purpose of the film is to ensure that the original thermal insulation characteristics are maintained throughout its entire service life. It is difficult to imagine a modern construction project without the use of various types of thermal insulation. Mineral wool, Penoplex, Izolon, Izover, various polystyrene foams and simply polystyrene foam - all these materials require their own protection.
Thermal insulation materials practically envelop our house, retain heat on frosty and rainy days, create comfort in the hot summer, preventing the penetration of heat flows. But how to protect the thermal insulation belt from negative atmospheric phenomena? Reliable protection from moisture, rain, damaging winds is designed to be provided by 100% polypropylene, with the proud name - Izospan .
To create a barrier at the stages of the construction process, to perform the function of protective insulation for thermal insulation, this is the true purpose that isospan vapor barrier successfully fulfills. Despite its apparent simplicity, the material differs by type.
We bring to your attention – Izospan instructions for use. Figure it out: which side to lay the isospan on. Consider the isospan technical characteristics, and the installation method.
Worthy competitors of isospan:
- Tyvek vapor barrier;
- Vapor barrier TechnoNIKOL;
- Vapor barrier Nanoizol;
- Vapor barrier Ondutis;
- Vapor barrier Yutafol.
Before moving on to a detailed review, it should be clarified that the films are presented by the manufacturer in a wide variety and have different purposes. Vapor barrier films and membranes are divided into absolutely vapor- and water-tight and partially permeable to moisture only in one direction. Some of the materials successfully complement thermal insulation, enhancing its characteristics.
Insulation problem
Thus, each person releases on average about 100 grams of water vapor per hour when breathing, which is 2400 grams per day. In addition, steam is generated as a result of everyday activities - washing, drying clothes, cooking, taking water procedures (about 3000 grams in total).
In total, per day of living in a house, a family of 3 releases more than 10 liters of water into the air. If this moisture is not removed outside the house, it can condense on building structures and roofing. Moisture saturation also harms the building’s insulation, reduces its efficiency, increasing thermal conductivity.
Moisture that is not removed from building structures in a timely manner promotes the proliferation of mold fungi and putrefactive bacteria, house dust mites and other pests. Gradually, the walls are destroyed, mold spores are released into the air of the interior space, and the atmosphere in the rooms becomes harmful to health.
Vapor barrier laying technology
After choosing a vapor barrier, it is also very important to install it correctly. This is not difficult, but requires care when installing, since in most cases the vapor barrier material has an external and internal surface in relation to the insulation
Choosing a side
Among builders, there are two opinions on which side to lay the vapor barrier against the insulation. Some believe that the vapor barrier should be attached only to one “correct” side, while others believe that it does not matter which side the vapor barrier is attached to. All vapor barrier membranes come in two types:
- for one-sided installation, this type of vapor barrier is attached to only one side;
- double-sided, which can be worked with regardless of its side.
Before installing the vapor barrier, you should carefully study the instructions included with the material itself. If there is none, remember these simple rules:
- The outer side of the vapor barrier has a pile in which moisture is retained and then evaporates. The inner one is smoother. It is the smooth side that should come into contact with the insulation.
- If the vapor barrier material has a different color, then the light side will be the inner side and should lie on the insulation.
- Usually the vapor barrier is sold in rolls. When rolling out such material, the side that will be facing the floor will be the inner one.
If you still have doubts, you can do a small experiment. Take a small piece of vapor barrier membrane and cover a mug of hot water with it. Condensation will appear on the side of the film that is waterproof, which means the inside.
Installation of vapor barrier film on the ceiling
After determining the inner and outer sides of the vapor barrier, there are no further questions about how to properly lay the vapor barrier. But still, a few nuances need to be taken into account:
Before laying the vapor barrier, it is necessary to carry out preparatory work
First of all, it is necessary to treat all wooden elements with special agents against insects, fungus, rot and fire. Subsequent work should be carried out only after the impregnation has completely dried. Irregularities on the surface to which the vapor barrier will be attached should not exceed 0.5 cm. If the house is located in a climate zone where there are frosts below -25˚C in winter, then a vapor barrier must be laid on both sides of the insulation. When installing, pay special attention to the corners
It is important that the corners are covered with a solid film. It must be well stretched. At the joints of the canvases, the vapor barrier must be laid with an overlap of at least 10-15 cm. With less overlap, moisture can penetrate inside
With less overlap, moisture can penetrate inside
It is important that the corners are covered with a solid film. It must be well stretched. At the joints of the canvases, the vapor barrier must be laid with an overlap of at least 10-15 cm. With less overlap, moisture can penetrate inside
Seal the joints with tape
You need to use special tape, preferably the same brand as the vapor barrier. The film is attached to the beams using a stapler. If installation is carried out between beams, you can use slats and screws with a wide head.
Laying vapor barrier on walls and ceilings
After installing the insulation on the walls, a vapor barrier film is laid. Which side to lay towards the insulation was discussed above. You just need to consider the following:
- The vapor barrier must be well tensioned so that it does not sag, there are no unevenness and so-called waves.
- The joint should overlap 5-10 cm and be securely taped with wide tape.
- The film should fit tightly to the insulation.
- Near window and door openings, it is necessary to leave 2-4 cm of vapor barrier film “in reserve”, since shrinkage or deformation of the material may occur during operation.
- There should be a small gap between the vapor barrier and the facing material for ventilation and condensate removal.
- After laying the vapor barrier, it is necessary to cover it with finishing material as soon as possible, since this material is “not friendly” to sunlight. If you leave the vapor barrier uncovered for just one season, ultraviolet radiation will do its dirty work and all your work will go down the drain, and the vapor barrier membrane will have to be replaced.
When laying a vapor barrier film there is nothing complicated and no special skills are needed. The main thing, as with any other work, is to be careful, take your time and read the instructions of the manufacturers of the material you are working with. Then there will be fewer mistakes, the house will be warmer, the mood will be excellent and you will be proud of your creation.
How to protect your home from excess moisture?
There are several ways to protect your home from the harmful effects of water vapor. Firstly, ensuring good ventilation, in which moist indoor air will be constantly released into the street, and fresh, drier air will begin to replace it.
Secondly, the use of water- and vapor-tight barriers that do not allow moisture to pass through, but allow it to slowly evaporate.
With this method of protection, water does not get into the insulation and onto the walls, and the resulting condensate evaporates directly from the protective coating.
Some features of a pie on the ceiling
In general, when constructing an insulated ceiling pie, the same ceiling vapor barrier scheme is used, regardless of the type of materials used for insulation
However, their capacity may make some changes, so it is important to know how to properly lay a vapor barrier on the ceiling
In particular we are talking about the following:
- The use of extruded polystyrene foam in rooms with low humidity levels allows you to skip the vapor barrier layer. This is explained by the fact that insulation of this type practically does not allow moist warm air to pass through, therefore, it does not require additional protection.
- In rooms with high levels of humidity, a vapor barrier layer must be present regardless of the type of thermal insulation material and its characteristics.
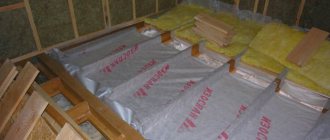
- Laying mineral wool of any hardness and foam is always accompanied by the use of vapor barrier material.
In the process of deciding how to lay isospan on the ceiling, it is necessary to ensure that the edges of the insulating material are located at a higher level than the upper edge of the insulation. In other words, the thermal insulation is placed in a kind of bowl made of vapor barrier material. In the case of a panel ceiling, a vapor barrier material is placed in each box under the insulation. When laying thermal insulation in the space between ceiling joists, they should be wrapped in vapor barrier material.
The method of using vapor barrier material must be considered at the design stage
It is important to choose the right installation method and options for fixing the material. With the advent of new technological insulation materials on the market, it has become possible to correct mistakes made during the installation of the vapor barrier layer
The main thing is to know the characteristics of the insulation used, how to lay isospan on the ceiling, as well as the technological features of the selected material.
What is Izospan?
Among the materials presented on the construction market, the leading role is played by the products of Hexa - Nonwoven Materials LLC, produced under the Izospan trademark. The company has its own production base in Russia, not far from Tver, and operates a research laboratory.
Izospan materials are special films and membranes made using modern polymer materials and having special properties. The thickness and strength of the films, their dimensions are selected in such a way as to make installation simple and convenient. The line of materials under the Izospan brand is represented by the following groups.
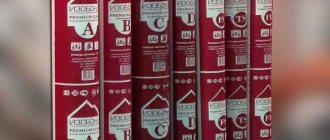
Ruler
The first group is waterproofing membranes with properties of vapor permeability and resistance to wind loads. They are designed to protect buildings from external wind and rain. The property of vapor permeability allows moisture released by the walls of the house to evaporate into the external environment. Such materials are designated A, AF, AF+, AM, AQ proff, AS, A with OZD.
The second group is energy-saving heat, steam, and waterproofing materials. These are airtight films coated with metal foil, which reflects electromagnetic radiation in the infrared part of the spectrum. Due to this effect, more thermal energy remains in the room, and heating costs are reduced. Film designations - FS, FD, FX, FB. Materials of this group can be used for saunas and steam baths.
The third group is waterproof vapor barrier film materials. They perform two main functions: the first is to protect the wall insulation from condensation and the penetration of moisture into it from the rooms of the house, the second is to isolate the interior of the home from harmful emissions of insulation and walls (for example, mineral wool fibers, cement dust from concrete blocks). Their designations are RS, B, C, D, RM, DM.
The fourth group is tape connecting materials. Designed to eliminate leaks at the junctions of films and membranes. Presented under the designations KL, KL+, SL, FL, FL termo, ML proff, SUL.
Briefly about the choice of materials
Above, we dwelled a little on a rather important point, the better to insulate the ceiling of a bathhouse. Now we want to tell you a little more
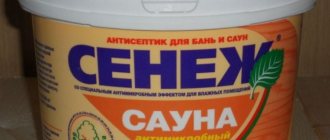
First, let's look at basalite and isospan, intended for saunas.
Basalite is an excellent material for thermal insulation of bath ceilings. Click on photo to enlarge.
Basalite is a lightweight and elastic tile insulator. It is made from basalt fiber, hence the name.
The scope of application is quite wide. In addition to insulation, basalite is used for sound insulation. The main thing is that no significant loads are placed on the surface to be coated.
As for isospan, it is divided into two types. Izospan A performs the functions of water protection and vapor insulation. Essentially, it is a membrane that counteracts the influence of moisture.
The material is often used in the construction of wall structures and roofs of buildings. Not to mention the protective properties that prevent premature damage to the insulation.
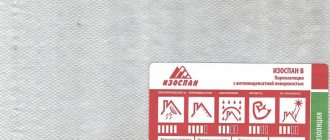
Izospan B refers to universal vapor barrier products that include two layers. The main task is a vapor barrier for thermal insulators.
The material is installed from the inside of the insulation.
Sawdust, covered with an earthen layer on top, is also suitable. Frankly speaking, this is not the best way, as it has many disadvantages.
There is also expanded clay. The material is made in the form of clay capsules, fired under high temperatures. When swelling of the raw material occurs, it is sent for heat treatment. This is how finished products are obtained.
Despite the presence of many other insulators, insulating the bathhouse ceiling with expanded clay is not without meaning. The excellent thermal insulation qualities of the products are explained by their cellular structure. In addition, expanded clay is an affordable material that almost everyone can afford.
The only thing to consider is the thickness of the insulating layer. It should be at least 30 cm. Plus, do not forget about the vapor barrier and waterproofing, otherwise the efficiency of the system will leave much to be desired.
What is the situation with other parts of the structure?
If you are new to insulation, the information above may have been misleading.
We examined the ceiling in detail, but did not touch other elements of the building at all. In fact, not only the ceiling surface, but also many other parts of the bathhouse need to be thermally insulated. These include the foundation, walls, floor, roof, etc.
And don’t expect to do anything quickly. Ultimately, you end up with a building from which heat escapes extremely slowly. It will not be possible to completely plug the leak. Yes, this is not necessary. Any building must be well ventilated, including the bathhouse.
In steam rooms, the warmth does not disappear immediately after the rooms are warmed up, but lasts for a certain time so that you can have a good steam bath.
Want to know what's coming? Check out the photo of how to insulate the ceiling of a bathhouse, and other images presented in the article. We recommend that you read our other publications on the topic. Have a hot steam!
Izospan B: description and application
To prevent moisture and water vapor from entering insulating coatings and walls from the internal volumes of the house, Izospan V is used. Its structure allows you to create a kind of barrier for steam: a surface for collecting and ensuring gradual evaporation of condensate. Another property of Izospan B is the protection of the air in the house from the penetration of particles from insulation and wall materials.
Scope of application are:
- internal surfaces of walls and ceilings in attics and attic floors;
- internal surfaces of living room walls made of any material;
- surfaces of interfloor and basement floors.
Insulated flat roof
Regardless of the flooring material, the insulation of a flat roof is protected from vapors from the room. For these purposes, one of the types of vapor barrier is used: Izospan D, RM, C, RS.
Installation of vapor barrier is carried out according to the following scheme:
- the film is rolled out over the slab (the side of installation does not matter);
- the canvases are overlapped, the amount of horizontal and vertical overlap of the strips is 15-20 cm;
- overlaps are taped with Izospan tape;
- Insulation and covering are installed on top according to the roof design.
Structure and parameters
Structurally, Izospan B is a polypropylene film with one smooth side and the other covered with a thin rough layer of fibers of the same material.
The smooth sealed surface of the film creates an impenetrable barrier to steam and water, and the fibrous coating is an excellent collector of condensation, which will remain on the film and will not get into the insulation of walls and ceilings.
The effectiveness of this protective coating depends on which side of the film is adjacent to the building structures or insulation.
Izospan B has excellent performance characteristics:
- vapor permeability not less than 7 mg/(m•h•Pa);
- water resistance is not less than 1000 mm. aq. pillar;
- tensile strength of at least 25 N/cm;
- operating temperature range from -60 °C to +80 °C.
The film does not lose its properties from exposure to direct solar ultraviolet radiation for 4 months. Izospan B is produced in rolls, strips 1.4 and 1.6 meters wide and with a total area of 35 m2 and 70 m2. What width and area to choose the material depends on the geometric dimensions of the protected surfaces.
What tasks do insulating films perform?
Izospan is a film or non-woven membrane used in thermal insulation structures to protect insulation from moisture, wooden and metal elements from rotting and corrosion.
Vapor barrier membranes are necessary when arranging multilayer building structures, mainly external ones. These are external insulation systems, pitched roofs, frame housing construction, and the installation of wooden interfloor ceilings.
The main task of the Izospan vapor barrier is to prevent the appearance of a “dew point” in the structure. Warm air tends to leave the room, and cold air tends to get inside. Without a well-equipped barrier, flows of different temperatures will meet in the density of the wall and condense into droplets of moisture. The result is that wet insulation freezes, thermal efficiency decreases, and mold appears inside.
Vapor barrier solves this problem - the membrane allows moist air to escape without being trapped in the thermal insulation layer. The dew point moves - condensation does not fall.
General principles of application
The film is laid from bottom to top with the strips overlapping each other by 10-15 cm. The joints of the strips are glued with tapes such as Izospan KL, KL+. Izospan B is always mounted with the smooth side facing the insulation. The places of contact between the sheets and laths of the sheathing, and the counter laths of the air gap are sealed with a special sealing tape. The tape is pressed with the self-adhesive side simultaneously against Izospan B and the abutment surfaces.
Areas connecting to windows, niches and openings for utilities (ventilation, sewerage, water supply) are sealed with Izospan ML proff tape material. The same tape is used to finish joints with concrete and wooden structural elements.
Recommendations
When working with Izospan S, you should follow several recommendations from experts:
- The quality of insulation depends on the reliability of the joints between materials. More attention should be paid to this issue. To reliably seal them, Izospan FL tape is often used.
- The connecting points of the material and the elements of the building structure are covered with Izospan SL tape. If this tape is not available, then you need to use another material, after consulting with a construction specialist.
- After completing the necessary set of works, it will be almost impossible to correct anything, since these joints of materials will be located inside.
- To secure the material, galvanized nails or construction stapler are most often used. The choice is always yours.
- If the finishing coating is a cladding , then Izospan S is secured with vertical wooden slats. It is advisable to treat them with antiseptic solutions.
- If the finishing is made of ordinary plasterboard , then galvanized profiles are used. They must be prepared in advance.
- When installing Izospan S, it should always be with its smooth side facing the insulating material, if one is used. This is a very important rule.
Installation plan
Installation of Izospan B has features depending on which element of the structure needs to be protected.
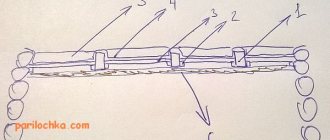
For attics and attic floors
The installation diagram is shown in Figure 1.
First you need to unroll the roll and cut the ribbons to size. To determine which size of panels is most convenient and economical for installation, it is necessary to measure and mark the walls and ceilings. Then you need to apply the first tape to the internal insulation of the attic or attic (from the ceiling side) with the smooth side and secure it.
The fastening method is chosen which is more convenient for the owner: it can be fastened with a construction stapler or on nails. The first tape in attics must be laid from below, parallel to the floor. For convenience, the tapes can be rolled into tubes with the desired side inward and unfolded as they are secured.
Next, you need to secure the following tapes in the same way, overlapping the previous one with an overlap of about 15 cm. Seal the joints with a special tape such as Izospan KL, KL+ and mount the lathing for cladding or finishing material on the coating. For ventilation and evaporation of possible condensation, the gap between Izospan B and the cladding should be 50 mm.
For interfloor ceilings
The installation diagram is shown in Figure 2:
Installation proceeds as follows:
- Unroll the roll and cut the ribbons to size;
- secure the first tape with the rough side to the rough ceiling (floor) using a stapler or nails;
- fasten the remaining tapes parallel to the first, with an overlap of 150 mm;
- seal the joints for sealing with the appropriate tape of the Izospan family;
- install the sheathing and lay insulation.
Next, you will need to lay another layer of Izospan B with the smooth side facing the insulation, secure it to the sheathing and seal the joints.
On top of the insulation, it is necessary to provide a ventilation air gap (gap) of 50 mm using counter slats on which the finishing cladding can be installed.
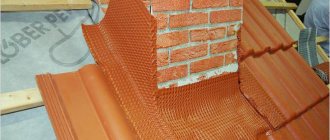
Uninsulated pitched roofs
*
According to the manufacturer's instructions, steam and waterproofing materials Izospan D (DM) are used in non-insulated pitched roofs. If you plan to insulate the roof in the future, then the best solution would be to choose a reinforced superdiffusion membrane from the Izospan AQ series (proff or 150 proff).
The structure of the roof in section looks like this:
- Rafter legs.
- Vapor and waterproofing Izospan D (DM) or waterproofing membrane Izospan AQ proff (150 proff), laid and fixed to the rafters.
- Rail on top of the waterproofing (to create a ventilation gap in the under-roof space).
- Lathing.
- Roofing covering.
Installation of waterproofing
Laying Izospan begins from the roof eaves, rolling it out on the rafters in horizontal sheets.
This is how the first strip of waterproofing is laid
The lower edge of the first row is lowered onto the drain drip and secured with Izospan KL+ tape.
Important! You need to remember how to lay Izospan on the roof: Izospan D (DM) - smooth side up, Izospan AQ - logo up.
The waterproofing is laid with a slight sag between the rafters - up to 2 cm. The upper panel should overlap relative to the bottom by at least 15 cm. If the length of the panel is not sufficient to cover the entire slope in length, then the extension is carried out along the rafter leg (the overlap size is similar - from 15 cm). All overlaps must be taped with Izospan KL+ tape.
On a ventilated ridge or ridge (when using Izospan D or DM), a gap about 10 cm wide is left in the waterproofing layer.
On a non-ventilated ridge or ridge (when using Izospan AQ proff or 150 proff), the waterproofing is laid with a bend on the opposite side of 15 cm and the joint is glued with Izospan KL+ tape.
The waterproofing of multi-gable roofs is more complicated than that of a gable, hip or half-hip roof. Here it is necessary to waterproof the valleys with a separate sheet.
Valley device
The film is rolled out along the entire length of the valley and fixed to the boards and rafters. The connection with the waterproofing of the slopes goes like this:
- the canvas of the left slope is placed on the right board of the valley with an overlap over its edge of no less than 15 cm;
- the canvas of the right slope is brought onto the left board of the valley with an overlap over its edge of no less than 15 cm;
- excess materials are cut off;
- fastening to the valley boards and along the rafters (at a distance of at least 30 cm from the valley axis) is carried out with a stapler.
The waterproofing is also fixed to the rafters using a stapler. The final fastening is carried out using a batten attached to the rafters. Before installation, sealing tape is glued to the surface of the rail facing the waterproofing.