Once upon a time, the only type of vapor barrier was glassine. We cut it, attached it, secured it – that’s all! It was only a few decades ago that a more convenient polyethylene film appeared, and more complex and reliable materials began to be made on its basis. Yes, modern options please not only with their strength characteristics, but also with their resistance to temperature changes and ultraviolet radiation, and their versatility. But, at the same time, they are upset by the complicated instructions for their use: they should be connected along a clearly defined line, and only special tape should be used, and - most importantly - do not mix up the side of installation!
It is not surprising that you can so often find panicky questions on the Internet: how and which side to lay the vapor barrier to the insulation, what to do if the sides are mixed up? Do you really have to dismantle the entire structure? We can assure you that you won’t have to. Let’s take a closer look at determining which side is “correct” - you will be very surprised.
Features of the material
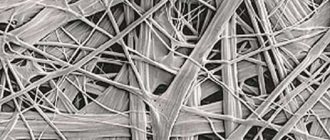
This is a special membrane that allows air to pass through. In addition, the film performs other functions that are very important during the construction of a building:
- does not allow the development of corrosion on metal surfaces and mold on wooden elements;
- two-layer structure, allows you to retain steam, does not allow moisture to penetrate;
- protects various materials from the destructive effects of moisture.
Such characteristics significantly improve the efficiency of the thermal insulation materials used. To get this result, you need to know which side of the insulation is placed on Izospan V.
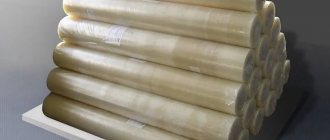
Series B film Source img.bizorg.su
Does vapor permeability change when changing sides?
All of the above modern barriers are divided into the following types:
- for one-sided installation, which need to be rolled out with a certain side up and it is recommended not to confuse them;
- and for double-sided use, usually with membranes that can be laid on either side.
You will be interested to know that the first membranes, which had the same properties as modern roofing membranes, were used in astronautics. And from there they were borrowed for construction and the national economy. But until recently, there were not as many problems with their installation as there are today.
There is a strong opinion among ordinary people: if you lay the vapor barrier to the roof insulation “on the wrong side,” then the entire structure will not last long. In fact, the correct choice of side affects exclusively the service life of the interior finishing of the roofing pie, because the rough side has the same abilities as the smooth side and has absolutely the same vapor permeability. But how much it will retain droplets of condensate is a little-studied question.
Why is vapor barrier needed?
It is important not only to know which side to put Izospan on, but also why it is important in use. It’s very simple - inside any premises moisture gradually accumulates and escapes through the ceilings. In cold weather, steam turns into condensation, which settles on structures and gradually destroys materials, and mold begins to develop. Using a vapor barrier will help get rid of such problems. The film must be laid correctly, otherwise it will not give the desired result.
Among all protection options, the domestic Izospan is especially popular and of high quality. It is made from special materials that give it a number of properties, the main ones being durability and high strength. The canvases have certain sizes that ensure the simplest possible installation. At the moment, there are no analogues for this film; it is one of the best, performs all the functions assigned to it and has an affordable price.
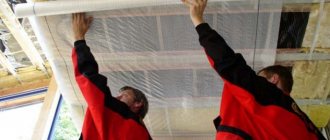
Laying Izospan Source buildhome.semtex.ru
Laying stages
Let's look at the process of installing a vapor barrier step by step. It must be taken into account that the installation of insulating material is only an integral part of the overall process of installing the roofing and insulation pie. Therefore, it is quite difficult to highlight only the installation of a protective film.
The insulator is laid on both sides - between the roof and the insulation, and on the attic side on top of the heat insulation.
- The first step is usually to lay the outer layer. Most often, diffusion membranes or similar materials are used to remove residual water vapor from the heat insulator.
The membrane is laid before the roofing is laid. The material is laid in longitudinal strips, starting from the bottom (from the eaves area); strips are spread, trying to avoid wrinkles
This is important, since the connections are glued with a special adhesive tape. In some cases, two types are used - double-sided tape and a special wide adhesive tape to secure the connection line; The amount of overlap is usually 10-15 cm (it is often marked on the film with special marks)
When laying, you must act carefully, avoid tears or cuts of the tape. Particular attention is paid to the tension of the material - it should not sag, but excessive load is also dangerous, since when fixing the strips with a stapler, breaks are possible; the finished canvas must be completely sealed. All areas adjacent to supporting structures, cornices or ridges must be secured with double-sided tape or a special adhesive.
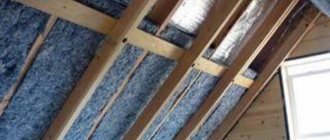
- Laying the heat insulator. This procedure is performed from the attic side (from the inside). Different materials are used - mineral wool, polystyrene foam, penoplex, etc. There is no point in considering the installation of insulation, since this is a separate and responsible procedure.
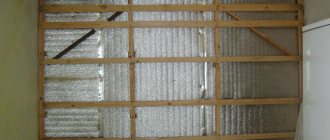
- Installing a vapor barrier from the inside. It uses a basic insulating film that is completely impermeable to any moisture. If the region has frosty winters, it is recommended to use foil material to save thermal energy. Installation procedure:
- The first strip is laid from the bottom. The side edges are glued (or fixed with slats) to the rafters. It is necessary to provide a temperature reserve in case of changes in the length of the web. To do this, a deformation fold is made near the edge of the strip, which is fixed with a clamp. With any changes in length, it will maintain the strength of the fastening and the overall tightness of the canvas. The length of the strip is attached to the rafters using a stapler;
- subsequent strips are installed overlapping. Its size is marked on the film and is 10-15 cm. The strips are connected to each other with double-sided tape and adhesive tape connecting the joint from the surface side;
- All areas of passage through the roof, adjoining walls or supporting structures are carefully glued with special acrylic glue or other materials. If the surfaces are smooth, you can use double-sided tape.
The last step should be the installation of longitudinal strips on top of the vapor barrier sheet. They are needed for installation of sheathing (OSB, chipboard, plywood, other sheet materials) and subsequent finishing. These strips are attached horizontally to the rafters. It is imperative to cover the joint lines of the vapor barrier strips with them. This will help protect the joint areas of the material from damage.
All passages of pipes, antennas or other structures must be insulated with special care. Special materials are used - adhesive tapes, sealant, etc. There should be no cracks, gaps or other openings through which moist air can enter the roofing pie. Otherwise, all efforts and expenses will be useless.
Film types
Izospan is presented in several options, which were developed for specific needs. The differences lie in a number of changes in the parameters of the scope of application, some characteristics and properties. At the moment, manufacturers produce materials that are divided into 4 groups, they include several types:
- A – used outside buildings;
- B – used only inside;
- C - for the roof, but provided that there is no insulation in it;
- D – designed specifically for concrete surfaces;
- AM – used at high humidity, has a reinforced structure;
- FB – high level of protection, for buildings with high humidity and temperature.
Izospan FB series Source teplotek24.ru
It should be noted that two-layer materials differ in structure and density, and have differences in purpose and application. A characteristic feature of such materials is heat retention and resistance to high temperatures.
Video description
The correct arrangement of an insulated interfloor ceiling is shown in the video:
Work order
Before laying a vapor barrier on the floor in a wooden house, all wooden surfaces must be impregnated with special antiseptic agents. This is a powerful additional protection of wood from rotting, damage by insects and microorganisms.
When installing the floor of the first floor, the sequence of work should be as follows:
- roofing felt waterproofing is laid on concrete or brick intermediate supports for logs;
- skull blocks are attached to the mounted logs, to which subfloor boards are sewn;
Advice! It is better to lay subfloor boards with gaps for better ventilation.
Installation of subfloor Source freevilladge.com
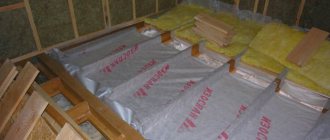
- membrane waterproofing is spread over the subfloor with the smooth side up; it should cover not only the flooring, but also the joists;
- the material is laid with an overlap, gluing the joints with tape to ensure tightness;
- the next layer is insulation, tightly laid between the joists;
- the thickness of the insulation should be slightly less than the height of the log, so that there is an air gap between it and the vapor barrier;
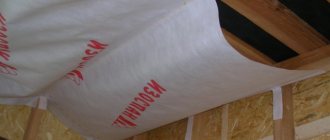
- the vapor barrier material is rolled out over the insulation across the joists, overlapping the walls;
- it is attached to the walls using double-sided tape, and fixed to the joists with a stapler so that between them it sag slightly and is not tense;
- all strips are laid with a good overlap and connected with tape;
- After installing the vapor barrier, counter-lattice bars are laid and secured along the joists, which are necessary to create a ventilation gap between it and the finished floor.
Scheme of installing an insulated wooden floor using joists Source grind-wood.ru
The last stage is the installation of plank floors or sheet flooring for the final coating.
Which side to lay Izospan
This material is today very widely used in the construction of various buildings. How to place Izospan correctly completely depends on the type of insulation used. These issues must be addressed before installation work begins. Particularly popular are the materials of the A and B series, which are distinguished by their high characteristics.
Installation is carried out using different methods, but the general rule is the same. The film is laid in such a way that the smooth surface is directed outward from the thermal insulation layer. On the other side there will be a fibrous side pointing inward. This allows moisture to be retained and prevents it from penetrating into the room. The rules for laying the material are described on the packaging.
Correct installation of Izospan Source dom.germanovich.com
Experts and the manufacturer recommend an overlap of the vapor barrier of at least 15 centimeters. All joints must be carefully sealed with tape or tape. Places of contact with structural parts are treated with a sealing strip. The tape is used at the junction of communications and structures.
See also: Catalog of companies that specialize in bath equipment, ventilation and air conditioning
What is the difference between the external and internal sides
Specialized vapor barrier films are made from impermeable polymer materials and cannot change physical properties depending on the side. But for ease of use, manufacturers apply markings on the outside, and some even technical markings that simplify installation. The rolls are also usually wound with the front side facing outwards and it is easier to unroll them “along the wool”, rather than from both sides.
If we consider the two-layer vapor barrier offered by some brands, then one of its sides is smooth and the other is rough.
But this does not in any way affect its ability to retain steam, just as it is not able to additionally prevent the formation of condensation. A rough surface only retains droplets of moisture on the surface, preventing them from falling and rolling off. Considering that this is a vapor barrier, and not a diffusion membrane, and condensate, subject to insulation technology, is promptly removed and dried due to ventilation, there is no particular profit from this property.
IzospanForumHouse participant
Which side of the vapor barrier, smooth or rough, by and large, makes no difference; vapor barrier does not allow either steam or water to pass through on either side. We recommend that in horizontal structures the rough side is downward - droplets of condensation do not hang on this side and, accordingly, do not drip. We recommend the diffusion membrane with the pattern facing outwards - but this is pure marketing. In fact, a vapor-PERMEABLE membrane allows steam to pass through and retains water in any direction.
Installation recommendations
To get the maximum effect and effectiveness from using the material, you must adhere to a number of recommendations from experts. It is important not only to know which side of the insulation Izospan B is placed on, but also to follow the rules for attaching it.
Installation of film on the roof Source pravozem.ru
The vapor barrier installation diagram is as follows:
- Having opened and laid out the roll, it must be cut into strips of the required size;
- fastening parallel to the floor, you need to start from the bottom, the smooth side is directed away from the insulation;
- installation of the next tape should be carried out with an overlap of at least 15 centimeters;
- All panels are fastened with a regular construction stapler; galvanized nails can also be used;
- to seal all joints, you must use SL tape designed for this operation;
- a sheathing is mounted on top of the laid vapor barrier, the gap is within 40-50 mm;
- at the last stage, suitable finishing material can be mounted on wooden slats.
Lathing on Izospan Source pbs.twimg.com
The right insulation pie
There is no need to reinvent the wheel; the vapor barrier in the house has long been thought out to the smallest detail - the correct roofing pie for a mansard-type roof is as follows:
- Interior decoration;
- A gap of 20-30 mm for air circulation (usually formed by a counter-lattice);
- Vapor barrier;
- Thermal insulation (the thickness of the insulation is the calculated value, depending on its thermal conductivity and the region of residence);
- Diffusion membrane;
- Ventilation gap 50 mm (in extreme cases, no less than 40 mm, formed by a counter-lattice);
- Lathing;
- Roofing covering.
The ventilation gaps themselves do not solve anything; air must circulate through them, keeping the structures dry. Ventilation is carried out through overhangs, covered with soffits and ridge aeration, or through dormer windows and a ridge, when installing a cold triangle.
It is impossible to lock steam in a room, set it in the desired direction and ventilate it through the vents or force it out - vapor barrier only works in tandem with ventilation of the under-roof space.
KabykiFORUMHOUSE Member
In practice, it is impossible to create an absolutely airtight structure, and this is not required - there will always be an unglued hole, cracks, and leaks. It is unrealistic to stop the phenomenon of the transition of a substance (in this case water) from one state to another (liquid, solid, gaseous). The condensation plane, also known as the dew point, is always located in the structure, from here you take a number of measures to prevent moisture accumulation - limit the flow of steam (vapor barrier) on the one hand, and ventilate the structure on the other. At the moment this is the most effective solution.
You can make a single-layer structure, you can heat it, you can install forced ventilation, but the classic vapor barrier/insulation/vent gap pie is definitely cheaper and easier to implement. I repeat - we insulate on one side and ventilate on the other. At the same time, the problem of the materials’ own moisture content is solved, which is important in our construction conditions.
When it comes to the attic floor and the cold attic, there are no fundamental differences in the insulation scheme.
- Finishing.
- Gap.
- Vapor barrier.
- Thermal insulation.
- Diffusion membrane.
- Ventilation gap.
- Sparse flooring for free movement (not always installed).
It is recommended to use a diffusion membrane over the insulation even in the case of a cold attic, as it protects against convective heat transfer, which minimizes heat loss. And in case of leakage or precipitation in the form of rain and snow, the membrane is very useful, as it will prevent the insulation from getting wet even in direct contact with water. When insulating the interfloor ceiling, both film and diffusion membrane are used. The film cuts off steam, albeit in a minimal amount, but entering the insulation through the ceiling when warm air rises upward. And the membrane will prevent particles of thermal insulation from entering the air, which inevitably occurs over time, and will protect the insulation if the floor leaks.
Advantages of film
This material is used directly for high-quality protection of various thermal insulation layers during the construction of buildings of various purposes and heights. The main qualities of the product are high strength, long service life, excellent reliability, simplest installation, absolute environmental friendliness, versatility, resistance to high temperatures.
The excellent versatility of the film makes it possible to use it for interior and exterior finishing work. But at the same time, you need to choose the right type of film for a specific job and also mount it correctly. Only in this case can we guarantee high performance and quality indicators of the material.
Izospan for outdoor work Source galich-dom.ru
How to check if the vapor barrier is working
There is a very simple way to check the effectiveness of a vapor barrier. You need a small piece of material and two glasses of the same diameter. Pour boiling water into one glass, cover it with a piece of the material being tested, and place the second glass upside down on top. If the material works as it should, the second glass remains dry.
If drops form on the walls, “fog” appears, the material conducts steam. Perhaps you have a vapor barrier with one-way conductivity, then you need to turn it over and repeat the tests. The situation has not changed? This is a vapor-permeable material with two-way vapor conductivity.
Checking the operation of the vapor barrier
Standards
It is possible to carry out high-quality roof waterproofing only when the materials used meet the following standards.
Their main property should be immunity to water, as well as water resistance. It will be good if such materials are also excellent in terms of thermal insulation - this will make it possible to save on insulation. An important feature of waterproofing materials will be their high elasticity, since rigid materials are difficult to use when covering roofs, especially when it comes to some complex shaped options. When creating waterproofing for certain categories of roofs, it is necessary to select materials that have excellent vapor permeability. This parameter will be extremely important when there is a living space under the roof of the building - a room or, say, an attic. No less important aspect than the above will be the strength of waterproofing materials
Everything that will be used for waterproofing must have the ability to withstand physical stress and be as impervious to physical damage as possible. Some fragile or not very strong materials simply cannot be used, since even the slightest disturbance in the structure of this or that material can cause water to begin to get inside and destroy the material, and cold will begin to get inside the building.
- Some people, in the hope of saving money, simply trim the roof with good material. They mistakenly believe that its strength is sufficient to protect the building from almost all negative natural factors. They are right that such material can protect the building from low temperatures, scorching sun or wind. But water will easily penetrate into holes and cracks, destroying this coating inside and provoking corrosion with fungus. It is precisely because of the fight against the phenomenon mentioned above that it should be understood that it is impossible to do without roof waterproofing.
- And for the material to be suitable, you should know about standards such as vapor permeability, especially if we are talking about an insulated roof. This property allows water to escape from the insulating layer under the roof, from where it will simply erode. If the vapor permeability of the material is low, then water will collect in the material, transforming into condensate, and will simply begin to destroy it, as a result of which the insulation will ultimately lose all its useful properties and characteristics. If we talk specifically about materials with high vapor permeability, then they can be called a superdiffusion membrane, which is usually placed directly on the insulating layer, which makes it possible not to make any intermediate frame. If the roof is not insulated, then it can be waterproofed with a material that has low vapor-permeable characteristics.
- Another important point is water resistance, which was also mentioned above. It is expressed in maintaining contact with water for as long as possible. When finishing a flat roof, it is necessary that the water-repellent surface be high, because water tends to linger on a roof of this type. If the roof is pitched, then this indicator will be no less important due to the fact that the roofing material often has so-called sagging or depressions, which is why water can linger there. If we take it according to the standard, the waterproofing layer must withstand a pressure of one and a half meters of water column. As a temporary roof, you can use a membrane with a water column of four meters.
- If you decide to use a waterproofing film as a temporary roof, then it must still have excellent characteristics in terms of withstanding the effects of solar radiation.
- And the last important parameter will be mechanical strength. It’s just that during the process of laying materials on the roof, some elements may disrupt the film integrity. Where deformations and breaks occur, leaks may appear. The integrity parameter is measured in units of weight per square meter. A film with a value of 100 grams per 1 square meter will be reliable.