In the old days, when our ancestors used black baths with all their might, the question of dividing the internal space of the bath did not arise. Baths of this type combined a steam room and a washing room into one, and the function of a dressing room was performed by a porch, sheltered from the weather. Now, a modern bathhouse has clearly separated functional zones, which are logically outlined in the internal volume of the bathhouse structure and isolated from each other. The separating function is performed by partitions in the bathhouse. Our story today is about what they are, how they are built and what methods to obtain the most effective result.
How to do it?
To connect the main walls of the bathhouse with the partition, pieces of reinforcement are mounted at one end into the wall and at the other into the masonry joints. The diameter of the rod should be 6 mm. If a brick partition in a bathhouse is placed near the stove, then it would be correct to leave a window for the combustion channel. The progress of masonry work is carried out in the following order:
- The first thick layer of mortar is laid, leveled with a trowel, and creates the base of the wall. We need to give it time to catch on.
- Then another layer - thinner - under the first row of bricks. The mortar is applied to the ends of the outer bricks with a trowel, pressed tightly against the wall and excess mortar is removed. Using a stretched string, the evenness of the rows is controlled. And the level shows horizontal and vertical.
- The laying of the second and each even row begins with halves of material. This - dressing - is done to evenly distribute the load.
- Every 3-5 rows, pieces of reinforcement or steel wire are placed on the cement to provide strength.
- In a similar way, the entire wall is driven completely up to the ceiling. The remaining gap is filled with small pieces and fragments soaked in solution. Small cracks are sealed with tow.
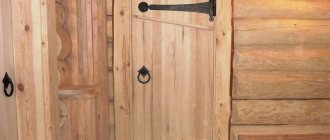
- If the bulkhead is planned with a door, then the frame is set up in advance. It is attached to the brickwork using steel strips. The bricks are laid close to it. Do not forget to control the horizontalness and evenness of the masonry by moving the stretched string higher.
- After the solution has hardened, the seams are sanded.
Between the sink or rest room and the steam room for ventilation during drying, you can place a small hole that can be closed during bath procedures with a shield or plug. After the partition is erected, the wall on the washing side is tiled, and in the steam room it is insulated, thermal insulation foil is laid and covered with clapboard.
3x5
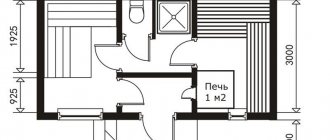
Since people are interested in washing and steam room options for these dimensions, separately and together, we will present both options, and then you can decide which one you prefer, but everything that was said about the possibilities of reproducing the conditions of a Russian bathhouse in a building with an area of 3 by 3 meters - remains valid even when increased to 5. Make a stove in a surround, use steam generators if it is not possible to make a full-fledged closed heater.
Washing and steam room separately
Let us say right away that this option cannot be called the only possible one. Moreover, for those who are not inclined to receive guests and drink libations, the design of a bathhouse with a steam room and a sink of such dimensions may seem unsuccessful. But you can always start from what you have and reshape everything in your own way
Layout (plan) of a 3x5 bathhouse, washing and steam room separately.
There are no fundamental differences here with the previous scheme, we left the same layout with a meter washing room, a two-meter steam room, we simply increased the size of the relaxation room. Of course, on three meters you can place a normal table, seat more guests, this is also significant.
But the washing room could also be a resting place where you can take a breather after the steam room. Then it would be possible to distribute the space differently: divide these five meters between three rooms, make a steam room 2x3 m, a washing room 2x3 or 1.5x3 m, a dressing room 1x3 or 1.5x3 m. And if the dressing room seems too long, at the end make a firewood storage room or pantry.
Sink and steam room together
But the same problem can be solved differently - by making the same design of a bathhouse with a wash room and a steam room together.
Layout (plan) of a 3x3 bathhouse, sink and steam room together.
In our opinion, it looks quite attractive, although we will not impose our point of view. The oven in this case is quite limited in size, you see that it is possible to make it in a surround - there is enough space. The shelves can be made wider if desired. We assumed the standard 60 cm, but they can be a meter wide.
Installing a partition in the bathhouse near the stove
Partitions in the bathhouse near the stove require special attention when constructing them. The stove flame and the heat associated with it are the main source of danger in the sauna. Therefore, the most important requirement for the partition surrounding the stove and separating the steam room from other rooms is the fire safety requirement. At the same time, such a partition should provide good thermal insulation of the steam room so that the temperature regime inherent in this room is maintained without unnecessary fuel consumption.
The thickness of such a partition is determined by its material and design. It is not advisable to lay a brick partition of less than half a brick. Better - in brick. It will turn out beautifully - with the proper skill of the mason. No additional thermal insulation is required. The frame partition is mounted on bars with a cross-section of at least 50x50 mm. Plus the thickness of the skins on both sides.
The need for thermal insulation should also be taken into account. For a steam room, it is laid in a layer of at least 100 mm. Thermal and sound insulation of partitions in other rooms can be thinner - 50 mm. Partitions made of timber or logs do not require additional insulating coatings and are made with a thickness of 15–18 cm, which corresponds to the standard section of timber 150x150 mm and log diameter 18–22 cm. For internal partitions, such values are sufficient.
How to insulate the partitions between the rooms of the bathhouse is decided on the basis of local traditions and the available budget. A mandatory requirement is that the material used is harmless at elevated room temperatures. Mineral wools are popular because they have suitable thermal conductivity at an affordable price. Since the material is hygroscopic, it is protected with films or membranes that prevent the accumulation of moisture in the thickness of the insulation.
In addition to mineral wool, the steam room is often insulated with a layer of foil polyurethane foam. The metallized surface should face the inside of the steam room to reflect heat flows. In this case, the use of a vapor barrier is not necessary, since the foil is impermeable to moisture.
Partitions with convection are used to organize heating of rooms adjacent to the steam room and oven. In heat engineering, convection is understood as the process of heat transfer by flows of gas (air) or liquid. In the bath business, such flows are organized by arranging holes in the partitions. The first is done near the floor near the hearth of the oven. Cold air is sucked into it. The second is at a height of about a meter. The air flow heated by the stove passes through it and, rising to the ceiling, heats the room.
The use of partitions with convection for heating the entire bath requires the installation of a stove with a higher heat output, since part of it will be spent on heating rooms in addition to the steam room.
Near the fire-protection stove, a partition made of combustible materials - in the case of a frame, timber or log - is replaced in a place close to the stove with brickwork. If the stove is made of brick, its surface temperature will be lower than that of a metal one. In this case, it is possible to isolate the partition made of combustible materials from the brick surface of the furnace with several layers of felt impregnated with a clay solution. This measure eliminates unauthorized heat loss from the steam room to adjacent rooms and prevents the possibility of fire in the bath structures from contact with the heated surface of the stove.
Brickwork is sometimes used as a heat accumulator in a steam room. To do this, the stove is fenced off from a nearby wooden wall with a brick screen, which protects the wood from excessive heating and stores heat. As it cools, the masonry mass maintains a comfortable temperature in the steam room for a day or more.
Features and Functions
The protective partition in the bathhouse near the stove is a universal item. Modern manufacturers of such equipment offer many options for barrier screens. New products will suit any needs and different budgets.
The partition plays an important role because it performs the following functions:
- eliminates the possibility of burns;
- used as additional room decor;
- Using a protective partition, you can control the flow of heat not only into the steam room, but throughout the entire house.
Brick baths are in great demand. This material has a fairly low thermal conductivity, so brick walls heat up much more slowly. But this property does not make the brick walls in the bathhouse completely safe - here it is also necessary to protect the bathhouse walls from the heat of the stove. Wood is used as the most popular material for building a bathhouse. High temperatures increase the risk of fire.
How to do it: work progress
If this is a partition that serves as a load-bearing partition, then it is made in the same way as the other walls, namely, it is laid on a foundation with an insulating layer and attached to the walls using tongue-and-groove fastenings.
Non-load-bearing ones can be placed on floor slabs if the weight allows. Decorative dividers can be laid on the floor (or on the ceiling, if possible) and attached to the walls in various ways:
- Tenon and groove. It is best suited for thick and heavy partitions, since this method can securely fasten the entire structure. The disadvantage of this method is the difficulty of cutting grooves in the wall, as well as adjusting the size of the logs for the partition.
- Using anchors, you can fix the logs both among themselves and with the floor/walls.
This type of fastening is not noticeable indoors, but for greater reliability, its outer part is fixed on the outside of the wall. Among the disadvantages, it can be noted that it can be used only after the house has completely settled, and also for structures that are not too heavy, since due to the weight, the anchors can be pulled out or the wall deformed. - Construction staples can be used to secure logs for a certain time, but they are not a reliable fastening, since when the wood dries, they will simply fall out.
- Stainless steel angles can also be used as fasteners. Among their disadvantages, it can be noted that they are mounted on top of a wooden structure and will be very noticeable, and over time, due to the drying of the wood, this fastening will become less reliable.
- Long length construction nails. They can be hammered into the outer part of the wall and used as anchors, but over time the wood will dry out and such fastenings will begin to play.
Procedure:
- Before laying on the ceiling or floor, the lower part of the first crown is leveled to have a larger contact area and better stability. If possible, attach the first log to an anchor.
- After this, the partition is laid in the same way as conventional walls. To do this, crescent-shaped indentations are made on the bottom of the log, which are used as fastenings.
- Also, instead of them, longitudinal grooves can be made, and the upper part of the lower logs can be turned with a longitudinal tenon. If the separator is only decorative, small in size, and also lightweight, then in some cases additional fastenings are not required.
Interior and exterior decoration of the building
Insulation is a mandatory process when constructing a brick building; the walls of the bathhouse can be finished with the following types of insulation:
Bulk materials (sawdust mixed with slag and fluff lime). The mixture is laid in layers up to 50 cm thick, each layer should be watered with liquid lime. Plate materials
The panels are fixed inside using special fasteners; during installation it is important to create an air gap. To do this, the fixed parts are cut into strips, which are installed at intervals between each other and facing the walls. If we are building a bathhouse with a small budget, we can use mineral wool
This material is used between the walls or a slatted surface is arranged inside, and cotton wool is placed between it and the brick. When choosing cotton wool for insulation, it is important that it is a type that does not cause allergies or problems with the respiratory tract, otherwise it will be impossible to use the sauna. Foam is another material that can be used. It is installed not in the bathhouse, but outside, then plastered and covered with classic or vinyl siding.
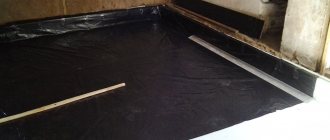
In addition to thermal insulation, it is important to waterproof the structure so that moisture does not destroy it. The walls are coated with bitumen, mastic, you can paste them with roofing felt
As a vapor barrier, special polyethylene foam is usually used, which is secured using bars or slatted material.
Partitions in the bathhouse: what material are they made of?
Even the smallest bathhouse will have two rooms: a steam room combined with a washing room, and a dressing room. What material should the wall between them be made of if the bathhouse is wooden? Should I order a five-wall log house with a permanent internal wall or build it later, after the log house has shrinked? If we install a stove that will heat both compartments, is making a brick partition in the bathhouse with our own hands correct, or are there any contraindications? Approximately this list of questions worries every owner who begins to build a bathhouse on his site. Let's try to figure them out.
Partitions in a wooden bath
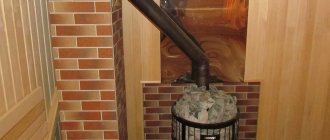
Partition in a bathhouse with a built-in stove
Wooden baths will include those built from logs, timber, or those assembled using frame-panel technology. Experts do not advise making internal partitions in wooden bathhouses from bricks, especially if you are going to heat it not regularly, but occasionally. The thermal conductivity of brick and wood is different, and it will take more time to heat the inner brick wall, especially in the cold season. It is possible to build walls between rooms from the same material as the external ones, but there is no need. Still, there is no exposure to atmospheric phenomena indoors, and if you use the same material, but with a smaller cross-section, problems will arise at the joints. Most often it is advised to arrange internal walls according to the frame principle.
How to make partitions in a bathhouse using boards and insulation?
- For interior walls, you will need a board 3-5 cm thick and no more than 10-15 cm wide, because thinner and wider boards are more likely to fail.
- The boards are stuffed onto a pre-assembled frame of beams, and a layer of insulation is laid between them, which must be covered with waterproofing.
- If you use foil in the steam room, then you will also need to secure it to the inner wall.
- The last step is to install the sheathing along the plank partition and cover it with clapboard, the same one you use for the main walls.
But if you are going to use a metal stove in the bathhouse, which will be heated from the dressing room, then you will need a partition made of brick, preferably fireclay. It is made 2 or 3 bricks wide in each direction from the stove, as in the photo, and high - to the ceiling, or to the point where the chimney exits the room, these are the requirements of fire safety rules. If the metal stove will be heated inside the steam room, then you can make the wall wooden, but you need to cover it with non-flammable materials and install the stove one meter from the walls or even further.
Partitions in stone baths
Construction of a frame partition
How to make a partition in a bathhouse if it is built of brick or some blocks? Experts recommend using the same frame technology, because the room will still heat up faster, in addition, condensation will settle on the brick or stone wall, which will need to be drained somewhere.
Instead of boards, some professionals advise using magnesite sheets; by the way, the partition in a log bath can also be made of them. Magnesite panels are made from perlite and cellulose fibers. They belong to the class of non-combustible materials and behave better in conditions of high humidity than OSB boards. They are mounted on vertical profiles on both sides, with insulation laid between them, which must be protected with a waterproofing layer. The final finishing of such sheets can be lining or any other materials. It is possible to install partitions without insulation inside; if you make them in two boards 30 or 50 mm thick, the air space between them will perform an insulating function.
If you still want to use brick, then it is better to make a heating shield for the stove out of it, since then it will not just heat up from the air, but will let the heat of the stove pass through and then transfer it to the bathhouse, which will allow it to dry faster.
The last thing I would like to talk about is how brick partitions are attached:
- Scraps of reinforcement with a cross-section of 6 or 8 mm are inserted into the main walls; the other end of the rod should fit into the seam of the brickwork being built.
- The width of the partition must be no less than half a brick, and every few rows of masonry are additionally reinforced with steel wire.
- If you are building a brick partition in a wooden frame, then you can do this only when it settles, and you need to connect it to the main walls through a board inserted into the groove. This technology makes it possible to compensate for the ongoing shrinkage of the log house.
Steel case
Steel is also a fire-resistant material. It cannot be left untreated, as it will instantly rust in a bathhouse. When finishing the space around the stove with steel, you need to keep in mind that unlike brick, tiles and stone, steel does not insulate heat at all.
A protective portal around the stove made only of steel will be completely pointless, since it will not be able to fulfill its main task - to protect wooden walls from overheating. In order for this function to be fulfilled, it is necessary to provide a good heat-insulating layer of another material, and then cover it with a facing steel sheet.
To finish the portal around the furnace with steel, it is convenient to use ready-made factory-made elements. Such accessories are made for fireplaces. Without modifications, they are also suitable for a bath.
This heat-insulating separation layer is created from mineralite. Other fire retardant insulation materials can also be used. Simple mineral wool is not suitable, since after getting wet once it shrinks in volume, and this defect cannot be corrected by anything.
The insulation near the stove should not get wet. You need to take care of its waterproofing. Moreover, this waterproofing should only be on the side of the cold wall, but not on the side of the stove.
Steel has a metallic luster. This effect can be used to greatly increase the efficiency of the portal.
If made from uncoated polished stainless steel, it will act as an infrared reflector.
A similar element can very often be seen in electric fireplaces, heating stoves and any other heating devices.
The main difficulty of this solution is the need to use only stainless steel. Compared to ordinary steel, it costs 10 times more, but the total thickness of the sheets for the reflective screen can be small.
Stainless steel perfectly withstands any humidity. It can even be placed in rooms such as a steam room in a bathhouse; the decoration around the stove will be compact and with a modern design. In a steam room, all interior elements are usually made only from wood. Stainless steel would be appropriate next to a metal stove-stove.
How to make a frame partition in a bathhouse
Before learning how to build frame partitions in a bathhouse with your own hands, you need to learn a little about such structures.
Design features
The essence of such partitions is to construct a frame made of wood, insulate it with mineral wool and construct an upper cladding from clapboard. Before erecting the partition, it is necessary to make a concrete curb that will serve as a kind of foundation. Now let's get acquainted with how to make a partition in a wooden bathhouse.
Stage one. Preparatory work
We clear the field of activity from debris and unnecessary items. We are constructing a concrete curb that will make the future structure strong, reliable and durable. The height of the border will be about 10 cm and the width - 12.5 cm.
We treat the base with a primer, which will provide good adhesion. We build the formwork, not forgetting about the doorway. We drill holes inside the formwork through which you will need to drive the wire, or drive in dowels. Such actions are necessary to ensure the stability of the curb. We pour concrete inside the formwork and wait for it to dry completely, after which we line the roofing material in two layers.
Stage two. Frame construction
When constructing a frame frame, precision must be maintained. During preparation and fixation of this or that element, everything must be carefully checked. Level checking should be carried out in horizontal and vertical positions. All dimensions must correspond exactly; errors are not appropriate here.
Stage three. Thermal insulation. Installation of sheathing
At this stage, you need to take care of how to make a heat-tight partition in the bathhouse. This process is mandatory and requires a serious approach. Mineral wool or magnesite boards can be used as thermal insulation material. Although the latter material has appeared recently, its popularity is increasing due to its low cost, high practicality and excellent performance characteristics. It is not surprising that many are interested in the question of how to make a partition in a bathhouse between a steam room.
It is necessary to prepare cells in the frame that will correspond to the size of the slabs of thermal insulation material. For mineral wool it is 120x60 cm. After the material is installed in the frame, it must be covered on both sides with plastic film. A stapler is useful for this. As a result of such actions, protection from moisture will be provided, thermal insulation will increase and a barrier to sound penetration will arise. This stage resolves the issue of how to insulate the partition in the bathhouse.
Now you need to do the sheathing. For this process, beams measuring 2.5 x 5 cm are suitable. You can simply attach the sheathing on top of the film. For fixing, you will need self-tapping screws that will be attached to the frame. On the sink side, the lower beam from the sheathing is fixed to the concrete curb. From the steam room side, fastening occurs to the floor.
This is only half the battle and we have not yet figured out exactly how to make partitions in the bathhouse. Therefore, we continue to delve into the theoretical material.
Stage four. Door frame
The doorway should be given special attention. To form a frame, you need to install two posts in a vertical position
To secure the frame frame you will need jumpers and screws.
When installing the top frame, it is necessary to leave a distance to the ceiling of at least 3 cm, especially for bathhouses made of logs, which, as is known, have a tendency to expand and shrink. The frame should be one centimeter smaller on the sides and top than the opening. The cracks can be easily sealed with foam, the remaining foam can be cut off and subsequently covered with platbands.
Stage five. Finishing the sink with tiles
This work can be done before or after covering the partition. An important point is to observe the junction of the forcing and the end of the tile
There should not be a single gap, this is very important
Stage six. Cladding
There is very little left and you will know how best to make partitions in the bathhouse. The lining is attached to the sheathing. This process is simple. The installation process must be carried out according to the “tongue and groove” principle. If you are attaching the lining to the sheathing, you will need clamps.
Stage seven. Installation of skirting boards and platbands. Final finishing of the edges of the structure
Platbands can be replaced with clapboard. The edges of the material will need to be cleaned using a router, and the length is adjusted with a circular plate. The top trim is cut at an angle of 45 degrees. Then docking is performed. Similar processes are carried out in relation to skirting boards.
Thermal insulation of the steam room
Everyone knows that before covering a steam room, the room must be insulated and a vapor barrier installed.
The choice of material for decorating a steam room in a bathhouse with your own hands is great. Today, there are several types specifically for the steam room. Such materials that tolerate temperature changes well and do not emit harmful substances when heated do not rot and do not contribute to the appearance of fungus. They are also fire resistant and will last for many years.
Basalt and mineral wool are the most popular cladding materials. And foil film is excellent for vapor barrier. The foil material is sheathed on the walls and ceiling and used for waterproofing them. It looks like a roll of basalt wool only with a layer of foil.
Ceiling insulation
We attach the foil material to the ceiling using a stapler, with the reflective side facing the room. We overlap the joints and seal them with aluminum tape.
We fasten the sheathing for the future ceiling (for cladding to hide the foil layer) using screws across the beams. You can read about how to vent a chimney through the ceiling here.
Also, do not forget in the attic, before filling the ceiling with insulation (earth, expanded clay), put a film on it so that dust does not get inside the room, or cover all the cracks between the boards.
Thermal insulation of walls
The technology for covering the walls in the steam room is the same as for the ceiling. Just before insulating the walls in the bathhouse, you need to smooth out all the cracks and joints. The insulation is attached parallel to the floor, from top to bottom. Laying is done in three layers: hydro-, heat-, and vapor barrier.
The first layer of waterproofing is needed to prevent condensation from settling on the walls. The second layer is for insulation; it is laid in a timber sheathing. The third layer is needed to protect the insulation from moisture.
Floor insulation
A floor made of concrete is certainly more durable than wood, but such floors are cold, so people still give their preference to wood.
For a wooden floor, the foundation is poured, beams are laid, and logs are placed on them. The voids formed between the joists and beams are filled with insulating material, most often expanded clay or sand. Next, a vapor barrier and the “first floor” are laid, and insulation material and waterproofing are placed on it, and only then we make the finishing floor.
For a concrete floor, a base is made of concrete and crushed stone, 12-15 cm thick. Waterproofing can be installed after the concrete mixture has completely dried. It can be roofing felt or bitumen mastics. The concrete is coated several times with bitumen mastic, and only then we apply waterproofing. The insulation can be mineral wool, perlite or expanded clay with a layer of 10-15 cm. The next layer of the floor is made on the heat-insulating surface.
What is profiled timber?
Profiled timber is lumber that is processed using woodworking equipment. All manipulations are carried out taking into account the latest technologies. This allows for improved technical characteristics.
After processing, the lumber appears with grooves with tenons, which allow you to create a tight connection between individual beams. This increases the speed of log assembly and thermal insulation characteristics.
Stages of production of profiled timber:
- Preparation of consumables. For the manufacture of profiled timber, larch, spruce, and pine wood is most often used. Larch is highly resistant to temperature changes and deformation from humidity. Spruce and pine are more affordable in finance.
- Selection of lumber from the total mass. At this stage, wood with defects is rejected - through rotten knots, darkening, large cracks.
- Selection of section. Performed before processing of consumable raw materials begins. The cross-section can be rectangular or square.
- Calibration The selected lumber is divided into separate groups depending on the size and cross-section.
- Technological drying. It is carried out in two ways - natural or chamber. The first involves storing lumber under a shed. The timber is laid out in two rows at a distance from each other. With kiln drying, the wood is immersed in a drying chamber where it is kept for 2–4 weeks.
- Processing on a machine. Performed after the wood reaches a certain moisture level. Grooves with tenons are cut out on the side elements, and the front sides are ground to obtain smooth surfaces.
The last stage is packaging of finished lumber. It is needed so that the wood maintains the required level of humidity during transportation and storage.
The processes of production, transportation, and storage of profiled timber are regulated by state documents GOST 8242-88, GOST 8486-86, GOST 11047-90, GOST 24454-80.
Brick
A brick partition in a wooden bathhouse is much less common than in a brick bathhouse.
They are usually built in brick and block bathhouses.
Quite often they make a brick partition in a wooden bathhouse with their own hands if it is necessary to cover the stove, which is located in the dressing room.
This is done due to the fact that the wall here must be as fire-resistant as possible and able to withstand high temperatures.
Important! It is very important to note that the partition in the bathhouse made of facing bricks is erected only after the frame has shrinked!
This can be explained by the fact that after a few years the wooden bathhouse will shrink by five or even ten centimeters, but the brick wall will remain in place.
Attention! Maximum attention should be paid to the quality of the cement mortar, since the reliability and service life of the partition being built depends on it. Also, the disadvantages of a brick partition in a wooden bathhouse include the fact that brick heats up many times slower than wood, which is why it is better to build wooden partitions in wooden bathhouses
The wall with the stove in this case is an exception
Also, the disadvantages of a brick partition in a wooden bathhouse include the fact that brick heats up many times slower than wood, which is why it is better to build wooden partitions in wooden bathhouses. The wall with the stove in this case is an exception.
Brick has a number of advantages, which include:
- Good soundproofing;
- Moisture resistance, which means the formation of fungus and mold is unlikely;
- Fire resistance;
- Brick is completely unattractive to pests.
Let's not forget about the shortcomings. These include:
- Heavy weight of the partition;
- The complexity and duration of work on arranging a partition in a brick bathhouse with your own hands;
- Before finishing a brick partition, it is mandatory to plaster it.
How to make bricks correctly
The process of constructing a brick wall is as follows:
- Before building partitions in the bathhouse, you need to prepare the room. To do this, all unnecessary objects are removed from it, brighter lighting is installed, and materials are prepared. It is also necessary to remove the wooden covering from the walls and floors, clean the surfaces with a damp broom;
- On each of the components of the bath box, the contours of the future partition are marked;
- The prepared sand is sifted and mixed with dry cement in a ratio of 3:1. Next, water is poured into the resulting mixture until the solution becomes homogeneous and plastic. You need to decide what brick to make the partition in the bathhouse from;
- In order for the partition in a brick bath to be laid evenly, it is necessary to stretch a tape along its edges. You should also periodically check verticality using a plumb line;
- The door frame is pre-installed in the opening. It is lined closely with brick;
- It is necessary to carry out masonry with dressing of seams. To do this, every second row must be started by laying half a brick;
- Near the ceiling, small cracks and holes can be sealed with tow;
- If a partition is installed in the bathhouse between the steam room and the sink, then on the washroom side the brick should be protected with ceramic tiles in order to avoid the material getting wet and causing rapid wear.
Brick
Brick partition
It is better to stock up on all the necessary material in advance. The masonry can be done in half a brick. This will save money and also reduce the overall weight of the entire structure. It is desirable that the sand that will be used to prepare the solution be dry. This will help you calculate the ratio correctly and will promote good adhesion.
The level of the surface on which the laying will be carried out is checked. Using a laser level, a line is projected onto two walls and the distance to the floor is measured from it. If the difference is up to 10 mm, then it can be compensated by thickening the seam in some places in the first rows. If the difference is larger, it will be necessary to perform equalization. A wooden frame is installed in the shape of the future door. It will serve as a guide.
Construction of a brick partition A fishing line is stretched between the two walls, which will help maintain the plane. It should be at a height of one brick plus the seam. The sand is sifted through a homemade sieve. It can be played by an old armored bed or a mesh with small cells. Next, it is mixed with cement, it is better to maintain a 3:1 ratio. Water is added
It is important that the solution is not very thick, but not liquid either. It is recommended to bring it to the state of thick sour cream. A layer of mortar is applied to the floor and the first row is laid on it
Using a building level, the horizontal plane is checked. After the foundation laying is completed, the line is moved to a higher level. The second row begins not with a whole brick, but with half of it. This is necessary to ensure dressing. In addition, you need to connect the partition well with the side walls. This can be done using reinforcing bars or metal plates. A hole is drilled along the diameter of the rod, it is inserted into the wall, and its second end is walled up in the seam of the partition. If plates are used, then a corner is bent from them. It is attached to the supporting walls using a hammer drill and self-tapping screws, the second part of it is laid in the seam. Every few rows an additional metal mesh is placed in the seam. It will serve as a reinforcing element that will increase the strength of the entire structure. After the wall is finished, it is covered with facing material. A vapor barrier is laid on the side of the steam room. A sheathing is installed on top of it, and a wooden lining or block house is attached to it. On the washing side, you can finish it to your own taste. There will not be large temperature changes here, but high humidity must be taken into account.
Reinforcement
Selection of building materials
When choosing logs for partitions, you should take into account their purpose and the material from which the main walls are made. This is necessary to ensure that the structure is durable, not subject to deformation, and also has an attractive appearance that will be in harmony with the surrounding environment.
For partition walls, 2 types of material are suitable:
- "Wild Logs" They are felled trees from which the bark has been removed without damaging the bast layer.
This is necessary for better protection from moisture, so that the wood does not begin to rot or fungus appears on it.The disadvantage of such lumber is the different diameter of the sides, since the tree tapers towards the top. This leads to difficulty in aligning the entire structure.
- A rounded log is a tree that has been cut into pieces of a certain size and turned on a special machine so that it does not warp and its diameter is the same on both sides.
Most often, special grooves are made in it to make it more convenient to lay it. The disadvantage of this material is that it is more of a timber than a log and, due to turning, additional treatment with antiseptics and fire retardants is required.
Since the tree is conventionally divided into 3 parts: “komel” - lower, from the root, “drugach” - middle and “tretyak” - upper, then the choice between them is different. If the partition will be used as a load-bearing wall, then most likely it is necessary to use the “butt”, since it is used for the construction of walls.
For non-load-bearing walls and ordinary partitions, thinner and lighter parts of wood can be used.
The purpose of the partitions should be taken into account, since wood that was harvested in winter has a higher resistance to moisture and can be used in dividers for showers or baths.
Also, if a partition separates a living space from a utility room, it must have good thermal insulation properties. Therefore, if the temperature behind the separator can drop to -20 °C or lower, then it is necessary to take a log with a diameter of 200 mm.
When choosing a material for building partitions, you should pay attention to their appearance, since high-quality wood should have a yellow or dark yellow color. It is also necessary to select lumber without knots, cracks and deformations (for example, “torsion”)
This is necessary so that the enclosing structure is not damaged during shrinkage and does not cause harm to the main walls.
Making partitions from foam blocks
Making partitions from foam blocks
Foam blocks (made from aerated or foam concrete) are distinguished by the fact that, despite their low weight (compared to bricks), they are large in size, which means that masonry will be carried out much faster.
Partition foam blocks
Standard blocks have a height of 300 mm and a length of 600 mm. The thickness depends on the type of room where the partition is planned to be installed, but in most cases, products of 75 mm, 100 mm and 150 mm are used. The cost of foam blocks ranges from 21.5-49.5 rubles, depending on the thickness.
Interior partitions made of foam blocks
The masonry procedure is not much different from the previous version, but there are still some differences. Below is the sequence of actions.
Masonry procedure
Stage one. Marking
First, the floor and walls are prepared in the same way as in the case of brickwork. Then the cord is pulled and the doorway is marked. In accordance with the markings, the first row of blocks is laid out “dry”, and if necessary, trimming is done. A grinder is suitable for this, although it is better to use a stone saw. In the absence of these tools, a simple hacksaw is used.
Block cutting
In place of the future structure, waterproofing (roofing felt is suitable) is placed in two layers.
Stage two. Installation
For laying foam blocks, a special glue is used, which must be diluted in accordance with the manufacturer’s instructions. The glue must be mixed with an electric drill with a special mixer attachment. The adhesive composition is applied to the foam block with a layer of 3 mm, then the block is put in place and tapped, verticality/horizontalness is checked. Each new row of foam blocks must be shifted by about ½ the width of the product to make the partition more durable.
Block laying
Where the partition meets the main walls, it is tied with pieces of reinforcement or large nails. To do this, holes are made in the walls, and reinforcement with glue is inserted there to a depth of at least 50 mm. You can make recesses in the blocks themselves, although it is preferable to place the products directly on the rods that stick out from the walls.
Partition made of blocks
Partition installation
Partitions made of foam blocks
Stage three. Plaster
For plastering, you can use the same adhesive solution that was used for laying. If necessary, channels are created for laying communications. After plastering is completed, the surface is dried, puttied, painted or tiled.
Plastering blocks
Good advice
In some cases (if the weight of the structure is insignificant), a partition made of foam blocks can be built directly on a wooden floor. Although there are some nuances here.
When purchasing blocks, you need to pay attention to the quality of their surfaces. The smoother the surfaces are, the better the finishing will be. The dimensions of the blocks depend on the installation location, while the density does not play any role. It is advisable to purchase blocks produced using cutting technology. If the foam blocks are moistened with water before work, this will increase the density of the masonry. The blocks of each new row must be shifted to avoid the appearance of vertical seams. It is advisable to leave a small gap (about 100 mm) between the partition and the ceiling, which must be filled with polyurethane foam.
Fire resistant structures
A special heat-resistant cladding is used as protection for the walls. To do this, the fire-resistant cladding is covered with heat-resistant tiles. Non-flammable glue is used for its installation. The following facing materials have good fire-resistant qualities:
- terracotta tiles;
- tiles;
- porcelain stoneware;
- soapstone and so on.
In addition, fire-resistant plasterboard, mineralite, glass-magnesium sheet and other fire-resistant boards for a bathhouse can be used as fire-resistant protection for walls. It must be taken into account that for each type it is necessary to provide ventilation in the form of a gap at the bottom. Practice shows that the use of cladding as heat-resistant protection for walls in a bathhouse has almost the same thermal characteristics as reflective cladding. The only drawback is the cost, which is several times higher than standard options.
Construction requirements
There are a number of requirements for wooden buildings, which are described in several documents:
- Design standards - SNiP II-L.13-62.
- Impact and load - SNiP 2.01.07-85.
- Foundations of buildings, utility and auxiliary structures - SNiP 2.02.01-83.
- Wooden structures - SNiP II-25-80.
- Construction standards for gardening non-profit partnerships - SNiP 30-02-97.
Regulations:
- Evacuation routes, exits - SP 1.13130.2009.
- Finishing coatings for building structures - SNiP III-21-73.
- Fire safety of auxiliary structures and buildings - SNiP 21-01-97.
Permissible distance from the bathhouse to other objects:
- The roadway is from 5 m.
- Reservoir - at least 22 m.
- Trees - at least three meters.
- Forest - from 15 m.
- Residential building - at least 8 meters.
- Well, borehole - at least 12 m.
- Neighbors' plot - at least 1 m.
The bathhouse should be located on a hill so that its foundation is not flooded by melt or rain water.
Fire safety rules:
- Wooden surfaces inside the shower and dressing room are coated with fire retardant.
- Doors should open outward so that in an emergency there is no difficulty in going outside.
- All wooden surfaces near the stove are covered with heat-resistant screens.
- A working fire extinguisher is installed inside the dressing room or any recreation area.
- The chimney pipe passing through the ceiling or roof is insulated with a layer of non-combustible material.
- Natural and forced ventilation should be designed inside the bathhouse.
- Electrical appliances are grounded.
- The wiring is covered with a special corrugation or plastic boxes.
- A metal sheet is laid on the floor in front of the combustion chamber.
- All heating appliances (including the stove) are located at a height from the floor.
- The bathhouse building is located taking into account the wind rose. The smoke from firing the stove should not smoke residential buildings.
Inside the bathhouse
Internal partitions are those that separate the three main rooms: steam room, sink, relaxation room from each other.
Between the steam room and the sink
It’s up to you to decide what material your partition between the steam room and the washing room will be made of - if you follow the links above, you will learn how, if possible, to completely neutralize the inherent disadvantages of each material.
So do what you like
But consider the nuances that are important to know. What is characteristic of the partition between the steam room and the sink? On the one hand, it has increased temperature and humidity, on the other hand - only increased humidity
In some cases, this is a critical difference - you cannot use moisture-resistant drywall in a steam room because it protects against moisture, but becomes brittle from heat.
But the main thing is that the walls of the steam room and sink, including the partition, are often finished in completely different ways. This could be tiles in the washing room and lining in the steam room. Of course, where the partition is made of timber or logs, this is superfluous, but for a brick or frame it is quite relevant.
There is one more nuance - even if you prefer clean wood on both sides, then in the steam room it can only be treated with oil or oil wax, but on the washing side it is already permissible to use antiseptics and all kinds of paints and varnishes. And all because the temperature is lower.
Heating the sink is another problem that needs to be solved in winter. Of course, you can keep the door open. Or you will have a partition in the bathhouse sink that easily allows air to pass between rooms (wooden on a frame, but without insulation), and at the same time sounds :). Or the partition is impenetrable, but it has holes, plugs and a fan. You can also use the diagram shown in the figure above.
Partition in the sink of a bathhouse with a rest room
What should be the partition between the wet sink and the dry rest room? First of all, impenetrable, right? Here a simple wooden shield is not suitable; something more substantial is needed.
Again, it can be made from any material, but the frame or brick wall must be insulated. A log or beam does not need insulation.
Paintwork materials are allowed in both rooms, almost any of those produced for indoor use.
Partition in a steam room in a bathhouse with a relaxation room
This can be a regular wall or a cutting wall. If the furnace firebox opens into the rest room, then the partition will be at least partially (and for some completely) made of brick. But this was discussed above.
In the steam room, vapor-proof and infrared-reflecting foil is often used as finishing. With such a finish, plus thermal insulators, any partition will conduct little heat, which, on the one hand, reduces heat loss and fuel consumption, and on the other, the question of heating the adjacent room again arises.
If you have a partition between the steam room and the relaxation room, you can use the heating method described above, but you will have to close the holes when steam is supplied to the steam room, otherwise you will significantly increase the humidity in the relaxation room. And since most often there is ordinary furniture from home, and soft furniture at that, this is not good.
Another heater is always an alternative.
To insulate or not?
Regarding the insulation of the frame, it is worth saying that here you should look at the circumstances, taking into account the characteristics of a particular bathhouse. First of all, you need to determine how much the washing room needs to be warmed up. If in the design of the bathhouse the washing room along the perimeter of the external walls has good thermal protection or a brick shield or part of a brick steam room stove is placed in the wall between the washing room and the steam room, then it is obvious that the washing room does not need additional heating.
If there is no need to additionally heat the washing room, thermal insulation can be placed in the frame between it and the steam room. This will make it possible to retain more heat in the steam room, as a result of which it will warm up faster and cool down more slowly. In addition, the use of an insulated partition guarantees protection of the sink from overheating, which often happens in bathhouses that have good thermal insulation of the outer walls of the structure.
In general, insulation is not performed in the partition. The fact is that the insulation in the space between the wet steam room and the wet washing room will inevitably collect moisture. The peculiarity of the heat-protective material made of basalt wool is that on one side it must be able to evaporate moisture from its surface. That is, it will be necessary either on the side of the steam room or on the side of the washing compartment not to protect the wall with a sealed vapor barrier.
In the bathhouse, both the washing room and the steam room have high humidity and in each of these rooms, as a rule, a vapor-proof film is installed to protect the wooden frame from the large amount of moisture in the air of both compartments. If there are mineral wool slabs in the wall, then even if a sealed protection from moisture is created on both sides, they will still collect moisture, and there is nowhere to evaporate it.
The only acceptable option for installing thermal protection in a partition is to make special openings for ventilation with ventilation gaps. The holes are made not in the walls, but at the ends of the frame.
Thus, we can conclude that if sufficient thermal insulation of the washroom from overheating is needed, you should install a solid partition made of timber or thick boards without cracks and free space inside the wall. This design will isolate the washing room from active heat coming from the steam room and will not create a danger of excessive condensation.
The lack of insulation in the wall in most bathhouse buildings is rather a necessity. This is due to the fact that it is the steam room that actively warms up the entire building and the washing room needs heat no less than other rooms, but rather even more. The wash compartment, as a rule, is colder than we would like, and the heat coming from the steam room just compensates for this shortcoming.