When to install protection
A protective screen for a stove in a steam room is installed only when, for some reason, it is impossible to comply with fire safety requirements at the heating design stage. So, fire safety equipment is necessary only in the following cases:
- the distance between the wall and the stove is less than 32 cm;
- the space between the stove and the ceilings does not exceed 100 cm;
- if the inside of the metal stove is lined with fireclay, and the distance to the wall is no more than 70 cm.
Protecting the stove in the bathhouse with a reflector and masonry Source par-torg.com
Relevance of the design
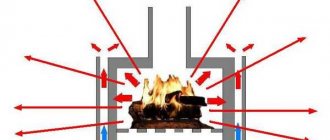
The screen for the stove in the bathhouse is installed primarily to protect people and adjacent structures from dangerous heating. For vacationers there is a risk of getting a skin burn, for wooden products there is a risk of charring or fire, plastic under the influence of high temperature in most cases is at least deformed. Only materials similar in nature to stone may be damaged to a minor extent.
Enclosing structures can be located not only on walls. Often the screen in a bathhouse is built around the stove. This solution allows you to solve 2 problems at once regarding human protection: from direct contact and IR (infrared radiation). The second problem is especially common in cases with metal units without additional cladding or cladding. Exposure to rays for many people results in a general deterioration in well-being.
An example of a wooden fence around a heating unit Source zoon.ru
In addition to the main functions, shielding structures around the furnace perform 2 particularly important tasks. The first of them is convection. Cold air from below is drawn into the gap between the stove and heats up. That is, the room does not cool down so quickly due to the design features of the bath floor. The second task is heat accumulation. This is especially true for brickwork. When the room is ventilated, the fence gives off heat, which contributes to faster drying of the materials. In conclusion, we cannot fail to mention the decorative side. As a rule, designs are created to be visually attractive.
Acceptable reasons for refusing screens
However, there are exceptions that allow you to abandon enclosing structures. The most common of them are a brick-lined stove, with decorative finishing or simply with a plastered surface. A similar solution is metal equipment with cladding, for example, red brick. An effective option is to decorate the heating system with natural stone, which has low thermal conductivity.
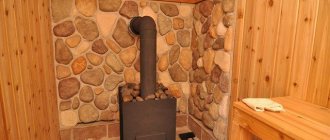
Option for lining a sauna stove with natural stone Source pechi-troyka.ru
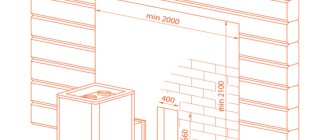
Also, the absence of protective screens for sauna stoves can be justified by technically acceptable standards (for example, according to SNiP 41-01 of 2003). They refer to the minimum distance between the heating device and the nearest walls. For example, between the walls of a half-brick firebox and the frame, the lower limit is 320 mm. Before a lined metal stove (for example, fireclay), the space must be at least 700 mm, and without lining the value increases to 1 meter. Compliance with such requirements is relevant for large premises, but not for most private buildings. Therefore, it is easier to reduce these distances by means of protective screens and structures with cladding materials.
How to finish the walls around the stove
The fencing of the stove in a wooden bathhouse or for other premises can be of different types of structures:
- creation of special shielded sheets located around the furnace body;
- covering the walls with special reflectors that have minimal thermal conductivity.
Each method is individual in its own way, so we recommend that you understand its features.
Construction of furnace protection in the form of brickwork Source feflues.ru
Covering bathhouse walls with non-combustible insulating materials
To prevent the walls from overheating, you can use materials with increased thermal insulation properties and inertness to high temperatures. Two types of materials are used:
- reflective;
- fireproof with lining.
The first type includes materials for wall cladding, consisting of thermal insulation with fire-resistant properties and a metal covering in the form of a sheet.
Insulating walls with reflective sheathing
A protective cake with reflective materials is done this way. First, the thermal insulation is attached using ceramic bushings directly to the wooden walls, then it is sewn up with a stainless steel sheet.
Types and features of the construction of protection around the stove in the bathhouse
We propose to consider several types of protective shielding that will prevent a fire and also prevent burns for the owner of the house. First of all, let’s look at how to close the stove structure.
Brick screen
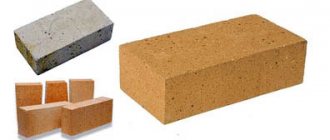
The most popular is a brick screen for bathhouse stoves. Only for masonry, ideally, not ordinary, but ceramic or refractory bricks are suitable. To make the cladding, all work is carried out as follows:
- Performing a small elevation (foundation). First, remove the floorboards around the stove structure, if necessary. Then simply screw the metal pins into the concrete base at the corners of the sauna stove.
- Leveling the floor surface. Before you start arranging the base of the furnace, make sure that the floor on which the foundation will be installed is level, otherwise, it is trimmed by concreting or scraping off the excess layer.
- Installation of the base. At this stage, cement mortar or special brick glue is prepared, formwork is installed around the furnace and the foundation is poured in a circle. Wait until it hardens completely (this may take more than a day (it all depends on the air temperature in the room).
- Start of laying. After the structure is completely ready for use, apply a mixture of glue or any cement mortar to the base and begin laying. Lay two or three rows of bricks in a circle and leave until hardened for 15-20 minutes, then continue masonry.
- Level check. It is performed after installation of each subsequent row. To do this, use a building level or stretch twine. When errors are observed, they are corrected by pressing bricks into the mortar or, conversely, adding it
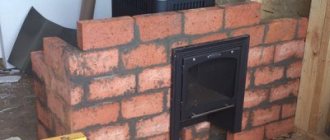
Construction of a brick screen on the walls near the sauna stove Source feflues.ru
Next, the masonry is brought to the top, after which the structure is left to dry naturally. After that, jointing and elimination of gaps are carried out if they appear between the bricks and cement mortar.
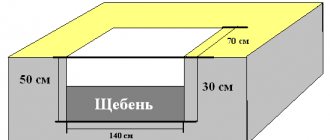
Important! When making brickwork, make sure that it does not rise above the stove by more than 50-100 mm, while leaving a gap of 40-100 mm between the brick screen and the stove. This will provide a greater effect, thereby minimizing the risk of heating the surfaces adjacent to the stove in the bathhouse.
Metal protective screens
A protective metal fence is installed around the perimeter of the heating structure. When installing, leave small gaps between the screen and the stove to activate air convection along the walls. The size of the gaps depends on the thermal conductivity of the material from which the thermal protection is made, and the characteristics of the sauna stove. You should follow the manufacturer's recommendations. Usually they deviate from the walls of the body by 3-5 cm.
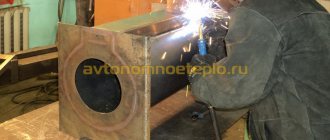
Approximate diagram of installation of a metal protective screen around the furnace
If you make a furnace screen with your own hands, then you need to choose stainless steel. In the factory version, the screens are box-shaped elements made of stainless metal. The elements are hollow inside and have ventilation holes. For ease of installation, protective barriers are equipped with adjustable legs. The presence of legs allows you to set the bottom gap for additional air flow. The screens are coated with heat-resistant paint, for example, organosilicon.
What does installing a metal thermal screen provide:
- the intensity of infrared radiation decreases,
- due to the air flows directed along the walls of the structures, the room is quickly heated,
- the presence of ventilation holes helps to lower the temperature of the oven body.
The disadvantage of metal protection is the harsh heat, but it is milder than without protection. One of the advantages is the absence of cracks through which the flame can come into contact with unprotected surfaces.
How to Install Reflective Trim on a Wall
Reliable protection of the walls in the boiler room or room where the stove is installed is a reflective screen for a bathhouse, but in order for it to properly perform its functions, it is necessary to carry out the correct installation.
- On the wall that needs protection, lathing is installed, and the thickness of the bars should not exceed the thickness of the selected thermal insulation layer.
- Thermal insulation material is placed in the spaces between the wooden frame. It can be mineral or glass wool, the main thing is that the fabric is not flammable.
- Next, the reflective trim is attached to the wood screws. If it consists of several parts, then the sheets are attached joint to joint.
Technology for installing fire-resistant materialheat-resistant materials for finishing walls near the stove
Multilayer protective technology, using the example of wall cladding near a heater in a bathhouse, consists of a sequence of actions:
- A layer of vapor barrier and waterproofing is attached to a wall made of combustible material. As a vapor barrier, you can use a three-layer film consisting of foil, polyethylene, and kraft paper for strength. It is attached using a metal profile (wooden blocks can be used instead of a metal profile).
- Next, insulation is installed, for example, foiled mineral wool. It is placed inside the sheathing so that the foil layer is on top. The joints of mineral wool slabs must be sealed with aluminum tape.
- Using self-tapping screws, fire-resistant boards, for example, made of fiber cement, are attached to the sheathing. An alternative to fastening a multilayer structure is to install the plates with self-tapping screws through a sleeve. This creates a space between the slab and the wall.
- After fixing the slabs, they can be faced with ceramic tiles for aesthetics. To do this, a metal mesh is screwed onto the self-tapping screws onto the slabs, onto which heat-resistant adhesive is subsequently applied and the tiles are glued.
If the installation is carried out in compliance with the technology and ventilation gaps, the wall near the stove will not heat up and will not create a fire hazard.
A budget-friendly way to protect between a stove and a wooden wall is to use profile metal used for the roof. To do this, you will need two sheets of such metal and hollow tubes. Hollow metal tubes are attached to the wall, and a metal profile is mounted to them. The distance to the floor and ceiling should be at least 10 cm. The tubes are attached to the sheet in the same place as the first ones and covered again with the sheet. Hot air moves in the gaps between the wall and the floor, while the wall remains unheated.
Installation of sheathing with cladding
This method of isolation is considered quite costly in terms of time and finances. Any suitable building material can be selected as cladding, depending on preferences and capabilities. Often they try to install porcelain stoneware or ordinary durable ceramics.
To protect the walls, you need to perform several steps:
- Make a small ventilation gap on the surfaces to which the stove is closest. To do this, you can use thin metal profile strips and form a small frame from them.
- The next step is to attach a heat-insulating layer of the selected material to the formed frame. As such, you should use mineral wool or any other non-flammable composition.
- Fix fireproof plasterboard over the thermal insulation. For this purpose, you need to select special fasteners or dowels, having previously drilled holes for them in the metal frame.
- Finally, lay down a layer of decorative finishing using fire-resistant glue or special mastic as an adhesive base. When performing this work, be sure to knock off the beacons using a cord or a special laser level (if available on the farm).
- The next step is to seal all the seams between the tiles using a special grout with increased fire resistance properties.
Decorative masonry near the stove in a bathhouse Source postroitbanju.ru
Try to use small tiles for masonry, as they are less susceptible to deformation when exposed to heat.
The wall behind the stove! Option to protect a wooden house from accidental fire
The wall behind the stove (more precisely, its protection) is a very important issue of fire safety. This issue is especially relevant if the house is wooden. And for good reason! After all, a negligent attitude towards such a place as the “stove wall” can lead to disastrous consequences.
To neutralize the dangerous effects from the main heater in a building on walls located close to it, various methods and construction technologies are used. Starting from the use of protective mastics and impregnations that are used to treat the wooden surface, and ending with the arrangement of so-called “fire-retardant shields”.
In the first case, the wall near the stove retains its original appearance. Those. a wooden house remains that way internally. This option will be useful when you want to preserve the image of wood in the interior. But there is one significant drawback. Over time, wood shrinks, becomes deformed and even cracks. And this leads to the formation of “weak points”. And to neutralize the possible risk of fire, the wall behind the stove requires periodic treatment of the wooden surface with protective agents.
The second option is more durable and more reliable. He suggests that insulation of the walls from the furnace is carried out by installing a fireproof shield. Let's look at this option in more detail using an example.
The easiest way is to install a sheet of metal to the wall of a wooden house from the stove side. Yes - simple and fast. But this approach will clearly harm the interior of the house! In this case, decorative finishing of the wall behind the stove will be difficult. And, besides, the efficiency of such a design will not be the highest.
There are many options for arranging a shield. And here is one of them. The wall near the stove is lined with non-flammable thermal insulation to reduce the impact of hot air on the wood, and the top is covered with non-flammable sheet material to prevent the surface from igniting when a coal or spark hits it. It usually consists of a sheet of metal (not the best option), fireproof gypsum plasterboard, LSU, etc.
So, we've sorted out the materials. Next, let's look at an example of how a wall near a stove is insulated from harmful influences.
First of all, the wall behind the stove is prepared for work. We remove sawdust and other debris that is on it. This, of course, is not necessary, but it will not be superfluous.
Next, a metal profile and self-tapping screws are used. With their help, we equip the frame of the future “thermal shield”.
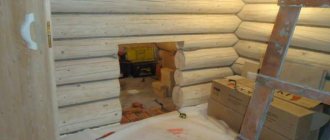
When the frame is ready, we install thermal insulation slabs of stone wool into it...
... and sew it up with LSU sheets.
This is how the wall is insulated from the furnace by installing a “fireproof shield”. This design also meets fire safety requirements and is suitable for further decorative finishing. Most often, ceramic tiles are used for this. As a result, the wall near the stove will be fireproof and beautiful (after applying a decorative coating).
What other way can you insulate walls from the heat of a stove?
There are several more options for modern materials that create a protective screen for a bath. It could be:
- Basalt wool with foil outer layer. The material is fire-resistant and environmentally friendly. This lining can withstand temperatures up to 700 degrees and above. This layer easily insulates both the walls and the stove itself, along with the chimney coming out of it.
- Gypsum fiber sheet. It is made by pressing gypsum and cellulose. Such material does not require additional treatment with waterproofing and other compounds. Often used for lining fireplaces, stoves and walls that are as close as possible to heating equipment.
- Calcium silicate. A protective screen in the bathhouse, which reliably insulates the firebox, prevents hot air from penetrating the walls and other nearby surfaces. This material is quite expensive, so it is rarely used and only in cases where the requirement of fire safety is paramount.
Table of contents
1. Options for wall insulation
2. Wall insulation material
3. Examples of thermal insulation of a wooden wall
Installing a stove is a complex process and requires a lot of attention to each stage, from preparing the installation site to the nuances of removing the chimney pipe from the roof. In this article we will talk about how to properly insulate a wooden wall from a steel or cast iron stove. Any wood has a predisposition to ignition, so a constantly hot stove design can easily cause a fire. Any builder understands that insulating the wooden wall behind the stove is a mandatory process. Let's look at an example of installing a Bavaria stove-fireplace on a wooden floor next to a wooden wall. The furnace does not have a separate foundation, so a light base for a metal structure is required. The base for the stove will be laid out with bricks in one layer. In this case, wall insulation can be done in two versions: asbestos cement sheets or flame sheets (non-hot composition). There are several opinions about asbestos - sometimes they say that they emit toxic fumes. But flamm has its drawbacks: they have standard sheet sizes of 600x1200 mm, which can be inconvenient when working, and also in terms of price they do not beat asbestos cement at all.
Options for wall insulation
The width of a particular oven is 720 mm. As a result, it turns out that horizontal sheets need to be installed - you will need four sheets to the ceiling, it turns out that they can cover the upper part of the room - there is a beautiful partition there. There are several other options on how to proceed: get rid of the existing partition, replace it with a fireproof one and cover it with tiles or stone. You can also place a screen and use a circular saw to remove the wood on the partition completely. Next, finish with tiles, plaster or paint. There is no doubt that the tree needs to be removed. After all, if you cover it with non-flammable materials on top, there is still a chance that the wooden surface will ignite. In this case, it is better not to take risks and remove the partition from wood. Thermal radiation from the oven will not only be from the back wall. Lateral radiation will also emit radiation onto the wall at a distance of 0.8-1 meter. You should carefully read the installation instructions - the manufacturer describes everything very clearly there, including what concerns safety. For example, when a stove with a glass door is on and there is a chair next to it, it is better to move it further away (more than 1 meter).
Initially, the base for the stove was supposed to be one brick thick, but such a thickness for a wooden floor is not very good. Regarding the non-combustible partition, you should also note the importance of the situation - where the chimney will go, at what distance from the beams, walls and rafters. In the area of this Bavaria stove, it is best to use a concrete slab as a base - lay it along the beams, flush with the floors or a little more - it will turn out like a podium, reliable and ensuring safety. However, the bottom of this stove practically does not warm up; there is an additional part for firewood, which takes on the heat. Therefore, you can make it simpler - lay mineralite or CSP on the floor, then tiles or porcelain tiles on mastic or hot melt adhesive. In places where the chimney pipe is laid, you can use basalt, non-flammable or kaolin wool. Cotton wool plays the role of additional insulation and is placed in the ceiling section. In this case, you should make an opening in the ceiling - in accordance with safety standards - from the contour of the two-layer pipe - sandwich, 250 mm in different directions. The furnace cutting should be made of non-combustible materials - superisol, mineralite, calcium silicate, vermiculite. When passing through a chimney pipe, the groove should be filled with cotton wool.
It is, of course, very difficult to get rid of a beautiful partition, because it was built for aesthetics, a lot of time was spent on it, but if it was decided to install a metal stove against this wall, then you should get rid of the additional threat of fire of wooden parts.
Wall insulation material
Facing materials are often made from cement, the complete hardening of which can take several years. As a result, even after the work has been completed, changes in size, bends and deflections may be observed. Some manufacturing companies (for example,), use an effective and efficient method of keeping facing materials in an autoclave in a high-temperature, high-pressure oven. And it turns out that shrinkage due to drying and expansion by exposure to heat can be avoided, and reliable strength is also ensured.
Those same Nitikha panels are made from fiber cement, a universal material that consists of 90% cement and 10% cellulose fibers and various mineral fillers. In this case, technology without the use of asbestos is used by pressing the ingredients.
Panels of this type are environmentally friendly; their production does not use formaldehyde resins, chlorine compounds or asbestos. Fiber cement has excellent fire-resistant properties; it fully fits into the category of non-combustible materials. Fiber cement siding has many advantages, including the fact that it can easily be used to select various design variations, and it is also easy to install. Instead of mineralite, you can also use glass magnetic sheets - this is a more budget option.
Examples of thermal insulation of a wooden wall
Here's another example of making a fire-resistant wall located behind the fireplace:
- treating the wall with fire protection (about 5 layers);
- fireproof mats are attached with a stapler;
- The slabs are attached through ceramic bushings - there are gaps at the bottom and top.
The decorative panels available are slightly flammable according to the fire classification. It turns out that only a 5 mm layer of basalt cardboard really protects the wall from fire. However, the oven is convection in nature and its outer surface does not heat up much. If you follow the manufacturer's instructions, it will not heat up more than 60 degrees. But you can't help but worry about safety. For example, even in summer, on the facade of the stove on the south side, it is worth measuring the temperature of the outer surface, and its value may greatly surprise you.
You can pay attention to the color of the first mono-pipe; the most furnace heat emanates from it. From the floor to the sandwich pipe, the wall should be reliably covered with super-insulation, especially since the stove is installed close to the wooden partition. In this case, when thermally insulating the partition, you should also pay attention to the cutting.
You also need to be careful about fiber cement boards; they come in two types: moisture-resistant for the facade and for landscaping fire-resistant partitions (the second option is gray in color, there is no paint or pattern).
Minerite panels, painted with acrylic (sometimes even in several layers, 5-6), belong to the category of low flammability and low combustion support. Because of the acrylic, the entire slab cannot be classified as “non-flammable”, and this is very bad; such panels, supposedly resistant to fire, are often used just when it is necessary to insulate wooden walls behind the stove - mineralite panels coated with acrylic look It’s beautiful, but, unfortunately, it won’t reliably save you from a fire.
If it suddenly turns out that you bought mineralite coated with acrylic, then you need to get rid of such “protection” of the wall. You should dismantle the panels - this is not difficult, in their place you glue gray classic mineralite onto a galvanized profile, and then terracotta tiles are glued onto it using heat-resistant tile adhesive. With such reliable thermal insulation you can sleep peacefully.
It also happens that gypsum board is used as protection. If the gypsum board is not protected by anything, then it will not play the role of high-quality thermal insulation. If the gypsum board is fixed to a tree with a metal profile, and tiles are attached on top of the gypsum board, then such protection is possible. Bare gypsum board should not be used for such purposes; its flammability class is G1, not NG (non-flammable). When installing, it is necessary to take into account the distance from the stove to the wall.
If the oven is operating normally, nothing should happen in any way. But the fire safety measures specified in the stove manufacturer’s passport must be observed. The distances to fireproof and combustible structures are clearly stated there. Gypsum is a good heat insulator, but its features should be taken into account. If the wall is wooden and gypsum board is attached close to it, therefore, when it is heated, dampness will form behind it, since the wall is cold. The wall itself also shakes - the tree always lives its own life at different humidity levels and temperature fluctuations in the environment. The profile is necessary not only to create an air ventilation channel behind it, but also for the durability of the entire structure. The tile adhesive needed here is one that is suitable for heated floors.
It is imperative to take into account fire safety standards when installing important distances. If you calculate the distance from the metal firebox to the wall, then it is more logical to add another 65 mm to such offsets - this is the thickness of the brick, which any metal stove does not have.
It turns out that an open retreat
- to the unprotected wooden part is 320 mm (+65 mm), resulting in 385 mm - this is the minimum value.
- To the protected wooden part 260 mm (+65 mm), and a minimum of 325 mm is obtained.
With a metal chimney things are much simpler. A sandwich with 50 mm insulation is already approaching the edge-on distance of a brick, that is, when passing the floor between the floors of such a pipe and without filling the foam with non-combustible materials and completely open for control, the following important distances must be maintained (from the outer wall of such a pipe):
- To an unprotected wooden wall 320 mm (+ 15 mm), resulting in a minimum of 335 mm.
- To a protected wooden wall 260 mm (+ 15 mm), resulting in a minimum of 275 mm.
If you are making an interfloor polyurethane foam completely closed and filled with any non-combustible materials (from pipes to wood), it becomes not a retreat, but a cutting, and accordingly, the minimum distances change:
- minimum 500 mm from smoke to an unprotected wooden panel;
- to a protected wooden panel 380 mm from smoke minimum. That is, with a sandwich insulation thickness of 50 mm - 330 mm from the outer contour to the protected joist. As for the roof passage, the distance of 130 mm to the sheathing and rafter part is taken into account from the wall of the brick chimney of 120 mm. That is, from the smoke to the protected sheathing and rafters there should be a minimum of 250 mm.
The simplest option for protecting wood is basalt cardboard and a metal sheet.
go to the section - THERMAL PROTECTION or to the section INSTALLATION OF FIREPLACES
Video description
This video discusses one of the simplest options for covering walls next to the stove in a bathhouse using mineralite sheets:
Floor protection
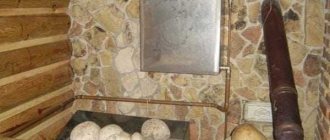
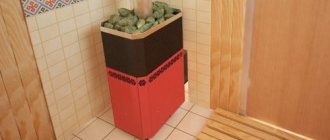
A floor screen for a stove in a bathhouse must, among other things, have high compressive strength. This is justified by the large total weight of the heating system, to which the smoke exhaust network, heater and, most often, a container with hot water are attached. Therefore, stands and platforms are assembled here from materials such as brick, natural or artificial stone, steel or cast iron. The latter are easier to find ready-made on trading platforms.
Option for a floor screen for a sauna stove Source prom.st
How to make a brick screen correctly?
To build protective masonry, you will need solid red ceramic bricks that can withstand temperature changes and constant exposure to water.
The basic rules for constructing brickwork for shielding a furnace come down to the following...
- The heat shield must not be placed close to the chassis. There should be at least 3-10 cm between the metal stove and the brickwork.
- It is worth making holes in the lower part of the masonry through which heat will intensively pass, heating the steam room. If you want to be able to regulate the temperature in the room, equip these openings with stove doors. You can also insert bricks into these “holes”, remove them if necessary, and then insert them again. If you like your bathhouse to be extremely hot, increase the number of such windows.
- The masonry is done in half a brick. There are craftsmen who prefer a screen made of brick, which is placed on its edge. But such a partition will heat up very quickly. A whole brick masonry takes a long time to heat up, so the room does not warm up too quickly, but the partition itself will give off heat for a long time.
- For masonry, a solution of clay and sand is used. However, the use of cement mortar is allowed.
- The height of the screen should reach at least the top of the firebox. But the higher you build your protective wall, the higher your level of protection from IR rays will be. Often there are structures laid completely up to the ceiling.
Video description
This video examines the causes of a fire in a bathhouse with improperly organized fireclay brick protection:
Among the recommendations on choosing quality materials, craftsmen note several points that will allow you to create durable and visually attractive protection. For example, stainless steel quickly becomes unattractive from frequent heating. This can be avoided by using heat-resistant metal paint or by regularly wiping the surface with household cleaners. It is recommended to cover the log house and ceilings with two layers of heat insulation for the purpose of reinsurance.