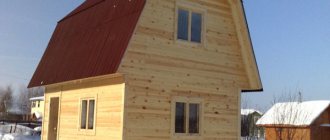
Choosing natural materials for buildings located on suburban areas is the right decision. Surrounded by nature, everything should be natural and environmentally friendly. Traditionally, our compatriots build houses from logs or timber, but there is an opinion that using half-timber for construction is a better alternative to the usual options. It has been tested in the cold Norwegian winters, confirming its full energy efficiency. The neat appearance of the log house walls only adds another plus to the list of advantages of this material.
Which timber is better to build a bathhouse from?
A lot depends on the lumber. An incorrectly chosen material will last a short amount of time, so you will soon have to build the bathhouse again. This issue should be taken seriously. Suppliers offer low-quality goods at the price of high-quality ones. When choosing, you should pay attention to several things:
- cracked material, even if the cracks are small, such a structure will begin to rot quickly;
- dark spots, they are often ignored, but it is the spots that indicate the beginning of the process of rotting;
- traces of bark beetles and various wormholes.
Suppliers try to sell low-quality goods at a reduced price. It is better to refuse their offer. The bathhouse will still have to be rebuilt after a short period of time.
If you pay attention to these things, the chance of purchasing low-quality lumber is reduced. High-quality blanks will look better than cracked materials.
Selection of materials
The first question a builder faces is what is better to take, stone, brick or wood? In this case, we are considering the option of a wooden bathhouse, which can be built in two ways - frame or log house.
Wood has been used as a material for bath buildings since ancient times. Advantages:
- environmental Safety;
- cheapness;
- simple processing;
- the presence of useful essential resins that have a good effect on human health;
- durability with proper care.
Wood cannot be called an ideal material, as there are many difficulties. For example, it is not easy to ensure that the walls are even; only high-quality timber or logs with precise cutting are suitable for this.
There is also a shrinkage factor - the wood dries out and becomes deformed, so it is important to dry the wood in order to reduce the percentage of shrinkage before the finished log “goes” to the wrong place.
Most often, hardwood is used for construction; a linden bathhouse is especially good. Linden weighs little, allowing you to save on the foundation. There are options from poplar, birch, and pine.
What size of timber to choose for a bath
Baths are built using square or rectangular beams. And the size of the timber for the bath is more than 100 mm. According to GOST, the maximum and minimum thickness are established. Minimum – 100*100 mm, maximum – 200*200 mm. You can build a steam room using a blank with a thickness not in accordance with GOST, then the price will be higher.
Many people forget to think about section size. The thickness of the sauna timber helps to retain the required amount of heat inside the sauna. When choosing a size, you should take into account the climate of the area. If a small thickness is chosen, then the heat loss will be large.
The area of the bath should be taken into account. The larger the room, the thicker the lumber is needed. Otherwise, all the heat will go away. More often, paired rooms are built using blanks with a size of 100*150 mm. And in cold latitudes, thick blanks with a cross section of 200*200 mm are used.
Prices for different sizes of timber sections differ little. Therefore, it is better to choose the best option for your area.
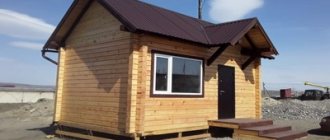
Bathhouse made of timber 100x100
It’s easy to build such a bathhouse alone. And if you decide to build a small room, then it is not necessary to fill the foundation. Blanks 100*100 mm are cheap.
If you decide to build a small, light bathhouse from 100x100 timber, then it will be easier to make a columnar base. Supports of various materials are placed along the perimeter of the future building. Be sure to place it under the intersection of the partition. The distance between the pillars should be 1.5 m.
It is necessary to reinforce the supports, then protect them with waterproofing between the base and the foundation. This is done to increase strength.
Now the walls are being completed. You should pay most attention to the first row. The better and better quality it is installed, the longer the building will last. After installing the first row, you should select beams that match the length of the selected lumber. Afterwards, grooves are cut out on two opposite sides of the beam. Grooves will be required to connect the elements of the future bathhouse.
Advice! To connect workpieces, it is recommended to use wooden wedges instead of nails and screws.
Then they start connecting. Drill the top workpiece completely, and then the bottom half. Remove the first beam. The wedges should be driven into it until they stop. You can put insulation here. Then they insert the beam back where they took it from.
After building the walls, we proceed to the roof. The roof is easy to make. It is enough to lay the material, gradually narrowing it, then cover the roof with corrugated sheeting. It can be replaced. For example, use tiles. It all depends on the capabilities of the bathhouse creator.
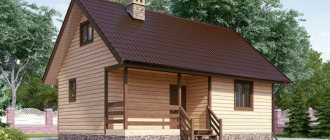
Bathhouse made of timber 100x150
It is better to build such a bathhouse in cold areas. Lumber of this size costs slightly more than blanks with a section size of 100*100. A bathhouse made from 100x150 timber will be heavier. It is not necessary to pour a foundation for it. It is enough to get by with a tape base.
A strip base should be laid. It is worth considering the following factors:
- dig a suitable trench;
- build formwork;
- You can choose any width;
- the structure should be filled with concrete.
It is better if the height of the base does not exceed 50 cm, but so that the top edge is above 30 cm. It should be reinforced and waterproofed.
It is recommended to continue further construction according to the same scheme as with 100*100 mm timber. This scheme is reliable, and the bathhouse lasts a long time.
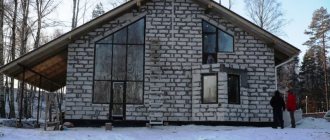
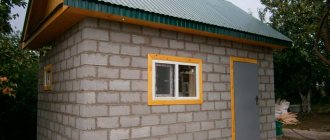
Heavy adobe
These are real brick blocks made of dried clay, straw and sand. In order to make a brick, you need to independently build a mold from planed boards without a bottom. For small blocks it may contain several sections.
The inside of the mold can be lined with polyethylene for easy removal of adobe bricks. For the same purposes, you need to fill the ends of the molding box with handles.
There are no exact proportions for heavy adobe mixture; it is prepared experimentally.
The mixture should be homogeneous, thick and mushy; it is collected in a heap and allowed to stand for a day.
Then the mixture is filled into the mold and the already formed brick is taken out of it.
The blocks need to be dried in a place well protected from moisture; good ventilation is required. When the blocks have dried, you can check their quality.
You should not form all the blocks at once; to check the quality, it is enough to prepare one brick.
- If the adobe brick is broken by hand, there is not enough straw.
- If the brick crumbles, there is a lot of straw and little clay.
- The brick block is covered with cracks - a lot of clay and little sand.
Preparing heavy adobe is a longer and more labor-intensive process. The blocks take a long time to form; in addition, they must dry out.
It is better to start building buildings from heavy adobe in the spring, when weather conditions allow it to dry well.
Heavy adobe makes interesting, sometimes intricate buildings, since the blocks can be shaped into very different shapes.
A bathhouse can be fashioned as if from plasticine and even without corners, but this type of masonry requires experience and skills in construction. If you don’t have the skills, you can practice on a small structure, such as a doghouse.
Which timber for a bath to choose
People are often faced with choosing the type of material, because a lot depends on it. For example, how long can a steam room last? Now they are building a bathhouse using square timber. Many consider this a tradition. However, there are different types that are applicable in the work process:
- non-profiled;
- profiled;
- glued;
- planed;
- half beam;
- double.
The type of wooden blank should be selected individually. Different species have completely different characteristics. This should be taken into account when choosing a base for the walls.
Profiled timber
Has an average price. It differs from the usual one in its shape. Profiled blanks are a rectangle with a special recess. Thanks to the shape, there are practically no gaps in the buildings. Because of this property of timber, it is an excellent material for a bathhouse. Its price is average, so everyone can buy profiled material.
Non-profiled (solid) timber
The cheapest is non-profiled timber. The price is low due to the absence of primary processing. Unprofiled lumber quickly settles in a humid environment. Fungus often appears. Due to these factors, it is used less and less. It is used by people with low financial income.
Bathhouse made of double timber
Double timber is considered environmentally friendly. It was invented in Austria a long time ago, the Russians began to use it recently. It has low thermal conductivity, that is, the high temperature of the heated structure will remain indoors for quite a long time. Perfect for people who love a hot bath and steam. A distinctive feature is that walls are much easier to build.
Projects for a bathhouse made of double timber exist in greater numbers compared to different types of timber. This is due to the heavy construction of the bathhouse. That's why they order them more often. Baths come in completely different characteristics and sizes.
Bathhouse made of half timber
The half-beam will serve for a long time. Particularly resistant to cracking. It is very difficult to build a bathhouse using half timber.
Advice! If you decide to build a bathhouse using half-beams, it is recommended to hire a team of professionals. This way, fewer mistakes will be made during construction, and the steam room will turn out to be of high quality.
This bathhouse is reliable. If it is assembled correctly, there will be practically no gaps. The half-beam retains heat inside the room and also eliminates drafts.
Planed timber
It is a quality product. Lasts a long time, environmentally friendly. All this depends on the quality of the processing performed. Different types of wood are used for different purposes. To build a steam room, it is better to use planed larch beams.
Glued laminated timber
Glued laminated timber is a “layered” piece. This is one of the best materials for construction. This is due to the process of its creation. The glued blank is produced using complex technology. The whole process consists of several stages. Before creating timber, all materials undergo special processing. Due to the complex method of creating laminated veneer lumber, the price will be high. But the finished structure has little heat loss.
What are the benefits of a log frame made from a gun carriage for a homeowner?
It is no coincidence that the construction of houses from gun carriages is increasingly attracting customers - such a house is much more convenient for subsequent finishing and arranging furniture than houses made from traditional round logs. The peculiarity of the carriage is that the sides of this log are hewn, which means nothing will prevent you from moving furniture close to the walls, hanging curtain rods and arranging household appliances.
Reviews
Below are reviews of a sauna made of 100x150 timber.
Sergey Ivanovich Kostomakh, Ryazan region.
I built a bathhouse using profiled timber. I built it myself. Now I'm very happy. It is better to make a bathhouse using a minimum size beam. I made it with blanks measuring 100*150 mm. I built a steam room alone in 1.5 months. Now I'm very happy. I go to the bathhouse to steam every weekend. I recommend to everyone.
Nikolay Grunberg, Irkutsk region.
I recently made a sauna using half a beam. It's a pleasure to wash there. In the Irkutsk region, and throughout Siberia, I recommend using 100*150 mm or 200*200 mm timber. The second option is better used in cold regions, since such a width of timber has low thermal conductivity.
Reviews of saunas made of 100x100 timber are given below.
Vasily Zhukov, Rostov-on-Don.
I decided to build a new bathhouse, since the old one had completely collapsed. I hired the guys, they told me about the material. I purchased 100*100 timber, and the team began building. The bathhouse is ready in a month. I am very glad. The team did everything efficiently. Before this there was a wooden bathhouse. This steam room is much better. I have been using the sauna for several months, no complaints.
Roman Vasilievich Koshkin, Vladivostok.
I have a humid area near Vladivostok. Therefore, log bathhouses begin to fall apart. This year, a team of craftsmen suggested making a large bathhouse using double larch beams. They began to build it, building it in several stages. They built it over the summer, and quite well. The bath is holding up great. And steaming inside is pure pleasure.
Recommended Posts
Russian sauna with wood,
sauna with gazebo
Do-it-yourself bathhouse: projects, photos, construction stages
Reading time: 12 minutes No time?
It is difficult to imagine a summer cottage without an indispensable attribute - a hot bathhouse, which raises vitality with the aromas of birch broom and eucalyptus steam. Bath procedures cure many diseases, relieve stress and provide an opportunity to communicate mentally with loved ones. So, no matter how you look at it, you can’t do without her, my dear. The topic of our research is a do-it-yourself bathhouse. Projects, photos, important nuances and invaluable experience of practitioners - all this is in this material.
A cozy bathhouse is an important element of a country holiday
Read in the article
What is the basis for choosing the optimal location for building a bathhouse?
Perhaps it will be news to some that the bathhouse cannot be placed in any place. There are many official and practical principles that should be adhered to. Moreover, choosing the wrong location can lead to dire consequences. Let's look at all the rules.
Location of the bathhouse in the summer cottage
There are three main requirements when planning the location of a bathhouse complex on a garden plot:
| Distance from site boundary | The distance from the bath complex to the fence is at least three meters. The building should not obscure the territory of the neighboring plot. This gap will protect the buildings from a possible fire, because the bathhouse is a fire hazard. Another important aspect is drainage. A three-meter zone, even if your bathhouse has the most primitive drainage system, will not allow dirty water to penetrate into the adjacent area. For reliability, you can lay a drainage ditch filled with gravel along the fence. And a couple more important points: the distance to the neighbors’ residential building should be at least eight meters (six if the bathhouse is brick). When deciding where to build an object, keep in mind that the smoke from the sauna stove should not reach the windows of the neighbor’s house. |
| Distance to the reservoir | On the one hand, the location of the building on the banks of a river or lake is very advantageous. And it’s easier to collect water, and the pleasure of diving into the cool waves after a steam room is guaranteed. On the other hand, you should strictly follow the rules that protect the reservoir from the negative effects of wastewater. To do this, the structure must be located no closer than 15 meters from the shore. This distance, moreover, will protect the foundation of the structure from being washed away during a flood. The coastline should be strengthened with your own hands using wooden or concrete frames. |
| Gap to residential building | The “black” Russian bathhouse is located on the leeward side of the house at a distance of at least twelve meters. This will prevent smoke from entering the rooms. It is advisable that there are no other easily flammable structures near the building. Experts recommend maintaining a four-meter distance from a chicken coop or barn. |
In the photo - a bathhouse on the shore of a natural reservoir
There are situations when, with the purchase of a summer cottage, a bathhouse is inherited, as they say. In this case, of course, it is not always possible to move it to a new place in accordance with the listed rules. But, with the help of competent reconstruction, fire safety standards can be achieved.
How to attach a bathhouse to a house without damaging the main structure
The size of the plot does not always allow meeting all of the above requirements. There is only one way out - to attach a bath complex directly to the house. Let's consider the advantages and disadvantages of this solution:
- saving site area;
- In winter, it is more convenient to use a home bath, since there is no need to go outside;
- you can significantly save on insulating the structure, since one wall will be internal;
- You can use a common heating and water supply system.
Frame sauna
- Difficulties may arise in connecting the bathhouse structure to the house. Special measures will be required when constructing the foundation and connecting wall planes;
- consolidation of the wastewater system may result in excessive load on the local sewer system;
- the fire hazard of the facility poses a certain threat to residential buildings.
A self-built sauna in the house is a place not only for hygiene procedures, but also for communication with loved ones
When designing a bathhouse as an extension to a house, it is necessary to consider all the important aspects of such a decision. First of all, the foundation is either connected to the base of the house or made separately. In the second case, metal staples are used for joining, and the seams are filled with foam.
It is better to make the walls and roof of the extension from the same material as the main structure. Materials of different weights will shrink unevenly. The roof of the extension is made pitched, its upper part should go under the main roof and adjoin the wall.
The following video contains instructions on how to make an extension bath:
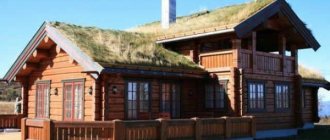
History of appearance
The poor people of Scandinavia first began to build their homes from half-beams, or carriages. The logs were cut from two opposite sides, resulting in a slab suitable for constructing a floor, attic floor and roof. Over time, half-beam houses became a kind of hallmark of the Scandinavian style, and residents of the northern regions of neighboring countries became interested in the unique thermal insulation properties of the buildings.
Today they no longer remember that the bowls for a Norwegian castle were once cut by hand, and the half-timber had to be adjusted to the spot. Modern manufacturers supply the market with ready-to-assemble material made from softwood.
Roof
The craftsman refused the now popular soft tiles for several reasons.
mike099
I rejected the soft roof immediately, due to its less environmental friendliness and higher price. The binders, the basis of soft tiles, are far from natural materials. Its installation is more expensive, and you need a smooth flooring made of OSB or plywood.
Therefore, I preferred metal tiles that imitate the ceramic source. A wide, semicircular ridge, instead of sub-rafter elements there is a central supporting ridge beam. Waterproofing, counter-lattice along the rafters (50×50 mm), lathing with pitch to match the covering profile (35 cm). As planned, the eaves overhangs are 70 cm long; in the future there will be a metal drainage system.
After assembling the frame “under the roof”, I protected the ventilation windows with awnings, and also installed temporary flashings made of waterproofing along the ends, cracks of the flashings and at the junction of the frame and trim. No matter how much I wanted to avoid the use of chemicals, I had to treat the imitation timber gables with protective impregnation.
Ways to protect wood from the external environment
Wooden materials look beautiful and smell nice, but need protection from moisture, fire, and insects.
It would be best to buy timber impregnated with protective agents at the factory. This will be more expensive, but will save time and effort on processing the material.
Ordinary timber will be inexpensive, but you will have to cover it with protective agents yourself and give it time to dry.
Review of suitable impregnations for outdoor use, brief characteristics, properties of the compositions.
Features of half timber
For the carriage, select trunks with a diameter of at least 40 cm. After processing and sawing, they acquire a height of at least 35 cm and a thickness of:
- 20-24cm – for external walls;
- 15cm – for internal partitions.
The energy efficiency of a half-beam log house is influenced by the height of the lumber, because there are significantly fewer crown joints in the wall. At the same time, the thickness of the walls allows you to expand the interior space of the house.
The half-beam is distinguished not only by its unique cross-sectional shape, but also by its unusual self-jamming lock.
A specific locking connection, called a Norwegian bowl, a Norwegian chopping block and a Norwegian cross, helps the half-bars fit tightly to each other. After shrinkage of the log house, the inter-crown gaps are minimal, and the connections are reliable and durable. The trapezoidal shape of the Norwegian bowl is complicated by the presence of a wedge-shaped seat, a system of grooves and protrusions.
How and where to store on site?
When the self-loader brings you the timber, it will most likely just throw everything on the ground in one heap.
So you need to immediately lay out the timber, even if you are sure that the construction will be completed in a week. It is better to store it in the shade. The surface must be flat. Try to avoid slopes and bumps, carefully check everything with a building level. For example, lay down the knocked down panels remaining from the formwork to protect the bottom row of timber from dew. There are bricks under the shields to make it higher. Ideally, if the height from the ground is 30 centimeters. Or you can use not knocked down shields, but put old sleepers or logs, or other old, but durable and thick material every meter and a half on the ground. Also check the level. Fig. 2 Our forest lay on boards. We put bars of equal thickness on the boards, then the first row of bars, about 10 in a row, maintain a distance of about 1 cm between adjacent bars. Don’t make our mistake, don’t put bars from an old painted fence, although this is convenient - the whole bar is the same thickness, but the paint will remain on the bar. Then stack each row through the bars. The distance between the bars is about 70cm. And one more thing - stack the beams so that the narrower side lies horizontally, and the tall side lies vertically. That is, a 10x15 beam should be laid with a 15-centimeter edge vertically, and a 10-centimeter edge horizontally. It is necessary.
Fig. 3 Do not forget that the timber must be the same thickness for each row, otherwise the timber will move in just a day! At the end of installation, be sure to organize a canopy over the stack or cover it with slate sheets
Fig. 4 Press the slate sheets with bricks, since in a strong wind the slate can easily be blown away. And finally, remember that when buying wood with natural moisture, you need to put it into use as soon as possible. It is better to start building from the very next day, since even with properly organized storage, when drying under natural conditions, cracks form in the timber, and material defects after a month or two can amount to up to 10%. December 23, 2014 Nadya Novosibirsk