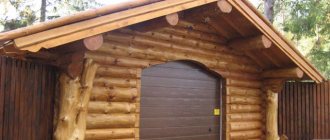
If the owners have a desire to install a full-fledged heating system in their garage to spend time in comfortable conditions, then, in principle, they can build everything themselves. But you will need to delve into the installation process, taking into account even the slightest nuances. In a heated garage, it is more convenient for the car owner to repair the car and inspect it for breakdowns. When organizing heating, you will need a chimney. It is convenient to form it through the wall. And after installation, it is important to always remember the operating rules and care measures.
Chimney in garage through wall
Choosing material for the chimney
To build a chimney for a potbelly stove yourself, you need to know what material is best to take, what tools and components. Materials must meet the following criteria:
- made of stainless steel;
- wear-resistant;
- react normally to high temperatures.
If it is not particularly important what material to use, then you can make a brick channel. But costs will increase and maintenance will be more difficult. In this regard, preference is often given to metal corrugations.
Suitable materials
For installation you will need:
- metal conductors – 16 cm in diameter;
- tee - may be required to organize a tap;
- knees for joining - they help change the direction of the channel - you must take into account that the size is at least 16 cm;
- mushroom - it is attached to the head, it is needed as protection and to enhance traction;
- sealant - it reliably seals the joints to ensure that the system complies with safety standards;
- materials for thermal insulation, they are used in areas of passage through walls;
- bitumen resin.
Conclusion
From all of the above, we can conclude that the installation of a stove in a garage must be done correctly, and all fire safety standards must be observed. Not only the long and normal operation of the heating device itself, but also safety depends on the correctness of the work on installing the stove.
You should strictly adhere to all rules and requirements to ensure normal, trouble-free operation of the furnace. It is important that before firing the stove for the first time, you must carefully ensure that there are no leaky joints and connections, and if the slightest defects are detected, they should be eliminated immediately. This will help protect against carbon monoxide poisoning and fire.
If everything is done correctly, the stove will delight and provide warmth for many years. You will be able to forget forever about working or relaxing in the garage, which previously looked more like an ice palace. In addition, the stove still remains a very efficient and economical heating device.
In addition to everything, a stove in the garage can be used for cooking. You can equip it to heat water and use it for your needs. Based on the stove, you can make full-fledged water heating for your garage; of course, this will only be appropriate in cases where the garage is visited every day. If the garage is not visited often, it is not worth using water heating as an addition to the stove.
Principles of chimney design
A potbelly stove is a great way to heat a garage. The chimney design is different. Most models have 2 main elements:
- exit from the premises;
- heat exchange segment.
Principle of the device
If you build the thermal part yourself, the productivity of the stove increases noticeably.
All potbelly stoves are divided into 2 types:
- horizontal;
Horizontal model
- vertical.
Vertical model
The chimney differs in accordance with the location of the stove. In a vertical position it is more difficult to organize smoke removal. It will be necessary to form curved channels in order to properly remove smoke exhaust from combustion to the street.
Horizontal models are complemented by special cameras. If smoke enters the chamber, its speed slows down. The energy is transferred to the room and saved as much as possible. Due to this, the efficiency of the stove increases.
Long-lasting care
To ensure reliable operation of the unit, before each new season it is necessary to carry out simple manipulations to care for the chimney, namely:
- Carry out a visual inspection for possible damage due to rust or any other harmful effects;
- And also clean the pipe from soot. It is better to use special chemical additives added to the burned fuel. When burned, they enter into a chemical reaction with soot deposited on the walls of the pipe, thereby cleaning it.
By following the simple rules for chimney production during installation, as well as periodically checking it, you will get a good heating system for the garage that will serve you for a long time.
Types of chimneys
There are three types of chimney designs for potbelly stoves:
- Maximum efficiency for heating. This is a pipe that comes out of the stove, rises to the ceiling, but does not reach it, turning towards the wall. The channel goes outside through the wall. The pipe inside the garage plays the role of an active heater - a battery. This improves heat exchange in the garage while reducing fuel consumption.
With an outlet near the ceiling
- The design is similar to the first option. The only difference is that the chimney will exit through the roof. The method is also effective, but additional work will be required to create a tight seal. To do this, all cracks are sealed with a heat-resistant sealant composition.
Through the ceiling
- Output through the wall immediately when the pipe leaves the furnace. This method is as fireproof as possible, but is not as effective as the first.
Through the wall at the level of the stove
The least commonly implemented method is to remove the chimney through the roof. And the most popular is the first method.
Approximate diagram
What pipes should I use? (+assembly video)
It is impossible to build a brick chimney in a garage; asbestos and ceramic ones are difficult to use.
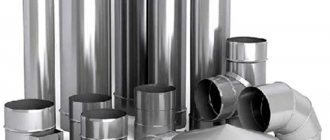
Therefore, there are 2 options left:
- Stainless steel pipe.
- Stainless steel corrugation.
Corrugation can and is conveniently used to lay the inside of the chimney (which runs inside the garage). It can be carried out all the way to the tee near the wall or ceiling.
Stainless steel pipe - can be used both for the external (street) part and for the internal part. Working with it is a little more difficult: since it cannot be bent, each turn will have to be connected to a bend. But the stainless steel pipe is smooth inside, and the corrugation is ribbed (which means soot will accumulate).
Let's summarize: the simplest and cheapest option is corrugation inside, then a tee, then a stainless steel pipe outside. The option is more convenient (to maintain), but a little more difficult to install - a stainless pipe both inside and outside.
Tools and materials for work
Building a chimney yourself is quite troublesome. Assembly requires careful attention, adherence to rules, and recommendations of professionals.
The technological process for a chimney through the ceiling and wall is generally no different. First, in any situation, the length is measured, then assembly begins.
It is not advisable to produce pipes yourself, since this process requires taking into account many factors. Without special knowledge, this simply cannot be done. The easiest way is to assemble a chimney with your own hands, but from ready-made purchased parts.
Features of operation of potbelly stoves
To assemble an efficient and fireproof chimney duct for a metal stove, the following nuances must be taken into account:
- The efficiency of the stove is extremely low - no more than 50%. Accordingly, half of the heat generated by burning wood is lost through the chimney.
- The walls of the flue heat up considerably - up to a maximum of 400 °C, the average temperature is about 200 °C.
- Contact with cold outside air causes condensation to form inside. Its quantity depends on the temperature difference between the exhaust gases and the environment.
- Soot settles on the channel walls. The more condensate is released, the faster the soot layer grows.
- With periodic firing, an ice plug gradually freezes in the area of the head, blocking the passage and reducing the force of natural draft. With each subsequent ignition, the stove works worse and begins to smoke into the room.
Examples of incorrect stove chimneys - burnt-out galvanization and a pipe clogged with soot
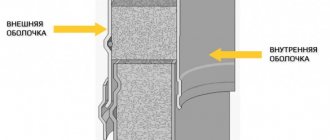
Note. When using conventional single-wall pipes, condensate forms not only inside, but also on the outer walls of the chimney.
Abundant moisture condensation is promoted by operating a solid fuel heater in smoldering mode. Closer to the head, the pipe warms up weakly, which is why the water released from the air does not have time to evaporate. The problem is aggravated by humidity and low quality fuel burned in garage and country stoves, which produce a lot of soot.
The correct chimney pipe for a potbelly stove minimizes the following problems:
- reducing the amount of condensation and soot is achieved through external insulation of the area running along the street and unheated rooms;
- thermal insulation also prevents the upper part of the flue from freezing;
- installing a chimney in a wooden house involves protecting structures from fire;
- The efficiency of the stove can be increased and the temperature of the pipe reduced by organizing heat removal in various ways.
These measures are taken as a whole. Removing heat from the iron chimney increases the efficiency of the furnace and reduces heating of the exhaust channel, and the insulation resists moisture condensation and soot deposition.
Installation of a chimney through a wall
Craftsmen rarely agree to hire craftsmen to build a chimney for a potbelly stove in the garage. Most owners believe that they themselves are able to cope with the task. But as a result, many do not take into account the tightness of the structure, making mistakes in this regard. Also, you should not neglect fire safety rules, form good draft, so as not to get poisoned or, especially, not to suffocate under the influence of carbon monoxide. Almost no one pays enough attention to the rules for organizing an effective and safe chimney. It's not difficult, just follow these important rules:
Processing of joints
- Following fire safety guidelines. All areas where the chimney meets other surfaces are treated with fire-resistant compounds, and fire insulation is formed on them.
- You need to build a pipe from 2 or 3 parts; it should not be all metal. This is important in case of burnout, since only one part will need to be replaced, which has deteriorated during operation.
There must be several sections of pipe
- When carrying out an output through a wall, measurements are taken in advance and elements for organizing channel turns are ordered. You can’t do them correctly with your own hands.
Rotating elements
- Secure the chimney only with clamps, do not use welding, because the temperature inside the pipes is constantly changing, the metal expands and contracts, so the welding points may burst, especially during severe frosts.
Clamp
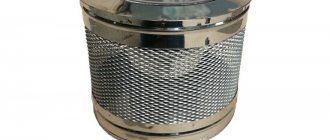
When all the structural parts are assembled and firmly attached to each other, proceed to the next stage - the installation of the cap. The functionality and correct operation of the system must be checked. No sparks should fly out of the potbelly stove when burning.
As a spark absorber, it is permissible to use a mesh with small cells - no more than 5 mm. This is a relevant solution when the roof or other nearby objects are made of flammable material. When there is no fire danger, a simple cap is used. It is put on the end of the chimney, secured with a clamp, and securely fastened with rivets.
Cap
Differences: output through the wall
To remove the chimney through the wall, you do not need a PPU or master flush. All you need is a pipe, an outlet and a deflector. It is easier to organize removal through a wall, since it is easier to properly seal cracks in a vertical surface.
But it is not always possible to drain through the wall. Often, garages are installed in rows without gaps or the available distance is not enough to install a full-fledged system. Another garage may also be located at the rear of the building. In this situation, there is only one outcome - organizing a drainage through the roof.
The gaps in the wall for the outlet, which remain between the pipe and the wall, are treated on both sides with a sealant with heat-resistant characteristics.
Chimney installation steps
After studying the nuances and basics, you should refer to the detailed installation instructions. She will help you build everything with your own hands, ensuring high quality work.
The sequence of how to do it correctly is as follows:
- Fastening the very first part of the chimney to the chimney hole in the potbelly stove.
- Extension of the knee to the wall - removal will be carried out through it.
- Now a hole with a diameter of at least 16 cm is formed. It is important to comply with fire safety regulations.
- A passage glass is mounted into the hole - this is the only way to pass the chimney pipe.
- Connecting the pipe to the outer elbow.
- A layer of bitumen resin is applied to the outer part. It is thermally insulated with a special material, such as mineral wool.
- The fungus is mounted above the upper segment from the outside of the building. It helps prevent debris, dust, and other foreign objects and precipitation from entering the chimney.
After the final completion of the work, you can begin to use the potbelly stove.
Preparing the walls
The wall must be prepared for the passage of a pipeline through it. First, markings are applied, then a hole is made for the passage pipe.
Then the pipe is installed. It is fixed in the hole according to size and must be supplemented with insulation made of foiled mineral wool. Then the pipe is connected to the stove. A three-section elbow is required and connects to the tee through a transition piece.
Hole in the wall
If it is necessary to change direction, a tee equipped with a cleaning cup is used. It is easy to remove for cleaning and is secured with a bracket.
The gas outlet pipe is attached to the wall using a special clamp. The gaps between elements are no more than 2 m.
Features of care
Maintenance of the structure is carried out regularly. Seams are inspected, with special attention paid to areas of increased risk of crack formation. Burnt areas, etc. may also appear. Cleansing is organized at least once a quarter, and definitely at least once every 12 months. This type of maintenance will help maintain the functionality of the chimney.
Cleaning is carried out by burning special briquettes in a potbelly stove. This gas is caustic and harmful when inhaled, but it effectively cleans pipes of soot and burning.
Proper care
Potbelly stove for the garage: how to make it yourself plus drawings
» How to insulate » Garage » You are here