As practice shows, it is not difficult to make a chimney from a steel pipe with your own hands. This topic is very relevant. After all, to heat their homes, people use various devices:
- ovens;
- fireplaces;
- potbelly stoves;
- gas boilers;
- solid fuel boilers.
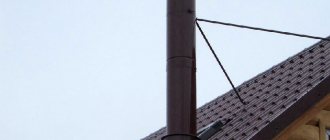
But none of the listed devices can function without an installed chimney. This design ensures that exhaust gases are removed from the furnace, which in turn is freed up to accept a new portion of oxygen through the vent. This is what a homemade chimney looks like in a house:
With your own hands, such structures are made from different materials:
- bricks;
- stainless steel;
- ceramics;
- asbestos cement.
A chimney made of brick and asbestos cement will require pouring a foundation, because such a structure is heavy. Masonry requires the presence of certain skills, and asbestos cement will not stand for a long time.
Long-lasting chimney materials include ceramics and glass ceramics. But, at this time, these building materials are highly expensive. In terms of overall characteristics, stainless steel is not inferior to the described options.
But steel pipe products are becoming the most inexpensive. They are relatively lightweight, and the connection of finished modules is easy to do without outside help.
Having the skills to work with welding equipment, it is not difficult to weld a chimney from metal pipe products yourself. Although, it is much easier to assemble ready-made elements.
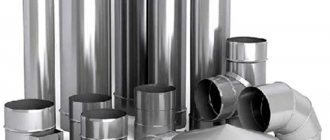
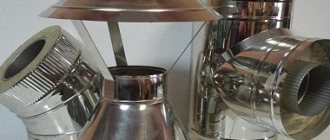
Manufacturers offer a full range of parts for steel structures, these are:
- tees;
- fastenings (clamps);
- bends;
- dampers;
- plugs;
- pipes.
Video
Making a chimney pipe and air duct from galvanized sheet metal with your own hands.
Another advantage of metal pipe products is their resistance to corrosion. One way or another, condensation will definitely be present.
The moisture that collects quickly destroys brick chimneys because the masonry cracks. Only ceramics can compete with iron options. But, in this case, the buyer expects a high price.
Types of steel structures
Such structures are divided into the following:
- Chimney with one wall.
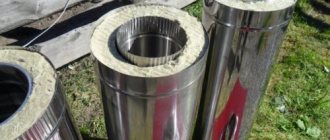
- With two walls. In these types, fire-resistant insulation is located between two blanks of different volumes.
- Coaxial. With two walls, but without an insulating layer between them.
The first type of chimney is used in areas with warm climatic conditions. The third type is suitable for gas boilers.
But the second type is considered a popular option, because the insulation reduces condensation, as a result the structure can last a very long time.
Malfunctions and their causes
All malfunctions that require stove repair in a country house are related to temperature conditions. Bricks and metal become larger when heated, and when the furnace cools, they return to their original position. If the stove is used daily or vice versa - it is used extremely rarely, the materials cannot withstand the loads. The presence of cracks or clogging of the chimney becomes inevitable.
In addition to temperature stress, there are other causes of problems:
1. Burning of coniferous trees. Spruce and pine leave a lot of sawdust that does not burn. They go up the chimney and clog it.
Conifers for use in the oven
2. Burning garbage. Since the oven is not designed for this purpose, plastics and other materials contribute to the formation of cracks.
Burning garbage in a furnace
3. Bad seal. If a low-quality mortar was used, over time it may simply fall off, opening cracks between the bricks.
Sealing joints with mortar
4. Huge amount of fuel. The desire to heat the stove as quickly as possible often leads to putting too much wood in it. The result is gaps of different sizes.
Loading the stove with wood
5. Brick in the chimney. Sometimes fragments or even whole bricks get into the chimney. If this happens, cravings are partially or completely lost.
Foreign objects in the chimney
6. Problems in brickwork. Perhaps the stove was originally assembled in a hurry. Then a major overhaul is needed.
Furnace brickwork
Malfunctions also occur due to external factors. Since the chimney is also located outside, it is affected by weather conditions. Birds occasionally fly into it. It is almost impossible to predict these moments.
3a797b2f047d6e38359a115fd7adae50.jpe
How to do the calculations
The diameter, height and wall thickness of the pipe during construction must be determined accurately. It is important not to make any mistakes. After all, the diameter of the chimney must be sufficient to exhaust the processed gas. And at the same time, the thrust should not be very large.
If this is a pipe for a boiler, the primary source when choosing is the instructions from the manufacturers. Provided that this data is not in the passport, then calculations are made taking into account the volume and height of the firebox.
The height of iron pipes is a little more difficult. The greater the height of such a pipe, the greater the thrust. And how much the pipe needs to be extended is a difficult question. When determining the distance from the stove to the tip, specially developed formulas and programs are used.
But one condition for such calculations remains the same - the chimney must be at least 50 cm higher from the roof peak, and in vertical sections its height can be at least five meters.
Video on how to calculate height
How to calculate the height of the chimney!
The wall thickness of the pipes used should be from three to five millimeters. At the exit from the stove, at least 5 or more millimeters. In the upper sections it is allowed to use a pipe of three millimeters or more.
Main settings
The advantage of store-bought models of galvanized steel chimneys is that manufacturers produce a wide range of sizes. In addition, among the factory products you can find double-circuit, thermally insulated, corrugated, with increased flexibility and single-circuit. When making a homemade chimney, you have to limit yourself to only single-circuit pipes. In order for the smoke removal system to work effectively, the following parameters should be taken into account:
- Pipe section size. In order for smoke to come out of the firebox through the chimney, you need to choose the correct pipe diameter. A pipe that is too thin does not provide the required level, which can result in backdraft. A large diameter chimney, on the contrary, releases combustion products into the atmosphere too quickly, therefore increasing fuel consumption and energy losses. The more turns there are in the smoke exhaust duct configuration, the thicker the pipe should be. In most cases, a galvanized steel pipe with a diameter of 100 mm is suitable. Recommended chimney pipe cross-section for boilers of different capacities:
- Material. Chimney pipes are made of sheet metal. This material must be highly resistant to corrosion, moisture and high temperature. Therefore, simple galvanized steel is not enough, since the temperature in the chimney of solid fuel stoves and fireplaces exceeds 500-700 degrees. Therefore, for the manufacture of pipes, metal with increased heat resistance and corrosion resistance is used.
- Wall thickness. The service life of a chimney made of a steel pipe depends on the thickness of the metal used. Sheets of steel with a thickness of 0.25-1.0 mm are used. The higher the temperature of the gases leaving the furnace, the thicker the metal needs to be.
Important! A sheet of galvanized steel measuring 2500x125 mm in construction stores costs about 600 rubles, with proper cutting, one sheet produces 8.75 m of pipe with a diameter of 100 mm, the cost of 1 m is approximately 68 rubles, which gives 60% savings!
How to make a chimney from a steel pipe
Chimneys made of iron pipes are popular both in the construction of industrial facilities and in the arrangement of a private home.
It is easy to install such a structure; installation is carried out according to the principle of assembling a metal structure, and this is easier than creating brickwork. The connection process consists of a series of sequential actions.
Preparation of material
For manufacturing, you will need to stock up on material, the quantity of which must be determined in advance by calculation, and tools.
What we need:
- fitting - adapter from the stove to the pipe;
- stainless steel pipe, 1 piece per meter of circuit;
- gate;
- fireproof gasket for arranging passage through the ceiling and roof;
- galvanized plates;
- insulating material;
- chimney head;
- clamps that will fix the joints;
- fasteners for securing the channel to the wall;
- condensation collector;
- material for sealing joints that can withstand high temperatures;
- wire, screws and nails.
You can buy a ready-made chimney kit, which contains everything you need to assemble it.
Important! It is worth knowing that pipes for placement indoors and outdoors must be made of different types of steel. For the internal one, the mechanical strength coefficient is allowed to be lower than for the external one, but the heat resistance should be higher.
Tool:
- drill with a set of drills;
- electric jigsaw;
- screwdriver;
- dowels;
- hammer.
You may need another tool, it all depends on the chimney model.
Installation of a single structure
Chimneys can be external or internal, and any of them can be made with your own hands using a pre-made drawing.
The step-by-step process for installing a chimney after installing the stove is as follows:
- The chimney is connected to the heating device pipe using an adapter. In this action, the tightness of the seam is very important. Therefore, sealant is applied to the sedimentary part of the adapter, put on the console and secured with a clamp.
- The outlet is mounted at the desired angle (90, 60, 45, 30 degrees), it depends on the selected model. To do this, a tee is attached to the installed element, which has a special compartment for condensate and inspection. It is fixed with heat-resistant sealants and secured with a clamp. All other segments are also collected.
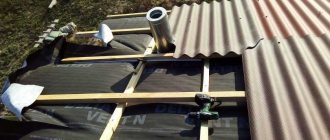
- An opening is made for the pipe in the wall or ceiling - it depends on the type of structure chosen. If the model is internal, then in the ceiling, if external - in the wall. If there is a monolithic wall, after the pipe is installed, it will be enough to seal the cracks with cement mortar. In the case of wooden partitions, or any flammable material, the hole is made 2 times larger than the diameter of the pipe itself. The place where it passes through the wall should be insulated using an asbestos sheet or cord that is wrapped around this place of the chimney. In addition, the channel itself is treated with galvanized sheets or asbestos boards, and something similar to a box is constructed.
- A second outlet is mounted - a tee, its lower hole is intended for installing a condensate collector.
- The straight part of the iron chimney is assembled by connecting all segments.
- It is fixed using brackets that are attached to the wall.
- A protective umbrella is installed on the upper end of the pipe to ensure that nothing from outside gets inside.
- Stretch bars are installed if necessary.
- The furnace is initially heated. The tightness of all joints is checked, and whether there are areas on the walls that get very hot.
For your information! When installing an internal chimney yourself, you need to make a valve on the adapter from the boiler or stove, this will allow you to retain heat. And also, beams and rafters that are located in the attic should be located further from the chimney.
Sandwich channel installation
A sandwich system is two pipes that have different diameters, they are located one inside the other, and the gap between them is filled with insulation.
Such a structure will cost more, but its price is justified by its high performance characteristics. Installation of this model is easier, since their surface has a lower temperature than single ones.
A distinctive feature of the installation of a sandwich structure is that the assembly process is carried out strictly from the bottom up, by placing the narrow end of the inner upper pipe into the assembled lower section. This will allow condensation to pass through the channel and not leak out.
Otherwise, the installation process is similar: treating the seams with sealant and fastening the chimney with clamps and brackets to the wall (the distance from the wall is at least 15 cm), the TsAGI deflector is attached to the end (it is fixed with self-tapping screws).
The chimney installation itself looks like this:
- Construction begins from the stove and moves to the upper part, where the head is located. Each segment that is “planted” from above must go into the part located below.
- A hole should be made at the base of the stove. You will need it to clean the chimney. This could be a door or a glass that can be removed.
- Joints, bends, etc. connected with clamps and lubricated with heat-resistant sealant.
- Fasteners on vertical zones are made with a distance of one and a half or 2 meters. Horizontal distances should not be more than one meter.
- In areas where the steel chimney pipe passes through the wall and ceiling, the opening for it is made larger.
- It is impossible for the chimney to pass close to the roofing material or ceiling. The gap is covered with metal plates, and the passage glass is covered with insulating material and stainless steel.
- At the final stage, the rain umbrella is installed. It perfectly protects the building from rainwater, snow and dirt.
Sandwich installation diagrams
You can make a chimney from modular sandwich pipes in 3 ways:
- The vertical part is located on the street, attached to the outer wall of the building. The horizontal chimney crosses the external fence, enters the house and is connected to the boiler (stove) pipe.
- The vertical smoke channel passes through the roof, descends into the boiler room and ends with a condensate collector. The heat generator is connected to it by a horizontal pipe.
- The trunk again crosses all roof structures, but is connected to the heater directly, without a pocket or horizontal sections.
Installation diagram of a wall chimney (left) and an internal duct passing through the roof (right)
The first option is suitable for ready-made houses of any type - frame, brick, log. Your task is to place the boiler against the outer wall, take the sandwich outside, and then secure the main pipe. In terms of financial and labor costs, this is the most profitable way to install a chimney.
Installing a modular system according to the second scheme is much more difficult. In a one-story house, you will have to go through the ceiling and roof slope, arranging fireproof cuts. In a two-story house, the piping will get inside the room and make you think about decorative cladding. But you won’t need to go around the roof overhang and secure the end of the chimney with guy wires.
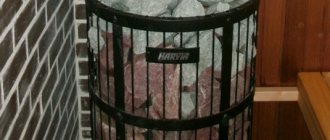
The latter option is suitable for sauna stoves and fireplace inserts. The former get very hot and practically do not condense, the latter are hidden behind a fire-resistant plasterboard finish. To organize cooling of the sandwich channel, ventilation is provided in the space between the lining and the pipe. The photo above shows convection grilles that remove heated air from under the fireplace insert casing.
Rules you need to know when installing a chimney
Making a chimney is not difficult, the main thing is to adhere to some nuances that are important when arranging it:
- the location of the pipe above the roof surface - the higher it is, the better the traction, but there is no point in making it more than 2 meters above the house;
- fastening - if the model is external, then the brackets are located at a distance of 1.5 meters, and everything is fastened in three places;
- connection - the end of the higher pipe should look down, that is, the upper one fits onto the lower one, otherwise smoke will leak out and rainwater will get into the cracks;
- a deflector or umbrella is a mandatory part that protects from precipitation.
When heating the furnace for several weeks, there may be a smell and slight smoke from heating the sealant and oils, this should not be alarmed.
It is important to know! It is forbidden to connect pipes of different diameters into one system, as this can cause a fire and cause fumes, since smoke will enter the room through the cracks. You cannot continue the brick model with metal pipes. The only way to combine them is by lining a brick pipe with a steel pipe.
Manufacturing
To make a pipe from a sheet of galvanized steel, you will need a rubber or wooden mallet that is heavy enough to bend the metal . In the process of work, scissors are used for cutting metal, a long ruler, a scriber for marking, a corner and a “gun” for bending. The bending process occurs as follows:
- First of all, the sheet of metal is marked by drawing lines using a scriber. On one side the part is made 340 mm wide, and on the other 330 mm, so that during assembly they can easily fit into each other. If cut correctly, you should get 7 strips 1250 mm long.
- Using a metal corner and a mallet, both edges are bent at an angle of 90 degrees in opposite directions to a width of 0.7 mm. Then the workpieces are turned over and the angle at the edges is adjusted to an angle of 135-145 degrees, gently tapping with a mallet.
Bending the edges of the workpiece - The workpiece is moved to a “gun”, a device for giving a rounded sheet of metal with a diameter of 100 mm. The sheet laid on the “gun” is tapped with a mallet until the desired pipe shape is obtained.
Metal bending machine - The edges of the workpiece are hooked together and placed on the gun. Using a rubber mallet, create a flat seam where the edges of the sheet meet. The joint can be reinforced with metal rivets, although this will require welding.
Scheme for bending the edges of the workpiece
Note! The installation of a chimney requires rotating parts, which are made by cutting straight pipes at an angle. If you cut the pipes at an angle of 75 degrees, then when joining, you get a 150-degree turn; if you cut them at an angle of 45 degrees, you get a 90-degree turn. To improve the efficiency of a homemade chimney, it is wrapped in non-flammable thermal insulation material.
Ceramic chimney
Ceramic chimneys are gaining popularity today because they are durable, safe, and environmentally friendly. They took the best from brick and steel systems. The main disadvantage is the high price of components.
Kit contents
Installation of a ceramic chimney is simple and easy to do yourself. After all, it is assembled from ready-made parts; they are connected using a special composition, which you cannot make yourself.
The set consists of:
- bases with a drain for condensate;
- element for connecting to the pipe;
- inspection cell with door;
- lightweight block for exterior finishing;
- kit for treating the roof area;
- insulation products with non-flammable properties;
- paste glue.
In addition, you will need fasteners, fire-resistant facing material, plaster, natural stone, ceramic tiles.
Assembly Rule
According to technology and regulations, the chimney should be located no further than 2 meters from the generator, but as far away from walls and ceilings as possible.
The installation process requires compliance with a number of rules:
- the presence of a foundation that is coated with a fire retardant;
- installation must be done from below, from the basement, and move towards the roof;
- The segments should be fixed with a special adhesive composition, it is sold in a set;
- the pipe must have a diameter larger than that of the pipe connected to the heat generator;
- use mineral wool and plaster as thermal insulation material;
- the area where the pipe and roof connect should be equipped with a metal apron;
- If the roofing material is flammable, a spark arrestor must be installed.
If the chimney circuit stretches for 4 meters without fastening, then it requires reinforcement using iron rods, for which there are special holes.
Installation method
All parts intended for ceramic chimneys contain fireclay, it helps to withstand high temperatures and significantly increases service life.
The bottom of the chimney - the base, has a hole for the exit of condensate, which is released when combustion products are removed. The liquid accumulates and goes into the sewer, which is equipped in advance.
A tee equipped with an inspection hole is installed on the base, through which the heating system is inspected and cleaned. When heating the stove, it must be closed with a door. All other elements are mounted in accordance with the manufacturer's instructions, and therefore assembly is not difficult.
Preparing and applying glue
To seal the joints of the elements, a special glue with acid-resistant properties is used. The composition can be prepared independently, based on dry powder.
Take 7 parts of dry concentrate and 1 part of water. The temperature when kneading should be at room temperature, the consistency will be thick.
Immediately the composition seems dry, but after 7-8 minutes it will become pasty. It must be used within 30 minutes, then it loses its properties. Apply to joints that need to be moistened beforehand. Remains of glue should be removed, from the outside - to give an aesthetic appearance, from the inside - to prevent soot from collecting.
If you want to decorate the chimney, you should leave free access to the inspection window.
Advantages
With the advent of a large number of factory products for assembling galvanized steel chimneys, the need to make pipes with your own hands has decreased. However, homemade pipes allow you to reduce costs and choose the ideal diameter. In addition, they are used to equip drains, so the ability to make pipes with your own hands will be useful in everyday life. Metal chimneys have the following advantages over others:
- A light weight. Smoke exhaust ducts made from homemade galvanized pipes weigh much less than brick or ceramic ones. Therefore, to install this type of chimney, there is no need to equip a foundation, the cost of pouring which exceeds the cost of material and installation work.
- Fire safety. According to building codes, steel chimneys are completely fire safe. High quality metal can withstand heating up to 900 degrees, so it is suitable even for solid fuel stoves and fireplaces.
- Low cost. Chimney pipes made of steel are the most democratic way to organize smoke removal; the cost of installation is several times lower than the installation of brick and ceramic analogues.
- Easy to assemble. You can easily assemble a chimney made of galvanized steel with your own hands according to the instructions, thereby saving money spent on hiring professional workers.
DIY pipes
Important! The effectiveness of smoke removal depends on the correct assembly of the chimney. Experienced craftsmen advise choosing a predominantly vertical configuration with the least number of turns. Each rotating element acts as an obstacle to the smoke, reducing the draft force.
Brick chimney
These chimneys have been known for a long time; they were used in the construction of stoves in village houses many years ago. There are 2 ways to make a chimney:
- On the stove - an easy option;
- Placed next to it and connected using an adapter.
The structure of brickwork is:
- working area - located below the ceiling;
- outer part - passing through the ceiling with fluff to the roof;
- neck with a head - a pipe passing through the roof equipped with an “otter”.
Such a chimney is a heavy device, and it is recommended to install it only if you have a brick stove.
To learn more about how to lay a brick chimney with your own hands, see this article.
Features of operation
Metal chimneys, having a lot of undoubted advantages, require increased attention both during assembly and during operation:
- They should not be located near other utilities, such as electrical wiring or plumbing.
- Before starting installation work, the internal longitudinal seams of the pipes must be coated with a special sealant, since they are subject to temperature changes, which gradually weakens the joining edges.
- When cleaning stainless steel pipes, it is better not to use traditional metal balls with a wire “hedgehog”. Their influence deteriorates the mirror inner surface, making it difficult to drain condensate into the storage tanks. It is better to choose a brush made of synthetic materials.
Mechanical cleaning method is the most effective
Chimney insulation
Many may have a completely appropriate question - why should the chimney be insulated? After all, this is not very cheap.
But, in proper care, insulation plays a very important role. It is a mistake to think that thermal insulation does not change the temperature in the room.
If you compare this work with analogues that are carried out with walls or ceilings, it will be slightly different.
The walls are covered with insulating building material until a protective casing is created that does not allow warm air to escape outside. But in this way the chimney is protected from regular changes in temperature.
Many people know the term dew point. This is the area where condensation occurs. This process is natural and occurs when there is a difference in temperature.
Temperature changes are gradual and less frequent, and this significantly reduces moisture formations.
In the case of chimneys, everything looks completely different. Steel products for combustion exhaust heat up and cool down quickly. As a result, the volume of condensate becomes higher.
Video
Chimney made of 159 pipes /// Cheap chimney /// DIY chimney
And this causes significant damage to nearby elements. This is especially noticeable when the channel operates from a gas boiler, where heating occurs to significant temperatures.
IMPORTANT! You need to know that condensation is not only moisture and steam. This is the concentration of various microelements, acids and other combustion products. If simple condensation dries out in a short time and is not absorbed as quickly, then the moisture on the pipes from the stove quickly performs its detrimental effect.
Because of this influence, the metal chimney begins to become covered with rust. Also, moisture flows into the middle of the boiler, and this should not be allowed.
Insulation options
There are many means that allow you to isolate the furnace channel. Metal chimneys are somewhat reminiscent of asbestos. Therefore, you can perform actions yourself in a short time.
Pipes are often installed at the outlets of a gas heater; this is facilitated by their light weight and mobility. Laying these products with your own hands is not at all difficult. Addition to all this: it’s easy to make a bent terminal out of steel and route it as required by a specific design.
Video
Chimney insulation part 3 (final)
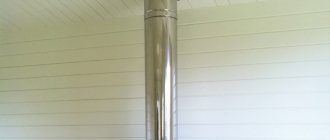
The process itself is easy. The pipe is wrapped in a layer of mineral wool and secured. Then everything is covered with a casing.
If compared with the asbestos version, a steel pipe will require thicker insulation. The methods of attaching the material to the chimney of their steel will also differ.
A few words about safety
There are some requirements for safe use. It is important not only to build such a system with your own hands correctly, but it must also be used according to strict rules:
- Do not use flammable liquids or flammable materials for kindling. In solid fuel heating devices it is not allowed to stack firewood that is longer than the length of the firebox.
- Chimney pipes should not be used for drying clothes and other items of clothing.
- Cleaning by burning off soot is not allowed; this may result in rapid failure.
- Do not use chlorine-containing substances for cleaning.
- Any attempt to douse the flames in the firebox with water can end disastrously.
- It is recommended to clean the chimney at least 2 times every six months.
- It is recommended to perform maintenance at least twice a year.
- To avoid additional problems with the functioning of the smoke exhaust duct, you must strictly adhere to the advice given by the manufacturers. You should not try to use heat-generating devices in any other way.
Video
Typical mistakes when installing stoves and chimneys
IMPORTANT! The influence of the chimney on the level of safety is very large. For these reasons, the correct functioning of the fire control authorities is checked. Without their written permission, a self-assembled steel structure will not be connected to gas networks.
Arguments for self-building
A beautiful and functional homemade chimney can be built easily if you carefully read all the recommendations provided. At the same time, there is an opportunity to save significant money.
Also, a do-it-yourself design, unlike the modular version, allows you to do without a lot of additional work. Indeed, in some cases, the use of a modular chimney can be severely limited.
And if in doubt, you can always turn to professional experts for help. They will give competent advice or provide assistance with competent installation work.
Material selection
The choice of material is determined by the operating mode of the boiler equipment, the financial budget of construction and the personal preferences of the master. There are designs from:
- Brick. Brick is the most traditional material for chimneys. The only positive quality of brick is its thermal insulation properties and thermal inertia. The rest is all downsides: some experience is required in order to create the right solution, which is dense enough not to allow gas to pass through. This pipe is large in size and difficult to connect to the boiler. Therefore, the use of brick when creating a chimney yourself is rare.
- Steel. Steel is a wonderful material. Properly selected stainless steel will be an excellent material, easy to install and affordable for self-assembly. In addition, the pipe can be made independently by welding from a sheet of metal, which will significantly save on material. The only negative is the high thermal conductivity coefficient. This means that, unlike brick or ceramics, steel requires a significant layer of insulation. In order to avoid such an unpleasant procedure, which requires some skill, you can use sandwich pipes.
- Glass. Indeed, glass pipes exist. But it’s worth saying only a few words about them, since there is practically no such product on the Russian market. Glass pipes have almost absolute gas tightness, which is why they are popular in Europe. In addition, plexiglass goes well with a minimalist interior, which allows this design to fit organically into the interior. Among the disadvantages: price, complexity of installation and heavy weight of the structure.
- Polymer. Polymer pipes bend too easily, so they are used only as sleeves laid inside brick pipes. By lining polymer pipes, you can extend the service life of an old brick chimney.
- Asbestos-cement. Asbestos-cement pipes are a cheap and easy-to-install material. But at the same time, asbestos cement has a low heat capacity, and it is much more difficult to insulate it than the same steel. In addition, despite the ease of installation, pipes are almost impossible to lay at an angle.
Asbestos-cement pipes are a cheap and easy-to-install material
Fire safety
To avoid a fire hazard, it is necessary to install the flue gas exhaust device so that it does not touch the wall or ceiling. Sandwich pipes must be in special boxes that limit them from touching other materials.
To ensure greater safety, closed hollow structures are equipped with basalt wool. Quite often, a self-installed chimney is separated from the ceiling by a small metal sheet. Steel becomes a kind of radiator, heating the surrounding air.
Reliability of masonry
When laying chimneys, the difficult issue of installing a closure or cap arises. Because It is customary to make passages one brick wide; to block it, you need to place two bricks end-to-end over it. In this case, the seam does not rest on anything. Such a ceiling device looks, at first glance, weak and unreliable, and one would like to lay a rail for support, but this is not necessary.
Firstly, the rest of the furnace array stands on the second half of these bricks, preventing them from falling through. And secondly, the overlap is done in two rows, in the first row the bricks are laid end to end, and in the second row the bricks are tied, and the brick is laid on the seam. Thus, a kind of “lock” is obtained that firmly seals the passage of smoke.
Tools for work
You won't need many tools for laying stoves. This is a trowel (a special trowel for laying bricks), a container in which the clay mortar will be mixed, a drill with a “mixer” attachment for mixing it (although you can do without it) and a building level to control the evenness of the masonry and check the geometry of the furnace.
Despite the fact that the stove is a fairly simple geometric figure, it is still worth keeping an eye on the level. because the mortar can be heterogeneous, its thickness can vary from row to row, and the brick always strives to “move” somewhere. When building “by eye”, the entire structure often “collapses” in one direction.