Sandwich chimneys have many advantages: lightness of construction, safety, aesthetic appearance. Why not try to assemble a sandwich chimney with your own hands? As practice shows, it is really quite simple. And everyone can build such a chimney like a construction set.
This work will require knowledge of the structure of the chimney and its installation - we discussed this material in detail in our article. We selected photos and diagrams describing the main elements of the chimney system, and provided step-by-step instructions for assembly and installation.
We also supplemented the material with useful tips for improving draft and a video demonstrating the process of installing a chimney in a country house.
Material from which pipes are made
For different heating devices and types of fuel, a different type of steel is selected. It must be highly alloyed and stainless, suitable for the manufacture of chemically resistant and fireproof chimneys.
In the construction of a chimney, one of the main characteristics is the steel grade as a criterion for long-term service and resistance to external negativity
When various substances burn, chemically active substances can accumulate in the chimney: sulfuric acid, sulfur, hydrochloric acid. In addition, the temperature during combustion of different fuels can vary greatly.
When heating with wood or gas, it does not rise above 450 °C; when burning coal, it can reach 700 °C. Metals react differently to these indicators. Therefore, when choosing a smoke exhaust system, pay attention to the main characteristic - the quality and properties of the steel.
Option #1 - stainless steel with alloying additives
The main grades of steel alloys that are used for the production of sandwich chimneys:
- Titanium stabilized stainless steel (AISI 321) . Used for wood burning equipment. Not resistant to corrosion in sulfur-containing environments. Permissible operating temperature is 600–800°C.
- Molybdenum stabilized stainless steel (AISI 316) . Installation of a sandwich chimney made of this grade of steel is carried out for heating installations that operate on wood, gas, or diesel fuel. The metal is acid-resistant and has increased resistance to corrosion and aggressive environments of various types.
- Heat-resistant steel (AISI 304) . The inclusion of chromium and nickel makes the steel insensitive to elevated temperatures and acidic environments. Used for the production of chimneys with high temperature exhaust gases - about 1000 °C. At temperatures of 600–800 °C, it is prone to loss of viscosity and ductility, which leads to embrittlement.
- The widely used grades AISI 409 and 430 are poorly resistant to high temperatures and acids. Most Chinese products and some domestic ones are made from these grades of steel.
It is impossible to check the steel grade visually. When purchasing, you can check the markings on the product itself or try to approximately determine the quality using a magnet.
Low quality material will attract a magnet, metal with added alloying additives will not.
When choosing pipes for a chimney, take an interest in their main characteristics. If you have doubts about the seller’s honesty, take a magnet with you - it will be attracted to steel products with insufficient proportions of alloying additives
Option #2 - ferrous metal for chimney pipes
The ferrous metal itself quickly wears out - it oxidizes and burns out. Therefore, special enamel is used to protect it. This increases resistance to acidic environments.
Enamel can serve for a long time at temperatures not exceeding 400 °C and can withstand short-term increases up to 750 °C.
The variety of shades of enameled pipes makes them quite popular
Enameled pipes are used to remove combustion products from heating columns, stoves, heating boilers, and fireplaces. Unlike steel ones, they can be painted in different colors. This allows you to select the right shades for the interior or facade of the house.
Option #3 - combined sandwich chimneys
To reduce the cost of production, enterprises try to use cheaper materials. If the inner pipe is made of expensive stainless steel, and the outer pipe is made of galvanized or enameled metal, then this has little effect on the service life of the product.
It’s worse if it’s the other way around: they use stainless steel on the outside, and hide cheap, low-quality material inside. With intensive use, such a pipe can last a year and fail, which will entail new costs for materials and installation.
Before purchasing, it is advisable to ask for the accompanying documents for the product to ensure the quality of the pipe you are purchasing. It is important that the internal element is made of high quality stainless steel
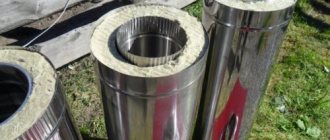
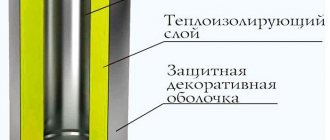
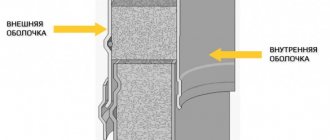
Between the two pipes of a sandwich chimney there is a layer of insulating material that retains heat inside and thereby maintains good draft. Basalt or ceramic wool is used as insulation - fibrous materials with the highest fire resistance class.
Basalt wool can withstand temperatures up to 600 °C, ceramic wool - up to 1000 °C. Both materials have good thermal insulation properties. A layer of insulation of 25-50 mm is used. For a chimney that is mounted outside, the larger it is, the better.
Manufacturing process
Creating such a structure is accessible to anyone with minimal construction skills. To make a sandwich system, you must have:
- metal pipe;
- galvanized steel sheets;
- stone wool.
The design of the device is a cylindrical product, which is covered on all sides with stone wool. The top of the structure is wrapped with galvanized sheets. In most cases, the outer shell of the chimney is prefabricated and consists of several parts. Therefore, the junction points of structural elements require increased attention.
Fixation of galvanized iron is carried out with special fleas, but you can also use ordinary screws. The fastening must be complete, that is, not only one sheet is fastened, but also all adjacent metal parts.
When making a sandwich chimney, each craftsman independently chooses the appropriate material. In this case, the brand of the fuel unit must be taken into account. For example, domestic hot water boilers maintain the temperature of the exhaust gases within 120 degrees. For such devices, mineral wool can be the thermal insulation material.
Things are completely different when it comes to homemade fireplaces or solid fuel boilers. The heating temperature in such systems can reach 800 degrees. In this case, you simply cannot do without stone wool. As a substitute, you can use a basalt analogue. To avoid rapid burning of the inner pipe, it must have a thick wall.
Stainless steel is considered the ideal material for a sandwich pipe. It has certain properties that allow such a system to be used for many years. Moreover, the inner surface of the stainless pipe always remains smooth. Gases escaping through this product do not affect its walls, which in turn increases the efficiency of the chimney itself.
When joining thermal insulation from the long side, some problems may arise. The fastening should be carried out with an overlap, having previously made an undercut equal to half the thickness of the pipe wall, with an additional overlap of approximately 10 cm to create an even geometry.
Let's make a small comparison. A high-quality sandwich structure 10 m long can be purchased for RUR 20,000. An ordinary metal pipe costs 6,000 rubles. The price of insulation does not exceed 2,125 rubles. For galvanized sheets you will have to pay 2,500 rubles. The total amount is 10,625 rubles. In this case, you get a 50% savings. Of course, unforeseen expenses are also possible, so we’ll add another 6,000 rubles. But it's still quite profitable.
In other words, 4,000 rub. left in your pocket, and a metal pipe with a wall thickness of 3.6 mm is always better than a stainless steel structure of 0.5 mm. From the above calculation it is clear that before you start building a smoke channel, it is worth considering what it is best to make it from.
Calculation of the cross-section and height of the chimney
This is done quite accurately according to a schedule called a nomogram. The square and rectangular icons on the chart indicate a rectangular or square channel; in this case, the cross-section value is multiplied by a coefficient. But this does not concern us. But in the case of a round channel, the nomogram overestimates the required value, since the installation of the gate is taken into account. We look and record the relationship between the power of the boiler (stove), the diameter and height of the chimney.
| Boiler or furnace power (kW) | Chimney diameter (mm) | Minimum pipe height (m) |
| 32 | 200 | 12 |
| 32 | 150 | 20 |
| 45 | 200 | 14 |
The nomogram shows the diameter and height of the attached chimney
There are some rules:
- Height is the vertical from the stove to the top of the chimney, any horizontals or diagonals are not taken into account.
- It is better to avoid narrow, tall pipes; they are more likely to produce draft pulsations.
- For low-power devices up to 10 kW, it is better to choose a narrow and low pipe that is safe in terms of wind, since the gas pressure is weak and will not prevent back blowing.
Selecting the desired design
You must also have basic welding and tinsmithing skills and submit a drawing. For example, we chose the left chimney in the figure and, knowing the power of the boiler or stove, calculated its required length using the nomogram. For example, it is equal to 12 meters.
Detailed design of two chimneys - attached and attached
Approximate required finished parts
We must remember that we can make sandwich pipes, deflectors, and clamps ourselves. But most of the related parts - such as elbows, tees, brackets - will be easier to buy. It will be easier to buy a deflector.
Chimneys are assembled from a mass of parts
Materials required for construction
| Position | Name | Marking | Quantity | Approximate price per piece | approximate price |
| 1 | Boiler connection | ADP | 1 piece | 2100 rubles | 2100 rubles |
| 2 | Muffler | SILDP | 1 piece | on request | on request |
| 3 | Pipe with pyrometer and gate | TPDP | 1 piece | 2700 rubles | 2700 rubles |
| 4 | Elbow (bend) 450 | CDP45 | 2 pieces | 3450x2 rubles | 6900 rubles |
| 5 | Tee with plug 450 | TTDP45 | 1 piece | 7300 rubles | 7300 rubles |
| 6 | Plug with condensate hole | PRDP | 1 piece | 900 rubles | 900 rubles |
| 7 | Tee with revision | TIDP | 1 piece | 7500 rubles | 7500 rubles |
| 8 | Main mount | SMDP | 6 items | 1100 rubles | 6600 rubles |
| 9 | Wall mount | BMDP | 1 piece | 1100 rubles | 1100 rubles |
| 10 | Elbow (bend) 300 | CDP30 | 1 piece | 3100 rubles | 3100 rubles |
| 11 | Elbow (bend) 150 | CDP15 | 1 piece | 3100 rubles | 3100 rubles |
| 12 | TsAGI deflector | SDP | 1 piece | 2700 rubles | 2700 rubles |
| 13 | Spark arrestor | CI | 1 piece | 2000 rubles | 2000 rubles |
| 14 | Crimp clamps, bolts with nuts and other metal fittings | according to need |
Determination of steel sheet thickness
The thickness of the steel sheet for the outer pipe should be between 0.6 millimeters (steel 409) and 0.8 millimeters (steel 430); For the inner pipe, the thickness of the corresponding steel (for inner pipes) depends on the device. For a gas boiler - from 0.6 millimeters, for liquid fuel appliances - from 0.8 millimeters, for solid fuel appliances - from 1 millimeter.
Important! The quality of the steel for the inner pipe does not affect the determination of the sheet thickness! The required sheet thickness depends only on the characteristics of the device to which the chimney is being built.
Determination of the area of the steel sheet and the amount of insulation
The sandwich pipes we need with an internal diameter of 200 millimeters and an external diameter of 250 millimeters will need to be made in quantities: 330 millimeters long - 2 pieces, 500 millimeters long - 2 pieces, 1000 millimeters long - 10 pieces. We will make the simplest calculation of the area of these pipes based on the diameter. For example, for the inner pipe: 3.14 x 200 = 628; plus a small reserve for connecting the sheet into a pipe, let it be 650; multiply by the length of all pipes according to the calculation - 650 x (330 + 330 +500 + 500 + 1000 x 10) = 7.579 m2.
Sectional view of a sandwich pipe with a clamp and insulation
The area of a typical steel sheet is 1,250 x 2,500 mm. Respectively. we need to purchase 4 sheets of steel 430 for the casing (average price - 780 rubles per sheet) and 3 sheets of steel 316 (average price - 8800 rubles per sheet) for the inner pipe. Ideally, you can buy a couple of sheets of ordinary structural steel for partitions when insulating.
The insulation corresponding to the diameter of the inner pipe of 200 millimeters will be 25 millimeters thick. We will need a package of Rokwool Floor Butts basalt wool 1000x600x25 mm (8 pieces per package) with an approximate cost of about 800 rubles.
Basalt woolRokwoolFlor Butts
In addition, we will need heat-resistant and roofing sealants and fiberglass mesh or fiberglass.
Heat-resistant sealants can withstand temperatures up to 1500 degrees
The required materials are presented in the table
| Position | Name | Specification | Quantity | Unit price | Price of everything |
| 1 | Steel sheets | 430, thickness 0.8 mm | 4 pieces | 780 rubles | 3120 rubles |
| 2 | Steel sheets | 316, thickness 0.8 mm | 3 pieces | 8800 rubles | 26400 rubles |
| 3 | Insulation | Rokwool Floor Butts 1000x600x25 mm | 1 piece | 800 rubles | 800 rubles |
| 4 | Steel sheets | structural hot rolled | 2 pieces | 760 rubles | 1520 rubles |
| 5 | Heat-resistant sealant | Penosil | Of necessity | 270 rubles | Of necessity |
| 6 | Fiberglass mesh | 1 roll – 10 m2 | 220 rubles | 220 rubles |
Pipe manufacturing
All of the steels mentioned are easily processed by hand. But you cannot join the sheet into a pipe using a regular fold, as when making pipes from galvanized iron.
Incorrect chimney pipe seams
Such a seam is not at all airtight, and through it acids from the flue gases (through the inner pipe) and moisture from the atmosphere (through the casing) leak into the insulation. Therefore, it is better to weld the seams (with argon-arc welding or electric welding) - if you know how to do this. If not, then all seams must be thoroughly sealed with heat-resistant sealant.
Properly assembled sandwich - pay attention to the folded seams
Insulation
Insulation is done in stages according to the drawing. Basalt wool is wrapped and separated by partitions. Then everything is wrapped with fiberglass mesh and tied with soft wire to make it easier to put on the outer pipe.
Insulation of sandwich pipes
Chimney assembly
- We don't need a foundation; all support brackets will be attached to the wall.
- We connect the boiler and pipe using an adapter.
- A gate has already been installed in the first factory section of the pipe. A condensate trap is connected. In our project, we still decided to do it inside so that the condensate would not freeze. We install a tee with an inspection hatch for cleaning soot (“pocket”) and a condensate collector. We provide easy access to the pocket.
First steps to assemble a chimney
- We prepare a hole in the wall with a diameter of at least half a meter: we install a system of stops, install a pipe, lay non-combustible insulation into it, and cover it with the same insulation.
Chimney passage through the wall
- We pass our sandwich through the pipe. We close the hole on both sides with non-flammable asbestos sheets. There are ready-made feed-through units in different sizes, and it may be easier to use a ready-made one.
Table of chimney passages through the wall and roof
- All pipes and bends made by us and purchased are inserted into each other “from the bottom up”, from the heating device to the deflector.
Connecting the chimney pipe in stages
- We insert the pipes with their narrow ends, first the inner upper pipe into the assembled sandwich of the lower one. Then the condensate will not seep out, but will flow through a sealed pipe.
Connecting a chimney pipe manually
- As the pipe is assembled, its connections are secured with clamps and coated with sealant, and section by section are secured to the wall with brackets at intervals of no more than 1.2 meters using anchor bolts. Deviations from the vertical should be no more than 3 millimeters per linear meter of the chimney. The distance to the wall is at least 15 centimeters.
The chimney is secured with brackets in increments of 1.2 meters
- A deflector is bolted to the end of the pipe, optimally from TsAGI.
TsAGI deflector
- The pipe is strengthened with guy wires or a rigid fastening system.
Pipe on guy ropes on the roof
- We do a test - turn on the boiler or flood the stove to check the tightness of the joints and whether there are places on the walls that get very hot. There may be an odor or slight smoke for a couple of weeks from heating the sealant, oils, etc.
Caution: if you do not want a fire in your home, under no circumstances connect pipes of different diameters in the same chimney! It is also unacceptable to extend a brick chimney with a steel pipe. The only way to combine brick and steel pipes is to line a brick pipe with a steel pipe.
The influence of the type of fuel on the operation of the chimney
Below is a table that will help determine how to choose the right chimney for different types of heating equipment so that it works longer.
The user manual for each chimney device indicates the permissible temperature
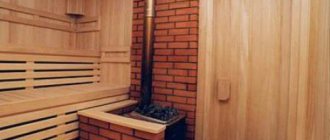
When installing a sandwich chimney for gas equipment, you can get by with a cheaper design option. But for a Russian or sauna stove, it is better not to save money and choose a system whose quality is beyond doubt.
Flaws
The list of disadvantages of sandwich pipes is quite modest. The designs on sale are relatively expensive. This drawback does not matter for those owners who want to make such a chimney with their own hands.
It should also be noted that sandwich structures have not been used for more than 15 years. This is also a dubious flaw. The building materials market is constantly improving. If new, high-quality materials are used in the manufacture of pipes, they can last longer.
According to professional builders, the presented systems have a lot of advantages that overshadow the disadvantages. It is for this reason that many owners create sandwich pipes with their own hands. For a wooden bathhouse, the presented option is considered the best. It is also suitable for other types of materials.
Structural elements and their features
The variety of products allows us to perform complex tasks in the construction of sandwich chimneys.
Chimney manufacturers have developed more than twenty different elements to facilitate installation
The main design elements of the chimney duct are:
- Straight pipe sections. Sections with a diameter of 80-600 mm, up to 1 m long. The ideal chimney design is straight, but in practice this is difficult to achieve.
- Knees and tees. They are used if it is necessary to bring the chimney through the wall, to the outside of the building, or to bypass the structural elements of the house - beams, rafters. Sometimes, for turns (especially straight, 90°), tees with revision are used - they allow you to clean the chimney in hard-to-reach places. They are installed and reinforced with brackets so that they do not bear the weight of the structure above.
- Feedthrough pipe. It insulates the pipe from the interfloor partitions and serves as a fastening for the chimney.
- Roofing cutting . It is a metal cone that is attached to the roof at a certain angle. Helps to pass the pipe through the roof without compromising its tightness and increasing fire safety. Instead, a special silicone seal can be used, which serves as better protection against leakage.
In addition to the above elements, there are also a lot of devices for installing a chimney made of sandwich pipes, as well as its further operation.
The chimney is secured with brackets every two meters. Fasteners for fixing clamps on the wall are selected in accordance with the material from which it is made
Final stage
The sandwich pipe must be installed correctly with your own hands. It should be noted that the distance of the entire chimney should be a total of 5-6 m. The distance is measured from the head to the grate. All joints will need to be sealed with sealant. Also, the space between the two pipes from above must be treated with the presented product. The insulated circle should not remain open.
Pipes are treated both indoors and outdoors. You should also seal the joints on the outside of the chimney. Moreover, after starting the system, all connections must be carefully checked. If there are leaks, the joints are once again treated with a sealant that can withstand heating temperatures of up to 1000 ºC.
Having learned how to assemble a sandwich pipe with your own hands, you can create a chimney yourself in accordance with building codes. At the same time, it will be possible to save money on the family budget and install a strong, durable system that will not need to be restored for many years.
How to choose the required chimney diameter?
The diameter of the chimney pipe is selected based on the boiler power data.
For low-power heating installations with less than 3.5 kW, pipes with a diameter of 8 cm are used, for boilers with values no more than 5.2 kW, pipes with a diameter of 9.5 cm are used, and over 5.2 kW - 11 cm. Narrowing of the chimney is not allowed, but widening, on the contrary, can be carried out.
Another indicator that affects the diameter of the chimney is the thickness of the insulating layer. It can be 25-100 mm. The larger it is, the better it exhibits its properties, but its cost also increases. The thickness of the metal itself used to produce pipes can be up to one millimeter.
If it is necessary to build on, replace or modernize any section of the chimney, the consumer may find himself in a difficult situation. Elements from different brands are not able to provide a sealed joint.
When purchasing missing parts, it is better to find (order) components of the same brand as the rest of the structure.
Layout
What is important in the layout of the chimney is the absence of joints and contact with other blocks. The chimney is directly mounted into a metal pipe; it is made in the form of a box. An important parameter is thickness; it should exceed the thickness of the ceiling by no more than eight centimeters. The smoke removal system is important; it should be calculated when designing the facility. Pipe connections are also an essential element to be aware of. There are two types of layout:
- by smoke;
- by condensate.
When installing “by smoke”, the lower part of the pipe is installed in the element of the upper elbow. With this combination, hot gases, without encountering any obstacles, move upward unhindered along the inner surface of the pipe. In the second joining option, the internal element is installed in the lower part. With this arrangement, all condensate flows down. Typically, all chimneys (taking into account the appearance of condensation) are mounted on innovative gas units. The outgoing temperature of the outgoing products does not exceed 200 degrees Celsius.
As an example, we can mention: in furnaces that are made of metal sheets (“potbelly stoves”) the combustion temperature is about 300 degrees Celsius, moisture is released already at one hundred degrees. When the device heats up, steam is formed, it settles on the internal chambers, drops are formed, which then roll down into a special collection. It is most rational to install a chimney of “sandwich” structures taking into account the appearance of abundant condensation.
Installation of a sandwich system for smoke removal
Before installing the structure, you must carefully read the technical documentation and safety regulations.
It is imperative to take all measures to prevent fire during operation of the chimney.
Before purchasing, it is necessary to calculate all materials, taking into account the specific layout of the house
Step #1 - assembly of chimney pipe elements
Installation of the structure always starts from the bottom up. Sandwich chimneys must not be connected directly to a heating device.
A sandwich chimney element is never connected to the heating device - a single-wall pipe or adapter is installed first
First, install a special adapter or a single-wall steel pipe half a meter long.
If it is planned to lead the pipe directly into the wall, then install a horizontal outlet with a slight slope of 2°.
The adapter is designed to connect different sections of the chimney system - single-wall and sandwich pipes
The section of uninsulated pipe can be short or long if greater heat transfer is expected. Walls and structures located near it must be protected with a screen or casing.
They install it “smoke-wise”, that is, they put it on top of the heating device pipe and additionally protect the joint with a heat-resistant sealant.
Assembly “by condensation” prevents drops of moisture from penetrating into the insulation system, which significantly reduces its insulating properties
The chimney sandwich element can be connected to the heating device through an adapter - a double-circuit pipe, the lower part of which is installed “for smoke”, and the upper part “for condensate”.
All subsequent pipes will be installed “on condensate”, which will prevent its seepage and protect against damage to the thermal insulation layer.
All joints are secured with couplings. A clamp is installed near each joint to secure the system to the wall.
To prevent lateral movement of the structure, wall brackets are used every two meters, and support brackets are used for tees. The system is attached to the wall using consoles or support platforms every five meters.
Step #2 - passing ceilings and walls
Even the fact that sandwich chimneys have an insulating layer does not mean that their surface cannot heat up quite strongly. Therefore, it is prohibited to place them without additional insulation near flammable materials (wood, plastic, etc.).
The joints of sandwich pipes for chimneys during their installation and operation should not coincide with the passage in the ceiling or wall.
The free space between the ceiling and the pipe is filled with non-flammable and non-flammable basalt wool
The diameter of the hole in the wall or ceiling is cut 250 mm larger than the diameter of the outer pipe.
Make it round or rectangular. Heat-resistant material is placed in the free space, which is hidden with decorative plates.
The passage unit is heat-resistant, it prevents deformation of the chimney when the building structure moves - shrinkage, moisture and temperature deformation
To pass through the ceiling and, especially, through flammable materials, a special passage unit is also used. An air gap is left between the outer contour and the inner surface of the assembly.
When passing through a ceiling or wall made of a slightly flammable material, you can use an unloading platform instead of a passage unit. It will act as an additional support.
Step #3 - passing the system through the roof
When the chimney pipe is brought out through the roof, its tightness is broken. To strengthen the pipe, isolate it from flammable elements of the roof and eliminate the possibility of leaks in the roofing, special devices are used: conical roofs, silicone seals.
These parts have standardized slope angles; they are selected taking into account the roof parameters.
Silicone sealant - Master Flash greatly simplifies the work and helps create reliable protection against leaks
When placing the pipe, it is calculated so that the distance to flammable materials is at least 37 cm. To protect against water getting under the roof, an apron is installed on top of the roof. Its edges go under the roofing.
Step #4 - placing the structure above the roof
The height of the chimney pipe depends on the distance between the base of the pipe and the ridge, but not less than half a meter above the ridge, 1.2 m above the surface of a flat roof or 2 m with a combined roof. If the head of the ridge is one and a half to three meters away, then it should be placed above or opposite the ridge.
If the distance is 3 m or more, then it is permissible to place the head no lower than the line that is formed if you draw a horizontal line from the ridge and measure down an angle of 10°.
If the pipe head is mounted lower than required, backdraft may occur in the system.
If there is a nearby building, the top of the chimney pipe should rise above its roof by one and a half meters or higher.
A pipe of this size must be further strengthened with guy wires.
When planning the design of the chimney, take into account the type of roof and the location of neighboring buildings. The pipe should not get into the support zone, which will negatively affect the formation of draft
If flammable material was used to cover the roof, a spark arrester is placed in the chimney. The chimney design is completed by a cone-shaped head. Sometimes it is protected with a fungus or a deflector or other devices.
Diagram with internal structure
Elements of the chimney system in the diagram:
- A heating device with a vertical pipe for connecting a chimney in the upper part of the firebox.
- Connection unit for the chimney from the boiler, which includes a 90º inspection tee, a plug - an inspection hatch, a plug with a condensate drain and a 90º connection tee.
- Mono-pipe is a section of a smoke exhaust duct without thermal insulation. It is located in close proximity to the boiler. The need for such a section is explained by the maximum temperature effect on this zone of the structure, so there is a need for effective heat removal. In turn, the hot initial section of the chimney will become an additional source of thermal energy in the room. With a different approach to assembling the structure, high temperatures can lead to sintering of the insulation in the sandwich, which will increase the fire hazard in the house.
- Additional equipment: tank, mesh heater or convector. The thermal energy of the initial area without thermal insulation can be used to install a hot water tank or a heater grid on it. You can also make good use of the high temperature of combustion gases if you replace the monopipe with a convector equipped with channels and additional heat exchange fins. Using a convector will provide faster heating of the room.
- A damper (gate) is a rotary or translationally moving device designed to regulate draft. This happens by changing the cross-sectional area of the channel for removing flue gases.
- Adapter from mono to sandwich - a special design with a round cross-section, used for connecting an uninsulated area with a sandwich-type pipe;
- Sealing all connections with clamps. Clamps are placed and tightened on each connecting node of the smoke duct.
- Ceiling-passage unit is an element of the system that ensures fire safety in places of passage through the ceilings.
- A sealed passage through the roof. A ready-made pass-through node is used - a master flush. It is installed at the junction of the pipe and the roofing to protect against leaks.
- The cap is the final element of the smoke channel. Protects the system from precipitation and decorates the structure.
What to do to improve traction?
The principle of operation of the chimney is based on the creation of draft - the ventilation effect that occurs due to the temperature difference in the middle and outside of the duct.
The density of warm air in the chimney system is less than that of cold air outside and this leads to a pressure difference. Due to this difference, cold air enters the stove, and hot air rises through the chimney and goes outside.
Reasons for poor removal of combustion products
A simple way to determine the presence or absence of draft is to visually assess the presence of smoke in the room or identify the problem by the color of the fire.
Orange shades indicate insufficient draft, white flames and a hum in the chimney indicate excessive draft. Sometimes cravings may change direction for a short time.
Common causes of reverse or poor draft are a high obstruction and a low-lying chimney
Without taking into account a chimney that is not cleaned in time and is clogged, the reasons why backdraft occurs in it are the following:
- incorrect calculation of the ratio of boiler power and pipe parameters;
- unfavorable weather conditions - fog, rain, heat, strong wind;
- a large number of narrow sections and turns in the chimney design;
- high location of the ridge in relation to the head of the chimney or nearby tall buildings;
For the formation of normal draft, a lack of supply air and insufficient ventilation in the house is extremely undesirable.
How to prevent problems with traction?
Here are some recommendations on how to assemble a sandwich chimney so that the heating device does not become a source of soot and soot in the house:
- the height of the structure must be equal to or greater than five meters;
- it is preferable to build a straight chimney - without bends and turns;
- turns (no more than three) are made at an angle of 45°;
- An almost horizontal section of the chimney can extend from the boiler (with a slope of 2°), but not more than one meter.
If during the operation of the chimney problems are discovered with smoke removal, they resort to installing special devices that increase draft.
It could be:
- Deflector. It works on the principle of reducing pressure as air passes around obstacles. It works effectively in windy weather, but in calm weather it can, on the contrary, hinder the removal of smoke.
- Stabilizer . It is an additional element that has the shape of an umbrella and is placed on top of the pipe. From below, air enters through the open area, increasing traction.
- Rotary turbine . It works using the force of the wind: rotating in one direction, it creates a vacuum of air above the channel. It is not effective in calm weather.
All these devices are not a panacea, especially if the chimney is not initially designed correctly.
The deflector may interfere with the removal of combustion products in calm weather
Common mistakes
Errors in choosing the material and assembling the chimney can lead to a number of problems during its operation.
Traction problems
Traction problems can occur due to:
- Insufficient height of the canal or its incorrect location.
- The passage is too narrow or wide for gas outlet.
- Pipe deviations from the vertical.
- The location of the head is below the outlet section of the ventilation hood.
Building fire
A fire can occur if there is insufficient thermal insulation where the flue pipe passes through the structural elements of the house.
Roofing leaks
Insufficient sealing of the joints between the surfaces of the smoke exhaust duct and the roofing will inevitably lead to the entry of atmospheric moisture into the attic and the wetting of the ceiling.
Operation of chimney sandwich systems
After installing the chimney, you should conduct a test fire to check the tightness of the joints and make sure that the adjacent structures and materials do not heat up.
When using the system for the first time, light smoke and a specific smell may appear from the heating of oil residues, sealant, and dust on the surface of the pipes.
Proper operation involves timely removal of soot. When cleaning, do not use any detergents. A review of the best cleaning products and methods is discussed in our other article.
It is better if it is carried out by an organization that has a special license giving the right to carry out this type of work.
Preparation
Do-it-yourself installation of a sandwich pipe is carried out using a certain technology. It includes several stages. First you need to make a drawing. To do this, take appropriate measurements and think through the necessary details.
After creating a plan, you can purchase the required amount of materials. You should also prepare all the tools necessary for the work. Next, the structure is assembled and installed on the roof.
To manufacture such a system, you will need to purchase a sheet for the inner part of the pipe made of stainless steel, thermal insulation and an outer sheet for the pipe, which can be made of galvanized steel, brass or copper. The choice of materials must be given special attention. The functionality and durability of the chimney will depend on this.
Conclusions and useful video on the topic
More information on how to correctly assemble a reliable chimney from modular sandwich pipes can be viewed in the video:
Independent installation of a chimney from sandwich pipes will require the user to study some of the nuances and subtleties. But by doing the job correctly, you can be confident in the safety of your family and yourself.
Do you have experience assembling a chimney from sandwich labor? Did you install such a chimney yourself? Share your experience with novice home craftsmen - write in the comments block what difficulties you encountered during installation, how long you have been using it and how you care for your chimney.
general characteristics
The structure, like a sandwich pipe, appeared on the building materials market relatively recently. Production technologies are constantly being improved. New types of materials are being produced that allow you to mount any system and give it the necessary qualities.
Installing a sandwich pipe with your own hands will save money on the family budget. The production of such chimneys is not very difficult. The presented designs can be made from materials that are available in hardware stores.
A sandwich pipe is a structure made of metal and insulation. For the latter, non-combustible materials are used, for example, basalt wool. The structure also includes two pipes of different diameters. Insulation is installed into the resulting cavity between them. It is thanks to the simplicity of such a pipe that you can assemble it yourself.
Advice from professionals
When installing a chimney, you should take the advice of experts to make the ideal unit for the smoke to escape. The tube that comes from the outside collects condensate. If you perform the smoke procedure, condensation can leak into the cartridges. The insulation cannot be wetted; in this situation, the tubes will be poorly insulated, and the outer sleeve can cause a fire when the wall structures heat up. In addition, freezing of liquids can cause holes to form in the tubes, and the acid inside the condensate substance causes the liner to burn out from the inside. The leakage of smoke in open spaces is not dangerous; it can be eliminated if you additionally lubricate the joint parts with sealant.
It is not recommended to reduce the diameter of the chimney opening; this may cause a stop or decrease in draft. The chimney duct must be cleaned of soot twice a year, and the head part of ice, snow or condensate frozen on it. Sandwich pipes do not require additional insulation, except for the section of passage through the partition or wall. For this purpose, it is better to use fire-resistant insulation and eliminate the use of glass wool. The area where the pipe runs through the wall must be insulated using ceramic or basalt wool, asbestos or foamed vermiculite. The use of asbestos does not cause problems; at the final stage, the product will not begin to generate dust or release hazardous substances.
When working with wooden walls, you must remember the danger of fire, so installing chimneys in such buildings is much more difficult when compared with brick ones. When the chimney is routed through a wooden wall, the distance from the pipe to the wall must be strictly observed; it should not be thicker than 260 mm. Additionally, you need to take care of the thermal insulation part and treat the walls with fire retardants. When installing a chimney in such a structure, you will need to insulate the surfaces of the walls near the monopipe and the outlet pipe from the heat generator. Such insulation is created using combustible materials, such as tiles, plaster, stone or metal sheets.
https://youtube.com/watch?v=SrXoY-IEbs0
Safety regulations
The likelihood of a significant increase in pressure in the channel involves closing the joints with specially designed couplings. It is advisable to seal joints on steel pipes with heat-resistant sealants. Complete insulation of the chimney promotes proper draft.
Sandwich panels, which have good thermal insulation characteristics, do not exclude the possibility of overheating and possibly ignition of materials located near the chimney. To prevent this situation, it is recommended to increase the layer of thermal insulation at the joints of the structure.
If you follow the main safety rules, installing a chimney will not be difficult. In addition, it is necessary to ensure high-quality maintenance of the canal, including its regular cleaning. This will become a kind of prevention of accidents during operation of the furnace.
Roof installation
You can install a sandwich pipe for a chimney with your own hands through the roof. From the inside, a sheet of galvanized steel should be attached to the created hole. It is attached only after the pipe is brought to the roof. If necessary, it can be placed under the edge of the roofing material.
If the pipe is high (more than 1 m), you need to consider a system of spacers. Otherwise, such a system will be unreliable. Crimp clamps are also used. This will prevent the pipe from tilting due to the wind. When installing spacers, you should take into account the wind rose in the area.
If the roof is made of bitumen or roofing felt, the material is additionally protected from fire. To do this, install a deflector above the coating. It has an absorber mesh in its design.
Pipe joints should not go through the ceiling or roofing material. These are the most fire hazardous places in the chimney. The home owner must be able to control the joints.
Fastening
You need to fix the sandwich pipe correctly with your own hands. All elbows, tees and joints must be tightened with clamps. It is especially important to consider the height of the chimney. Such structures must be properly fixed and strengthened.
Clamps are tightened at the junction of the sandwich pipes. If there are tees or adapters, you will need to use two mounting elements.
Supports can be created from corners of 50, 30 mm. It is also important to use a heat-resistant sealant. This substance prevents air from entering the pipe. If you do not ensure the tightness of the system, the draft in it will be insufficient. Carbon monoxide may enter the room.
