Despite global progress in the field of gasification, in some settlements there is no main fuel supply. As an alternative, you can build a brick stove with a water heating boiler with your own hands. This will reduce the cost of heating the building and solve the problem of lack of hot water supply.
A brick stove with a water heating boiler will reduce heating costs.
How to choose a project? Order
First of all, decide on the conditions in which the furnace with a water circuit will operate.
If this is integration into an existing OS, it is important to ensure interchangeability in the operation of existing communications. For the independent option, it is important to determine the area that the system will heat
For 100 square meters of a one-story house, a conventional stove is quite enough.
Another thing is if the area, number of rooms and floors is larger
Finally, it is important to understand whether the OS will be used all year round or only in cold weather. If people live in a house in the summer, and in winter it is idle, then after cold weather and frosts the system will require restoration work, which will entail additional costs
Photo 4. An example of the order of a brick kiln with a water circuit: the initial stages of construction from 1 to 20 are depicted.
What materials will be needed
For the furnace itself: concrete, mortar, refractory and red clay bricks, valves, fire door, grate, ash pan.
For the manufacture of a heat exchanger: metal pipes with a diameter of up to 50 mm or steel sheets 3 mm thick and a rectangular profile 60x40 mm.
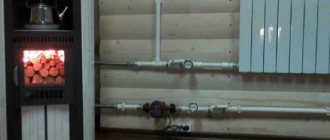
For the manufacture of outlet and supply lines of the furnace: metal pipes. For distribution of hot water throughout the house: polypropylene pipes and radiators.
Required Tools
For laying the furnace, making a heat exchanger, installing communications and heating devices you will need:
- building level;
- roulette;
- Master OK;
- bucket;
- pliers;
- electric drill;
- welding inverter;
- wrench;
- screwdriver.
Other tools may also be required, since the laying of a furnace with a water circuit and the wiring in each case are carried out taking into account individual conditions.
Preparing the site
A furnace with a water circuit is located in a fireproof area that is waterproofed.
This area of the room should be well ventilated and access to the oven should always be open. Then make sure that the place for the stove is level and its walls rise up at a right angle.
It is important that the roof allows the pipe to be brought outside without obstacles. Then check how strong the foundation under the future structure is
After all, a stove is a heavy structure that requires a prepared base. The approximate weight of the stove is calculated by equating 1 cubic meter to 1350 kg. If a suitable location is identified, it is cleared and prepared for the construction process.
Attention! To achieve maximum effect, a stove with a water circuit is positioned so that it heats as much space as possible. This will reduce heat loss and reduce the cost of its production.
Building a stove with a water heating boiler with your own hands
Construction begins with the foundation. Its lower part is filled with concrete, and its upper part is laid out with bricks. Then the laying begins. The first row is laid out dry, and then - on the solution. In this case, the masonry is made from the walls to the middle.
During the laying process, a heat exchanger is installed in the firebox, and the pipes coming from it are distributed throughout the body right up to the point of entry/exit of communications. When external communications are installed, water is released into the circuit and the system is tested for leaks. If the test is successful, the furnace with a water circuit is considered ready for operation.
Difficulties during construction and commissioning
The main challenge when building hot water furnaces is their integration into the existing building layout. You have to look for a convenient place in it, and then adapt it to the operating conditions of the furnace.
If you put the design of the system into perspective at the design stage of the building, you will be able to calculate all the nuances and make the efficiency of the heating system as high as possible.
It is better to test the elements of the water circuit (heat exchanger, pipes for hot water outlet and return inlet) immediately after manufacture and before installation.
If everything is already built and installed, and the heat exchanger suddenly leaks, you will have to dismantle the masonry and disconnect the communications in order to eliminate the detected defect.
Another problem when building a system can arise from pressure. The liquid moves through the water circuit under its own pressure. But it is not always enough for the coolant to reach remote areas of the room. Then an electric pump comes to the rescue to distribute heat evenly throughout all areas of the building.
We make a coil
Stove water heating begins with the manufacture of a heat exchanger. If desired, you can equip an existing stove with it, adapting it to the size of the firebox. In this case, the costs will be minimal. In principle, the coil can have any design, and the basis for its manufacture is a steel pipe with a wall thickness of 4-5 mm - this thickness is necessary to prevent the coil from burning out from burning wood. It is also possible to use a profile rectangular pipe measuring 60x40 mm.
Which stove to choose
Each type of furnace-boiler is appropriate for solving certain problems.
When heating utility rooms or greenhouses, there is no need to fence a multi-ton colossus of bricks. Most consumers in this case choose the simplest boiler.
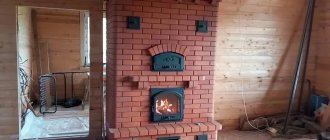
Photo 1. The process of building a heating furnace with a boiler. A heat exchanger made of pipes is mounted in the firebox.
If the house already has a working brick Dutch oven, you can insert a heat exchanger welded from pipes or sheets of metal into its firebox. To do this, you will have to remove the door, expand the opening of the fuel chamber, insert the heat exchanger and put everything back in place.
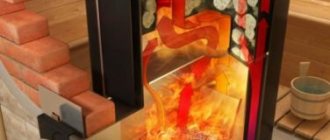
When constructing a new furnace, the Kuznetsov boiler design is considered optimal. High heating efficiency is achieved by installing a heat exchanger in a hot hood, where the temperature is higher. The wood in the firebox of the stove burns in an optimal mode, and the hot gases heat the stove hood with a heat exchanger. The temperature rises gradually and remains stable for a long time without additional heating.
Briefly about the main thing
If a brick stove is supplemented with a water heating circuit, then such a system can significantly (up to 100 square meters) increase the heated area of a house of any configuration. The design has high efficiency and good heat transfer, evenly distributing energy throughout all rooms.
To select or make a high-quality heat exchanger, you need to take into account its shape, location and material of manufacture. The design should follow the shape and dimensions of the firebox (or chimney) as accurately as possible; only in this case the efficiency of the system will be maximum.
Ratings 0
Laying a heating and cooking stove
Before work, it is necessary to make a drawing of the furnace and a detailed order plan. You can use ready-made schematic solutions. The Kuznetsov stove with a radiator hidden in the chimney duct on the side of the stove is popular.
Kuznetsov furnace
Kuznetsov furnace:
Construction materials
To create a brick kiln, prepare:
- concrete;
- solution;
- fireproof fireclay, red brick;
- valves;
- firebox door;
- grate;
- ash pit.
For the heat exchanger you will need:
metal pipeline with a cross-section of up to 5 cm, sheet steel 3 mm thick.
Outlet and inlet communication lines are made of metal pipelines. The water circuit lines for supplying hot water throughout the house are made of polypropylene pipes and batteries.
Diagram, dimensions of the furnace unit
Technical parameters of the heating unit:
- length/width/height - 102x116x238cm;
- heat exchanger dimensions - 75x50x35 cm;
- battery power - 6 kW. You will have to add fuel twice a day. You can heat 60 sq. m at home.
Bake
External section of the furnace
Step-by-step instructions for laying a stove
Detailed instructions for installing a brick kiln:
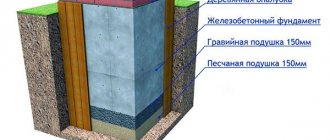
- The furnace is being marked. The foundation is poured 50 mm below the future final floor covering. To increase reliability, it is worth performing reinforcement with rods. It is necessary to exclude contact between the stove foundation and the foundation of the house.
- Once the foundation is completely dry. He'll be ready. You can start laying bricks according to the order scheme. The first two balls are made of red solid material on a cement mixture. The purpose of the masonry is to level out the resulting unevenness in the foundation. The foundation is being laid.
Foundation
The layers are connected using clay mortar.
- The thickness of seam joints between individual rows should not exceed 5 mm. The smaller, the more uniform the surface of the structure will be. Heat dissipation is better.
- The jointing is carried out immediately after laying the brick.
Masonry
- Arrangement of the door to the furnace: before installing the door on the brick, an asbestos plane is laid. An annealed wire 0.4 m long is located in the corners of the frame. Fastening is carried out between brick rows. The circuit will make the door more reliable, otherwise the solution will crumble. It will fall out of the oven. You need to check the location of the door with a building level. An asbestos strip is placed on top.
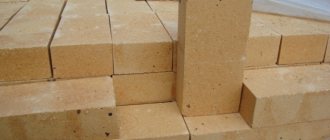
- The firebox is lined with fireclay refractory bricks. A simple brick will crack and fall apart. The schematic representation of fireclay building material in the sketches is done in yellow.
- If you need to install a hob, grooves are left under the stove. Heat losses are minimized. Smoke is prevented. The tiles are laid using mortar.
- A self-created heat exchanger is placed in the chimney at the stage of laying the brick layer, which is equipped with a lower fitting. It is installed in the combustion chamber when the last firebox ball is being laid. The distance between the heat exchanger and the brickwork should be within 5-6 mm.
- Cleanout doors are installed in the chimney. They remove accumulated soot, otherwise heating will deteriorate. There should be enough doors to provide access to every section of the chimney duct.
- A damper or damper is made at the top of the chimney. The chimney structure can be made of brick, the same as the stove. You can purchase ready-made sandwich panels. It is necessary to follow the rules for contact between the pipeline and the roof. The brick chimney is made with a plow.
Stove heating has been used for many centuries. Heating systems have been improved. To heat the house evenly, a water circuit with radiators is used. You can make heating for a private home on your own. The main thing is to follow the instructions.
Manufacturing a brick kiln with a water heating system:
average rating
more than 0 ratings
Share link
Tip 2: arranging the base and marking the contours of the masonry
Foundation diagram for a metal furnace.
Before covering a metal stove with bricks, you should make sure that the floor surface will not bend and will support the weight of the cladding and mortar. Of course, if the base for the masonry is made of concrete or finished with durable ceramic tiles, it will not be deformed and no additional work on arranging the floor will be required. When there is no complete confidence in the stability of the foundation to the load, a separate foundation is made for the masonry area or additional supports are placed under the load-bearing floor beams.
At the preliminary stage, the contours of the future masonry are also marked. To do this, step back a distance of 1 to 10 cm from the stove and outline the location of future brick rows with precise drawing of right angles. When choosing a gap between the stove and the brick, you need to take into account that the smaller the distance between the masonry and the metal surface, the greater the overheating of the stove walls. If the gap is too large, heating of the brick will be very slow.
Figure 2. Laying rows of refractory bricks.
According to experts, the optimal distance between the stove and the brick, at which the room is heated quite quickly without overheating the metal of the stove walls, is within 3-5 cm. This should be adhered to.
After applying the markings, a metal sheet 2-4 mm thick is attached to the floor of a size that would overlap the contours of the future masonry. And on top of it they lay asbestos cardboard with a sheet thickness of up to 1 cm. Now you can proceed directly to the cladding.
Return to contents
If a metal sauna stove lined with brick is not suitable for installation according to the table, then in this case it is necessary to make a foundation. This task is simplified if you have just started building a building with your own hands and you do not need to dismantle the stove and floors.
To build a foundation, a hole about half a meter deep is dug around the perimeter of the masonry and filled 3/5 with crushed stone or a mixture of gravel and sand. It must be taken into account that contact with the bathhouse foundation is unacceptable.
After laying the cushion, a cement screed and a layer of waterproofing are made, after which formwork is made, which is filled with concrete mortar. For such a product to harden properly, it must be regularly moistened with water to avoid cracks.
Boiler installation
When implementing plans to create a combined heating system, it is important to pay attention to some features. Water-heated brick stoves have many options, each of which differs in material, type of main element and other nuances. Ignoring technical and construction requirements will certainly lead to the rejection of the entire work
Ignoring technical and construction requirements will certainly lead to the rejection of the entire work
Ignoring technical and construction requirements will certainly lead to the rejection of the entire work.
The boiler must fit completely into the firebox. However, in practice there are incidental situations when part of the heat exchanger is located outside the stove. This is unacceptable, because the main task of the unit is to heat the coolant. The boiler is made in the shape of a “P” from pipes or sheet iron. All its elements are hollow and are designed to remove heat.
The preferred option is from pipes. It has a larger convection area and allows the flame to reach the cooking surface to cook food. In addition, attention is required:
Dimensions. It would seem that a massive product is needed that can heat a lot of water and provide heat to a decent-sized structure. But that's not true. The boiler itself is made of very modest dimensions - 75 * 50 * 30 cm (length, width, height). The convection surface of such a device is enough to heat a house up to 200 square meters. Installing a pump for forced circulation of coolant increases productivity by up to 50%. Boiler. Its shape is designed in such a way that the heated surface area is as large as possible
It is very important to install it in the center of the combustion center. This is the only way to achieve high efficiency of water heating. Peculiarities. It is necessary to leave a small gap between the walls of the furnace and the surface of the boiler
The optimal distance is considered to be 5 millimeters. It is quite sufficient to level the free movement of the metal during thermal expansion.
A small gap must be left between the walls of the furnace and the surface of the boiler. The optimal distance is considered to be 5 millimeters. It is quite sufficient to level the free movement of the metal during thermal expansion.
The heat supply and outlet lines are carried out in strict accordance with the laws of physics. It is known from school that hot flows tend to go upward, while cold flows are always directed downward. Therefore, the pipe supplying hot water to the house is always adjacent to the boiler at the top point, and the channel with the “return” is at the lowest point. This arrangement eliminates the accumulation of hot steam, which poses a serious threat to the integrity of the system.
Preliminary preparation
Before covering the stove with bricks, it is necessary to create a solid, non-combustible base. If the device is installed on a solid concrete floor, then it is necessary to lay roofing material waterproofing. The base for the future oven is laid out in several rows and dries for 5-6 hours. After this, the equipment is installed and connected to the chimney.
To make the foundation, four bars are placed at the corners of the base. Then strong formwork and reinforcement are created. The bottom of the resulting pit is filled with sand and crushed stone. Next, the resulting cake is covered with concrete or clay mortar. After the foundation has cooled, another concrete layer with a thickness of 50 millimeters is applied. The end result is a durable coating for installing the stove and laying brick walls around it.
Solution
For the solution, you can use a concrete and clay mixture. The first is diluted according to the instructions specified by the manufacturer. The second is formed using the following technology: the same amount of sand is taken for one part of the clay. In this case, you need to put 100 grams of salt on the bucket of the created solution. The clay should be damp and the sand should be free of small pebbles. Water is added in small portions so that the mixture is not very liquid.
Note! The finished solution is able to hold its shape well, not stick to parts of the trowel and easily slide off the container walls.
Safety regulations
The main rule is not to close the oven view ahead of time. Kuznetsov’s boiler works on the principle of a gas view - cold gases do not mix with hot ones, so the stove does not cool down much. If you close the view ahead of time, carbon monoxide may enter the room, causing poisoning.
The boiler is especially afraid of overheating - the boiling coolant will rupture the heat exchanger. Therefore, in severe frosts, if the power is not enough, resort to additional heating of the room with electric heaters.
When installing a water pump in the heating system, operating efficiency increases.
When firing, some parts of the stove become very hot. Keep small children away from doors and do not let teenagers heat the house.
While burning, keep the door either closed or slightly open, as escaping embers can cause a fire.
An “apron” made of ceramic tiles or a sheet of iron is installed in front of the stove.
Soot is removed twice during the heating season. Its accumulation in the chimney can lead to a fire.
A brick stove is an excellent option for heating a home. The rules for safe use are simple and intuitive.
Work order
You can make the equipment yourself or buy a factory unit.
When installing yourself, it is important to consider the following points:
- First, the heat exchanger is prepared;
- Then the circuit is mounted and connected to the thermal boiler;
- Before building a furnace, a pit is dug, then a layer of crushed stone and broken brick is made in it (the foundation should be 2-3 cm higher than the floor level);
- The furnace structure is being erected.
Advantages and disadvantages of a combined system
A stove with a traditional heater heating boiler consists of components such as grates, a smoke exhaust duct, an ash pan and a combustion chamber. These attributes of a classic country stove are familiar to any village resident. As for modern stoves, visually they are almost completely identical, but they have slightly different characteristics:
- A simple village stove emits no more than 6500 Kcal of heat per hour of operation. This amount of heat is enough to heat a house with a small area. This heating method is ideal for a country house.
- If stove heating is combined with water heating, the productivity will increase several times. It will also be possible to heat a larger area of the house. In this case, the same amount of solid fuel will be burned. In addition, not so many exhaust gases will be emitted into the atmosphere, which will increase the efficiency of the system.
- In order to achieve even higher efficiency, you can combine two heating systems, convection and water. During simultaneous operation of two systems, their performance will be summed up. In one hour of operation, such a tandem will produce up to 21,000 Kcal. This amount of heat is enough to heat a house with an area of up to 300 square meters. meters.
- An important advantage of such a heating system is the availability of fuel. Typically, wood or firewood and coal are used to operate such a heating system. This fuel is the most accessible and relatively inexpensive.
Firewood is the most affordable fuel for heating
- A stove with a water heating boiler does not require a constant fire. For such a system to function, you will need to add fuel only 2 times a day. Regardless of what the temperature is outside, it will be possible to create the most optimal microclimate for you in the house.
- The efficiency of an ordinary village stove reaches a maximum of 50%. If you combine two heating systems, this figure will increase to 85%. Taking into account the fact that a wood-burning stove is used to organize the heating system, this indicator is ideal.
Stove heating also has its disadvantages. Such a stove-boiler for heating a house can be installed not only in a country house or village house; sometimes it is installed in country houses belonging to the elite category. Sometimes such stove heating boilers can perform not only the role of a heat source, but also a decorative function.
A stove can be a wonderful home decoration
Do you need electricity?
The system can be implemented in two versions:
- Free circulation when heating occurs by gravity;
- Forced way.
In the latter case, a pump and a battery will be required (provide uninterrupted power supply). At first glance, this is convenient: after all, stability is maintained. You can heat not only the first floor, but also other floors.
However, such components significantly increase the cost of stove heating; the design itself acquires impressive dimensions.
How to increase the efficiency of a solid fuel boiler, including one made by yourself
The disadvantage of all solid fuel boilers is that some of the heat is carried away into the chimney, reducing their efficiency - especially with a straight and high chimney. To reduce heat loss and increase the efficiency of solid fuel boilers, you can use the methods that I used in my home.
The first method is to use the energy of flue gases to additionally heat the room
To do this, it is necessary that the solid fuel boiler is located in the basement or on the ground floor of the house and that the height difference between the bottom of the boiler firebox and the upper cut of the chimney is large enough - at least 7 m.
To use the heat that is carried away into the chimney, a heating stove or heating panel is erected in the room or between rooms. The solid fuel boiler is positioned so that it is under the stove or shield. The design of the heating furnace is carried out in such a way that flue gases from the boiler pass through its smoke circuits. At the exit from the firebox of the stove, a valve is installed, which closes when the boiler is fired and opens when it is necessary to heat the stove, for example in the off-season, when the boiler is not yet heated or in another case.
Rice. 7
Option for the location of a solid fuel boiler (horizontal) in the house: 1 - heat exchanger; 2 - boiler body; 3 - slab or 14 - brick vault (optional); 4 - return; 5 - circulation pump; 6 - shut-off valves; 7 - pipe with heated water (supply); 8 - stove firebox; 9 - oven; 10 - valves; 11 - floors; 12 — expansion tank of the heating system; 13- smoke channels of the furnace; 15 - combustion door; 16 — blower chamber.
If you build a heating panel instead of a stove, then there are no problems at all, since it consists only of smoke channels. The length of the smoke channels is calculated as when laying the stove.
With this option, the smoke channels of the stove or panel accumulate part of the heat of the flue gases from the boiler, and subsequently release them into the premises. Even when the heating radiators have already cooled down, the walls of the stove radiate heat for a long time, which would simply go outside.
The second method is to use gas energy to heat water.
In addition, you can install a homemade water heater on a solid fuel boiler, the water in which will be heated by hot gases coming out of the boiler through a metal chimney. The easiest way to make such a water heater is from two pieces of metal pipes with a diameter of 300-400 mm and 100-110 mm. The inner pipe serves both as a chimney pipe for a solid fuel boiler and as a heating element, transferring the energy of flue gases to water.
Steel chimney
Steel chimney: collapsible design
You have the choice of a chimney made of regular or stainless steel. As you understand, the latter is becoming increasingly popular, since the service life of a conventional steel chimney is no more than 3-5 years.
high heat resistance - they can withstand temperatures from 500ºС to 700ºС.
resistance to condensation formation - and this, in turn, ensures the reliability and durability of the system itself
316, 316L, 321 - grades of stainless steel, which are suitable as a material for the chimney of a solid fuel boiler.
affordable price is another important plus that attracts attention.
the ability to adjust the design of the chimney - unlike glass or brick, you can easily add the necessary details to the device, for example, a damper, if you forgot about it in the original version.. Read more about the construction of a steel chimney in our article
Read more about the construction of a steel chimney in our article.
Laying a furnace with a boiler
If you decide to delve deeper into the topic, you may decide to install a Kuznetsov bell furnace, the operating principle of which is the free flow of gases, which does not require additional external energy. The drawings are available on the Internet. Here we will talk about a simpler design. So, first you need to pour a foundation, the depth of which is 50-70 cm. Sand should be poured onto the base in a layer of 10-15 cm, crushed stone, gravel or construction waste should be laid on top, and a space of 25-30 cm should be kept for pouring cement. It is best to prepare the solution for the foundation without using sand, replacing it with screenings, the ratio will be approximately 1:6. Roofing felt should be laid under and on top of the screed for waterproofing.
Then you should make a solution of clay + sand in a ratio of 1: 2.5, however, the proportions may vary depending on the level of fat content of the material
It is important not to leave lumps, and therefore the clay should be soaked in the evening. If the mixture slides off the trowel, leaving small streaks on it, then the concentration is appropriate. Before starting masonry, it is necessary to lay roofing felt over the area of the poured foundation and cover it with mortar
The first row is laid out with a pallet completely made of bricks, where the furnace will then be laid. Then the first row of the furnace contour is laid out, then the next, etc. During laying you will need order
Before starting masonry, it is necessary to lay out roofing felt over the area of the poured foundation and cover it with mortar. The first row is laid out with a pallet completely made of bricks, where the furnace will then be laid. Then the first row of the furnace contour is laid out, then the next, etc. During laying you will need order.
Now the firebox, ash compartment and ash pit are made. The doors are secured using galvanized wire or a strip of galvanized sheet. It is necessary to trim the brick above the doors using a grinder, but it is best to make one of them with a wedge, so that the masonry will not crack. Make protrusions for the boiler on the brick in advance, which can also be cut with a grinder. Do not forget that the instructions require level installation, and therefore you should use a level. Then the firebox and the rear part of the structure are installed, where the chimney with cleaning is located. The pipe should protrude at least 50 cm above the roof.
You can make your own stoves for heating your home without being a pro in this matter. They are versatile and have a high heat transfer coefficient. The big advantage is their autonomy, since they do not depend on external energy sources. Such boilers can have any size depending on the area of the heated room.
Covering instructions
Step-by-step instructions on how to line an iron stove with bricks in a bathhouse or house are as follows:
- First, a cord protruding as a level is pulled. As it is laid, it is raised higher;
- Then the first and second layers are laid out, which are coated with the solution. The width of the seams between layers should be up to seven millimeters, and horizontal ones up to ten. It is very important that the first row is executed perfectly, since it is fundamental for the others.
- Next, small ventilation gaps are created, and the masonry continues according to the pattern previously selected for the formation of the stove;
- By the third row, excess mortar is removed using a rubber hammer or trowel;
- The masonry continues to the level of the slab or to the ceiling, covering the chimney.
At the time of laying, it is important to understand that when the master reaches the ash pit and firebox, it is necessary to correctly position the window with hinges. When installing near doors, you need to check the ease of operation.
Note! The laid wall should not prevent the doors from opening freely. It is also necessary to make several holes near the chimney responsible for ventilation.
Flat-plate heat exchanger
A popular option, which is used both for stoves in the bathhouse and for the home. They are the simplest to manufacture, the surface is easy to clean from soot accumulations, installation is possible both vertically and horizontally, and the efficiency is relatively high.
A flat boiler can have a high volume, so you can take hot water for washing directly from the heating system. An expansion tank with an increased linear size is installed, into which water constantly flows after the level drops below critical. This option is quite convenient and helps solve several problems at once, but there is also a condition - the room temperature in winter should not drop to minus.
Key disadvantage: a sharp decrease in heat transfer from the furnace walls. This type of heat exchanger is made in the shape of the letter “P” and is installed around the perimeter of the firebox, bypassing the door. As a result, it turns out that the temperature of the external walls is quite low, as a result, warming up the room takes much longer. This is critical only if the stove is installed in a bathhouse; for residential buildings, where the stove is constantly heated, increasing the warm-up time by several hours does not play any role.
Thus, when choosing a flat boiler, think about how you can increase the heating rate. One option is to enlarge the heater and place it directly above the firebox. Second option: using a metal chimney for heating, increasing its length.
What happens when you combine brick and metal?
- When adjacent to metal, brickwork is able to retain much more heat, and when heated, it will evenly heat the room for a long time. This property of brick is used by bathhouse owners, since the brick transforms hot, scalding air into high-temperature vapors that do not cause discomfort. In other words, dense heat is created.
- Brick allows you to increase the heat retention time, without additional heating of the oven. Thus, by spending money on brickwork, you will save on fuel for a long time. In addition, you will save strength and energy, and going to the bathhouse will become a real relaxation. The additional layer prevents direct contact with metal. This option makes the bathhouse safer to use.
- We must not forget that brick is a natural material. Bricks made of clay can create a unique microclimate, and when combined with metal, they heat up much more, creating a huge amount of soft steam.
The only drawback. Together, these two materials heat up much more slowly than individually. But coupled with the listed advantages, it can be written off as nothing.
In order for all the benefits to really begin to work for you, you need to treat your work with great trepidation and responsibility. After all, the functional features of the resulting boiler will depend on the correctness of your actions.
In order to line the boiler with bricks, you need to prepare tools, binder mortar and, directly, bricks. Chimney improvements should not be ignored. It can be made entirely of bricks, or it can be lined with metal. A beautiful chimney will make your home aesthetically pleasing.
Using a cast iron radiator for homemade work
You can easily make an excellent water boiler for a stove with your own hands - just like you can build such a miracle stove yourself. And an ordinary cast-iron radiator is suitable as a water heater - you can use the M-140, which is often thrown away after the demolition of old five-story buildings. The approximate capacity of such radiators is 1.5 liters, and their surface area is 0.254 sq.m. If you connect 12 sections, you get a heater with an area of 3 sq.m. and 18 liters of capacity. A boiler welded from sheet material with such characteristics would take up a lot of space, which is an undoubted advantage of this particular design.
Such a stove with a water boiler-radiator can even heat a fairly large bathhouse - up to 100 sq.m. But, before installing the boiler itself, you will first need to disassemble the radiators, clean them of dirt and rinse thoroughly with a hot solution of hydrochloric acid - 6%. Then rinse again with water. Next, the cardboard gaskets between the sections are changed, because the temperature in the oven reaches 600? C, with coal it is even higher. The cardboard will simply burn out and the radiator will begin to leak - to prevent this from happening, it is more advisable to use an asbestos cord impregnated with graphite powder and natural drying oil instead.
Now the radiator parts need to be assembled in the following sequence:
- Nipples with their right and left threads are screwed into the sections being connected, after which the same impregnated asbestos cord is wound around them and both nipples are tightened with a wrench - but without any misalignment of the sections.
- As soon as two of them are pulled together, you can connect the third.
- Now you need to compress the radiator to check the quality of the assembly - despite the fact that the water pressure will be low.
- After all this, you can proceed to the installation of risers - their diameter should be 1 and ? inches. The cold water inlet and hot water outlet can be placed diagonally on the radiator battery, and the other two holes can be plugged with plugs to ensure water circulation through the entire volume. Moreover, one of the risers must have a left-hand thread - if it does not exist, then you can do this: screw a regular nipple into the radiator hole, and a coupling with a drive onto it.
But the battery itself must be placed not in the furnace firebox - but directly in the smoke channel, the one behind the firebox. This is necessary in order to heat the boiler not with direct fire, but with hot gases - cast iron, after all. And it is more expedient to place its entrance and exit perpendicular to the floor.
And in order to increase the natural circulation of water in such a furnace, the return line pipe must be routed through its foundation and underground space - this will increase the temperature difference between the return and hot lines, and the battery in the furnace must be installed with a slight slope to allow air to escape and enter the system. It wouldn’t hurt to install an additional cleaning door in the smoke channel of the stove with a heater.
The main advantage of such a stove with a water heating boiler is the overall dimensions of the sauna boiler room: only 1.6 x 0.2 x 0.7 m.
Fuel
The following types of raw materials can be used:
- Coal (brown, stone, reach temperatures of 1500 degrees);
- Logs (the most accessible, with a long shelf life and low cost);
- Fuel briquettes (they are convenient to store, burn for a long time and evenly).
By the way. Which resource to choose depends on personal preferences. This parameter does not affect the furnace design.
Wood stoves and fireplace stoves - model range and design features
All furnace equipment presented in the catalog is characterized by a well-thought-out design.
Wood stoves "Teplodar"
Heating stoves of the “Matrix” series are designed for heating a country house or cottage with an area of 70 to 200 m2. The convector casing of the furnace provides fast, uniform heating of the room and protection from hard infrared radiation from the walls of the firebox. The chimney can be routed both upwards and backwards.
Furnaces for the home, models “Matrix”, “Vertical” and “Top Model”, are equipped with two- and three-turn fireboxes, which allows you to reduce the heating time of the room to a minimum.
When installing most models, the chimney can be removed not only from the top of the stove (traditional option), but also from the back of the device, which in some cases allows you to save room space.
Functional stoves of the T series can be used in any premises, including at home. Ease of use provides the ability to regulate operating modes (intensive or economical) using the ash pan.
The “Matrix” and “Top Model” stoves, due to the installed afterburners, can operate in a long-burning mode, which allows the use of less fuel: one fill is enough for about 8 hours.
Heating installations Teplodar for residential and commercial premises
Wood-burning heat generators of this brand, depending on their design, can be used to heat residential and commercial premises for a wide variety of purposes.
- As a wood-burning stove for cottages, garages and greenhouses, the volume of which does not exceed 50 m3, the Teplodar company offers the compact multifunctional heating and cooking heat generator Pechurka. The design feature of this installation is the cylindrical body and the presence of a convective casing, which simultaneously plays a decorative role. The stove has high efficiency due to the efficient circulation of flue gases in the combustion space, which is ensured by dividers. The convective casing creates powerful air currents that quickly warm up the room.
The Teplodar stove is made of steel coated with durable heat-resistant enamel. At the top of the heat generator there is a cast iron hob.
- Teplodar T-100 is a compact heating unit that can provide heating for residential or utility rooms with a volume of up to 100 m 3 . The presence of convectors on the side surfaces of the heat generator ensures quick and efficient heating of the room. The T-100 firebox is equipped with a horizontal deflector, which increases the efficiency of the installation and improves heat transfer, and a wide, comfortable hob. The furnace is made of high-quality structural steel coated with silicone enamel. Cast iron is used to produce grates.
- The Teplodar Vertical-Metallic home stove is a wonderful combination of functionality and impressive design. The power of this heating installation is sufficient to heat rooms with a volume of no more than 120 m3. The transparent door of the fuel chamber, made of heat-resistant glass, gives the Vertical series stoves a resemblance to fireplaces. The tightness of the door promotes longer burning of the fuel.
Heat-resistant stainless steel is used to make the firebox, and gray cast iron is used for the hob. The elongated stove takes up minimal space and allows long logs to be loaded vertically into the firebox.
Correctness of cladding
A cast iron portal can be easily lined with solid brick, thus turning it into a brick fireplace.
Only half a thousand pieces of standard material will be required, the laying of which will be done using cement-sand mortar with seams of 1 cm.
The masonry is ordinary ordinary.
If it is necessary to cover the firebox supports, wooden formwork is used. Then, to form seams, the bricks will alternate with 10x10 mm rods, on which the reinforcing mesh is installed.
Next, the formwork is poured with concrete, the base of which includes gravel up to 1 cm or sand.
The product is aged for up to 15 days.
From the inside, the facing part is thermally insulated with basalt wool mats covered with aluminum foil. Ventilation must be provided to remove radiated heat from the combustion body.
Convection of air masses is a firewood chamber under the firebox for the entry of room air.
It passes behind the facing part, takes away the heat emitted by the fireplace insert, rises up into the convection cavity and goes out through the grate.
Due to the high temperature of the exhaust air, a sufficiently safe gap must be provided between the grille and the ceiling.
For preventive maintenance and repair of the firebox, a thermally insulated technological opening must be located in the lower part of the lining and covered with non-combustible materials.
Necessary tool
So, before you begin to build brickwork around a stove with a firebox installed in a house or bathhouse, you should prepare the appropriate tool.
To work with the solution you will definitely need a trowel.
In addition, you need to get a hammer with a small pick, with which you can separate solid bricks.
Video:
To make all the seams look aesthetically pleasing, you will have to use a special jointing.
You should also acquire a mooring cord, which will help control not only the evenness of the masonry, but also the corners and rows in the horizontal direction.
For bricklaying, you will also need an order, which includes several independent elements.
You will have to control the vertical evenness of the masonry using a plumb line. In addition, you should purchase a level designed to check horizontal evenness.
You will also need a rule from which you will have to build a base for a level when monitoring the walls. Don’t forget about a shovel with a container in which it will be convenient to mix the solution used.
Ways to increase efficiency
You can make the movement of water through the pipes better, and its heating in the heat exchanger more efficient, with several modifications:
- It is better to organize the entry into the cold water register at the very bottom of the front part. To implement this project, a profile pipe is welded to the shelves located at the bottom side. Its upper part should be flush with the grate of the boiler.
- You can increase the heat transfer from the flame in the following way: make the upper and lower piping of the heat exchanger from a profile pipe, and the vertical sections from a round one.