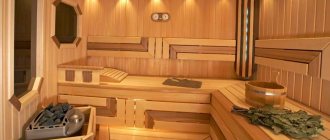
Ceiling and wall protection in the form of sheathing
In addition to treating elements of wooden structures with fire retardants and mastics, they can be protected from the hot parts of metal furnaces by covering them with fire-resistant materials. When preparing for this procedure, it should be taken into account that the ceiling lining in the area of the roof outlet is carried out only with non-combustible materials that do not spoil the interior of the room.
The optimal cladding option is gypsum fiber boards treated with fire-resistant putty. To protect the walls, basalt cardboard can be used, covered with steel sheets on top. Most often, special decorative screens made of stainless steel are used. They not only protect surfaces well from burning, but also look quite aesthetically pleasing.
Another option for protecting walls from hot stove parts involves covering them with bricks placed on edge.
Main manufacturers
If you decide to buy a cast iron hob, contact a specialized salon or use an online store. The minimum price for a product is 500 rubles. It depends on the size, material and manufacturer. The most common sizes are slabs of 34*41 cm, 71*41 cm, 58.5*34 cm, 66*41 cm, 51*34 cm.
The most popular and sought-after foreign manufacturers include the Finnish brands
Pilsa and HTT. But domestic manufacturers also produce products that are worthy competitors to foreign ones. These are the trademarks NMK, Litkom and SibStalShar, which create durable, high-quality models with an attractive design.
Installation of a brick kiln
It is preferable to lay out the base of a brick stove in advance (at the stage of designing a house or when pouring the foundation for it). For a brick wood-burning stove weighing about 300 kg, it is best to prepare a monolithic concrete base, poured over the entire area of the structure. If the house has already been built and lived in, you will have to dismantle the floors in the chosen place, then go deeper into the ground by about 25 cm.
After this, it is necessary to prepare a cushion of sand and gravel, compact it thoroughly, and fill the pre-reinforced base with concrete mortar. It is possible to make a foundation in the form of concrete columns or a strip structure constructed according to a standard design.
Upon completion of the installation of the fireplace stove in houses made of timber, all that remains is to insulate the wall in any way convenient for a person.
How to use a home wood stove correctly and safely
The stove must not be left unattended. When opening the door, embers and sparks should not fall outside the pre-furnace area.
If the sandwich pipe has a damper, it is not closed until the fuel is completely burned. For combustion, use the fuel specified by the stove manufacturer.
You should not leave hot ash removed from the ash pan at home, as it emits deadly carbon monoxide.
The cast iron body and parts of the device do not like sudden temperature changes. Do not allow cold water to come into contact with cast iron surfaces, as this can lead to cracks. It is forbidden to move an already installed stove, this will cause depressurization of the chimney.
Characteristics of modern cast iron stoves
Cast iron plates, also known as cooking floors, are mounted directly on the upper horizontal surface of the stove. The cast iron stove has inertial heat transfer.
When fuel (wood, coal, peat) is burned in the stove, the cast-iron stove heats up well and then remains hot for a long time, giving off heat. Once the cast iron is hot, it can be used as a cooktop.
Modern cast iron stoves for installation on a stove have a number of characteristics that distinguish them from other similar options.
- The cast iron used to cast the slab has increased strength.
- Due to the fact that the material also includes a number of chemicals, the physical characteristics of the product are improved.
- Throughout its service life, cast iron does not deform, does not crack and withstands high temperatures well.
- The cast iron stove is resistant to temperature changes, maintaining its appearance and original performance properties.
- Plates for installation on the stove are not subject to corrosion.
In general, all cast iron stove stoves are divided into two groups: prefabricated and solid. In both cases, the product can serve as a heat conductor, uniformly heating the air in the room, and as a burner for cooking.
A prefabricated cast iron slab is a panel with rings installed on it that fit into each other. By adjusting the number of rings and their diameter, you can choose the best option, depending on what kind of cookware you use.
This option has one important advantage - thermal gaps, which allow the plate to heat up evenly without deforming under the influence of high temperatures. Solid plate due to the absence of thermal gaps is less reliable during use
Cast iron can expand when exposed to too much heat and warp. However, cast solid cast iron plates are much cheaper and easier to install on the stove yourself
A solid plate, due to the absence of thermal gaps, is less reliable in use. Cast iron can expand when exposed to too much heat and warp. However, solid cast iron stoves are much cheaper and easier to install on the stove yourself.
If, when choosing a stove for the stove, you caught your eye on a model with a cast ornament or pattern, take a closer look at this option. Due to the patterns, the heat transfer of the plate increases, which has a positive effect on its functionality.
Features of installing a cast iron stove in a stove
Installing a cast iron stove on a stove is a serious matter. Violation of technology and incorrect selection of materials can lead to the fact that during the first fire the slab becomes deformed or cracks due to expansion.
Yes, cast iron stove plates have increased durability, but do not forget that when heated they expand, which must be taken into account by the technician during installation.
You cannot install the stove next to the material from which the stove itself is made. As a rule, this is brick. But brick expands differently when exposed to high temperatures. If you do not leave a gap between the masonry and the slab, either bricks or cast iron will not last long, since the metal simply will have nowhere to expand.
- The slab cannot be tightly walled into the masonry.
- There should be a gap of approximately 5mm around the perimeter between the brickwork and the slab.
- There is no need to coat the gap with mortar - it is necessary so that the slab has room to expand. This will keep both the cast iron stove and the stove masonry intact.
- When installing a cast iron slab, a special liquid clay-asbestos solution is used. It makes the fixation of the stove on the stove stronger.
Remember that it is necessary to install a cast iron hob level, otherwise cooking on it will become difficult. The smaller the stove burner, the closer it should be directly to the firebox. This is explained by the fact that a small burner heats up faster, but also cools down faster. This rule is for your convenience.
The first firebox is produced according to a special scheme. Don't expect to be able to cook on your new stove right after installation. To relieve the internal stress of cast iron, it is heated slowly and thoroughly for the first time.
If you are not sure that you can install the stove according to all the rules, it is better to trust professionals in this matter.
On the website https://svt-ukraine.com.ua/lyuki-dlya-zoly you will find even more useful products for building a functional stove in the house.
Conclusion
A cast iron stove stove is an excellent option for cooking and heating the room. A large selection of these products will satisfy even the most fastidious buyer.
Cast iron material is characterized by heat resistance, durability, and ease of use. A high-quality cast iron stove will serve you reliably for several decades.
But its purchase should be made in a specialized store. Experienced consultants will help you choose between a prefabricated or solid slab, and will also select the right size at an affordable price.
Attention must be paid to the quality, absence of defects and weight of the product. You can even install this flooring yourself. To do this, it is worth considering only a few nuances.
When melted and used, cast iron decking will remain in its original condition throughout its entire use. It will become not only a functional item, but also a decoration for your interior.
Types of foundations
Among the known types of foundations for arranging furnaces, the following are suitable:
- concrete pillars;
- strip foundation;
- monolithic slab.
Each type has its own characteristics. Concrete pillars are suitable for both a heavy metal stove and a massive brick fireplace. The number of supports is selected based on the total weight of the structure and the condition of the soil at the installation site. To install them, holes of the required size are made in the floor, and after installing the posts, a frame of welded metal channels is laid on them.
Strip foundations are erected according to the classical scheme. According to the method, when constructing them, formwork is first made around the perimeter of the supporting structure, into which liquid concrete is then poured. All other operations are performed in exactly the same way as described in the previous case.
The monolith is mainly used when installing fireplace-type stoves in dachas. Its thickness can reach 15–20 cm, which is quite enough to withstand the design pressure on the foundation.
Any of the types of foundation discussed above must sit for some time after pouring. You can begin installing the stove on it in about 28–30 days.
Advantages of cast iron
Cast iron provides the product with inertial heat transfer, which means that slow cooling of the surface contributes to uniform heating of the room. Cooking decks are cast from SCh 15-20 cast iron (carbon combined with iron), which is famous for its strength and fire resistance.
Phosphorus, sulfur, silicon and manganese added to the composition enhance the chemical and physical properties. That is why cast iron structures are not subject to temperature changes and remain intact for quite a long time of operation. In addition, any cast iron structures will not be subject to corrosion due to the rusty layer covering them.
Choosing a location for the oven
Any metal or brick stove in a wooden house is installed based on the following considerations:
- the possibility of arranging a chimney in relation to the design features of the floor and roof;
- free access to the stove for the purpose of its maintenance;
- compliance with fire safety clearances ensuring its distance from flammable surfaces.
Such types of stove devices as potbelly stove or buleryan are subject to special requirements related to the possibility of free movement of convection air flows.
The installation of a stove in a wooden house must be tied to the location of the designed chimney. It is not enough to simply move it as close as possible to the combustion products exhaust channel. Correct installation of a heating stove for a wooden house should ensure ease of connection to the chimney, as well as the possibility of servicing both.
This requirement is explained by the design features of furnaces, from which it is necessary to constantly remove accumulations of ash, clean the combustion chamber, and also clean the walls of the chimney. During installation, some distance should be left in the direction of opening the firebox door.
According to SNiP requirements, the distance from the stove to the walls must be at least 110–125 cm. The same gap is left on the side of the stove combustion chamber door. The stove should be located within the house so that maximum heat transfer can be obtained from it.
Advantages of an army stove
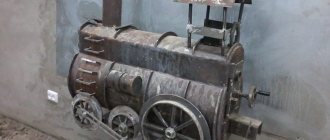
The POV-57 cast iron stove is very economical in fuel consumption.
One load of the unit can heat it for 6-10 hours. Historically, this type of stove was used about fifty years ago to heat barracks and army tents. This is where the name came from. The ease of operation and maintenance of a cast iron stove, as well as safety and low fuel consumption, have significantly increased its popularity and made it possible to use the stove in our time, in conditions where heating with central heating is impossible.
Today, an almost original version of the potbelly stove design is used, which has not been modernized. The reliability of the unit ensures a long service life. Another advantage of a cast iron stove is that you can use not only firewood as fuel, but also construction and wood waste and even household waste.
Chimney installation
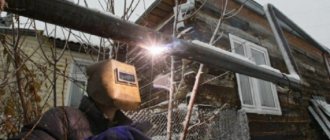
Due to the strong heating of the furnace, the temperature in the chimney area can reach 300 °C. If there is a large accumulation of soot in it and it ignites, this figure rises even higher. When installing steel chimney pipes with your own hands, you need to take into account a number of points regarding the order of their installation.
Firstly, the chimney can be laid not only inside the building, but also along the outer surface of the wall (in the attic). Secondly, in the internal spaces of the house it will be necessary to reliably insulate the pipe in the areas where it passes through the ceiling and roof. Finally, the outside of the chimney should be carefully secured to the wall of the building.
In the process of arranging a diversion channel, it is necessary to be guided by the following requirements of the PPB:
- near the walls, the drain pipe should be laid at a distance of approximately 25 cm;
- the surfaces of the walls are first lined with basalt cardboard, and then sheathed with galvanized or stainless steel sheets;
- the holes in the ceiling must be large enough to maintain 25 cm gaps on the sides (they are subsequently filled with basalt insulation).
To install a chimney, it is preferable to use a sandwich pipe made of ceramic and stainless steel, protected by a layer of thermal insulation. If you have available funds, you can install a branded ceiling trim.
Types of heating cables for water supply
There are two types of heating cables - resistive and self-regulating. Resistive ones use the property of metals to heat up when passing an electric current. In this type of heating cables, a metal conductor is heated. Their characteristic feature is that they always emit the same amount of heat
It doesn’t matter whether it’s +3°C or -20°C outside, they will heat up the same way - at full power, therefore, they will consume the same amount of electricity. To reduce costs in relatively warm times, temperature sensors and a thermostat are installed in the system (the same as those used for electric heated floors)
Structure of a resistive cable
When laid, resistive heating wires should not intersect or be located next to each other (close to each other). In this case, they overheat and quickly fail. Pay close attention to this point during the installation process.
It is also worth saying that resistive heating cables for water supply (and not only) can be single-core or double-core. Two-core ones are more often used, although they are more expensive. The difference is in the connection: for single-core ones, both ends must be connected to the mains, which is not always convenient. The two-core ones have a plug at one end, and at the other end there is a fixed ordinary electrical cord with a plug, which is connected to a 220 V network. What else do you need to know? Resistive conductors cannot be cut - they will not work. If you bought a coil with a section longer than necessary, lay it in its entirety.
This is approximately how heating cables for plumbing are sold.
Self-regulating cables are made of a metal-polymer matrix. In this system, the wires only conduct current, and the polymer, which is located between the two conductors, heats up. This polymer has an interesting property - the higher its temperature, the less heat it releases, and vice versa, as it cools down, it begins to release more heat. These changes occur regardless of the condition of adjacent sections of the cable. So it turns out that it regulates its own temperature, which is why it is called self-regulating.
Structure of a self-regulating cable
Self-regulating (self-heating) cables have many advantages:
- they can intersect and will not burn out;
- they can be cut (there are markings with cutting lines), but then you need to make an end coupling.
They have one drawback - the high price, but the service life (subject to the operating rules) is about 10 years. So these expenses are reasonable.
When using a heating cable for any type of water supply system, it is advisable to insulate the pipeline. Otherwise, heating will require too much power, which means high costs, and it’s not a fact that heating will cope with particularly severe frosts.
Work process
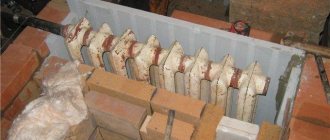
Installation of a high-quality combustion door. This process must be approached with full responsibility and
seriousness. It is most exposed to thermal and thermal expansion. Therefore, it should be installed so that the space in the stove is overlapped as tightly as possible and the door is securely fastened to the masonry. This oven door is secured with clamps, which are made of steel.
Clamps are made of steel. All ears should protrude 10-12 cm beyond the door frame, and they are fastened with special rivets. The lower part of the door can be secured with a wire about 60 cm long. Before installing the door, you need to wrap the frame with asbestos. The material can be used in the form of cord, crumbs or sheets, moistening with water before use.
In the exact location of the door installation, it is necessary to apply a layer of clay composition to the masonry. When using wire, the ends are hidden in the seams. Be sure to check the horizontal position of the installation with a level and fix it using a wooden strip. One end of this strip is placed on the door frame, and the other on three bricks of the masonry, a brick is placed on top of it. Next, bricks are laid on the mortar, gradually laying the door in the stove mass. Each row starts from the door.
Additionally: wood treatment with impregnations
Fire regulations require that wood be treated with special impregnations that reduce its flammability.
However, we know very well that impregnation in a bathhouse is not particularly desirable, because at a high temperature inside the steam room, all the chemicals begin to be released into the air and poison a person. That's not why we go to the bathhouse. And yet, not all rooms experience such a temperature load as a steam room, so it would be reasonable to treat at least them with fire retardants, as well as the attic, especially since a considerable proportion of fires occur due to sparks flying from the chimney (here Also install a spark arrester or a deflector with it).
The composition should be applied in two or three layers, waiting for at least 6 hours to dry between stages.
Yes, and pay attention to the presence of pigments to indicate impregnation if you do not want the wood to become, for example, a bright pink color. (That is, the color is not from chemicals, it is added specifically to distinguish treated wood from untreated wood.)
***
So, now that you have an idea of how to install a stove correctly, it’s time to put your acquired knowledge into practice. Write comments, we are interested in your opinion about what you read.
If you have not yet decided on the type of stove you need, then you should familiarize yourself with the characteristics and models of different types: gas, wood, electric. The variety of types of designs, sizes and prices provides the widest selection of stoves for baths and saunas. And which one is better, everyone has the opportunity to decide for themselves.
Laying the first row
- The first row of bricks must be laid taking into account the seam without mortar.
- After you determine the position of the corner bricks, you can lay out the mortar on them; from time to time you also need to check the horizontality using a simple level.
- Using a mallet, we hammer down the bricks with light blows.
- If you achieve horizontality, you can begin filling the perimeter of the first row with bricks and mortar.
- Constantly monitor the work performed with a level.
- The oven must maintain its dimensions, so constantly check the diagonal with a meter.
- Also keep an eye on the diagonal in the middle of the rectangle.
- If you notice an uneven diagonal, then you need to knock down the corner bricks to achieve their equality.
- This way you will get parallel sides all the way around.
- Then you need to line the middle of the first row with bricks and mortar.
Oven
The oven, installed in the oven body, is wrapped with asbestos around its entire perimeter. The wall adjacent to the oven is laid out on edge, and the top is covered with a solution two and a half to three centimeters thick. This will prevent the oven walls from burning out quickly.
The oven is usually made of strong steel. Gaps are determined using a level, the frame is wrapped around
sheet asbestos, half a brick wide. The plane of the frame at the top must coincide with the masonry surface of the last row of bricks, therefore, if necessary, the asbestos layer must be increased.
The grate must be installed 25-30 cm below the combustion opening with a slope towards the combustion door. The bottom of the firebox is shaped like a trough, and the slots located between the grates should be along the firebox.
The blower door and, together with it, the cleaning door are installed in the same way as the firebox door. The blower door is practically not exposed to high temperatures, so it must be tightly and firmly walled into the stove masonry, treating the seams with clay mortar. The horizontal of the frame is also determined using a level.
Securing the top of the oven door
It is good to cover the doorway with two whole bricks so that they are connected in the center of the door. Often the mortar falls out above the doors and the vertical seam becomes visible. To eliminate this, it is enough to make notches-pits in both bricks in the places where the mortar is laid with the angle of a hammer. Then, when the mortar is compressed in the seams, these pits will hold the mortar in the seam and it will not fall out. Doors with holes are shown here. You can make them yourself by simply drilling holes in a regular door. Very often the fire doors in stoves fail because they have a bad lock (latch), which sometimes falls off after a few days. Even with proper plumb installation, the door without locking begins to open randomly. This happens because there is a heavy handle on the door, and it, like a counterweight, helps open the door. To prevent the door from opening, all sorts of foreign objects are leaned against it - a poker or a piece of wood, which begins to smoke and often catches fire. The industry, apparently, is not able to invent a reliable lock for the fire door. I propose a simple way to get rid of the random opening of doors, at least in those stoves in which smoke is knocked out of the firebox by the wind. This method will help forgetful owners lock the door. If the pipe is laid incorrectly on top of the roof, the wind gets into the pipe and knocks smoke out of the firebox. When there is a strong wind, the door opens and the fire is knocked out along with the smoke, and sometimes burning coals fly out onto the floor. Therefore, if smoke is coming out of the firebox, you should not leave it unattended. In addition, it is imperative to place a sheet of iron on the floor. To prevent the door from opening, you can do this.