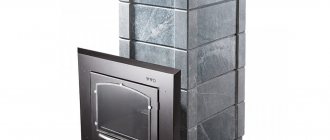
Experts in the bath business, through one, claim that the correct name for a stove of this type is “paravoz”, which means a whole load of steam, thus subtly hinting at the incredible productivity of such a stove. Other experts, and also through one, prove that the name, but already “steam locomotive,” was attached due to the striking external similarity of such a stove with a classic steam locomotive, from the time of the first five-year plans and the development of Magnitogorsk. It’s hard to judge which of them is right, and there’s no point. It is better to pay attention to the locomotive stove itself, its design and operating features. A truly worthy copy.
About the design
The Robinson rocket stove consists of the following elements:
- Firebox.
- Pipe for removing generated smoke.
The design feature is that the fuel bunker is located not only vertically, but also horizontally, at an angle. The method of placement depends on the desire of the person, the features of the structure in which the finished stove will be installed.
This is what a rocket stove made from a pipe looks like
An option can also be used in which the fuel bunker will be located between the chimney and two elements of a horizontal pipe section. This is done in order to lengthen the surface heated during fuel combustion, thereby increasing the efficiency and time of warming up the room.
Conventional schemes for creating furnaces have:
- A firebox located vertically and connected to the chimney by a piece of pipe (its length can be different). The area connecting the elements is used for cooking (hob).
- A firebox located directly next to the pipe (the diagram is used in the case when the stove must perform the function of a heating unit).
- A firebox fixed at an angle to the pipe (for ease of loading fuel into a special compartment).
The stove can have two fireboxes at once. A special feature is their location on the sides of the structure in a vertical position. Pipes must have a large cross-sectional size. The purpose of the oven is to heat a container with liquid, which is placed on a special stand (this option is used to supply hot water).
Design options
Drawings and projects
The design of a sauna heater differs from traditional designs: it has a special space for heating stones, which allows you to heat the steam room at high speed. There are two main designs of such a stove: grate and grateless.
In a grate stove, the firewood is placed on a small grate or grate. This device also serves as the bottom of the firebox, and primary combustion air is supplied through it. Through the holes in the grate, the ash goes down, thus creating space for a new portion of fuel. The best material for this element of stove fittings is cast iron, as it is more stable than steel. Such stoves have high efficiency, high combustion intensity, and are very easy to maintain.
There are solid grates, which cannot be disassembled, and stacked grates, consisting of several parts. In the first case, when purchasing a part, you need to focus on the available area of the firebox, and in the second, you can assemble an element of the required size yourself. Steel grates are produced by chain or pipe. Steel ones come in slab, basket, beam and movable types.
A grateless oven is also called a hearth oven. The firewood is placed on a sub-solid floor, on which there is also the possibility of cooking and baking, and air is supplied through the firebox door. In such furnaces, “top combustion of fuel” occurs, when the front spreads from the upper layers of the fill to the lower ones as combustion occurs, which is considered a more environmentally friendly method. For such stoves, exclusively wood materials are used: firewood and briquettes.
Some craftsmen assemble stoves “by eye”, because they believe that both the assembly of a brick stove and the lining of an iron stove are so simple that preliminary calculations are not needed. However, it is better to make preliminary calculations. Both the thermal regime and the amount of steam in the room depend on the correct design. Otherwise, it may happen that the air will heat up very quickly, but the stones will remain cold.
Tips from stove makers on how to improve a stove in a pipe bath
Well, first of all, if you do not have experience in creating stoves, then get ready for the fact that the first stove may turn out to be just a prototype. This also applies to those who intend to order a stove according to their design from a master. The optimal ratio of the parts of the stove is always specific, that is, it is your steam room where the stove will operate that is taken into account. And that is why it is difficult to give universal advice.
It is especially important to choose the size of the heater and the number of stones in it. This is done experimentally
Particularly difficult, oddly enough, are open heaters, in which it is necessary to achieve exactly the area of contact between the stones and the body that will lead to the desired degree of heating of the stones. So you can’t make a horizontal oven without a prototype.
+++
Well, we hope you found some useful information for yourself. Otherwise, write comments, because the most popular questions will be the topic of our next article.
Delivery across Russia
One of the key areas of our work is working with regional buyers: we have excellent prices, even taking into account the cost of delivery. The average delivery time to the nearest regions is 1-3 days, to remote regions – 7-10 days.
Attention! At the terminals of transport companies there are restrictions on the weight and volume of goods sent. For more detailed information, contact the online store managers.
Free delivery to 10 cities of Siberia and the Urals
When ordering from 20,000 rub. We will deliver free of charge to the DPD terminal in the following cities:
Biysk, Barnaul, Ekaterinburg, Kemerovo, Krasnoyarsk, Novokuznetsk, Omsk, Rubtsovsk, Tomsk, Tyumen
More details
The optimal delivery services for large-sized cargo are Energy, PEK and GDT (Chinese). It is their points that are indicated on the map. We also ship by other services upon request: Business Lines, ZhelDorExpedition, Postal League. Cargo is dispatched from the Fornax central warehouse in Novosibirsk. We will deliver your order to the transport company terminal in Novosibirsk for FREE! After sending the goods, we will send you a tracking number via SMS.
- All orders are insured
. If the cargo is damaged due to the fault of the carrier, the recipient is compensated by the transport company for damages in the amount of the full cost of the damaged part of the goods. - We ship orders without damage
. There is always a note about this in the invoice - “the goods were received without damage.” It happens that TC employees, in order to relieve themselves of responsibility for possible damage to the cargo during its transportation, write “the goods were accepted with damage.” We monitor this and offer to jointly open the packaging of the goods, check its integrity, record it with photographs and indicate in the delivery note that the goods were received without damage. So if suddenly damage occurs during transportation, you have every reason to file a claim. - Free storage for several days after the cargo arrives in your city
. Check with the transport company for the period of free storage of cargo at the pick-up point. This period may vary for different TCs. For example, for TC Energia this period is 3 days, not counting the day of arrival. The average delivery time to the nearest regions is 1-3 days, to remote regions – 7-10 days.
Instructions for making your own sauna stove
Once you have finally decided on the type of stove, prepared all the necessary tools, and selected the necessary materials, you can start creating a stove for a bathhouse from a pipe with your own hands. Below there will also be drawings and photos that will help you navigate the dimensions of your future stove.
Drawing
The initial stage of creating a bathhouse is the preparation and creation of all the necessary drawings. The stove design also indicates the locations of all the main structural elements, their sizes, and connections.
For example, a drawing of a horizontal stove:
And a drawing of the vertical project:
You can create such a drawing yourself (you just need to remember the school drawing curriculum), with the help of a specialist, or use a ready-made one. The last option is good because you don’t have to do anything or pay anyone. Fortunately, the Internet is full of various drawings of stoves, so you will definitely find among them something that will fully satisfy your needs.
You should not start work without having a drawing in hand, because in 99.9% of cases you will definitely make a mistake when installing the elements, as a result of which the equipment simply will not work, and you will have to start all over again. Moreover, an incorrectly made stove will negatively affect the health of people who often relax in the steam room.
Creating a horizontal oven step by step
The horizontal design is performed in the following sequence:
- A piece of pipe is cut off, corresponding in length to the drawing diagram. The optimal metal length is 70-90 cm. The cut must be carefully sanded so that it is not too sharp;
- A grate is installed at the bottom of the structure. If you have not purchased a ready-made version, or want to make it yourself, then use these instructions: 1. Cut a rectangle from a metal sheet to the size suitable for the pipe; 2. In this rectangle, make the middle so that there is room on each edge of the pipe for welding the structure; 3. Weld metal rods at a minimum distance from each other in a vertical or horizontal position:
A purchased or homemade grate is mounted in a pre-prepared pipe section.
After welding, the seams should be “hidden” inside the product, because the very first thing that will “suffer” from the negative influence of elevated temperatures is the seams.
Let's look at how you can mount a grate into a furnace structure:
- Welding to the back of the furnace. An oblong rectangular or square structure is cut out of sheet metal with dimensions slightly smaller than the diameter of the pipe. If there is a compartment for stones at the top of the stove, then the length of the sheet metal increases up to this compartment. This elongation is necessary to reduce the number of welds;
- Preparing metal for the stove facade. The sheet metal should have dimensions slightly larger than the dimensions of the stove;
- Cutting holes for the blower and combustion door. In the case when a ready-made door will be used, it is necessary to adjust the holes in the oven to its dimensions;
- Welding a façade sheet to the front of the oven;
- A slot at the top of the body has a hole measuring 15 by 15 cm for mounting the future chimney;
- Securing the door;
- Cleaning the structure with sandpaper to eliminate scale that appeared during the welding process and rust.
After this, the structure should be painted with paint that is “not afraid” of elevated temperatures, or lined with fire-resistant bricks around the perimeter.
If paint is chosen, then before sending the structure to its permanent location, it should be heated in the fresh air
This is extremely important, and it is necessary that excess paint burns off and does not cause harm to human health in the future.
Vertical steam room stove: step-by-step instructions
A vertical stove is made in the following sequence:
- A pipe of 70-90 cm in height is cut;
- The cut areas are cleaned;
- A piece of similar diameter is welded to the bottom of the pipe, which will play the role of the bottom;
- A door is mounted at the bottom of the structure - an ash pan;
- Grate bars made using the technology described above are installed or ready-made options are taken;
- A cutout is made above the grate for mounting the door. The combustion chamber will be located here:
- The heater compartment is made like this: 1. At a distance of 15 cm from the firebox, a rectangle is cut out in the pipe; 2. Another grate is mounted in it, where the stones will be located in the future; 3. The door is being installed. When it is open, you can pour water onto the stones to create even more steam.
- A purchased or home-made door is mounted on each hole;
- A circle is cut at the top for installing the chimney;
- The structure is sanded and painted.
Creation of sand-clay composition
After preparing the base, the next step is mixing clay and sand.
It would seem that why exactly such a composition is needed if there is cement, but the answer is obvious - the cement mortar is completely unable to withstand exposure to high temperatures. That is why all designs of a brick heater stove for a bathhouse require a sand-clay composition. The best clay for laying a stove in a bathhouse can be obtained at a depth of about half a meter. Naturally, the material must be thoroughly cleaned and soaked for several days before use. For soaking, you can make a small groove next to the bath. It is necessary to prepare not only clay, but also sand - it must be cleaned of various impurities and thoroughly sifted so that there is no debris in the masonry joints.
The clay is kneaded directly in front of the slave. Experienced stove makers use a special “oar” for these purposes, which is perfect for these purposes. Next, water is added to the clay, and it all mixes well until it becomes sour cream. Moistened sand is added to the clay mixed with water.
To determine the quality of the resulting solution, a dry and clean stick is lowered into it, and the result is determined by the following criteria:
- If a layer of mixture less than 1 mm thick has stuck to the stick, you need to add clay;
- If the thickness of the adhering layer exceeds 3 mm, sand is added;
- If 2 mm of the mixture adheres to the stick, then the solution is suitable for use.
Decorative finishing
A do-it-yourself sauna stove made from pipes, made according to the drawings of experienced craftsmen, in compliance with all welding rules, is not inferior in performance to factory analogues, but loses in decorative terms. To improve the appearance, it is recommended to cover the stove with fireproof paint (read: “How to paint a stove in a bathhouse - choosing the right paint”).
Another way to improve the appearance of a homemade stove is to line it with bricks. Brickwork will increase heat transfer, protect against hard infrared radiation that is emitted by hot metal, and extend the life of the stove (more details: “How to line a stove in a bathhouse with bricks - a guide to lining a stove”).
A homemade stove is not only a way to save money on purchasing a factory-made product, but also an opportunity to implement an optimal project in accordance with specific conditions: the area of the steam room, requirements for steam quality (dry or wet), and personal preferences.
Important points
The installation of a stove in a bathhouse must be carried out in compliance with all safety rules. Otherwise, the surfaces with which the structure will come into contact may heat up to a very high, critical temperature. This may result in a fire hazard. The stove is installed in a bathhouse on a clearly planned horizontal surface. The top layer with vegetation is first removed from the soil. Next, a flakier stone is laid on the surface, and the gaps between it are filled with a mixture consisting of crushed stone and river sand. This surface will be resistant to high temperatures.
Compact (small-sized)
It’s easy to get a homemade small-sized version from a laundry stove. Only instead of water, stones are placed in the tank. And water, when needed, is heated in a bucket, placing it on top of the stones.
The downside of the small size is the thin walls of the firebox. The solution is to cover it with brickwork, leaving gaps for air exchange.
It is recommended to assemble it yourself from steel sheets 3–5 mm thick.
For solid fuel
In such heaters, the firebox and smoke circuits are separated from the stones by a cast iron plate or wall. The partition prevents combustion products from entering the bathhouse, and soot does not settle on the stones. The average heater can heat a steam room with a volume of up to 10 cubic meters. m, maintaining the room temperature up to 140 degrees. The device has double side walls; air is exchanged and heated through their gaps.
READ How to hang a lamp on the ceiling without a hook
How to calculate the volume of the steam room and firebox of the stove?
It is not enough to measure the dimensions of the room. You also need to take into account the material of the surfaces. If the room has windows, a glass door, surfaces made of tiles, bricks, concrete, their area should be measured. For each square meter of area of such surfaces, add one and a half cubic meters to the volume of the room, which will be taken into account when choosing the size of the stove. The minimum power of a sauna stove is 8-10 kW.
Modern style in the interior of a Khrushchev living room: options and methods of implementation
What should the modern style of Khrushchev's living room be like? Design specialists are responsible for multifunctional, stylish, attractive, cozy and comfortable.
This can be achieved by following a few simple rules. Ceiling design rule - modern trends 2021 advise abandoning multi-level ceilings in favor of simple leveling with plaster or creating original patterns on the ceiling, for example, using suspended ceilings or plasterboard structures.
We decorate the ceiling
Here are some examples of how to decorate the ceiling in a Khrushchev-era living room:
- Laconic white coating;
- Smooth or glossy ceiling;
- Suspended structures;
- Decorating the ceiling with beams is a hit in 2021.
If the living room has low ceilings, you can use floor-length curtains or soft diffused lighting - this will visually increase the height of the ceilings.
Finishing
The stove should not only be beautiful, but also aesthetically attractive. To do this, it is recommended to resort to:
- brick lining;
- bluing;
- coloring
How to brick
Examples of brick lining are presented in the plate.
| View | Description |
| Convector cladding (with vents) | The most suitable option. Can be used to decorate any unit. The area of the room does not matter. |
| Continuous cladding | Plays the role of decoration. Ultra-fast heat dissipation is provided. Against this background, the performance of the structure is reduced. |
| Heat shield | Miniature stone fence. Heat dissipation is optimal. A person who is close to the stove is provided with 100% comfort. |
Blueing
This is a chemical treatment. The method is intended to protect metal from rust.
Blueing
Instructions:
- Clean the surface well. A characteristic shine should appear.
- Dilute 150 g of phosphoric acid and 4 g of butyl alcohol in 1000 ml of water, remove the oxides.
- Dilute 50 g of household soap in 1 liter of water, rinse the surface, removing any remaining acid.
- Preheat the oven to 150 degrees.
- Apply caustic soda by spraying.
- Wait until completely dry.
After this, the iron will be completely protected from corrosion.
How to paint
A special, heat-resistant paint is used for painting.
Painting
Instructions:
- Wash the surface thoroughly. Degrease.
- Fill the can with paint and shake well.
- Spray paint (optimal distance – 300 mm).
- Wait until dry (30 minutes) and apply the next layer.
There should be 3-4 layers in total.
Sauna stove options
The shape of the sauna stove is of great importance. Performance and heat transfer depend on this. Experts consider rectangular ovens to be the most convenient. The coals do not become hot. This shape ensures more uniform heat exchange in the steam room. As a heating device, you can build a gas boiler for a bathhouse with your own hands.
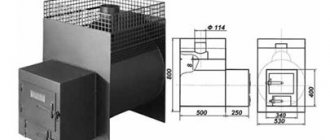
Steam locomotive stove for a bath
It is more convenient to make a stove for a steam locomotive with your own hands from a pipe with a diameter of 30-50 cm - this is a ready-made body, which is supplemented with some elements. Walls without seams will last much longer than welded structures. It is recommended to use steel grade St3 for the furnace. A closed heater will allow you to use the sauna continuously.
Installation steps:
- The metal pipe is cut to the dimensions of the drawing. A hole is made at the bottom the size of the ash pan.
- Corners are welded inside to accommodate the grate.
- Cover the back walls of the heater and ash pan.
- A hole is made for the chimney and the pipe is welded.
- A pipe is welded inside.
- The pipe is welded to the chimney.
- The body is sheathed with sheet metal according to the size of the stove. Doors, hinges and latches are welded. Install grates above the ash pan and a grate under the heater.
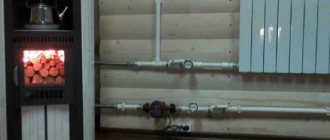
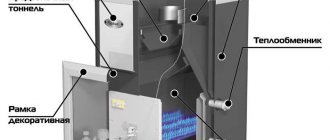
Buleryan stove for baths
The Buleryan unit is equipped with many tubes around the body, through which heating of the room is achieved. The principle of operation of a do-it-yourself gas sauna stove is the constant movement of heat. The tubes welded into the firebox heat up, and under the influence of draft, warm air moves. The oven body has a low temperature and is therefore safe.
The air movement is regulated by a valve, which is placed on the firebox door or on the nozzle.
Operating principle of the Buleryan stove
To make a stove you will need:
- pipe with a diameter of 70 cm and a thickness of 5-8 mm;
- sheet metal 5-8 mm and 2 mm thick;
- pipes with a diameter of 7 cm;
- electrodes;
- welding machine.
Cut the pipe to the size of the future stove and place it on legs. At the top of the cylinder, two plates in the form of a cone are welded. The works are bent at an angle of 45° and welded to the upper part of the body. Pieces of metal are secured in a checkerboard pattern. The structure is placed in the housing and welded. Cut out holes for the chimney and oven doors. Install hinges, plugs and doors.
The efficiency of the resulting unit is 75-80%, but there are disadvantages:
- many elements that increase production time;
- the unit turns out to be large;
- very heavy construction.
Potbelly stove for a bath
Small-sized stove for a hot potbelly stove.
Drawing of a potbelly stove for a bath
To install the stove you will need:
- chimney pipe and base
- Metal sheet;
- rods;
- grate bars.
The pipe is cut to size. Make holes for the doors of the ash pit and firebox. We weld the middle wall with a hole for the grate, the top with a hole for the pipe and the bottom of the stove. The chimney, hinges, latches and doors are welded. Install grate bars.
Stages of constructing a potbelly stove from a bathhouse pipe
Attention! The minimum height of the chimney pipe installed above the firebox is 4 m. This will provide the necessary draft.. Do-it-yourself sauna unit:
Do-it-yourself bath unit:
Rocket stove for a bath
To make a sauna stove you will need the following materials:
- 2 square pipes of different diameters;
- metal corners;
- grate bars.
Drawing of a metal reaction furnace
Pipes are cut according to the dimensions of the drawing. In a smaller container, at a distance of 4 cm from the bottom, corners for the grate are welded to the side walls. A hole is made on the top wall to align at an angle of 45° with a larger pipe.
The bottom of the larger container is cut off at an angle of 45 degrees. The two structural parts are welded to each other. The bottom, hinges, doors and legs of the unit are welded.
Square tube reaction furnace
People call the simplest stove design “topi wash”.
Gas cylinder stove for a bath
Empty gas cylinders are ideal for making a small sauna stove with a volume of up to 10 m3. The container is carefully emptied of gas residues and the tap is cut off.
A hole is made in the upper part of the cylinder for the firebox door. The container is turned on its side and 5 rows of holes are made on one side with a pitch of 2 cm and a diameter of 1 cm.
The ash pan holes are located at the bottom of the oven
A piece of channel is welded over the hole. This is a box for a retractable ash pan.
Doors and latches are welded onto the firebox and ash pan. A chimney pipe was welded to the rear wall.
The doors were welded onto the ash pit and firebox
Next, a test fire is carried out.
Heating device for a bath from a gas cylinder:
Metal heater stove, is it suitable for a bath?
This furnace design is the simplest. For work you will need sheets of steel with a thickness of at least 5 mm, a welding machine and a grinder (or a gas cutter), pipes for water supply and drainage, refractory bricks, stove clay solution, stones, pipes for the chimney, tap, stove doors with latches and hinges, metal profile for mounting the stove support.
READ DIY patch for suspended ceiling
The structure itself consists of a water tank with pipes and a tap connected to it. The tank is heated from the back wall of the stove, the internal space of which, in turn, is zoned into a firebox and an open heater. Flue gases are disposed of through a chimney exiting the firebox through the heater and the walls of the bathhouse.
First of all, it is necessary to cut out the bottom and side walls of the future stove from steel sheets and connect them by welding. We weld corners inside the stove - they will support the sheet of metal on which we will lay the stones.
On the front wall we cut out a rectangular hole for the door, and from the cut out rectangle we make a door. You can weld it around the perimeter with strips of steel for a tighter fit. We drill several holes in the lower part of the door or front wall of the firebox to allow air to enter the stove. We weld the door hinges and the hinge for the bolt.
We line the interior of the furnace with fireclay bricks
To make a chimney, we will prepare a pipe and make a hole in the sheet of metal on which the heater will be located. We weld the pipe to the steel sheet.
Let's start installing the water tank. It consists of three walls and a bottom, hermetically welded together and the back wall of the furnace. We weld the inlet and outlet pipes for water to one of the side walls of the tank. Then we weld the tap at the bottom of the tank. We install the entire structure on a frame made of steel profiles or on a brick base 20-30 cm high. We cover the metal parts of the stove with fireproof paint. We lay stones on top (soapstone, porphyrite, basalts, etc.) ranging in size from 5 to 12 cm. We install the chimney and chimney, pour water into the tank, cover it with a lid and ignite the finished stove, checking the structure for the presence of draft and the absence of smoke in room.
To modernize a potbelly stove for a bath, you can equip it with an ash pit with a grate and a box for collecting ash. This will greatly simplify cleaning the stove, and the ash door will help to better regulate the draft, and, accordingly, the temperature and rate of fuel combustion. For the same purpose (regulating the heating temperature of the stove), as well as to reduce heat loss through the chimney, it is equipped with a valve. It can be a gate type or any other.
Oven requirements
stove must be safe (both in terms of fires and for human health - not cause burns if accidentally touched and prevent smoke from entering the room), the temperature must be regulated, and the dimensions must correspond to the volume of the room.
Chimney installation
- Square holes measuring 450x450 mm are cut out in the ceiling and roof. A pipe will pass through them.
- Two metal blanks are cut out (to the same dimensions). One piece that will need to be attached to the roof slope should have an oval hole. The second blank is made with a round hole.
- A galvanized casing is placed on the internal pipes along with the insulation. The ends are closed with metal rings, which are fixed by bending the edges.
- The lower pipe is put on the stove pipe, while its upper end is pushed into the hole in the ceiling. You should make sure that it is clearly in the center.
- A blank sheet is attached to the ceiling.
- An upper pipe with a metal blank is inserted into the hole in the roof.
- The lower end of the upper pipe is pushed onto the upper end of the lower pipe and secured with a clamp.
- A metal sheet placed on the top pipe is screwed to the inside of the roof.
- It is imperative to fill the gap formed between the pipe and the ceilings. It is filled with some non-flammable substance (clay, expanded clay, asbestos).
After completing the work, the bathhouse must be thoroughly heated. This is best done with firewood, the temperature of which will enhance traction. Now the chimney is ready and you can safely go to the bathhouse to take a steam bath!
Features of stove installation according to fire safety rules
In order for an iron sauna stove to work properly for many years, you must follow the basic installation rules:
- Heating equipment is installed on a pre-prepared platform with a diameter of 70 cm and a height of 18 cm. Additionally, a 30-centimeter foundation base made of heat-resistant bricks is installed. The distance from the stove body to the wall should be 100 cm. It is recommended to insulate the walls with heat-reflecting foil to prevent the surfaces from catching fire.
- The minimum distance from the top of the device body to the ceiling surface is 120 cm, and from the firebox door to the opposite wall - 135 cm.
- The chimney pipe is also insulated. For this purpose, installation of an internal and external protective casing with a layer of heat-insulating material is provided.
- When the chimney pipe is routed through the roof, at the junction with the ceiling, a protective galvanized steel box filled with basalt insulation is installed.
- The doors to the combustion chamber should be directed towards the entrance door, and the heaters should be directed towards the near corner.
- The shelves in the steam room are fixed along the wall opposite the one where the heating equipment is installed. The best option is a multi-tiered design.
- Lamps in the steam room are mounted above the front door or along the perimeter of the room, with the exception of the wall behind the stove. To avoid possible short circuits, it is not recommended to install lighting equipment on the ceiling.
- If a metal sauna stove is used in a wooden building, the body will need to be lined with heat-resistant brick. The optimal height of the structure is 125 cm, and the length is 85 cm.
- A test run of the equipment is carried out before the start of operation of the steam room to identify possible design defects or errors in its installation.
Description of typical diagrams of pipe furnaces
A pipe stove is a metal cylinder with holes made for the firebox and ash pan and a chimney welded on top. There are two main options for pipe stoves:
- horizontal;
- vertical.
Horizontal models are suitable for baths and industrial premises, since their design provides for the installation of a tank for heating water and other auxiliary devices.
Grills and barbecue grates are installed on “lying” stoves, which makes them the best option for a personal plot or cottage.
Vertical stoves take up a small area and are suitable for heating sheds and cooking in small country kitchens.
Reference. In a vertically located stove, wood burns faster and produces more heat, while horizontal structures melt more slowly, but allow you to retain heat longer with less fuel consumed.
Making a stove with your own hands
After choosing the design of the furnace and purchasing all the necessary materials and tools, you can begin to manufacture it.
Furnace drawings
The first stage of construction is to draw up a drawing. The drawing of a pipe bath stove determines the installation location of the necessary components.
Drawing of a horizontal furnace
You can make a drawing of a pipe stove yourself (this will require certain knowledge) or use a ready-made one.
Vertical pipe drawing
It is not recommended to start manufacturing a furnace without a preliminary drawing, as there is a possibility of making mistakes that could lead to the device not working. Incorrectly assembled stoves can adversely affect human health.
Instructions for making a horizontal oven
A horizontal pipe stove is made with your own hands according to the following scheme:
- a piece of pipe is cut out, the length of which corresponds to the drawing dimensions of the furnace (the optimal furnace length is 0.7 - 0.9 m). The cutting areas are sharp, so it is recommended to sand them a little.
- a grate is installed in the lower part. Making this device yourself looks like this:
- cut a rectangle of the required size from a metal plate (fully consistent with the internal dimensions of the oven);
- in the prepared rectangle, the middle is cut out so that there is room for welding at the edges;
- metal rods are welded horizontally or vertically (at a short distance from each other);
Self-made grate
- the manufactured (purchased) grate is installed in the prepared section of pipe;
It is recommended to place the weld seam under the grate, since the first thing that is destroyed under the influence of temperature is the connecting seams.
An example of installing a grate in a furnace
- The back of the stove is welded. To do this, a sheet of metal with dimensions slightly larger than the diameter of the pipe is cut out. If a heater is supposed to be located in the upper part, then the length of the sheet needs to be increased by the size of the compartment for stones. This will avoid additional welds;
- a sheet is being prepared for the façade of the furnace. The dimensions of the sheet should be slightly larger than the dimensions of the oven;
- Rectangular holes are cut in the prepared sheet for the combustion door and the blower. If ready-made doors are used, the dimensions of the holes must correspond to the dimensions of the doors;
- the front sheet is welded to the front of the stove;
- a hole (approximately 15*15 cm) is cut in the upper part of the stove body to install the chimney;
- doors are hung;
- the finished stove is cleaned of rust and scale formed as a result of welding.
Next, the stove can be painted with heat-resistant paint or lined with brick.
If the stove is covered with paint, it is recommended to heat it outside before installation. As a result of this action, the excess paint will burn off without harming human health.
Instructions for making a vertical oven
A do-it-yourself vertical pipe bath stove is made according to the following scheme:
- cut off a piece of the main pipe 0.7-0.9 m high;
- the cutting areas are cleaned;
- A circle with a diameter equal to the diameter of the pipe is welded onto the lower part of the pipe. This serves as the bottom of the stove;
- A hole for the blower is cut in the lower part of the pipe. The dimensions of the hole must correspond to the dimensions of the door;
- grate bars are installed (how to make a grate bar yourself is described above). The grate needs to be installed slightly higher than the blower.
- A rectangular hole is cut above the grate, equal in size to the door being installed. This will be the combustion chamber;
Arranging a compartment for the firebox and blower
- If necessary, a hole for stones is provided. The easiest way to organize a heater looks like this:
- a rectangular hole is cut 10-15 cm above the combustion compartment;
- an additional grate is installed in the hole (it is on it that the stones will subsequently be located);
- a door is installed on the hole. If you open the door, you can pour water onto the stones to generate additional steam;
- purchased or self-made doors are installed on all openings;
- a hole is cut in the upper part for installing the chimney;
- as in the previous case, the stove is sanded and painted.
If desired, you can attach a tank to heat water on any stove.
Making a sauna stove yourself is only possible if the craftsman knows how to operate a welding machine. The manufacturing process is not complicated, but requires certain knowledge and skills.
How to correctly accept cargo from a transport company
We cooperate only with reliable transport companies that perform their work as responsibly, quickly and accurately as possible, so that our customers are satisfied with everything. However, in the work of any transport company, as elsewhere, the human factor is not excluded, because no one can be immune from mistakes by cargo carrier personnel. To protect you, we have compiled recommendations on how to accept cargo.
The main thing is to remember: the transport company considers its obligations to the recipient fulfilled if the consignee signs that there are no claims in the shipping documents. Therefore, if there is the slightest suspicion about the integrity of the goods, do not sign documents and draw up reports of transportation violations in the presence of a TC employee
. The violation report must be certified with the blue seal of the Labor Code and one copy must be given to you.
If a TC employee refuses to sign the document, DO NOT ACCEPT THE CARGO under any circumstances! Be sure to take a photo or video of the cargo at the TC warehouse, try to find out the details of the employee who refused to sign or accept the act, demand that the reason for the refusal be voiced, and urgently contact us on the same day. Send copies of the records and the violation report to our email. You can count on the help of our specialists and we are ready to provide you with all additional documents that will be necessary to solve the problems that have arisen.
STEP 1. Check the number of places on the invoice
. If the number of places does not match, open the cargo and accept the goods by item, and also compulsorily draw up a report on the discrepancy in places in the presence of TC employees.
Step 2. Check the weight and volume of the goods according to the invoice
. If possible (when receiving at the terminal), request that the cargo be re-weighed and measured in your presence. If there is a discrepancy in weight or volume, the procedure is the same as for other violations - be sure to open the cargo in the presence of a TC representative and receive the goods by item according to the invoice and packing lists, draw up a report on the discrepancy in weight or volume.
Step 3. Check the packaging for integrity and presence of original packaging
. The packaging must not have through holes, damage or dents, traces of jumping or double tape. Our company does not engage in additional packaging of cargo; goods can only be packed in original packaging! In case of any violations, take a photograph of the goods or make a video recording of the opening of the cargo package in the presence of TC employees, and draw up a report in which you describe the violations found. Subsequently, the photographs and videos you take will become the most objective and irrefutable arguments of the recorded violation.
STEP 4. Inspect the cargo for damage
. If there is even the slightest suspicion about the integrity of the packaging, voice them to an employee of the transport company and unpack the goods in front of him to check the integrity of the cargo. Do not sign documents until you are sure that the cargo has arrived to you intact. If damage to the cargo is discovered after signing the consignment note, it will be impossible to make a claim against the transport company.
Horizontal pipe stove
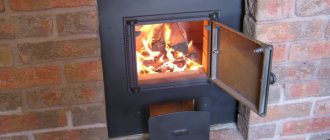
The advantage of a horizontal stove is that you can arrange a more spacious firebox here. The firewood here will burn longer, and your bathhouse will be heated hotter. The firebox door of such a stove is easier to open into the dressing room. But it is impossible to install a heater with a tank directly in the pipe with this design. For this you will need attachments. The stove itself is made from a piece of pipe 0.8 m long.
Horizontal sauna stove: drawing
- Organize the foundation for the stove in the same way as for the vertical one (step 1 of the previous instructions). Calculate its dimensions accordingly.
- Make a grate platform. Cut a rectangular blank with sides 40 x 80 cm from a metal sheet (thickness 10-12 mm). Weld the finished grate in the center. You can weld the grate in the same way as in step 3 of the previous instructions.
- Weld the platform inside the future furnace. The welds of the grate should be on top, not on the bottom. This will reduce the load on them.
- Cut out the front wall for the stove from metal. Its shape is a rectangle, rounded at the top to resemble a pipe. The lower part of the workpiece will serve as a support. Its width is 60 and height is 70 cm.
- Make two holes in the front part: one for the firebox and one for the blower. Install the doors.
- Cut out the back wall of the oven. It will be a rectangle with sides of 70 and 90 cm. There is no need to round it, since it will serve as the back wall for the heater.
- Cut a 15 x 15 cm hole in the upper part of the body at the back. Install a vault welded from sheets of metal on top. Make a hole in it, to which you will then weld the pipe. Move it 10 cm forward. The distance between the hole in the furnace body and in the roof will cut off the flame. The wood will burn, releasing more heat.
- Weld the pipe. The vault is the bottom of the heater. Complete its front wall. To make it accommodate more stones, you can weld 15-20 cm sides from the lattice.
- Buy or weld a water tank. Place it on the back of the oven.
Attention! To prevent the stove from becoming a fire hazard, you need to follow basic safety rules. The pipe must be routed to the roof through the ceilings using penetrations made of non-combustible materials
It’s good if you can equip the stove with a movable damper at the entrance to the chimney. This will prevent the oven from overdrafting. In addition, the stove must be periodically cleaned of soot, because it can also catch fire.
So, making your own sauna stove is not such a difficult task. If you are familiar with welding, you will be able to do it. All you need for this is a piece of pipe, sheet metal, a few hours of free time and golden hands.
Metal model
Basically, two types of stoves are used in Russian steam rooms: steel and brick. The simplest model is made from steel pipes or metal barrels with thick walls. For work you will also need a grinder and a welding machine.
Read also: self-installation of an iron stove in a bathhouse.
Design and material selection
At the very beginning, you need to decide what features the design will have. Therefore, it is worth drawing a drawing or using the Internet and choosing the appropriate option. The main thing is to correctly calculate the power of the furnace, which should be equal to exactly half the volume of the firebox. If you plan to install homemade stoves in a bathhouse, then it is better to increase the power with a reserve.
It is also necessary to prepare the material in advance; mainly steel pipes are used for the manufacture of blanks, the thickness of which is 8-10 mm and the length is 1.5 meters. In addition, you will need sheet metal, as well as gratings. For the sashes you will need to purchase several hinges, a latch and an ash drawer. As a rule, all these parts are cheap, so a home-made stove for a bathhouse will not be too expensive.
Assembly of the structure
If all materials and tools are prepared, then you can start working.
At the very beginning you need to draw a drawing
The process of making a homemade sauna stove is as follows:
- It is necessary to take a piece of steel pipe (1.5 m) and cut it into two parts, this must be done in such a way that one is approximately 90 cm long, the other about 60 cm. Moreover, the longer one will be used to create a blank for firebox, and a short one to the water heating tank.
- First, you need to process a 90 cm scrap. To do this, you need to cut a groove in the lower part, the height of which should be 50 mm and the width about 25 cm. This hole will be used as a blower, which will provide the firebox with oxygen.
- Now above this groove it is necessary to weld a thick steel plate on which the grate is fixed. This can be done using a welding machine. This structure will serve as the bottom of the firebox.
- At this stage, a combustion hole is made in the pipe, and on one edge it is necessary to weld hinges and hang a flap on them, which can also be made from a sheet of steel, but first bend it along the radius of the pipe.
- Then they begin to make a heater - a special container that will contain pebbles, stones and cobblestones. To do this, you can use a piece of iron pipe or a box that is welded from reinforcement.
- Now it’s time to start assembling the water heating tank. To do this, you need to take a short pipe and weld the bottom to the bottom, moreover, there should be a hole in it for the chimney. And a tap is welded to the side of the pipe.
- All that remains is to make a lid, but such that the container is covered only by a third. In this case, you can always add water to the tank without fear of getting burned.
More details in this video:
Recommendations
In order for the stove to work for a long time, you need to follow some recommendations:
- Do not forget to regularly clean the chimney, the inner walls of the pipe, and the ash box from soot and ash. It is recommended to sometimes heat the stove with aspen wood. They effectively clean the chimney.
- Do not use fuel with various impurities.
- Cover the stove unit with a layer of brick. It will protect against infrared radiation and improve heat transfer.
- To install a tank for heating water on the stove, you need to make a built-in heater. For it you need to cut a separate hole with a door.
- You can assemble a wooden fence to avoid getting burns when accidentally touching hot metal surfaces.
When painting the stove, it is recommended to add anti-corrosion additives to the paint composition. They will protect the metal from rust formation.
Not everyone can afford to buy a ready-made sauna stove or assemble a brick structure. If desired, you can make metal furnace equipment from large diameter pipes. By following simple recommendations, you can make a homemade design that will allow you to obtain high temperatures and high-quality steam.
Manufacturing and installation
The process of making homemade stove equipment depends on the type of stove chosen.
Manufacturing of vertical structure
Manufacturing stages:
- Cut round lids from a sheet of metal and weld the tube with them on both sides.
- Cut a hole in the top of the pipe for the chimney.
- On the front side of the tube, make holes for the chimney door and ash pan.
- Secure the grate from the reinforcement inside.
- Install the doors onto the cut holes.
Manufacturing of horizontal equipment
Manufacturing stages:
- Use a grinder to cut out two metal disks that will cover the ends of the tube.
- Fasten the grate inside the pipe.
- Weld the ends, cut holes for the combustion chamber door and ash drawer. Hang the doors.
- Make a hole in the top of the pipe for the chimney.
- Weld a frame of reinforcement above the tube. It will act as a heater.
- Place the pipe on the legs and secure the chimney.
When the work is completed, you need to install the stove on the base.
Decoration
To make homemade stove equipment more attractive, you can use special heat-resistant paint. It must be applied to metal surfaces in two layers. The metal is pre-cleaned of any dirt and sanded with fine sandpaper.