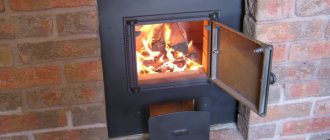
It is also worth thinking about a bathhouse in which you will install a stove of your own making, a metal stove, for which you can find many manufacturing schemes.
There's just one catch - this task will first require you to take a welding course.
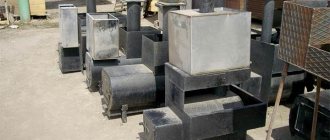
All options for sauna stoves are quite simple - and this is the key to a successful solution to the question of how to weld a sauna stove with your own hands
The firebox – when making a stove with your own hands, it takes up most of the time, but close attention needs to be evenly distributed between all the elements, there are no details here
Naturally, we mean your choice - a metal stove. After all, there is another option - brick. But you can’t find courses here anymore.
Basic properties of a welded furnace
It’s not difficult to decide on your own how to weld a sauna stove; the video will help you familiarize yourself with the assembly features and technological characteristics of such devices.
You can weld a metal sauna stove with your own hands at your own convenience.
Homemade heating metal structures, i.e. stoves, have such undoubted advantages as:
- low cost;
- availability of working material;
- simple design;
- easy installation;
- Fire safety;
- small dimensions;
- fast heating;
- long-term use;
- easy maintenance during operation.
Nuance! To install a metal stove, no special permits are required.
When thinking about how to weld a sauna stove with your own hands, you also need to take into account the main disadvantages of such metal structures. These include:
- constant monitoring of the operating furnace;
- the possibility of receiving burns of varying severity at the time of accidental contact.
Dimensions are calculated individually depending on the dimensions of the room where the heating device will be installed and operated. Therefore, before you weld a stove for a bathhouse with your own hands, drawings, diagrams, and calculation tables must be studied thoroughly.
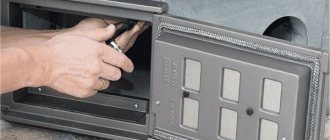
You need to be very careful with a metal stove in a bathhouse, as you can easily get burned when heating the sheets
Correct temperature in the steam room
A lot can be said about the rules of classic health bath procedures, but in this article we will dwell in detail on the temperature. If we talk about the temperature in the steam room that is most suitable for health in all respects, then this indicator lies
between 50 ° C and 70 ° C. In the classical Russian bathhouse, the stoves were always built of brick and, as a rule, they had closed heaters. This design was simply not able to heat the steam room above 60 ° C and in order to get a good sweat, it would have been necessary to sit in it for too long, but a way out was found.
A ladle of water was poured onto the stones, heated red from the direct flame, which instantly turned into light, hot, finely dispersed steam, most comfortable for both the respiratory tract and the skin. A cloud of steam rose to the ceiling and a person lying on the shelf was gradually doused with small portions of this steam using brooms. With the right technique of pumping steam onto various parts of the body, the steaming process brings not only unforgettable positive sensations, but also the strongest healing effect.
When designing your own sauna, it is important to understand that in addition to the correct temperature to obtain the full range of positive effects of steaming on the body, the sauna must also have a certain humidity. The optimal figure is within 60%. It is this combination of temperature and humidity that provides ideal conditions for the health of the whole body.
It is this combination of temperature and humidity that provides ideal conditions for healing the entire body.
It is possible to ensure that the steam room has both the specified temperature and the correct humidity at the same time only if the stove is in it with a closed heater
To obtain high-quality finely dispersed steam, it is very important that the stones in the furnace are heated to at least 300 °C. And if the heater is open, then when the stones in it are heated to such an extent, the stove itself will be so hot that the temperature of the steam room will go beyond 70 ° C
Options for welded heating devices
When thinking about how to cook a sauna stove yourself, you must first decide what kind of fuel will be used.
In heating metal structures the following is used:
- firewood, pallets, coal and/or briquettes, i.e. solid fuel;
- kerosene and/or diesel fuel, low octane gasoline (the so-called heavy);
- electricity;
- natural gas.
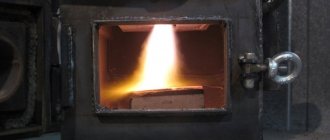
It is believed that it is best to heat a stove using firewood; they convey a specific sauna aroma.
The optimal fuel option for a metal stove in a sauna is, of course, firewood, pallets and/or briquettes. You can use brushwood or wood chips. This is an affordable combustible material. The degree of safety when using it is perhaps the highest.
Nuance! Kerosene, diesel fuel and/or heavy gasoline spoil the interior atmosphere of the room with harmful emissions and unpleasant odors. Fire safety when using them is significantly reduced.
Gasoline and kerosene have a very unpleasant odor, so it is not advisable to use them to fire a stove in a bathhouse.
Before you weld an iron stove into a bathhouse that will operate using electricity, you should think about the high cost of such a device. An electric furnace requires careful handling, high-quality wiring, and careful insulation of all wires and connections. This greatly increases the cost and complexity of installation work. Energy consumption during operation of the furnace is high. Electricity prices are constantly rising.
An electric stove in a bathhouse is considered the most expensive option for heating a steam room
Fuel for a gas furnace is supplied in cylinders or through a special outlet pipe. It is connected to the central highway. The gas poses a high risk of explosion or accidental fire. You should think about this thoroughly when deciding which stove to cook for your sauna.
Gas stoves in the sauna are also an inexpensive option for heating the steam room, but are very explosive
Advantages and disadvantages of the design
A metal stove is widely used for baths due to the many advantages it has:
- Due to its small size, it can be used even in the smallest home baths. Moreover, such structures do not require a separate foundation, which significantly saves time and money on building a furnace. The foundation is built light and simple enough to protect the structure from fire and fire.
- Constant combustion, which can be maintained in the furnace, guarantees uninterrupted thermal conditions. This gives you the opportunity to steam and do all the necessary procedures.
In addition to the advantages of metal products, there are also some disadvantages:
- Due to the fact that there is no material to store energy, the structure cools down quite quickly. To maintain heat, it is recommended to use combined or brick products.
- Such a stove is not suitable for heating a large sauna.
- Fire protection must be installed.
Thus, we can conclude that a metal stove is perfect for small baths. If there is a need to heat a large room, it is better to install another stove.
Preparing for work
You don’t need to specifically figure out how to weld a stove for a sauna; the drawings can be found here; they will make the task much easier. These options have been tested many times in practice, the calculations are made correctly and accurately. All you have to do is find a suitable option and follow the included instructions exactly.
All tools and building materials must be prepared in advance. You will definitely need:
- welding machine;
- tank for concrete solution;
- measuring container;
- construction mixer;
- tape measure, level, plumb line, ruler;
- Bulgarian;
- grinding and cutting wheels;
- hacksaw for metal;
- saw;
- hammer;
- technical knife;
- set of spatulas;
- rags.
Before welding a sauna stove, you need to prepare the necessary tools and equipment.
Basic consumables for creating a sauna stove:
- sand, cement or ready-mixed concrete;
- sheet steel (thickness 0.8 cm);
- metal pipes with a diameter of 60 cm and a wall thickness of at least 8 mm;
- reinforcing rod with a cross section of at least 1 cm;
- wheel disks;
- brick or stone;
- wooden plank.
Important! It is better to work in special clothes. Be sure to use gloves, a protective mask, etc.
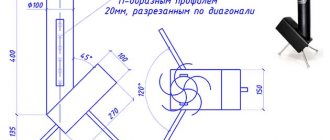
Scheme and dimensions
When choosing the most preferable pipe option, you need to take into account the internal cross-section and thickness of the steel. To do this, look at the marking: for example, it says “400*7”, which means 400 mm is the diameter, 7 mm is the wall thickness of the profile pipe. For sauna stoves, it is recommended to use pipes with a diameter of 500-600 mm and a thickness of 7-13 mm, but this is not mandatory; the choice of the size of a metal pipe depends on the area of the steam room and the required volume of water.
The most common pipe size for a bath is 530 mm; such installations are considered optimal for standard steam rooms. Some baths cannot boast of spacious steam rooms; they are used, rather, for washing, rather than for long rest, and then small stoves are placed here, for example, with a diameter of 426 mm. If the steam room space allows, then a pipe with a diameter of 630 mm will do.
Vertical
Vertical ovens are usually compact in size. The grate and heater are located under each other, and therefore the diameter of the stove is the diameter of the pipe. Making this variety is not difficult.
Horizontal
Assembling the horizontal version requires more labor-intensive work. For steam rooms, tubular stoves are used; they are distinguished by high strength indicators and create conditions for effective heat transfer into the air of the bath room.
Differences between vertical and horizontal types of furnaces:
- the flame in the vertical pipe travels a short path to the chimney in the upper part of the structure, the hot gases barely touch the sides of the body, but are mostly located in the middle;
- the horizontal version allows hot gas flows to the top of the installation, after which the gas, due to air rarefaction, exits into the chimney;
- the design of the vertical stove efficiently heats the walls of the steam room, but the floor and air at the top of the room are not able to warm up effectively;
- the horizontal version warms up all parts of the space, except for the area adjacent to the floor and the space under the firebox.
Before creating a furnace of any type, but especially a horizontal one, you need to make a competent drawing of the future device. Draw a diagram of the product, indicate all dimensions on it, and strictly follow these instructions. Errors made during the manufacturing stage of the stove can affect not only the performance of the installation, but also threaten the health of vacationers. In addition, this will greatly simplify the installation process.
How to pour a foundation
When you have chosen the place where to weld the sauna stove, you can get to work. First you need to pour the foundation.
The formwork is built from boards and other suitable material. Then the concrete solution is mixed with a construction mixer from sand and cement. You can use the prepared mixture by adding water to it according to the instructions.
Scheme of a buried foundation for a stove in a bathhouse
The size of the foundation depends on the dimensions of the future furnace. It is made larger by at least 5 cm. The finished solution is poured inside the formwork to a height of 25 to 40 cm. The surface is leveled. Air bubbles are removed with a stiff brush.
After technological hardening of the concrete, it is necessary to lay out the brickwork in 1 or 2 rows. Only clay mortar is used, fireproof and/or red brick is used.
The height of the brick base is from 15 to 20 cm above the finished floor level. The area is slightly larger than the planned dimensions of the future furnace.
To sum it up. A few words about IR radiation
Iron stoves have many advantages, but they all have one drawback - during operation they produce hard IR radiation, which leads to uneven heating of the air in the room. But this problem can be eliminated by making brickwork around the heater. The brick should be placed approximately 10-15 cm from the stove, so that air will circulate freely along the walls. In addition, the masonry also performs a protective function - accidentally touching a heated brick will not lead to a burn, which cannot be said about hot metal.
Two or three holes are left in one of the bottom rows to allow cold air to penetrate inside. Warm air will rise, driven by convection. You may also be interested in learning about the operation of a gas stove in a bathhouse.
Basic elements of a sauna stove
A metal sauna stove is assembled from the following elements:
- main firebox;
- a reservoir for collecting the resulting ash - an ash pit;
- a pass-through combustion pipe leading into the adjacent room (if necessary);
- afterburning system;
- tank with a capacity of 120 liters or more;
- steam pipe;
- inlet pipe for water supply;
- inlet for installing a shower (optional);
- protective screen (casing);
- tank for emergency water heating;
- tap and valve for water;
- chimney pipe system;
- lockable firebox door;
- grate.
Design of a welded metal stove in a bathhouse
You will definitely need a scoop and a special bucket to remove ash, soot and other combustion products.
Making a furnace
Following the instructions on how to weld a sauna stove from a pipe does not require special knowledge. It is enough to have minimal skills in working with materials, tools and a welding machine.
The casing in which the heater and firebox can be installed is made from a pipe 1 m long or a little longer. A water reservoir can be made from a piece 50-70 cm long.
A blower is cut in the lower part. Standard dimensions are from 18 by 5 (h) to 20 by 6 (h) cm. A steel plate or strip approximately 1.2 cm thick is attached a little higher.
A sauna stove can be made from a metal pipe
A grate (grid) needs to be welded above the ash pit. To fix the ends in the bar, it is necessary to cut holes of the appropriate size.
The entrance for the firebox is cut out at a distance of 40-45 cm from the lower edge of the blank pipe. The optimal size of the firebox is 30 by 30 cm. If necessary, a firebox measuring 25 by 25 cm is allowed.
A steel coupling must be welded to the top of the pipe. It is attached only at one end.
Hooks or loops must be attached to install the closing door. Next you need to weld the locking device - the latch.
Diagram of a sauna stove made from a pipe
A heater is placed above the firebox. Required dimensions for a small and/or medium-sized steam room:
- depth - from 12 to 15 cm;
- length - from 30 to 35 cm;
- container depth - 10 cm.
Another option is to weld a cast iron grate 40 cm above the grate. Large pebbles and/or cobblestones without sharp corners must be laid on top of it. The stones must first be washed with running water from a hose and dried. Can be treated with an antiseptic.
The pipe in which the firebox is installed is installed horizontally. A piece of pipe of a smaller cross-section is welded to it at a right angle.
Scheme of the horizontal arrangement of the furnace furnace made from a pipe
Now you need to weld the bottom to the second section of pipe. It is cut out of sheet metal. Then you need to install a valve and install a water tap. The bottom of the water tank is cut out of a steel sheet 8 mm thick and welded 10-15 cm above the heater. An inlet hole with a diameter of 12 to 15 mm is installed in the rear wall.
The lower end of the chimney must be welded to the bottom of the tank. An arched element made of stainless steel is attached to the top of the tank. The chimney pipe is welded to its inner bend. Water will flow through the remaining hole. After final assembly, the welding seams must be thoroughly cleaned and polished, and their tightness must be checked.
Methods for connecting chimneys to the stove
Increasing the heat capacity of the furnace
Brick cladding will help reduce heat loss and increase the rate of heating of the room. Masonry is carried out only using clay mortar with the addition of fireclay chips or powder. The proportion is 2x2x1. The brick used is 65 mm.
It is necessary to leave a technological gap of 10 to 15 cm wide between the masonry and the metal structure. Additionally, an upper and lower hole is formed between the bricks. This will ensure free air circulation and protect the iron stove from quickly burning out.
For safety, it is better to line a metal stove with bricks.
The minimum masonry height is 3 rows of bricks. You can cover a metal stove completely. In this case, a metal corner is attached to the upper edge of the masonry. The ceiling is subsequently mounted on it.
Lining a metal stove with brick helps to better retain heat
Types of refractory bricks
What types of wood-burning stoves for baths are there: comparison
Wood heating appliances do an excellent job of heating large and small rooms. You can make such a stove from refractory bricks or thick-walled metal sheets and cast iron. Brick kilns are capital structures with heavy weight that require a solid foundation. Metal models are more compact and do not take up much space. Let's compare these two types.
| Brick oven | Metal oven |
| pros | |
| Retains heat for a long time thanks to the large number of heated stones. | It will cost less than brick. |
| Creates a gentle heat that does not burn the skin and mucous membranes, and deeply warms the body. | Can be mounted in any corner of the steam room and does not require much space. |
| When using high-quality bricks, it will last for more than one generation of house residents. | Heats up the steam room quickly – in a couple of hours. |
| Simple and safe to use. | Saves fuel. |
| Minuses | |
| Long kindling – up to 5 hours. | Cools down quickly without adding fuel. |
| Takes up quite a lot of space in the steam room. | The cabinet becomes very hot and may cause burns or thermal shock. |
| In terms of the cost of the material and the cost of laying it from a professional craftsman, it is more expensive than its metal counterpart. | It may burst due to a sudden change in temperature (do not splash cold water). |
| Needs a reinforced foundation. | Over time it burns out and requires replacement. |
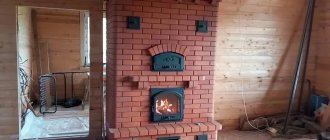
Owners of home baths are increasingly choosing a combined version of the stove: the inside is welded from metal, the outside is lined with refractory bricks. This tandem allows you to use all the strengths of stone and metal without the risk of burns and with significant fuel savings.
Homemade stoves made of metal and brick are not as expensive as purely brick ones and are quite easy to install
Basic safety rules
Solving the problem of how to weld a metal stove for a bathhouse is not difficult. The main thing is to comply with fire safety rules when carrying out all work:
- the finished stove can be installed indoors only after repeated preliminary heating in the open air;
- all seams must be welded tightly;
- only high-quality material can be used in compliance with all specified dimensions;
- the stove is positioned so that the firebox opening is opposite the front door;
- there should be no wooden floors, walls, etc. near the stove;
- around the stove, the floor and walls of the room must be covered with sheet steel and heat insulation;
- the chimney pipe is led outside, the minimum height is 70 cm above the roof ridge;
- around the passage of the smoke exhaust pipe through the roof you need to apply a layer of plaster, then whitewash it with lime;
- Small tubes should be installed in all technological openings in the direction of the chimney - this will prevent soot from accumulating;
- a damper must be installed in the smoke exhaust pipe to regulate draft;
- Chimney pipes must be cleaned periodically to avoid accidental combustion of accumulated soot.
The walls near the sauna stove must be insulated for fire safety
Installation Features
- In front of the firebox compartment, it is necessary to place heat-insulating material and cover it with a sheet of metal.
- The stove should not be installed close to wooden walls or materials that are quickly or easily flammable.
- You can line a metal stove with bricks. It will increase heat transfer and give the device a designer look, as well as increase safety of use. A wall thickness of half a brick will be enough, the distance from the firebox itself is 10-15 cm.
- The first few times the finished product should be heated to warm up and shrink the material, and then you can place it in the bathhouse.
- The firebox doors should be located opposite the entrance.
- The part of the chimney that passes through the roof should be covered with lime and plastered. The pipe should be 50 cm or more higher than the roof.
- A horizontal pipe firebox burns wood completely and produces more heat.
- It is most convenient to make a sauna stove from a thick, high-quality pipe that is not subject to corrosion and fits in size.
Modern specialists make a firebox with two compartments: in one solid fuel burns, and the other is designed to burn out what is left. This increases the operating efficiency. The size of the entire structure must correspond to the area of the bathhouse.
How to make a potbelly stove
For a small steam room, a potbelly stove is quite suitable. It has a primitive design, is easy to assemble, and works very efficiently. The cost of a potbelly stove is much lower than a stove welded from a pipe.
To work you will need:
- metal tank, you can use a barrel, tank or large milk can;
- reinforcing rod with a cross section of 6 mm;
- tap;
- file;
- chisel;
- hammer.
Scheme of a stove-stove
First you need to cut out a rectangular vent. A drainage hole is installed in the bottom. It should fit tightly.
At the location of the chimney, it is necessary to cut a hole using a chisel and hammer. It is done according to preliminary markings. The diameter should be 2 mm less than that of the outlet.
The outlet is forced into the prepared hole. At the same time, the reinforcing rod bends. A bent grid is inserted into the opening of the tank or can. Then it must be carefully placed inside the tank and leveled.
Welding a furnace from a vertical pipe
The main body of the furnace is a piece of thick metal pipe no less than 90 cm long. A sheet steel bottom must be welded to it.
Metal legs are welded to the bottom from the outside. You can use ready-made ones or make them yourself from thick reinforcing rod or other suitable metal structures.
The blower is cut into the side of the pipe. You need to step back 4 or 5 cm from the bottom. A door is made from the cut section of the pipe. A convenient handle, hooks or loops and a latch are attached to it.
Scheme of a vertical pipe furnace
To make a grate, you need to cut a circle from a metal sheet. The diameter is equal to the cross-section of the pipe. In the center of the workpiece you need to cut a hole in the shape of a square or rectangle. Sections of reinforcing rod are welded crosswise to its edges. The finished structure is placed in a pipe 15-20 cm above the bottom and welded.
The firebox door, measuring 25x25 cm, is cut 18-20 cm above the grate. Next, hinges, a handle, and a latch are attached to it.
To equip the heater, a grid of reinforcing rod is welded inside the pipe. It is placed 15 cm below the top edge of the pipe. A little above the grate you need to cut a hole measuring 25x8 cm. This will allow you to remove and install stones if necessary.
Container for water
The water tank is made from a piece of pipe 60 cm long. The bottom is cut out of sheet steel and welded from below. First, you need to cut out the entrance for the chimney pipe in the workpiece and install the pipe.
Water tank above the stove
To make a tank lid, you need to cut a circle of the appropriate size. The workpiece is cut in half strictly along the diameter.
One half is welded along the edge of the main pipe. A hole is first made in the semicircle through which the chimney pipe will subsequently pass. The second half is used to make a hinged lid. To do this, it is attached to the 1st semicircle using loops. First you need to weld the handle. By opening the lid, you can draw water and fill the tank as needed.
Remote tank for oven
A water tap is installed at the bottom of the tank. The last stage is welding the tank and the main pipe into a single structure. To properly cook a stove in a bathhouse with your own hands, you need to watch the video attached below carefully.