Main design components and principle of operation
A chimney is a structure used to eliminate exhaust gases after combustion of fuel to the outside. It is located vertically and has a cavity inside. The structure performs the following tasks:
- releasing toxic gases into the street (they are dangerous to humans);
- eliminating soot particles deposited on furniture and entering the body;
- removal of water vapor;
- fire prevention.
Before bringing the chimney through the wall , you should consider the principle of its operation. It lies in the physical properties of gases: when heated, their density becomes less, they become lighter and rise upward. As a result, the air in the firebox becomes thinner and fresh oxygen enters it. Good draft ensures constant combustion.
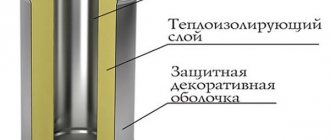
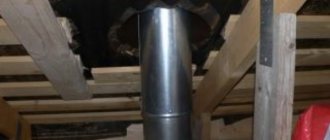
All chimney structures have the following components: a horizontal section (from the boiler to the wall), a vertical box, valves and inspection hatches (they are required for periodic cleaning of the walls from soot). At the top of the chimney, a cap is placed on the pipe to prevent precipitation from penetrating inside.
Components of a chimney Source dymoxody.ru
Advantages and disadvantages
The starting or support bracket is made of two strong cantilever structures that are connected at the base by jumpers. To a certain extent, it also carries a power load, since it serves as a support for the entire vertical mass of the chimney and is installed at the point where the chimney exits to the street.
The wall bracket is used to fix the smoke exhaust duct along its entire length, both vertically and horizontally. Able to withstand quite a large weight, create rigid support, and is easy to install.
The disadvantages include the fact that its fastening ring has a certain, unregulated cross-sectional size.
The clamps differ in the form of fastening the chimney ducts in them - instead of a closed ring, two tightening brackets are used.
As a budget option, ordinary clamps are used, attached to the walls with studs.
The main advantage of the telescopic bracket is its sliding design, which allows you to adjust the distance of the fastener from the base to the required amount. You can install it on uneven surfaces, maintaining the vertical position of the chimney. There is no need, as in other options, to cut rods or guides to the required size.
Devices consisting only of cantilever guides, without fixing clamps and ring pads, are easy to install. It is also easy to adjust the installation distance of the chimney outlet to the wall. However, their fastening is less rigid than in ring clamps.
Classification of chimney structures
Before installing a chimney pipe through a wall, you should consider the types of construction. By design, it can be single-walled or double-walled. The first option is made of sheet steel. It is inexpensive and suitable for installation in country houses and cottages. The disadvantage of the product is its short service life. For effective operation, the structure will have to be insulated.
Double-wall chimneys are sandwich systems that are recommended for installation in wooden houses. The chimney is multilayer and has low thermal conductivity, which is extremely important for highly flammable materials.
Depending on the material used to make the structure, there are:
- Brick . Often, their construction requires a foundation, and for proper laying, certain construction skills. This option is acceptable when building a fireplace in the house.
- Steel . Stainless steel material is cheap, but requires external thermal insulation. If this is not done, condensation will accumulate inside the pipes, which will affect the quality of traction. Moisture can also get into the firebox and extinguish the flame. It will be difficult to light the boiler again.
Steel chimney Source krovlyamoya.ru
- Asbestos-cement . Such products are heavy and fragile. A foundation is required for their installation. Under the influence of hot gases and moisture, such products deteriorate faster.
- Ceramic . Such a chimney can withstand temperatures of more than 100 degrees, but requires thermal insulation and careful operation. Installation of such pipes is difficult, and they are expensive.
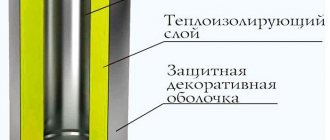
- From sandwich pipes . The preferred option for building a chimney on the street. To produce the product, two pipes are taken, placed inside each other. There is a thermal insulation layer between them. The system is installed simply and quickly.
When choosing a material, not only its technical characteristics are taken into account, but also its decorative properties.
Types of chimneys
Pipes are made from different materials, which we will consider in more detail.
Brick
Classic brick chimneys for gas boilers are still in demand, regardless of their many disadvantages and weak thermal characteristics. At the same time, they meet sanitary standards and rules, which state:
- The pipe is made of fireclay bricks.
- To build the walls, a clay solution or special glue is used.
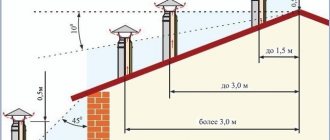
- To improve draft, the chimney rises above the level of the roof ridge.
Standards regulate the height of the pipe in relation to the roof ridge depending on the distance between them. Source kamin-estet.ru
- The masonry ensures tightness.
- At the internal hole, the deviation is no more than 3 mm per 1 m.
- To protect against precipitation, a deflector is installed on the head of the pipe.
The chimney can also have a mono design, which, due to low thermal characteristics, is repaired every 5-7 years.
Galvanized pipe
The “sandwich” type device today is the most effective option for chimney designs. The undoubted advantage of these chimneys is their resistance to aggressive environments and various mechanical influences.
The product consists of two pipes of different sizes, with one inserted into the other. Basalt wool is usually used as a filler between them.
Coaxial chimney
Currently, gas boilers use closed combustion chambers. Here, air enters and smoke is exhausted by a coaxial pipe. This is an original device, relatively recently introduced, but already very popular among users.
The non-standard solution lies in the supply of air through a pipe that removes combustion products. It turns out that one pipe performs two functions due to the design features.
A coaxial chimney is a pipe in a pipeSource rubankom.com
And its characteristic difference from ordinary pipes is the following... A smaller pipe (60-110 mm) is located in a larger diameter pipe (100-160 mm) in such a way that they do not touch each other.
At the same time, the structure is a single whole due to jumpers along the entire length and is a rigid element. The inner pipe serves as a smoke exhaust, and the outer pipe serves to supply fresh air.
Air exchange at different temperatures creates draft and sets the air mass in directional movement. The air in the room is not used during operation of the boiler, thus maintaining the microclimate in the room.
Ceramic
Such a chimney is a composite structure that includes:
- Smoke exhaust duct made of ceramic material.
- A layer of insulation or air space.
- Expanded clay concrete outer surface.
This complex design is due to several reasons. First, the chimney pipe is too fragile to be left unprotected.
The ceramic tube is always located inside some solid blockSource heatylab.comSecondly, ceramics have high thermal conductivity, and therefore it needs reliable insulation. The inner round pipe has a smooth surface, while the outer one has roughness that does not affect the integrity of the product.
Typically, such chimneys are produced in lengths from 0.35 to 1 m, depending on the manufacturer. The connection of the inner and outer pipes occurs through a lock, which is a thinning in outer size at one end and an expansion of the inner pipe at the other end.
The expanded clay concrete outer surface is made of a square shape with a round hole inside. In addition, this product provides space for insulation, which is held in place by metal bridges. At the same time, they are fixed on the outer surface and make the pipe securely fastened.
Stainless steel
A steel gas chimney seems to be more reliable than a brick one. They are resistant to corrosion, immune to temperature fluctuations, and are not affected by increased air humidity and aggressive environments.
Stainless steel chimneySource pech-kamin.ru
In addition, such stainless steel pipes have a number of advantages:
- Long period of operation.
- Multifunctionality.
- Relatively low cost.
- Great strength.
- Possible implementation of a product of any complexity.
Chimneys made of this material are characterized by an assembly of modules, which allows the replacement of a damaged segment if necessary. The installation of chimneys is done using special outlets that allow them to fit harmoniously into certain roof elements.
General requirements for construction
Since you can remove the chimney correctly yourself, you should take into account the technological requirements. The cross-section of the smoke exhaust ducts depends on the power of the heating equipment. With lower parameters, draft will deteriorate and combustion products will be removed more slowly.
Placing the pipe inside the box Source petropech.ru
To create normal draft, it is better to use a round chimney. The number of bends should be reduced. The minimum allowed height of the structure is 5 m. If the roof covering is prone to ignition, then a spark arrestor is placed on it in the area of contact with the chimney.
High-quality ventilation is installed near the boiler. The length of the inner part is no more than 1 m, otherwise this area will quickly become clogged with soot and traction will deteriorate. The chimney is equipped with a reservoir to collect accumulated condensate and a window for maintenance. Do not make 90° bends.
Advantages and possible disadvantages
Before leading the pipe from the stove through the wall, you should consider the positive and negative aspects of the design. The following are its advantages:
- saving space indoors;
- the construction is not at the initial stage of construction of the building, but after its completion (this is the best option if it is necessary to reconstruct the house);
- ease of maintenance and repair;
- less construction work;
- ease of regulation of the chimney if necessary to change the draft force;
- high level of fire safety of the building and heating equipment;
Fire protection of a chimney Source krovlyaikrysha.ru
- there is no need to violate the integrity of the rafter system, there is no need to make holes in the ceiling or roof;
- optimal level of safety in terms of leakage of toxic gases.
However, this design also has disadvantages:
- requires mandatory thermal insulation;
- low efficiency (heat from them enters the atmosphere);
- at high altitudes, operation of the structure is difficult due to the large windage, so additional fastening is required;
- with a large number of bends, the rate of removal of combustion products decreases.
To prevent water from the slope from entering the chimney, it is necessary to install special ebbs. Sometimes the design can disrupt the exterior of the building.
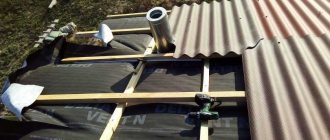
How to install a chimney through a roof
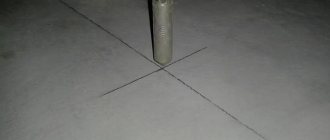
Before the pipe goes through the roof, it must be routed through the ceiling of the room. To do this, create a hole in the ceiling. The minimum distance from the wall to the chimney is 25 cm.
There are two options for installing a chimney through a hole in the ceiling:
- In the first case, thermal protection is made independently. To do this, the edge of the hole in the ceiling must be lined with a fire-resistant coating. The space between the coating and the pipe is filled with mineral or basalt wool. The entire structure from the side of the room is covered with a stainless steel sheet. Between the steel and the ceiling there must be a layer of thermal protection, for example, mineral wool.
- The second option is simpler. It is enough to purchase a ready-made ceiling-passage block. In this case, the edges of the hole in the ceiling are covered with mineral wool, and then a block that already has a thermal insulation box and a stainless steel coating is inserted into it. The pipe does not have to be tightly attached to the ceiling; it is enough to simply set it in a vertical position.
Exiting the chimney through the roof is the most difficult part of the installation.
It is important to know the location of the roof beams and slabs in order to position the pipes correctly. The chimney must pass between the beams without touching them
The distance between the chimney and flammable building materials must be at least 13 cm. All combustible materials must be additionally insulated with a thermal protective layer, for example, using mineral wool. This will prevent a fire if the pipe starts to heat up.
723fd6e6b45f4c0ad1909c3fda571530.jpe
From the outside, the pipe is separated from the roofing by at least 13 cm. There is a layer of thermal protection along the edges of the roof, the space between the chimney and thermal insulation is free. To isolate it, you need to purchase a master flash. This part is called a rubber “skirt” or “cuff”.
In addition to rubber, there are more reliable silicone options. The master flash must be selected according to the pipe diameter and roof configuration. It is put on the pipe, pressing it tightly to the roof.
A layer of sealant is applied between the cuff and the roof, as well as the cuff and the pipe.
After this, the master flash is attached to the roof with roofing screws. The process of installing the chimney and fastening the head is completed.
Preparing for assembly
Before installing a stove in a country house with a pipe exiting through the wall, you need to prepare. Work requires special clothing and gloves. If you will be cutting metal products, it is advisable to wear safety glasses.
Selection of tools and materials
To complete the work, the following tools are required:
- drill, equipment for cutting material;
- heat-resistant sealant;
- riveter;
- clamps, dowels, corners;
- foil construction tape;
- screwdrivers;
- level, plumb;
- knife;
- ladder;
- When working with concrete walls, you will need a hammer drill.
Components for installing a chimney Source vse-postroim-sami.ru
The materials you will need are a steel pipe, with which the horizontal fragment is connected to the boiler. You also need a tee for connecting pipes, an elbow (with its help the structure is directed upward), and a support console. Brackets and dowels are used to mount products on the wall. The connection of several pipes is carried out using clamps. You also need thermal insulation material and a protective cap.
See also: Catalog of companies that specialize in the installation of fireplaces, stoves and utility networks.
Choosing a location
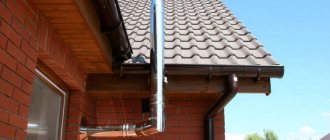
The house has central and side walls. The second is located on the side of the slopes and under the roof overhangs. Liquid gets onto this part when it rains (if the drainage system is not fixed). There is a small roof overhang above the central walls, so the risk of liquid entering from the roof is minimal.
It is better to mount the smoke exhaust structure on the front wall. Here it is taken into account that there should be no windows or balconies on it along the line of the chimney. If you have to install a pipe through an overhang, then high-quality fire protection is installed.
Choosing a location for the chimney outlet through the wall Source stroychik.ru
Calculation of chimney height
Since it is possible to correctly bring a chimney through a wall to the street in a wooden house only if technical requirements are met, the first parameter that is taken into account is the height of the structure. It depends on the number of floors of the house. If the height of the building does not exceed 5 m, then the minimum parameter for the height of the structure is 5 m. If this value is neglected, the structure in the house will smoke in the house, the draft will deteriorate, and the performance of the heating device will decrease.
If the pipe is too long, fuel consumption will increase. When the height of a building exceeds 10 m, the main reference point is its ridge: it should be 0.5 m below the chimney. This characteristic is affected by the cross-section of the pipes and the power of the heating equipment.
Chimney height Source vosaduly.ru
Pipe diameter calculation
The internal diameter of the structure must correspond to the dimensions of the pipe. Any narrowing of the internal volume of the pipe affects the formation of draft. The presented value is affected by the power of the equipment: the higher it is, the larger the internal diameter. You need to follow standard building rules:
| power, kWt | Internal section, cm | Minimum diameter, cm |
| up to 3.5 | 14×14 | 15,8 |
| 3,5-5,2 | 14×20 | 18,9 |
| 5,2-7 | 14×27 | 21,9 |
If we take into account all the technological features of installation, the structure will last for decades without significant problems.
Homemade antenna mast
I want to install a mast at my dacha. The purchased one comes out like an airship to lift it. The minimum height (according to the height profile) should be 12 m, 15 is better, but this is for growth. I just don’t want a pole because of the difficulty of finding and delivering such a tree. I found an aluminum profile and made some calculations. P.S. the pipe, which is 1 piece in quantity, will be sawn into 3 parts and used for joining supporting pipes.
The antenna will be 5-7 el. Yaga at 98 MHz, for now. Next I’m planning a vertical for 2 and 70, just above the FM, a small one - about 2 m. I suspect that I will have to add another tier of synthetic cable to the very end of the mast. Perhaps in the future DVBT will be added (see Finns). The total weight of all antennas is no more than 10 kg. Wires. HZ.
Will a 40-45 mm mast be enough for them based on calculations with 3 tiers of guys? Maybe the first option will work, which is 30 mm and 4 tiers of guy wires? Or don’t bother and think about how to drag the “perch”?
P.S. I chose answers 2, 3, 4.
Those. Should I start with the thick one at the base and work my way down? Then it will be a telescope. I rejected this option, because When purchasing pipes at the base, the price tends to match the purchase price.
But how I wanted to connect it won’t work? Will it break at the connection point? I thought 3-4 tiers of guy wires and an arrow-type lift would save the father of Russian democracy. After all, the inner pipe will only be a guide and there should not be any special loads on it.
Can you be a little more detailed? Are the pipes metal? Somehow the difference in diameters is small, I didn’t find anything like that, except that the wall is 1 mm thick. Even 12m is not enough, but the trouble begins. It will hold up - I’ll continue to think about it.
I looked at Avito - 10 m reinforced steel mast D = 50mm - 4 tyres and 20 kg. Army telescope 8 m with latches - 4 tr. and also under 20 kg, but it is much easier to deploy the telescope alone. The only thing I didn’t like about the army one is that the upper elbow is about 22 mm in diameter. On the other hand, steel has a diameter of 50 mm - there is room to turn around up to 15 m.
I compared it with my calculations - if we take it as steel D = 50 mm, then it turns out to be 10 m approximately 17 kg. The weight gain of aluminum is not that big. And I looked towards aluminum precisely because of the weight - to lift it alone. A telescope made from aluminum is both expensive and heavy. Maybe it’s easier to buy one of them to begin with, and then build up?
Damn, aluminum is definitely metal! “Heavy Luminous,” so to speak.
Thank you. I can imagine the basis. I'll weld it from iron if I find the right thickness.
I plan to raise it using a system of blocks at the ridge of the roof - the antenna will be located near the house or summer kitchen. Both have their pros and cons. The house has full grounding and a buried steel pipe 120-150, protruding 70 cm from the ground. I can sit in the summer kitchen for 24 hours without disturbing anyone at night, plus I can drink (tea) and smoke “without leaving the cash register.”
6 meters is not a mast. The mast starts at 10. And 6 is a stick. Of course, I won’t strain myself - there is already an approximate design for how it will rise.
Yes, blocks are everything to us.
Only, here is a home-made antenna that is comparable in price to a purchased one, a little lighter and somewhat higher. Here is the calculation of a slightly lighter version of 12.5 (without the lowest pipe in the table) and 15 m. diameter, thickness, length, weight, price of 1 kg, cost of the whole, quantity, height in the mast, cost, weight.
In red are the height and price, to the right of the price is the weight. It's just a mast without anything.
I plan to extend the guy wires at 6, 10 and 12.5 m, and mount them in the ground 6 or 7 m from the mast. Do you think 3 tiers will be normal?
P.S. Today there will be a salary. I’ll estimate the cost and start purchasing the thinnest knees first and look at the strength. Depending on this, it will be clear where to move at the base. I hope that D=40 mm with a 3 mm wall will be enough for the lower part.
P.P.S. I have a base for a chair in a boat made of D=18 mm pipe and a 2 mm wall - it has withstood my 105 (in shorts) on any wave for a couple of seasons already. This one, in the lower right corner, is bent out of a solid pipe:
I bought it today. I calculated 4.890 from their price list, but in reality it turned out to be 5.680. Their price list on the website is confusing with the weight of the pipes.
In the evening I will try to collect and evaluate the difficulty of the climb in one. Labor D16t: F45x2x3000 - 3 pcs. Ф40х3х3000 – 1 pc. Design height
10.2 m. I will use the thin one to connect the thick one, an F40 insert at the base with rivets to “thicken” the place of the bolt in the rotation axis and fasten it through with M8 bolts. I will lift it on the axis below through a block on the ridge. There will be 2 tiers of guy wires - 6m and 10m. At 3m there will be a rod for attaching to the wall. The top will be extended over time with a 2m wooden beam (when I try vertical polarization.
New questions have appeared for the experienced ones: - how long to “block” the pipes? Is 30 cm in each direction enough? Maybe 25 cm will be enough? — Will M8 bolts be enough or M10? — for each connection I plan 2 bolts mutually perpendicular, i.e. one above the connection, the other below. Or do you need 2 below + 2 above?
I forgot the most important thing, which is why I messed everything up. The weight of the 10.2 m mast came out to 9.4 kg + the weight of the bolts! The same steel one - 20 kg and the price is almost the same! Except that it has a thrust bearing and one place for attaching guy wires.
P.S. By the way, are guy ropes or stretches correct?
Installation instructions
Now you should directly consider how to install a chimney through a wall. The technology may differ slightly depending on the material used to construct the building.
Brick base
If the walls are brick, then installation involves the following work:
- Determination of the exit area of the structure. It should not disturb the exterior of the house.
- Marking the wall. First, the installation location of the boiler is determined. Next, the height of the boiler and the outlet pipe is measured. At the same time, we must not forget about fire safety standards for organizing heating. The pipe outlet is marked in the required location. The parameters are checked several times.
- Making a hole. This requires a hammer drill. The hole is insulated with fireproof material. For concrete walls or brick structures, mounting foam and asbestos sheet are suitable.
- Box insert made of fire-resistant material.
Rules for installing wall brackets
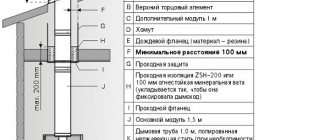
The installation of sandwich pipes and coaxial chimneys in terms of their fastening has certain rules.
Fastening devices must be installed along the height of the chimney every 1.5 - 2 meters, which ensures safe and reliable fixation of the entire chimney system.
The tee is secured with a support bracket on powerful cantilever guides.
Fastening devices cannot be installed at the junction points of the channel parts; the best place for them is in the middle of the pipe.
Video description
How to pass a pipe through a wooden base is shown in this video:
- Making a hole for the box. At this stage, the diameter of the product is taken into account, as well as the space for the insulating material (basalt wool inserts).
- Pipe installation. An asbestos sheet is laid between its walls and the box. The element is displayed strictly at a right angle. Any deviation will impair the operation of the boiler.
- Attaching a protective screen outdoors. This is a steel plate fixed to the outside of the wall. It protects the wood from overheating and reduces the risk of fire.
Pipe protection with insulating material Source petropech.ru
- Tee installation. A vessel for collecting condensate is attached to its lower part.
- Installation of support. It is screwed to the wall or rests on the ground. Its task is to maintain the vertical part of the structure.
- Chimney connection. Condensation should not get into internal joints. Every meter the structure is fixed to the wall with brackets. During fastening, a building level is used to maintain the strictly vertical position of the pipe. The last clamp is installed under the roof.
Lastly, a protective fungus is put on the pipe.
Sandwich pipe assembly
The manufacturer's manual recommends using two types of assembly, each suitable for certain conditions. When assembling and installing a chimney, you need to proceed from two factors:
- Smoke installation.
- Installation "by condensate".
The first option is not entirely correct from the point of view of organizing high-quality smoke removal, since the formed condensate will fall into the cracks and gaps of the middle layer. This happens due to a loose fit. It is very difficult to notice this, especially during installation, but over time the problem will manifest itself. And when frost sets in, water that gets into the heat insulator will simply “break” the chimney.
Two installation principles: “smoke” and “condensate”The second type of assembly is more preferable and correct. With this solution, all moisture flows freely through the sealed joint and enters the condensate receiver. Things will be the same externally; drops will flow down the seams without getting into the heat insulator.
Video description
You can see the chimney outlet through the wall in a bathhouse in this video:
- the upper part of the structure is located slightly above the roof ridge so that the smoke is blown away by the wind;
- there should be no other communications or wires near the box through which the pipe is inserted;
- Regardless of the material of the chimney, its horizontal part is inserted into the wall at a right angle.
Before making a chimney through a wall in a wooden house, you should treat it with an antiseptic and a liquid that increases its resistance to fire.
Stainless steel for sandwich pipes
The table shows the most commonly used stainless steel grades and their characteristics:
| Brand AISI | Application | Characteristics |
| 430 | For external casings of sandwich pipes | Belongs to economy class. It reacts poorly to elevated temperatures and has sufficient resistance to atmospheric influences. |
| 439 | As an air exhaust from gas boilers and solid fuel installations with a power of up to 30 kW. | The composition includes titanium, which increases thermal stability and resistance to aggressive environments. |
| 316 | The best option for any type of gas boilers. | The composition includes molybdenum and nickel, which increase resistance to acids and high temperatures. |
| 304 | For boilers of low and medium power. | They contain a small amount of nickel and molybdenum. Refers to the economy version of the AISI 316 brand. |
Selection of insulating materials
So , how to properly install a stove in a house with a chimney through the wall is already clear, so you need to consider the issue of insulating the outer part of the structure. If a sandwich system is used, then this procedure need not be carried out (except for the place where the element passes through the wall). The insulation must be fireproof. It is allowed to use the following materials:
- Stone wool. This is the best option for a wooden house. The material is easy to use, does not contain harmful substances, does not burn or smolder. Cotton wool not only does not burn, but also prevents the spread of open flames.
Insulation of structures on the street Source teplo.guru
- Asbestos. Many masters refuse to use it. The material contains toxic carcinogens. However, it has high insulating qualities and does not come into contact with humans in any way.
- Superpower. Modern insulation, which does not burn, provides good insulation. The disadvantage of the material is its high cost.
- Basalt cardboard. It is characterized by a long service life. The insulator is relatively cheap and resistant to high temperatures. The material contains no toxic substances, and its quality is better than mineral wool.
The insulated structure may not look very presentable, but this stage cannot be avoided. Without insulation, condensation will collect inside the structure. It will not only deteriorate moisture, but will also have a negative effect on the metal.
How to secure the joint between a chimney and a wooden ceiling?
And now we will touch on the most important point, knowledge of which will help you avoid a completely unexpected fire.
So, the higher the temperature of the flue gases, the more the sandwich pipe heats up, and all the structural elements around it are subject to temperature effects. Therefore, it is extremely important to ensure that the passage elements are reliably protected. And don't think that everything is so simple.
For example, an ordinary tree without special protection becomes charred at a temperature of 200 degrees. And dried wood can even catch fire at a temperature of 270 degrees Celsius! If you expose wooden joists to temperatures of 170 degrees for more than a day, they can also catch fire. Unfortunately, it is this point, which many do not know, that often causes fires, even if a high-quality sandwich pipe is installed.
Therefore, it is advisable to carry out the ceiling with good insulation of sufficient thickness so that the heat from the pipe to the wall and wooden elements is practically absent. In addition, the more the wooden floor itself accumulates heat from the sandwich, the worse the wood will perceive this heat each time. Of course, in an hour or two, the usual insulation in a polyurethane foam unit does not have time to warm up to a critical temperature, but the problem is that, in the language of stove makers, after heating, heat accumulates in the wood and insulating materials and gradually changes their chemical composition.
For example, with prolonged and constant cumulative heating, wood can ignite at a temperature of 130 degrees! But on the outside of the sandwich it often reaches up to 200 degrees (from 75 to 200, as laboratory tests have shown). So such a sad thing happens, when the stove or fireplace was successfully lit for many years, everything was wonderful, and then one day the owners fired it just 2 hours longer and hotter than usual (to warm up on a particularly cold winter evening or to heat the steam room for guests) , and the temperature in the sandwich exceeded the critical temperature, and the same temperature of 130 degrees Celsius reached the floor wood that had already dried over the years.
You also need to be careful if mineral wool is used as the thermal insulation material for polyurethane foam. Over time, from exposure to high temperatures, it also changes its properties and even becomes more thermally conductive! This does not mean that the wool will one day risk catching fire, but the outer contour of the chimney in this place will already be much hotter than you originally expected. But this is a factor that was not initially taken into account!
That is why experienced stove makers advise not to make the ceiling insulation too dense (the denser it is, the more heat it accumulates). Moreover, the natural possibility of blowing air through the pipe is vital:
They also often make a dangerous mistake by poorly calculating the distance between the rafters for the passage of the pipe, which does not correspond to the norm. Please also note that an empty ceiling assembly, in which no insulation has been installed at all, is also not the best option.
Also keep in mind that the material that envelops the inner arc of the chimney tends to settle slightly over time. As a result, the junction of the two walls is sometimes unprotected. And, if this joint burns out (and it is especially dangerous if it is also located inside the ceiling), then the fire that arises in such voids will be almost impossible to extinguish. Therefore, once every year or two, all passage units of the sandwich chimney should be carefully inspected.
Here's how to properly organize the passage of a sandwich chimney through the ceiling in its simplest form:
If you install a water tank on the chimney, then the entire installation should look like this:
Please note how the sandwich pipe should be passed through the ceiling:
And finally, if it is not possible to place a stove or fireplace directly under the sandwich pipe outlet, you will need a special tee:
Fire safety rules
The distance from the brick wall to the chimney is 130 mm. If the structure is wooden, then this parameter increases to 260 mm. When pipes pass in close proximity to rafters or through flammable materials, these places must be insulated.
Fire protection of a chimney Source petropech.ru
When using solid fuel equipment, the chimney is equipped with a mesh metal spark arrester, regardless of the material from which the building is constructed. The cell size does not exceed 5*5 mm. In addition, there are other rules:
- the chimney head must be positioned correctly relative to the roof;
- to reduce moisture condensation, the temperature at the outlet of the structure should be 15°C higher than the dew point temperature (60°C);
- if the chimney height is less than 5 m, then the installation of an electrically driven smoke exhaust is required.
The outer wall is separated from the structure by an asbestos-cement sheet or basalt overlay.
Fastening
The maximum length of the chimney, starting from the grate and ending with the deflector, can reach 5-6 meters. At pipe joints, it is necessary to use a sealing material with heat-resistant properties that can withstand temperatures up to 1000 °C. Upon completion of installation, the protective film must be removed from the structure.
To further clean the chimney from soot, a revision is provided in the pipe body - a tee with a door on the side. This element cuts directly into the channel.
For reliable support of the chimney, you can make your own bracket from steel corners measuring 30x50 mm. To do this you will need a drill, an angle grinder and M10 bolts. The presence of the last element is not necessary, since the bracket frame can be fastened using electric welding.
Errors in chimney installation
Since it is not always possible to correctly install a stove in a house and route the pipe through the wall, you should consider the most common installation mistakes in order to avoid them. Incorrect robot design is possible in the following cases:
- Insufficient amount of insulation at the junction of elements. In this case, the pipe will overheat.
- The presence of joints where they pass through a wall or roof overhang. Such installation increases the risk of fire in a capital structure.
Design features of the bracket
Bracket with a clamp for attaching the chimney to the wall
The most common type of fastening element is an adjustable bracket for fixing the smoker to the wall. It consists of two rods with round holes for screwing to the house and elongated grooves for changing the position of the clamp relative to the outside of the wall.
The clamp itself consists of two parts: supporting and fixing. The first is secured to the rods with screws, the second is attached to the support in the same way. The clamp is designed for a specific cylinder diameter.
Video description
This video clearly shows an example of violation of the rules for installing a sandwich chimney:
- The position of the pipe is not observed. It is installed strictly vertically. When insulating main walls with foam plastic or mineral wool, long dowels are used to secure the chimney.
- There is no ebb on the side roof slope. In this case, precipitation can get on the insulation and impair its functions.
- Insufficient overall vertical height. This error leads to poor traction.
Problems arise when using low-quality insulating material. Cheap insulation shrinks over time, so there is a possibility of local overheating of some parts of the chimney.
Preparatory work
Before proceeding with installation, it is necessary to clarify several basic factors. When selecting a channel, you need to take into account the height of the building, the diameter of the future channel, and others. Give special attention to the installation site and location of the heating equipment. Installation of a sandwich chimney, like any other, can be done in two main ways:
- Internal.
- External.
For example, when installed internally, the installation of a sandwich chimney is carried out directly in the heated room, and in this case additional sealing is not required. But, there is a nuance, if the attic space is not heated, in this case, it would be useful to additionally insulate the pipe during installation and carry out a seal to prevent exhaust gases from entering the rooms with the ensuing consequences. In addition, at the initial stage, think about what to do with those materials, walls, next to which, in contact, the chimney will pass. Surfaces must be treated with special fire retardants.
Do-it-yourself sandwich chimney installation
As for external systems, the assembly of the external sandwich chimney must be carried out taking into account the mandatory insulation. These types are much safer, since they immediately remove the pipe to the outside during installation, reducing the likelihood of exhaust gases entering the premises.
Which type and shape should I choose? Here it is worth giving preference not only to aesthetic indicators, but also to functional ones. Keep in mind that it is easy to fix or fasten a square chimney, it is quite easy to use and does not require special skills during installation. But the main disadvantage of such a system is the accumulation of condensation and other unnecessary dirt and dust inside. Round elements in this part are much preferable, given their shape; they retain much less not only a variety of debris that can get in from gusts of wind, but also form less condensation, naturally taking into account proper insulation. The only thing is that such systems are difficult to install and you will need skill. In addition, do not forget to prepare the necessary tools for installation in advance. So, the tools needed to install a chimney:
- Drill, grinder.
- Jigsaw, screwdriver.
- Hammer.
- Screwdrivers.
- Protective ammunition.
- Spatula and chisel.
Expert advice
Before purchasing the necessary materials for arranging an external chimney, the power of the equipment is determined. It affects the diameter of the pipes. You can also use these expert tips:
- if the heating equipment is equipped with forced draft, then it is not necessary to increase the vertical section of the structure; it is enough to remove the horizontal pipe;
- a horizontal section that is too long helps slow down the smoke flow (the value should not exceed 1-1.5 m);
Rules for installing chimney pipes Source krovgid.com
Inspection openings are installed not only on the outer part of the structure, but also on the internal horizontal element.
Is it possible to put a cap on a chimney pipe and how to do it correctly
Such a simple thing as a cap on a chimney pipe raises many questions: what should it be like, how to make a cap with your own hands, and in general, is it necessary to install it? Discussions and disputes on this topic occupy more than one page of the popular forum, but you will not find a definite answer there. Let's try to solve these problems ourselves, starting with the need to install a protective cap.
- 1 Chimney umbrella - pros and cons
- 2 Is it necessary to install a cap - recommendations
- 3 How to make a chimney cap 3.1 Making a simple round mushroom
- 3.2 Rectangular gable umbrella
Service life of the external chimney
The service life of the structure depends on the material of its manufacture and correct installation. When used correctly, ceramic pipes will perform their function for up to 40 years. A brick chimney can be used for more than 50 years. Stainless steel will have to be replaced after 15-20 years, but it all depends on the thickness of the metal. Galvanization has the shortest service life: up to 10 years.
The durability of the structure is affected by the heating temperature of the exhaust gases. A high-quality sandwich system will last up to 20 years. Structures last longer if heating equipment runs on gas or pellets.
Briefly about the main thing...
Chimneys can be single- or double-walled. Based on the material of manufacture, metal, brick structures and structures made of sandwich pipes are distinguished. The last option is optimal for private houses. When installing a chimney, the rules for its placement in the room are observed. Its functionality, as well as the presence of draft in the heating equipment, depends on the correct determination of the diameter and height of the structure.
The installation technology through a wooden and brick wall is the same, but there are some nuances: wood is more susceptible to ignition and requires maximum protection. During installation, you must comply with fire regulations, and also take into account possible errors.
Ratings 0
Tools required for installing a chimney
In order to install a chimney in your home with your own hands, you will have to stock up on the following minimum set of tools:
- a grinder for cutting metal and a drill for drilling holes
- spatula, chisel and trowel
- a screwdriver, preferably with hex bits and a jigsaw, possibly electric,
- small hammer and Phillips screwdriver,
- protective gloves and glasses
What you need to remember when installing a chimney yourself
Based on the method of construction, chimneys can be divided into internal or external. Let us consider in more detail in which case you need to choose one or another option.
Thus, the internal structure of the chimney can be used for the construction of heating systems based on heating boilers or fireplaces. Such systems are usually installed inside walls. After installation, such chimneys are closed in the thickness of the wall and decorated. As an advantage, it can be noted that such a system is not subject to moisture condensation and is well protected from the influence of atmospheric moisture.
However, combustion products passing through the chimney have a higher temperature. Consequently, sections of walls running next to internal chimneys become very hot and can catch fire. Thus, it is not recommended to install internal chimneys in walls built from flammable materials. Also, such systems are not recommended for powerful boilers with a large flow of hot combustion products.
chimney components
It is recommended to install an external chimney for industrial and simply large heating systems. Usually they are arranged if the area of the heated room exceeds 500 square meters. Also, such a chimney can be installed if the installation of an internal chimney involves significant difficulties. So, in a building with concrete walls and ceilings, it is easier to break through a slab between floors than to drill a channel in the wall.