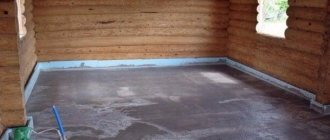
In the most unforeseen situations, a potbelly stove always came to the rescue.
To this day, it is a reliable assistant for owners of country houses, garages and even small residential buildings. Time does not stand still, everything changes - and now the designers have already reached the potbelly stove. Its updated look can harmoniously fit into and even embellish a room in an elite mansion.
We are more concerned about the question not of aesthetics, but of practicality: how to make a potbelly stove yourself, what is required for this? This article will help anyone who is planning to make this type of useful heating device on their own.
Advantages and disadvantages of a potbelly stove
A potbelly stove is a fairly common type of heating equipment. It is valued for a number of positive aspects:
- Versatility . The ability to use almost any type of solid raw material for heating: firewood, sawdust, coal, wood chips, briquettes, pellets, peat. Sometimes some models use used engine oil as fuel.
- Simplicity of design and ease of installation . This allows you to make a stove with your own hands. Moreover, any available material is suitable for this.
- Small size and weight allow this structure to be placed in a small room, in limited space.
- Perhaps the most important point is the absence of such requirements as the construction of a foundation, site arrangement, or installation of a chimney pipe.
With all the positive properties, a potbelly stove, like any equipment, has some disadvantages:
- Protection is required from combustion elements falling out of the firebox, for example, embers, sparks.
- Compliance with safety rules when working with the stove. There is a risk of burns from the strongly and quickly heating walls of the structure.
- Significant fuel consumption during operation. The best option is to use a potbelly stove for heating for a short time.
Operating rules
A homemade long-burning boiler, Buleryan, has a simple structure, but to achieve better results in terms of efficiency and long service life, you must adhere to some simple rules:
- Only dry fuel is used for combustion: briquettes, pellets, firewood, wood chips, etc.
- After operating the stove, the ash should not be completely removed each time; its layer protects the bottom from burning.
- Do not use wet firewood; plaque forms on the walls of the boiler and chimney, which reduces the efficiency indicator.
- To achieve maximum efficiency indicators, you need to close the damper throttle and the blower door to enhance the convection process.
Varieties of potbelly stove
There are many variations of the potbelly stove type stove design. Therefore, it will not be difficult to choose exactly the model that is ideal for a specific room: it will have a set of appropriate technical parameters, as well as satisfy its appearance. To make a potbelly stove, you can take any available material, be it a metal tank or a medium-diameter pipe, a barrel, an old gas cylinder, or sheets of iron with a thickness of at least 3 mm. The main thing is that the material is durable, with reliable walls.
As for heating a garage, any type of potbelly stove is suitable, but in a residential area, some models will be inappropriate.
We invite you to consider several types of potbelly stoves, their features, and methods for making them yourself. So, you can make the right choice in favor of the model you like.
Design
The rocket-type stove has a fairly simple design, which is made from pipes of the required diameter.
The fuel chamber is a horizontal section of pipe into which fuel is placed. In some cases, the oven may have a vertical loading option. In this case, the device consists of three structural elements - two vertical pipes of different heights mounted on a horizontal pipe. The short section of the pipe is the fuel compartment, the long section is the chimney.
To ensure increased efficiency, rocket furnaces may have additional design elements:
- Fuel compartment (vertical or horizontal position) – for loading fuel.
- Afterburner (horizontal) – for fuel combustion and thermal energy accumulation.
- The ash compartment is for afterburning pyrolysis gases that are formed during fuel combustion.
- The outer body of the furnace is for thermal insulation of the structure.
- A lounger is a platform for resting in a lying or sitting position.
- Chimney pipe - for removing fuel combustion products and creating natural draft.
- A hob is a horizontal platform for cooking food or heating water.
Model No. 1 – potbelly stove using waste oil
I would like to immediately note that this design is not suitable for use in a residential area where people are constantly present. Why? The fact is that during operation, during the combustion of waste oil, a specific aroma is released, and arranging a good exhaust hood will not help.
Materials
To create this option, the following types of material are required:
- metal sheet, several pieces, 5 mm thick. We will make all the parts and blanks from them.
- Pipes for making some structural elements.
- Pipe under the chimney.
Process of creation
The drawing below of the potbelly stove shows all the necessary parts, indicating their sizes.
So, we will divide all the work on creating a potbelly stove using waste as a raw material into successive steps:
- We mark all the necessary parts on a sheet of metal, and then cut them out using a grinding machine. The edges of the resulting workpieces must be thoroughly cleaned.
- We take a pipe of the required length and drill round holes in it. In the future, this pipe will be used to connect the upper and lower containers of the stove.
- We take the top tank and cut an opening of the required size on top. This opening will not be located in the center, but will shift to the left of it. We prepare this hole for the chimney pipe. From the bottom side we cut out an opening, shifting it to the right. It will serve as an entrance for the connecting pipe.
- We weld two circles to the part of the pipe that determines the thickness of the upper container.
- We will do the same with the bottom of the stove. But now we will cut the opening for the incoming connecting pipe in the center of the container. In addition, we need to cut another hole - a neck through which we will fill the stove with fuel. We provide a sliding cover for this hole.
- We weld 3-4 legs on the back side of the lower tank. This will ensure stability.
- To give rigidity to the structure and strengthen it, we connect both tanks to each other using metal brackets.
- The main work points are completed, it's time to think about beauty. We carefully clean the welds, and then paint the stove using heat-resistant paint. Painting the stove will also protect it from premature rusting.
- The last step is installation of the chimney pipe.
Principle of operation
The operation of this type of potbelly stove can be described as follows: pour waste oil into the lower container through the neck. Next, using a torch or paper, ignite the fuel through the opening. As soon as the oil raw material flares up in the tank, close the hole with the sliding lid.
The combustion process is enhanced by air entering the connecting pipe through the holes made. The air is heated and rises through the pipe to the upper part of the structure, while heating the surface of the container so that the kettle can easily be warmed on it. The big advantage of this model of potbelly stove is that there will be no unpleasant situations with a lack of fuel, since motorists always have used oil in the garage.
Work on the combustion chamber
A larger oven size will provide more heat. This means that the bottom of the chamber will require a lot of space. But in the future it will be possible to conveniently place firewood there. This determines the required shape of the stove: cylindrical, laid on its side.
Even a rectangular oven must still be horizontal. Verticality is only possible with a particularly large size.
Model No. 2 – potbelly stove made from a metal barrel or pipe
For this design, a metal barrel or pipe with a certain diameter is taken. An excellent option for a house in the country, and if you assemble it beautifully and decorate it, it will look quite good in a living room, while also providing excellent heating.
Step-by-step instructions:
- Take a container for the stove and mark two rectangles. These will be the entrances for the firebox and ash pan. Cut out these holes.
- We do not throw away the cut rectangles, as they will serve as material for the doors. To do this, each door is brought to the required size, for which it is framed with strips of metal. Next we install the latch handle.
- Inside the container (barrels, pipes), moving 10 cm down from the firebox door, we attach corner brackets. Then we will place a grate on them.
- You can buy a grate ready-made, or you can make it yourself by welding it from reinforcing bars.
- If you took a pipe as a base, now you should weld its bottom and top.
- To give stability and raise it above the floor, we weld several legs to the bottom of the container.
- In the upper part of the tank we prepare an opening for the chimney pipe, where we then weld it.
- We fix the hinges and hang the doors on them. We mark and secure the hook under the lock.
- Appearance plays an important role, so the surface and seams should be cleaned. Coating the stove with heat-resistant paint will allow our design to compete with the factory model.
- When the stove structure is completely assembled, it is necessary to connect it to the chimney pipe, which we take outside to the street.
This type of stove is a good option for heating a room, provided there is enough space, since the stove is quite large. But another plus is the spacious top panel, on which you can install both a kettle and a frying pan.
What is special about a stove for a Russian bath?
Connoisseurs of the bath business know that the main difference between a Russian bath is the mode and temperature of the steam room. The humidity here should be between 40-70%, and the correct temperature should be 90-120°C. Not every heating device can create such conditions. And one more important point - you need to maintain the required temperature and humidity throughout the entire bath procedure and preferably without unnecessary interference in the operation of the stove. This is the only way, at a uniform temperature, to create a special atmosphere in the steam room with soft steam that does not burn the mucous membranes and skin.
This atmosphere is the merit of the stove with stones. They heat up to almost 400 °C in a closed heater
It is the closed container for the stones that allows them to warm up to such a high temperature. The absence of contact of stones with the atmosphere of the steam room gives light dry steam, which is so valued in Russian bathhouses. The second and important difference between the heating unit in a Russian bath is the absence of convection, that is, the movement of air masses inside the room. There is no heat flow from such stoves, as in sauna heating devices. Convection is only permissible at the steam room heating stage to speed up the process.
If you do not stop the movement of air masses before vaping, the temperature in the steam room will continue to rise and the humidity will decrease
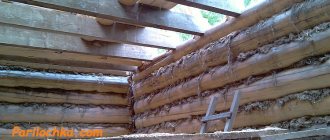
The mild climate of the Russian bath is also created due to the absence of hard infrared radiation. To achieve this result, stoves in steam rooms are lined with stone or brick. The facing material accumulates the heat of the stove walls and releases it to the steam room atmosphere for a long time. This gentle heat warms the body deeply without burning the skin. In a good bath there are no “bare” metal parts of the stove; they are all hidden behind the lining. Even the chimney is hidden behind the cladding. A possible, but not the most correct option would be to use a grid filled with stones as an IR screen.
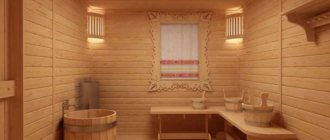
So, what do we get in the end: the correct stove in a Russian bath is a closed heater with the ability to adjust convection up to complete overlap, lined with stone or brick, and without open metal parts. The photo shows examples of sauna stoves suitable for our conditions.
Model No. 3 – potbelly stove made from a gas cylinder
The gas cylinder has an almost ideal, ready-made shape for the stove structure. A potbelly stove made from a cylinder is well suited for heating garages and country houses.
Let's look at how you can build a stove from a cylinder:
- Let's start by cutting off the top part of the cylinder where the tap was located and welding a plug here.
- Next, cut a square opening at the bottom of the cylinder. This will be the entrance to the firebox. We will not throw away the cut off part, as we will make a door out of it. You just need to scald this part, bringing it to the desired size.
- We weld the hinges, install the door, and attach the handle-lock to it.
- We make holes on the side of the cylinder that will become the bottom of the structure. They will take on the function of the grate.
- We prepare the box, making it from metal of a smaller thickness, and secure it under the holes - with a grate. The box will play the role of an ash pan, into which the remains of combustion products fall, and at the same time acting as an ash pit. You need to attach a door to the ash pan.
- All that remains to do for the stove structure is to make the legs. To do this, we will use a pipe or a metal corner. Using welding, we attach them to the bottom of the fuel tank.
- In the upper part, on the opposite side of the firebox, we cut an opening in the ash pan and weld the chimney pipe.
- If desired, you can build a cooking panel on the top surface of the stove. This is done simply - a frame made of steel reinforcement is welded. This panel turns out to be quite roomy; you can place two items at the same time.
The process of working on the ash pit
This element is present from time to time, since ash can be removed directly from the space of the fuel chamber. You will need holes in the door to supply air.
If you plan to have a stove with a garage for an ash pit, then the stove is given the shape of a box. This will avoid using the combustion chamber area. The metal will be thin. Welding is also not needed, screws will suffice.
Model No. 4 – rectangular stove
According to many experts, this type is considered the most optimal, aesthetic, and compact of all the previously listed models of potbelly stoves. This design is perfect for heating a living space.
A rectangular potbelly stove can be made in two variations:
- The first is the Gnome stove. Compact, simple model, consisting of two chambers, a firebox and ash pan, a chimney pipe and legs.
- The second is more complex, retaining heat for a long time. This is a Loginov stove. Therefore, it deserves detailed consideration.
Main purpose
The main task of a rectangular potbelly stove is to heat a room up to 15 square meters in size. m. An ordinary potbelly stove is characterized by rapid heat transfer, but at the same time it cools down very quickly as soon as the wood burns out. This disadvantage can be partially eliminated if you line the stove with bricks. But this is not an option, since bricks will significantly slow down the rate of heat transfer, and retain thermal energy only for a short time.
Modernization of the furnace device
Changes made to the design of the potbelly stove and a different method of fuel supply made it possible to improve the performance properties. At the same time, its main positive characteristics were preserved: fast heat transfer, small dimensions, ease of installation and arrangement, without additional construction of a foundation or creation of a capital pipe.
What did you do for this? In the fuel tank itself, its upper part, 2 plates were welded, which form a labyrinth. Thus, the path of gases has been increased, which means they leave more heat in the oven. Due to the expansion of metal surfaces, heat exchange between gases and the walls of the container has become more efficient.
The fire-fighting components of this model have also been improved: its chimney does not heat up, but remains hot. Proper placement of the pipe head will provide sufficient traction. In this case, the head is placed so as to exclude being in a high pressure zone, no matter what the wind is. Therefore, it would be better to install it higher than the roof ridge.
How to make a stove for a bathhouse with a water tank
It is convenient if the design of the sauna stove includes a built-in tank for heating water. It can be mounted or attached. Let's look at the features of both options.
Hanging tank for a bath
A separately located tank has its advantages - it does not evaporate moisture in the steam room and at the same time warms the adjacent room. It is better to take tanks from stainless steel; they can withstand even hot boiling water.
The connection between the stove and the tank occurs through pipes and hoses
Use pipes that can withstand high temperatures. Water is poured into such a system before the fire starts. If you pour water into a hot stove, it may burst due to the temperature difference. Water can circulate in the heating device by gravity - for this, the distance from the stove to the tank should be no more than 1.5 m, and the lower edge of the tank should be placed half a meter above the register. You can simplify your task by installing a small pump.
Sauna stove with built-in water tank
The second option for placing the tank is directly above the stove. It is a simple design, easy to implement and does not require any pumps or complex inclination systems. Water is drained from the tank through a built-in tap.
Such tanks are made from high-quality stainless steel with a wall thickness of 1.5 mm
Important! Built-in tanks must be kept filled at all times.
Built-in tanks help create a humid atmosphere in the steam room. Not everyone will like this, so think about it: maybe it would be better to take the tank outside the steam room.
Related article:
This article will discuss types of stoves for a wood-burning sauna with a water tank , popular models from manufacturers and the stages of DIY construction.
Bottom line
We have reviewed the most effective potbelly stove that you can make with your own hands. Unfortunately, there is no clear leader among them. There is a different option for each condition.
But still, the most effective potbelly stove can be called a working furnace. It has maximum efficiency, since there is a pyrolysis effect (after-burning of gases).
In second place is a rectangular potbelly stove with an internal labyrinth of gases. This also significantly helps increase efficiency.
I would like to note that each of the furnaces has great potential for modifications and improvements. There are a lot of different options on the Internet on how to increase the efficiency of a potbelly stove. From directing a fan at it to creating a water circuit. We will cover these points in a separate article.
Buleryan power calculation video
Buleryan stoves of four types of power, purposes and areas of application:
- Household with hob
- Buleryan household classic
- Industrial boiler Buleryan with power from 60 kW
- Buleryan stove with water circuit
Table for calculating the power of a Buleryan boiler
When choosing a boiler, it is necessary to take into account not just the area of the room, but the cubic capacity - the height of the room is taken into account.
DIY making
A homemade stove made from a used gas cylinder is an affordable option for a wood-burning stove, which is designed for efficient heating of rooms and economical fuel consumption.
To make a stove at home, you will need:
- Empty cylinder body – 2 pcs.
- Metal pipe for creating a vertical chimney channel (diameter - 12 cm).
- Profile pipe for making a firebox and loading chamber (length 100 cm, cross-section - 12x12 cm).
- Metal pipe cuts: short by 80 cm (diameter - 15 cm) and long by 150 cm (diameter - 12 cm).
- Steel sheet (thickness 3 mm).
- Metal rods.
- Insulating heat-resistant material (perlite).
- Welding equipment.
- Bulgarian.
- Personal protective equipment – glasses and gloves.
To ensure correct assembly of the stove, it is recommended to prepare a working drawing indicating the exact dimensions of all structural elements of the device.
Step-by-step instructions for making a rocket stove:
- Three sections are cut from the profile pipe - two of them are 30 cm long and one for the sunbed is 35 cm. Using a grinder, a rectangular hole for the fuel compartment and a semicircle for the vertical pipe are made from the blank for the sunbed.
- One 30 cm blank is cut longitudinally and welded to the fuel compartment to create an air channel.
- The fuel compartment is connected to the pipe by hot welding.
- The grate is made from fittings, and doors are made for the fuel chamber and ash pan.
- Next, a secondary chamber is made for afterburning pyrolysis gases.
- A hole is made at the bottom of the cylinder for the fuel compartment. On the outside of the cylinder, an elbow is fixed for a pipe with a diameter of 12 cm for the chimney.
- A hole is cut at the bottom of the pipe to clean the chimney.
- A piece of pipe with a diameter of 15 cm is placed on top of the pipe and welded to the cylinder.
- The free space between the two pipes is filled with insulation, and the edges are closed with a weld.
- In the second cylinder, the bottom is cut off and a hole for the valve is welded. It will be used for afterburning pyrolysis gases.
- Both cylinders are fixed to each other in a special groove using two welded rings so as to ensure the tightness of the finished structure. The groove is sealed with an asbestos cord.
Important! Before you start firing a homemade rocket stove, you need to carefully check the quality of the connecting seams and the tightness of the structure. Air masses must not penetrate uncontrollably into the operating installation.
How to properly sink a rocket?
To obtain the maximum heating effect, the rocket-type furnace should be thoroughly heated before the main loading of fuel material. For this, flammable materials are used: paper, wood chips, dry shavings, sawdust, cardboard, reeds or straw, which are placed in an open ash compartment.
Warming up the system will lead to the appearance of a characteristic sound - a quiet or loud hum. Next, the main fuel is added to the heated device to obtain the required amount of thermal energy.
The combustion process itself is carried out according to the following scheme:
- Opening the door to the ash compartment.
- Adding fuel material to maintain optimal combustion temperature.
- With the appearance of a hum in the furnace, the blower closes until it completely switches to silent operation.
Important! If a closed air valve has led to a decrease in flame intensity, it must be opened to increase draft and enhance the fuel combustion process.