Here you will learn:
- Advantages and disadvantages of gas furnaces
- Features of homemade gas stoves
- Construction of gas furnaces
- How to calculate the consumption of natural and liquefied gas
- What materials are used
- Gas-burners
- Water tank location
- DIY metal gas sauna stove
- Rules for installing gas furnaces
Today, there are a number of various modifications of hearth gas ovens, used both for cauldrons and for baking bread, which can easily compete with an electric oven. Therefore, in order to determine the most suitable model, it is necessary to clearly define the necessary parameters on which future work will be based. It is necessary to determine the location. To do this, you need to correlate the amount of heat generated and the size of the room. It should be noted that the equipment in question generates a lot of heat.
Gas furnaces can be divided into three types:
- heating systems, intended for heating and used in private households;
- heating units designed to provide hot water supply;
- household, intended for cauldrons, baking bread and heating large areas.
For example, for a bathhouse, it is better to install a heating heating system, which can have different cladding options, type of burner, as well as technology and method of heating the water available in the bathhouse. It is not safe to use an electric stove.
Types of gas furnaces
Devices can be of three types:
- Heating (gas stove for heating);
- Heating (designed to supply the room with hot water);
- Household (designed for a cauldron, performing the function of a bread maker, a source of heating for spacious rooms).
For example, a gas sauna stove is often installed with a heating and heating system; it can be lined with various materials, equipped with any type of burner, and is also made using different technologies and with various methods of heating water in containers.
Bottom line
A homemade stove based on gas cylinders is an inexpensive and high-quality heating unit that will last for many years. Of course, the efficiency level of such a stove is not the highest, but welding experts are working to improve it.
A potbelly stove based on cylinders, when properly welded and designed, copes with its task much better than other heaters running on electricity or gas. What type of stoves do you think is the most effective? Share your opinion in the comments!
Sources
- https://gidpopechkam.ru/pechki/burzhujka-iz-gazovogo-ballona.html
- https://cotlix.com/kak-sdelat-burzhujku-dlitelnogo-goreniya-iz-gazovogo-balona
- https://teplowood.ru/burzhujka-iz-gazovogo-ballona.html
- https://oboiman.ru/ingeneer/burzujka-iz-gazovogo-ballona-svoimi-rukami-instruktaz-po-izgotovleniu.html
- https://stroy-podskazka.ru/postrojki/garazh/pech-iz-gazovogo-ballona/
- https://sdelairukami.ru/pech-iz-gazovogo-ballona-luchshij-variant-dlya-garazha-i-masterskoj/
- https://kachestvolife.club/otoplenie/kak-sdelat-piroliznuyu-burzhuyku-iz-gazovogo-ballona-2-luchshih-sposoba
- https://dekoriko.ru/postrojki/garazh/pech-iz-gazovogo-ballona/
- https://vdome.club/bez-rubriki/pech-v-garazh-iz-gazovogo-ballona-kak-sdelat-svoimi-rukami.html
- https://VseProGarazh.ru/kommunikatsii/otoplenie/pech-dlya-garazha-iz-gazovogo-ballona/
pros
At the stage of modern economic development, gas is one of the most profitable and efficient types of fuel with high efficiency. The use of gas is particularly cost effective.
Today there are many different energy sources available on the market, despite this, a DIY gas stove remains popular and fully competes with factory-made products.
The advantages of using these devices include:
- Quickly, efficiently and efficiently heat the room to the desired temperature;
- Compact size and mobility (you can quickly move the stove to any place) due to the absence of a firebox and ash pan;
- No need for constant care;
- By installing a water tank, you can heat the water;
- Low resource consumption;
- Independence from public communications and other factors, which eliminates interruptions in work.
Potbelly stove made of metal sheets
Let us present the features of making a stove from metal sheets that use different raw materials for heating: waste and firewood.
Furnace in production
To start working with your own hands, a metal sheet of about 5 mm is prepared (this is the width that allows the stove to quickly warm up and effectively heat the garage) and pipes (needed for the chimney and some other elements). For a more accurate understanding of the manufacturing principle, look at the drawing:
Drawing of a potbelly stove being processed
Let's get started:
- According to the given dimensions, you need to cut out the elements from the sheet from which the stove will be made. Try to clean up the cut edges as much as possible.
- The part for fastening the components of the potbelly stove is being prepared - a pipe with holes.
- Parts of the upper tank are prepared for installation of the chimney pipe. To do this, according to the data given in the drawing, you need to make a hole shifted to the left in relation to the cent. Also, another hole is made at the bottom of the tank (offset to the right) - it is intended for installing a connecting pipe.
- The component parts are welded together and a finished tank is obtained.
- The lower tank is welded in the same way. Only a hole is made to install the pipe in the center. You also need to make another hole with a slight offset - recycling will be poured into it. A special sliding lid is made over the filling hole.
- The lower tank is attached to the upper one (they are welded to the connecting pipe). Strengthen the structure using brackets.
- Don't forget to weld the legs to the lower tank.
- To increase service life, the stove is cleaned and painted.
You connect the potbelly stove to the chimney and try to heat the garage. To do this, pour fuel into the lower tank and set it on fire. When it flares up, you need to close the processing hole with a sliding lid.
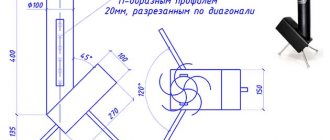
Rectangular wood stove
Drawing of a rectangular potbelly stove
This option is suitable when you need to heat a garage or bathhouse rooms intended for relaxation.
The features of the model, the manufacture of which we will describe with our own hands further, are high heat transfer and the ability to adjust the traction force.
Our oven will have dimensions 45x45x80. These dimensions are enough to heat an average room. It will hold long pieces of wood and is easy to move.
In this case, we will not provide a specific drawing, and will try to explain it in words as much as possible. Before starting work, we buy:
- Steel 3-4 mm thick. A sheet of one and a half by two meters will be enough.
- A piece of pipe. Choose with a diameter from 90 to 100 mm. Length: 0.4 m.
- Reinforcement 16 mm. You need exactly 6.2 m.
- Five kilograms of electrodes.
- Four door hinges.
- A steel rod, half a meter long and about 10 mm in diameter.
- Seven meters of corner with a 40 mm shelf. The walls should have a thickness of 5 mm.
When everything necessary is prepared, we begin to work with our own hands in the following sequence:
- The future walls of the structure are cut out of the sheets.
- The corner is welded in such a way as to form a frame. When performing this and the first point, you need to remember the above dimensions of the stove (45x45x80).
- The reinforcement is cut and welded to the frame at intervals of 2 cm.
- The finished frame is scalded with tin.
- Along the diameter of the smooth rod in the section of the pipe that will be the chimney, you need to make 2 holes. The pipe is welded to the frame (before this you need to make a hole for it).
- A curved rod is inserted into the chimney holes. It should be shaped like a right angle. A piece of round tin, slightly smaller in size than the internal diameter of the chimney, is welded to it - it will be used for adjustment.
- The potbelly stove must have doors. They are cut directly from the body. Loops are welded onto the removed piece of metal, with the help of which they are attached to the stove.
- The doors are equipped with bolts and handles, which can be made of any convenient type. The main thing is that they guarantee maximum fixation of the door (if you don’t want to burn down the garage).
- When the work is finished, you can check the result of the work with your own hands and start heating the garage.
Flaws
Gas furnaces have their own disadvantages, including:
- Mandatory access to a gas source;
- The use of fuel has certain restrictions according to standards;
- In some cases, you will have to obtain certain agreements and permits from government agencies and gas services, especially for non-residential premises;
- It is necessary to design the installation, which is quite expensive;
- Compliance with special safety measures.
To achieve the highest efficiency from a gas furnace, the room must be equipped with protective screens. They have surfaces that do not allow warm air to escape, but reflect it, heating the required space.
When using open-type burners, it is necessary to additionally design and install a ventilation system, chimney and provide air humidification. The latter are necessary because the gas burns oxygen, as a result of which the air becomes dry, which leads to pain in the head and throat.
Methods of supplying gas to the stove
There are two ways to gasify a bathhouse:
- From the citywide system.
Individually using a balloon.
Gasification from the city system
Gas can be supplied to the bathhouse from the city pipe. If a gas pipe runs through the area, then it is more profitable to power the bathhouse from it. Let’s say right away that this is a labor-intensive task and requires knowledge and permissions. The price for the services of specialized companies is high, but once you supply gas to the bathhouse, you won’t have to worry about it for many years. And paying gas bills will be less expensive than purchasing bottled fuel each time.
For urban gasification it is necessary to carry out a number of measures:
- Receive and approve a number of documents: gas supply project, agree on technical conditions and draw up an estimate.
Purchase equipment and pipes and carry out installation.
Prepare test and technical documentation and submit the work to the local gas service.
Enter the system, install and register the meter, start it up and receive documents for maintenance and fuel supply.
It’s difficult to do all of the above points on your own; it’s easier to call a specialist. Moreover, the city gas company itself will provide and conduct pipes to the heating device.
Individual gasification
You can power the stove from a gas cylinder, which comes in different sizes. Individual gasification is suitable for areas where there is no city line. A gas cylinder can be purchased at any specialty store. But such gas supply is quite unsafe.
Safety comes first, the cylinder should not be installed in a bathhouse, its place is outside. The place chosen is easily accessible and ventilated, that is, the cylinder cannot be filled with various objects or covered with things. A fire extinguisher is hung nearby or a small box of sand is installed.
Gas furnace design
The design of a gas stove is similar to a model heated with solid fuel, with the exception of some features.
The oven consists of:
- Housings;
- Thermostat;
- Fuse (to shut off the gas supply during extinguishing);
- Sealed gas chamber;
- Chimney.
The difference is that the fuel is supplied through a supplied line, which is a special flexible hose connected to the burner.
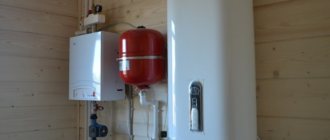
In some cases, a balloon is used. It is placed in a special container in compliance with all safety regulations. A five-cc gas cylinder is capable of heating a room of up to 200 m2 during one heating season.
The air supply to gas equipment is adjusted using a door located below, which does not interfere with cleaning the burner.
Chimney construction process
The complexity of the process of constructing a chimney for a potbelly stove in a country house directly depends on the location of the stove in the room. For example, bringing a pipe out through a window is much easier than making a hole for a chimney in the roof. In this regard, before installing a potbelly stove, you should take into account the design features of the building.
Safety rules and structural measurements
If you plan to install the stove outdoors, then installing a chimney will not cause much difficulty, the main thing is to choose a suitable location
It is important to remember that the stove structure should be located away from flammable objects and active recreation areas
Constructing a chimney indoors will require knowledge of safety rules that will help avoid fire. The material from which the pipe is made must have increased heat resistance and can easily withstand temperatures above 1 thousand degrees. If you plan to install a potbelly stove near walls lined with clapboard or plastic, then the part of the wall located in close proximity to the stove is sheathed with fireproof material.
Don't forget to decide on the pipe size
The hole through which the chimney will enter the ceiling must also be decorated with non-combustible materials, since the entire structure becomes very hot when the stove is operating. For these purposes, a special glass is used to prevent contact of the hot pipe with the edges of the hole. If there is more than one potbelly stove installed in a building, then a separate smoke exhaust system is made for each of them.
After calculating the diameter of the pipe for the potbelly stove, you will need to calculate the total length of the pipeline, but first you need to accurately determine the location of the stove in the room. Then determine the specific location where the chimney will be vented outside. When measuring the length of the pipeline outdoors, you need to take into account that the height of the pipe above the ridge should be 1.3-1.7 meters.
It is more difficult to carry out installation work indoors
Installation of all system elements
Installing a stove installed outdoors is not difficult. To assemble the system, you will need a pipe of the required diameter, which is placed on the pipe extending from the potbelly stove. The pipe must be put on the pipe, and not inserted into it. Otherwise, smoke will leak out at the junction of the nodes. The procedure for installing a smoke exhaust system in a room is much more complicated and consists of several stages:
- the pipe section is securely attached to the furnace pipe;
- the pipeline is extended using connecting elbows;
- the smoke exhaust is passed through a passage glass and discharged onto the roof or behind the wall;
- all connecting nodes are securely fixed.
A section of pipeline located outdoors must be insulated with heat-resistant material. During operation of the potbelly stove, condensation inevitably accumulates on it. To get rid of the condensate accumulated in the system, a tee is installed on the outer section of the pipeline, equipped with a faucet for discharging liquid. In the place where the horizontal and vertical pipelines connect, an inspection window is made to make cleaning the chimney easier.
The final stage is checking the functionality of the smoke exhaust system. If you managed to properly make a chimney for a potbelly stove, then after igniting the stove the necessary draft will be created and the smoke will quickly be discharged outside. During the combustion process, you need to ensure that smoke does not leak into the joints of the nodes. If a smoke leak is detected, the connections must be sealed using heat-resistant sealant.
Options
Before you start making a gas stove with your own hands, you need to decide on its parameters, such as:
- Material of manufacture;
- Burner type;
- Location of the water tank.
Choosing a quality barrel
To make a potbelly stove, you can use any steel barrel used in the petrochemical, paint and varnish, chemical, and metallurgical industries for storing and transporting technical products:
- bulk - oils, solvents, paints, diesel fuel, sodium liquid glass;
- pasty - thick lubricants, bitumen;
- bulk - caustic soda, various plasticizers.
They are produced in two types - with an open and closed top; they also differ in the thickness of the bottom, lid and shell.
Any of these containers can be used as a potbelly stove if you first thoroughly clean and rinse its inner surface. However, the thinner the walls of the container, the faster they will burn out and the stove will fail. Therefore, for a potbelly stove you need to choose a product with a metal thickness of more than 2 mm.
Well, the best option is a stainless steel barrel. High-alloy stainless steel is most resistant to high temperatures in the fuel combustion zone, which means a stove made from it will serve for a longer period.
Materials
You can make a gas stove yourself from stone, refractory brick or metal.
Stone structures heat up much more slowly, about five hours, but retain the accumulated heat for longer than four hours, compared to metal products. Brick structures have similar characteristics.
Metal stoves heat up quickly; in three hours they can heat a room with an area of up to 50 m2. However, they cool down quickly. The advantages can be considered light weight, ease of manufacture, and if you make the outer cladding with fireclay bricks, then the shortcomings in heat transfer will be completely smoothed out.
With grates or without?
In the simplest version, no grates are provided. If the cylinder is small or stands horizontally, then selecting a part inside is problematic. In this case, the design of a potbelly stove made from a cylinder is quite simple: the body is placed on legs, one door, and a pipe for connecting the chimney is welded in the upper part. All. The whole stove.
The internal structure of a potbelly stove made from a horizontally located cylinder is quite simple: only a door for loading fuel/unloading burnt coals and an exit for the chimney
The photo above shows examples of such simple ovens. In order to improve heat transfer, metal strips are welded to the outside of the body. In the upper part, in addition to the smoke pipe, there is another outlet - a lid is installed on it, and this outlet is used as a stove for cooking food and heating tea.
If you still want to make grates in a potbelly stove from a horizontally installed cylinder, you will have to weld a tray for collecting ash from below. Below there is a drawing and photo of the practical implementation.
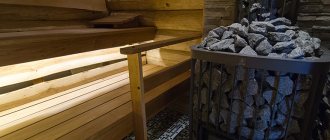
Tank location
There are several ways to place the tank in the bathhouse; the container can be:
- Removable;
- Built-in;
- Remote (i.e. placed in a separate room).
In a built-in tank, water heats up much faster, since the tank is installed directly on top of the stove or welded to the side. To install a remote tank, you will need to install a pipe system.
Supervisory requirements
A homemade stove must have a certificate of conformity from Rostechnadzor. In addition, special permission is required for the operation. When using main gas as fuel, this document must be drawn up with the gas supply organization.
When installing an atmospheric model in a bathroom, the following requirements apply:
- minimum tank volume 12 m3;
- availability of good ventilation;
- compliance with fire safety measures;
- the upper part of the tube is equipped with a spark arrestor;
- good adjustable traction;
- the pipe is insulated from the ceiling and roof.
Cylinders can be stored in a special metal cabinet separately from the tank. Gas tanks are located in an underground tank at a distance of more than 5 meters from the tank. Connecting pipes must be checked by a specialist for leaks. They are made from steel, copper and other non-flammable materials.
Firefighters have special requirements for the pipeline to the firebox and for the installation sites for cylinders. Those who ignore the rules risk getting a fine, which will reduce all savings to a minus
As practice shows, it is better not to install a homemade burner without the permission of the licensing authorities. This is too risky from a security point of view.
Having received permission to operate and all instructions, you must ensure that measures have been taken to ensure the normal functioning of your homemade sauna burner. It is necessary to periodically check the tightness of the joints of the burners and pipelines. If necessary, clean the chimney and strengthen the insulation.
Inspecting the condition of the equipment is not limited to the gas burner. It is important to ensure that the chimney is insulated from the ceiling and roofing slabs
To track the dynamics of changes in the state of equipment, keep a special log. Write down in it the dates and operations performed to service the elements of the gas unit. When heating a bathroom with a homemade nozzle, follow the usual fire safety rules.
The following article will introduce you to the intricacies of making a gas burner from a regular blowtorch, which is worth reading for skilled home craftsmen.
Preparation
When sketching drawings of a gas furnace, it is necessary to indicate the exact parameters of each element.
- At the installation site, prepare a level base and cover it with a fire-resistant layer.
- Lay fireclay bricks on top in two rows.
- Walls located less than one meter from the stove and the ceiling must be protected with non-combustible material.
- Most stoves heated by gas have almost the same design, so their assembly and installation is also identical.
It is not difficult to assemble it yourself; the main thing is to properly prepare the room before doing so, following the recommendations of specialists and observing safety rules.
Manufacturing recommendations
The topic of making various wood-burning stoves from gas cylinders is very popular and here’s why. Firstly, this is an accessible material that can be found at any scrap metal collection point. Secondly, such a tank is an actual finished furnace body with fairly thick walls. All that remains is to modify it yourself and you will get an excellent potbelly stove for heating a garage or cottage. Moreover, the design can be either vertical or horizontal.
Advice. Most of all, a standard propane cylinder with a capacity of at least 50 liters is suitable for making a homemade heater. Using tanks of a smaller volume will not give the desired effect, the stove will be heavy, and the heat exchange surface area will be small.
A vertical potbelly stove made from a cylinder, made by yourself, is more compact and takes up little space in the room. But the wood in it will not burn for a long time, no matter how you limit the air flow, since the flame will begin to cover the entire volume of fuel.
Another thing is a horizontal stove, in which the flame moves from beginning to end, gradually burning the wood. But with it there is more work; you need to arrange an ash chamber outside, since inside it will take up too much useful volume. The structure of this potbelly stove is shown in the drawing:
Now about how to make a horizontal potbelly stove at home. To do this, you need to carefully cut off the top of the cylinder with a grinder, where the gas valve is screwed on. Naturally, the valve must first be unscrewed, and the container must be filled to the top with water in order to displace all the propane vapor that could remain inside the tank.
Otherwise, you risk causing an explosion, the consequences of which are unpredictable. The next sequence of actions is as follows:
- cut a strip in the side wall where the ash chamber will be welded. Another option is to drill many holes, as seen in the photo below.
- make and weld an ash pan from metal 2-3 mm thick to the cylinder. Place a homemade door or damper in front to regulate the air supply;
- The loading door should be cut into the front end. It can be made in a round or square shape, or you can purchase a finished product;
- in the back you need to cut a hole for the chimney duct. You shouldn’t make it too big; it’s enough to take the chimney diameter as 100 mm, maximum 150;
- weld the pipe;
- make a stand from any available rolled metal and also weld it to the body.
Making a vertical oven from a cylinder is a little easier. To make such a potbelly stove with your own hands, you need to cut openings for the doors in the side wall, and the cut pieces of metal themselves can act as doors. You just need to attach loops to them, for example, from several links of a thick chain, as was done in the photo:
But you will have to tinker with the grate bars. Not only do you need to make a grid (preferably from periodic profile reinforcement), but you also need to somehow install it inside the cylinder. Here you will have to cut off its top or bottom part - at your discretion. After installing the grate, the cut part should be welded in place, and a pipe should be attached on top to remove combustion products.
Note. Instead of a cut-off hemisphere, it is easier to put a flat lid made of a sheet of iron. However, the pipe does not have to be attached from above. It can also be embedded into the wall of the potbelly stove at the top.
Installation rules
When installing the stove, you need to pay special attention to the following:
- The distance between the walls and the stove should be more than 5cm;
- The foundation must protrude beyond the edges of the stove by at least 10 cm;
- The height of the connector for the burner with an overlay should be 61.5-68cm, without an overlay - 47-55cm, width - 51.5-66.5 and 35-45cm.
Many craftsmen in the manufacture of gas furnaces do not stop there and constantly improve their products, equipping them with various devices.
There are homemade heaters with fully automated operation, equipped with special blowers that control the flow of warm air.
The final part of the work
We cut four identical pieces of round pipe and weld them to the bottom of the stove - we get support legs.
We make a locking mechanism so that the door can be closed while the oven is operating. We scald the door itself on all sides with steel strips.
At the last stage, all that remains is to clean all the welds with a grinder and paint the stove with heat-resistant paint.
The step-by-step process of making a homemade stove from a gas cylinder can be found in the video below. The idea belongs to the author of the YouTube channel DIY Projects.
Photo of a gas oven
Smokehouse
With this option, you don't have to do a lot of modifications. First, get rid of the oven door and replace it with a sheet of metal. A fire will be built in the bottom drawer of the stove, and the firewood will be placed in the lower part of the oven. Be sure to drill holes in the bottom for smoke. The oven will have racks with fish or meat.
A grease tray should be placed between the grates and the wood chips. The smokehouse is ready for use. There is a drawback to homemade smokehouses that you need to remember when cooking; you cannot regulate the heating temperature. This may affect the taste of the product. You should also be sure to clean the smoker after each cooking.
Wood chips are poured into the structure of the smoke generator and set on fire. The air, supplied by an air compressor connected to a generator, inflates the wood chips and the smoke is supplied inside the smokehouse. In this case, you can regulate the air supply, thereby improving the taste of cooked products.
Summarize. How many interesting things can be made from old objects that, it would seem, could have been gotten rid of. By using your ingenuity, you can do a lot of interesting things, as well as refine existing options.
Basic laws of heating
There are quite a few copies broken as to what kind of heating system should ultimately be considered, if not ideal, then at least approximately optimal. There are many heating systems.
The battles continue. If not user-created, then advertising - every sandpiper sings about its swamp no worse than a nightingale.
It is not easy to thoroughly understand these plot twists and turns. Especially for a person who plunged into the problems of heating engineering temporarily and, partly, forcedly.
Meanwhile, the question is serious - any of the projects is not cheap and is aimed at a long-term user perspective. Therefore, it requires detailed study.
Buleryan power calculation video
Buleryan stoves of four types of power, purposes and areas of application:
- Household with hob
- Buleryan household classic
- Industrial boiler Buleryan with power from 60 kW
- Buleryan stove with water circuit
Table for calculating the power of a Buleryan boiler
When choosing a boiler, it is necessary to take into account not just the area of the room, but the cubic capacity - the height of the room is taken into account.
Best models
Based on customer reviews, we have compiled our rating of the best models of gas furnaces for the garage.
| Model | Characteristics | Price |
| Gas heat gun MASTER BLP 33 M | Most suitable for heating a large box. Heater power 18 to 33 kW. Provides an air flow of 1000 m3 for 60 minutes. Resistant to power surges. Manual flame ignition system. Under normal operating conditions, gas consumption is from 2.4 kg per hour. The minimum pressure of suitable gas is from 0.75 Bar. Gun weight 9 kg | Average price from 15,700 rubles |
| Convector for heating a large garage. Model "Alpine Air NGS 50 F" | Average power 4.9 kW. Gas consumption during operation for an hour is from 0.5 m3, chimney outlet diameter is 80 mm. Weight 31 kg. Dimensions – length 220 mm, width 600 mm, height 630 mm. Designed for wall mounting. Closed gas combustion chamber. Comes with built-in fan and coaxial pipe. | 22700 |
| Gas infrared heater “BALLU BIGH-3” | Maximum power 3 kW. Powered by propane - butane. The flame ignition system is manual. In 60 minutes of operation, 200 mg of fuel is consumed. Incoming gas pressure – 30 Bar Weight 2 kg | 1179 |
| Ceramic gas oven "NEOCLIMA UK-20". | Maximum power 4 kW. Minimum thermal power 1.5 kW. Powered by propane - butane. In 60 minutes of operation, up to 0.3 kg of gas is consumed. Weight 400 g. | 5290 |
| Gas convector, model “Alpine air NGS-20”. | Wall mounted. Maximum power 2 kW. Mechanical control with manual ignition. Room area 22 m2. Weight 22 kg. | 22300 |
The simplest designs can be made independently from scrap materials.
Both pleasant and useful
The effectiveness of any engineering system consists of several factors, or rather, their combination. The main ones:
- budget required for the purchase of equipment;
- cost of system installation;
- operating costs.
It is possible that during occasional heating operation, depending on the duration of operation and the characteristics of a particular region, the leaders in the overall rating may change.
Somewhere priority should be given to electrical systems. In some cases, it is better to think about installing a boiler using diesel fuel or a solid fuel option.
But in most situations, gas will be the winner - especially if regular heating is required. Perhaps the cost of wiring, purchasing equipment and installing all the necessary sensors at the initial stage will turn out to be expensive in the end. But later everything is paid off by the lower cost of energy.
There is a way to reduce initial expenses. But it is suitable when it comes to heating small residential spaces, in which it is simply wasteful to install a full-fledged network with a circulating coolant. This is an ordinary stove, converted from wood heating to gas.
Moreover, with equal success you can build a new one or remake an old one. To do this, a special burner is inserted into the firebox, and the filling of the oven is slightly modified.