Popular wisdom says: “there are no generals in the bathhouse.” However, one quick glance at the shelves in the bathhouse is enough to understand which of those present occupies what place not only in the bathhouse hierarchy, but also in the registration card file of the local clinic. A person with good bath experience and good health sits comfortably on the top shelf, a newcomer with youthful enthusiasm and a sparkle in his eyes settles in the middle, an avid but weak bath lover, whose heart muscle has been undermined by a chaotic life and family troubles, hesitantly huddles at the very bottom, closer to the exit. . Polk actually has a lot to say. Let us take a closer look at it.
What is a shelf
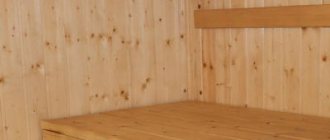
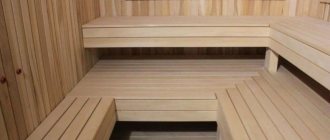
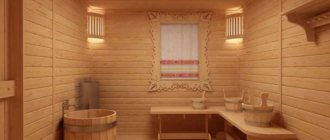
In essence, this is a bench, traditionally one- or two-tier, corner (you can make a corner corner in a bathhouse) or straight. There is a shelf in the steam room - you can sit or lie on such an elevation. Usually they lie on the upper tier and sit on the lower tier. This is a simple functional attribute that seems easy to make. This is true. But there are several points where mistakes can be made. How to make shelves in a bathhouse with your own hands and not break wood - first learn more about the design of the element.
Design
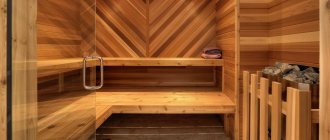
The decorative side of the shelves is no less important. Benches made from wood of different shades (dark and light) look interesting.
The choice of lighting color is individual. Red makes the steam room visually even hotter, green – relaxes, blue – gives calmness.
It is allowed to install spotlights on the ceiling directly above the shelves. This will make the room seem larger.
You can approach the decoration of corner seats creatively by designing a carved or wavy backrest.
There are benches that resemble the shape of a chaise lounge or where the upper tier very smoothly transitions into the lower.
Seats with separate backs and corner carved fasteners for hanging towels look good.
If the room allows, then a separate stand for slippers and shelves for soap products are equipped.
By playing with the shape, design of the benches, and their placement, the steam room can be decorated in both antique, high-tech or modern style.
Design
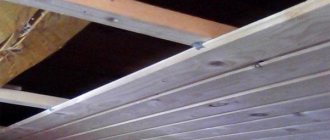
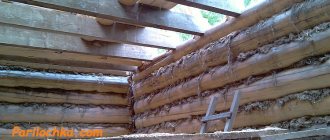
The element is assembled from a frame, base and boarding, which can be stationary, removable or folding. The basis is made up of support posts (vertical), as well as jumper boards - such a frame is attached directly to the wall. But between the shelves and the wall you need space for ventilation - this is about 8-10 cm. The flooring is made of narrow planks.
Ramunas
In theory, the frame is made from racks - vertically located bars. A diffuse film (membrane) and a vapor barrier are attached exactly over them, and then along these racks (vertically) an air gap is attached, forming a lath two to two and a half cm thick. And the lining is already attached to it - let me remind you, the lining is attached HORIZONTALLY with a “folder” at the top . And the shelves are attached precisely to the racks through this entire sandwich - that is, fastening occurs only at certain points of the wall and not just anywhere.
It is important to leave a gap between the wooden planks of the shelf flooring (it is better to make it removable so that it can be washed and dried in fresh air) so that the water drains and does not remain in puddles. A suitable step is usually 1 cm - sometimes a little more.
Kern:
Kern
I left 1.5 cm gaps between the boards (ours are made of abasha) - this makes them easier to wash and sweep away leaves. The sides were not sewn up, I think there should be some ventilation there
Regiment structure
Bath shelves are distinguished by their simplicity of design. There is no decor, since decorations can injure a lying person, and are not entirely appropriate in the interior of a bathhouse. The dimensions of each bench are usually selected taking into account height and weight. The flooring should accommodate a person of any size without experiencing discomfort.
The tiered design is due to the ability to sit in the steam room at a level where it is cooler or hotter.
The shelves consist of only two elements:
- Flooring is a plank base fixed to a frame. The pitch of the boards is in the range of 10-20 mm. Functionally serves as a seat or lounger. In some cases, the flooring is made removable - this makes it more convenient to ventilate, clean or dry it. This element is designed to enable a person to take a relaxed position. Therefore, floorings are complemented with backrests, armrests, and stands.
- The frame is the basis for installing the flooring. Structurally, it consists of vertical supports (legs or racks) connected by horizontal jumpers.
Shelves in saunas are most often frameless. They are mounted on brackets similar to compartment structures.
Shelf location
The correct placement of the shelves is against the wall. Often the question of how to make shelves in a bathhouse or steam room is decided based on the actual area of the room and its shape: square, rectangular, etc. There are several types of bath benches that may be suitable for a steam room with certain “architecture” features.
Steps . This is the most common and convenient option. This method helps you choose a certain temperature individually - the hottest air is near the ceiling. That is, at first you can choose the lower level, and then try the upper one when the body gets used to it. If someone doesn't handle the heat very well, they can stay downstairs.
Coupe. This is when one shelf is above the other. Compartment shelves can be installed even in a very small bathhouse. The space savings are obvious. You will need a side chair to climb up. But it’s not always comfortable to know that someone is lying above you and, perhaps, heavy. And it’s quite difficult to communicate like that.
L-shaped . You can make a corner shelf in the bathhouse - it also saves space, but it’s more pleasant to talk and it’s more convenient to “use” a broom. And more “seating” places.
The distance from the ceiling surface to the upper tier (if the arrangement is stepped) should be at least 110-120 cm - otherwise only a child will be able to sit on the shelf there. Other parameters: from the floor to the lower tier - 25-40 cm, between adjacent shelves - from 50 cm.
potaskuns
I made the shelves, observing the basic requirements that were presented to them in the book about baths and saunas, namely: the distance between the top shelf and the ceiling (I don’t remember how much now) and the width of the shelves.
In addition, I made the shelves so that you could lie on the top one both against the wall farthest from the stove and with your feet towards it (199 cm in length).
Since the distance from the bottom shelf to the floor was slightly higher than what was comfortable for sitting, I made a small pad from the remains of the boards, which can be moved along the floor like a stool.
You cannot install shelves near windows - if there are openings in the steam room. Glass can easily burst during bath procedures - there is a risk of injury and even serious harm. In general, there is no need for windows, and they also cause heat to escape.
Types of bath shelves
The steam room in the bathhouse is a small room, so when arranging it you need to make it comfortable and functional. Various types of regiments will cope with this task:
- Benches – suitable for steam rooms of any size.
- Beds - installed in medium and spacious paired rooms.
- Sun loungers are the most exotic option, reminiscent of beach furniture. Multifunctional, mobile. Suitable for both lying and sitting. Optimal for large steam rooms.
If the steam room has a window, you should not place the benches close to it. This is dictated by safety considerations: with a temperature contrast, there is a risk that the glass will crack, injuring vacationers with fragments.
Dimensions and diagrams
What shelves should be made in the bathhouse in terms of length and width? It is believed that the upper shelves, for lying on, should be slightly wider than the lower ones - on which they usually sit. And if in numbers, then for the first tier 30-40 cm is enough, and for the top - from 60 cm. It is more comfortable when the shelf is wide, 80-90 cm - especially if there are large, tall people in the family. The length should be at least 180 cm, and preferably 200 cm, so that a tall person can lie down with his arms stretched out in front of him.
Nagoa
Shelves - I have 75, I would like a little more, but it doesn’t work out, so 85 cm is excellent
But before you make shelves in the bathhouse, you should take the time to draw. You can use programs that are easy to download online and download for free, but often a piece of paper, a pencil and a ruler are enough. The steam room room is depicted, the dimensions (ceiling, floor, etc.), the location of the shelves and the sizes of the elements are indicated on the required scale - not forgetting the height of a person standing and sitting. A sketch usually helps to see how to make a corner shelf in a bathhouse, placing benches most conveniently, and whether the “compartment” location makes sense. It is important to think about where the stove will be located.
Avtomir
Then the passage will be narrow, the canopy is, for example, 90 cm, the bench is at least 30-40, if there is another 15-20 cm along the stove, there is only 50 cm left for the passage! not enough. If we are still talking about the bench to the right of the entrance, then it is there, I just didn’t draw it). There will be a supply of hot and cold water. Somehow I didn’t even think about the “danger” of the masonry; the only thing that bothered me about the entire stove was the sheet of metal, how not to touch it.
Material selection
When purchasing beams for such shelves, they are guided by the thermal conductivity of wood - the indicator should be low. Otherwise, the bench will be very hot - it will become impossible to sit quite soon after lighting the stove. Moisture resistance and the ability to withstand temperature changes without cracking are also valued - a steam room is not the best environment for wood. It is undesirable to choose some coniferous species, because when heated, they release resins and can burn the skin. Therefore, to make a shelf for a bathhouse with your own hands , it is better to choose hardwood. But each option has advantages and disadvantages.
Larch . This wood contains gum, which makes the material durable and resistant to both high temperatures and prolonged exposure to moisture. When used, larch releases phytoncides that are beneficial to health. But the wood density is high, the material is difficult to process, has resin pockets (the de-resin process usually helps get rid of the problem), and the price is not affordable.
Linden. The material, unlike larch, is easy to process, remains smooth for a long time, smells amazing and weighs relatively little. Therefore, folding shelves are usually made from linden. Externally, the wood is aesthetically pleasing, has a pleasant shade and retains its beautiful appearance for a long time.
Alder . This is a resistant type of wood that can be black (special grade) or regular, light. Even after several years, the boards retain their color, do not deform, or crack. The thermal conductivity of alder is minimal. By the way, in Rus' this particular tree was traditionally chosen for making bathhouse shelves.
Maple. It is also a very durable wood, not very expensive and has a beautiful shade and pattern. Maple boards are easy to process, are not afraid of high humidity and last a long time.
Abash is an African oak characterized by low thermal conductivity. But experienced builders do not recommend this wood for ordinary home baths.
ZYBY
Abash is not suitable for a regiment in the Republic of Belarus. It will suck in sweat and it will stink. In Belarus, the wood of the shelves is protected from sweat by impregnation with linseed oil. Abash is loose and is used in saunas so that at 120 it doesn’t burn your butt. And buy an expensive abash. And then painting it is beyond the bounds!
Stages of work
How to make shelves in a bathhouse with your own hands if the drawing is ready and the materials have been purchased? It is better to prepare in advance a tape measure, a drill, a mallet and a wooden hammer, a chisel, a grinder and a hacksaw for wood, as well as a screwdriver. It makes sense to take wooden pins. Blanks are made according to the drawing, based on the type of shelves (corner, stepped, etc.) and dimensions (width, height) - taking into account the area of the room.
Then the boards are processed - splinters, burrs, and any imperfections are eliminated (otherwise you will have to get the splinters out later). To prevent the wood from cracking during work, screws are used, but you can pre-drill holes. All surfaces of the boards are carefully sanded, and the corners are prepared. The lumber must be coated with a special protective compound to avoid rotting and cracking. You cannot choose varnishes, paints and ordinary chemicals - when heated, substances harmful to health will be released into the air.
Next, the frame is assembled. The frame is fastened at the corners (metal corners may be suitable for this) and tightened with bolts or screws in the inside of the shelves. Then intermediate slats (transverse) are installed every 50-60 cm.
The next step is to install the support frame on the walls, securing two wooden blocks at the same height using a level. Self-tapping screws or self-tapping screws are suitable for fixing the supports - they are attached at two or three points (at a distance of up to 40 cm). There are more fasteners if the bed is long. It is important to secure the lower frames with a protrusion that matches the width of the lower shelf. The frame is installed on the frame and attached to the wall (with self-tapping screws), then the flooring is laid in steps of 1-1.5 cm. The space between the lower and upper shelves is closed. At the end, the backrest for the upper tier is assembled and secured.
Bathhouse layout
Correctly selected bath dimensions do not yet mean the proper level of comfort
It is very important to pay attention to the layout of the premises. For example, not every guest will like having a toilet in the shower room. The most rational solution would be to abandon the washbasin, toilet and shower in favor of a wall-mounted shower with shower buckets, and install a bench for greater comfort
The most rational solution would be to abandon the washbasin, toilet and shower in favor of a wall-mounted shower with shower buckets, and install a bench for greater comfort.
Bathhouse owners often use closed showers. They prevent splashing of water, which negatively affects the service life of finishing materials, in particular wooden ones.
It is recommended to insulate the floor in the washing room, using a screed to make a slight slope - for better collection and subsequent drainage of water. Non-gloss tiles are predominantly used as flooring, which reduces the likelihood of slipping on a wet floor
.
Small seating area in the dressing roomSource pinterest.com.au
When designing a dressing room, it is important to arrange the furniture correctly, without blocking all the necessary passages. This can be taken care of at the stage of purchasing tables and sofas.
So, a folding table and a small bench with stools will significantly save floor space.
At the design stage of the steam room, special attention is also paid to the layout of the stove - the chimney should be located next to the ridge, for ease of cleaning. For people who like to plunge into a pond or pool after a steam room, the layout is calculated in such a way that the distance from the steam room to the exit from the bathhouse is small
Optimal bath sizes for 4 people Source pinterest.com